


Likes
12
Share


@NONSENSE
Follow
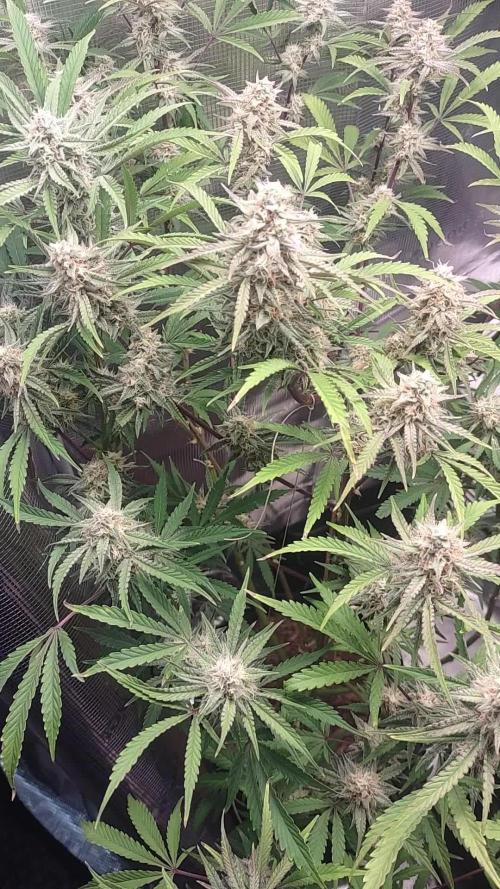
The plants start flowering last week and the light schedule is 12/12.
I feed the plant every day.
Hesi nutrients controls and correct the PH level, thats really helpful.
Let's see what size will be the buds after 2 weeks.

Likes
4
Share

@ThomFoolery
Follow
2/2
We are about half way on the 2 biggest, 3 weeks on the SG, and about 6 weeks on the Blue cheese. Damn...
You can see how much I lose on the bottom half, but like I said before. It will still be more than I can smoke. And I want to make sure it all gets enough light to ripen and allow plenty of airflow. The only issues in really having is the godberry seems to be premature yellowing, but I still think it's from the light stress early on. She also looks a bit like nute burn. Yeh .. that's probably the fish emulsion I gave it 2 weeks ago when I misread the light stress. Sometimes it's best to stop and think before you do something stupid. I always have at least one plant that goes yellow too soon. Living soil. But I don't think the soil is lacking. I've never dealt with light stress before so it's kinda fucking with my head. But it's all at the top, as you go deeper they get greener. The deep purple stems across 2 different strains was from the light too. I've seen that before but it's been a long time.
2/3
My Blue Cheese is about week 6ish. I lose track temporarily because of how that plant came about. It was started 1 week after the others had already been in the ground. And then she started to flower after only 2 weeks. She popped up on 12/6, the others popped up on 11/30. I can tell by the way she feels she ain't even close. Flowers are nice but there is no density. Theeaves are so frosty they remind me of sage a bit.
I did a bit of work on her. Mostly just tied the tops together so she wasn't so sprawled out commandeering an entire 1/4 of the tent.
The 2 biggest are really becoming pretty and the ChocoLope is acting like she wants to start showing some color! Trying to keep it cool at night but below 70 and I start having trouble keeping gt VPD up.
Strawberry gorilla is plumping up slowly. She didnt start till about 3 weeks ago. So as soon as I move out the Blue Cheese, I'll see if I can give her a bit more light. May have to harvest the BCA in 2 goes. Should have left her tied down.
More to come...


Likes
6
Share


@GODAXE
Follow
11.08.2024
officially D132 from seed.
this girls has became a realy fat lady she take 25% of the 5x5 tent. she is bushy like hell even if i have removed all fan leave.
Need to do some root prunning as the air stone is completly embed in the root ball, witch is really most darker that it should be, my nuts solution lightly die the roots but not this far. In the process i realized that the air stone was completly cloged, probably what cause the leave burn ,so switch it and add a second one for safety. the remaining root have been wash and get soak in 1% H2O2 solution for few hours.
really worried about bud roted, i decide to go for a 2 or maybe 3 shot harvest as lower and inner cola arent definitively ready and can still build up.
and some of tops cola show mostly milky trichrome and few amber one.
so 1st harvested from big top cola and some smaller side one for a total weight of 733.5g of wet sticky bud. looking for around 5oz of dry bud, so expecting easily 3/4pond from this mama😜


Processing
Likes
4
Share


@Grownewgenetics
Follow
These is a project in the we try (test) tge products of our sponsors to see how good they genetics are, for example we have know 6 seeds banks on these round.
Sweetseeds with the dark devil auto have break the time record for seed on the ground , 20 hours , only these tine have the seeds from sweetseeds on the soil and they just jump out to 2 cm , simple amazing

Likes
44
Share


@Suemchen
Follow
Sanlight evo at 100%
Day 50: watered with supplements: Looks pretty good 🤙
Day 53: bulking up nicely 🤙 smelling really good 👍 watered today with supplements 😜
Get 15% Off Fast Buds with Code: FBSUMO
https://2fast4buds.com/
Likes
176
Share


@DevilsBud
Follow
Week 6 of flowering cookies Gelato by RQS
Hallo again brother and sister Growmies and homies . I will be making the diaries somewhat individual per strain. They're in same tent but not same strain lol . In the beginning didn't know what i was doing 🤣🤣 and had both diaries the same but from now on I will treat them as different plants/diaries 💪🏻 so this will be same as the other diary because there's nothing to talk about yet lol
Fresh new week ahead . I am excited let's do this 🤘🏻🤘🏻
Day 35 Cookies Gelato
New start of the week.
The Cookies Gelato looking mean, green and sticky as hell . Getting my better microscope in tomorrow so i can check on the progress. I had a small microscope but you have to ram that one into your eyes to see through it lol . This morning i gave them 1L water with the full range of awesome advanced Nutrients. I am very happy with these nutrients! They are perfect for me!
Come look at my other diaries! I appreciate it a lot 🤘🏻
I am running this fully marshydro
Marshydro GT 100X100X180cm tent and
Marshydro TS-1000 LED lamp
Day 36 Flowering Cookies Gelato
Cookies have good time next to the Critical's i am very excited to try this one. They don't sell in shops here but if they do, you pay 40 euro per gram and i ain't that dumb lol.
Gave the plants 1.25L 🌊 pH 6.6 and that's it I let them do their thing. Also trying out my new microscope it's definitely a learning curve to focus in with not steady hand lol . Sorry for the first blurry pics 🙈
Come look at my other diaries! I appreciate it a lot 🤘🏻
Come visit www.marshydro.eu
for your best gear and use the PROMO CODE: DEVILSBUD
And you will get a nice discount.
Day 37 Flowering Cookies Gelato
Got some leaves away that were droopy . Nothing special, made new video today so take look if you want 🤘🏻.
Come look at my other diaries! I appreciate it a lot 🤘🏻
Day 38 Flowering Cookies Gelato
The Cookies Gelato
Frosty Town in cookies gelato ally
3 big main ones going on with cookies Gelato#2 this one was topped and the cookies Gelato #1 i think was fimming and has 2 main ones and nicely grow below . Same issue with critical tho low bud structure . its definitely Going to be better to cut the top when they're done and let the lower grow continue for a week or so . Today i Gave the cookies gelato water with advanced Nutrients with pH 6.5 ppm the same as critical i forgot right now what it was lol
Day 39 Flowering Cookies Gelato
Moved the big branches more to the light and tied them to the ScrOG netting definitely more light created now 🤘🏻🤘🏻
Come look at my other diaries! I appreciate it a lot 🤘🏻
Come visit www.marshydro.eu
for your best gear and use the PROMO CODE: DEVILSBUD
And you will get a nice discount.
Day 40 Flowering Cookies Gelato
Been bizzy trying to get cookies gelato under the microscope is quite a task . The best way for me is to cut 😱😱😱 something off and lay it down. it works but still need to fine tune it a little better but amazing what you can see up close 👀 some leafes had a lot of ambers on it but the buds (not photography) are still clear so it has some way to go still.
Day 41 end of week 6 of Flowering
Week 6 is over Growmies what a wonderful week!!! Getting the microscope under control and starting to see the milkyway . But still a lot of clear trichomes so i will wait with flush this week . I think next week i can start the flush of cookies gelato 🤘🏻
I appreciate all the comments, likes, views and tips you guys are an awesome community 👍🏻👍🏻 .
Have great time growing and see you in the other week
guys and girls Growmies and homies
Come look at my other diaries! I appreciate it a lot 🤘🏻

Likes
22
Share


@GROWINGDREAMS
Follow
Além das 5 Peyote Zkittlez que chegaram eu ja tinha um clone que ganhei de um amigo, estava pequeno e passando por deficiências quando peguei mas em uma semana voltou a crescer vigorosamente e agora vai fazer companhia pras outras 5 e quem sabe render mais alguns clones ate a floração de todas !

Likes
3
Share


@GreeneScene
Follow
She’s growing like a champ . I couldn’t ask for more. I’ve began light defoliation of lower leaf sets. I also am experimenting with what I call “grooming” . I had a theory after about 5 weeks of growing my last run & decided to see if it pushed any limits .
I haven’t begun training any lateral branches yet I think I’m gonna hold out until flowering is initiated or try to anyway .
Only watering when dry still . No additional feedings or compost teas yet although I am considering .
I think that’s all , another week on the GreeneScene in the books 📚
Likes
1
Share


@I_Identify_As_A_Dan
Follow
Week 5 for Strawberry Gorilla by fastbuds,
She's now definitely in flower mode. She's almost the same height as Moby dick but way less leafy so I'm not expecting as much flower from here for now anyway. Don't feel the need to train her just yet whatsoever. She's a little more fragile ATM but hopefully she will stiffness up a bit now with the wind outdoors. 😇 Right after this picture i also put a decent amount of mulch on her as i believe the sun will be coming back fairly soon.
Likes
8
Share


@4F1M6
Follow
The ladies are starting to flower and the male is starting to drop some pollen. Most his more developed pollen sacs will be ripe and dropping in about a week a couple were aheadand already dropped. Giving the females plenty of time to throw a bunch of stigmas out there to catch it. Blessed.
I super cropped his main stalk over top of the ladies. I also added a clone from him in there for some more pollen for storage. For future crosses. All in all this breeding tent is doing swell. I also snipped of a couple really ripe sacs. Than dusted a couple sweet and sour buds with it. Get 1 more extra cross going.
Until next update. Happy growing and stay lit fam.

Likes
321
Share


@Tropicannibis_Todd
Follow
🤔🤔🤔🤔🤔 HAPPY GROWING 🤔🤔🤔🤔🤔
We are now 49 Days in and everything is going great 👍 👈 We are now slowing down in the streching and the budz are growing all over 👌
👍 decided to showcase the Mini BigBand , was a extra seed that germed so I kept it as a Mini Me 😊 She's killing it 👈
Except for some watering it's been pretty smooth I've done a little maintenance and manipulation of the canopy 👈
Might do a slight defolation later in the week 🤔
👉Soil Medium Provided by ProMix.ca
👉Nutrients Provided by Agrogardens
👉Lighting Provided by MarsHydro.ca
I would like to thank the many growmies for support throughout the years 🙏 So Let's Do This 👊👊👊 Happy Growing


Likes
14
Share


@eldruida_lamota
Follow
Vamos familia tercera semana de vida de estás Tropical Zmoothie de SeedStockers.
Que ganas tengo de ver el progreso de esta variedad, las plantulas están sanas, se ven con buen color.
La cantidad de agua cada 48h entre riegos.
Esta primera semana ya añadimos nutrientes de la gama Agrobeta.
Tuve problemas de trips en un indoor y tengo todas plagadas pero ya las e tratado con aceite de neem y un insecticida genérico, además añadí varias tiras de color azul, trataré esta semana y la siguiente.
También realicé el trasplante a maceta definitiva, 7 litros.
Estas próximas semanas veremos cómo avanzan.
Mars hydro:
Code discount: EL420
https://www.mars-hydro.com/
Agrobeta:
https://www.agrobeta.com/agrobetatiendaonline/36-abonos-canamo
Hasta aquí todo, Buenos humos 💨💨.

Likes
47
Share


@S2340420
Follow
Hit a dry spell this week leaves weree white droopy just gave them some water n theve perked back up might need to add a bit of time on at the end time will tel

Likes
24
Share


@el_cultivito
Follow
TOTAL YIELDS wet weight
Blue Dream 1 - 600.2 G
Blue Dream 2 - 552.9 G
Blue Dream 3 - 565.3 G
TOTAL Blue Dream - 1718.4 G
________________________________
Chemdog 1 - 616.9 G
Chemdog 2 - 598.1 G
Chemdog 3 - 558 G
TOTAL Chemdog - 1773 G
________________________________
TOTAL OVERALL - 3491.4 G
7.7 pounds wet

Likes
20
Share


@Adkguerrilla44
Follow
I messed up and didnt get many pics as me and my buddy were very very busy trimming from 10am-10pm got the 1 blue cheese plant finished!!! In 12 hours we did 1 plant thats fricken insane considering me and him did 8 of his outdoor plants in less time back in fall,more bud than i have ever seen on a plant under 3ft shit it had more bud on it than the 8 footer i grew last fall lol just so impressed with this plant i will definitely be growing many more blue cheese using FOOP nutes in the future thats for sure ,i am not touching any of this nugget until its dried and cured...gonna be hard to resist lol but it will be worth it for sure 😉
Likes
17
Share


@Wakesk8
Follow
Babies are getting tall and stretched, looks beautiful and still no issue, I must adjust properly the ph since my pen is not working anymore but still there’s no sign of any problem. Hope to end by beginning of June!


Likes
8
Share


@GrowingABushWithButch
Follow
It's Day 15 Week 03 Of Flower For My 02 Kombucha Cream by atlasseed
. And For My Snow White and SpliffStrawberry by Spliff Seeds Amsterdam
. Today was Feeding. So my Kombucha Cream 3-Part and Snow White Received. 2ml of Emerald Harvest Nutrients Grow, 4ml Micro, 8ml Bloom, 8ml Emerald Goddess, King Kola, Honey Chome and 4ml of Quad.AG Products Fulonic. I ph this mix at 5.9 ppm at 933. Now on Runoff my Kombucha Cream 3-Part ph is at 6.4 and ppm is at 1211. My Snow White ph is at 6.2 ppm is at 933. I Feed the Kombucha Cream 2-Part and SpliffStrawberry. 5ml of Emeral Harvest Nutrients Cali Pro Bloom A&B, 8ml Of Emerald Goddess, King Kola,Honey Chome and 4ml Of Quad.AG Fulonic. Now I mix this feed at 5.8 and ppm at 728 on Runoff My Kombucha Cream 2-Part as a ph of 6.2 and ppm is at 933. My SpliffStrawberry as a ph of 6.5 and ppm is at 821 l. I'm starting to win the battle on the pH on my next feeding I will pH at 6.0. all 4 plants are Looking Great Bud Formation is rocking and getting really Frosty .
Happy Growing Growmies 🤘🏻
