
Likes
Comments
Share


@Go_Ku
Follow
My ladies are doing good, smell are weak at the moment but they are still on the beginning.

Likes
3
Share


@jonnyblaze
Follow
The girls are looking healthy. Both Banana Purple Punch autos are yellow on the outer leafes and I don't know why. Maybe someone can help.
Peace, Johnny ✌️

Likes
4
Share


@Naujas
Follow
56 days!!!!! wow this week it really rained a lot, there were storms during which we had to bring the girl inside so that she wouldn't be broken by the strong wind:) but all that stopped, and the nice weather has already started:) The girl's flowers are starting to grow a little, which is very pleasing:) good luck to everyone:)

Likes
1
Share

@hinterhofgrower
Follow
.
🌱 :
💧 : 4l day 35, 4l day 39, 4l day 41
💡 : Dli: 40 mol/m²/d
🤔 :


Likes
9
Share


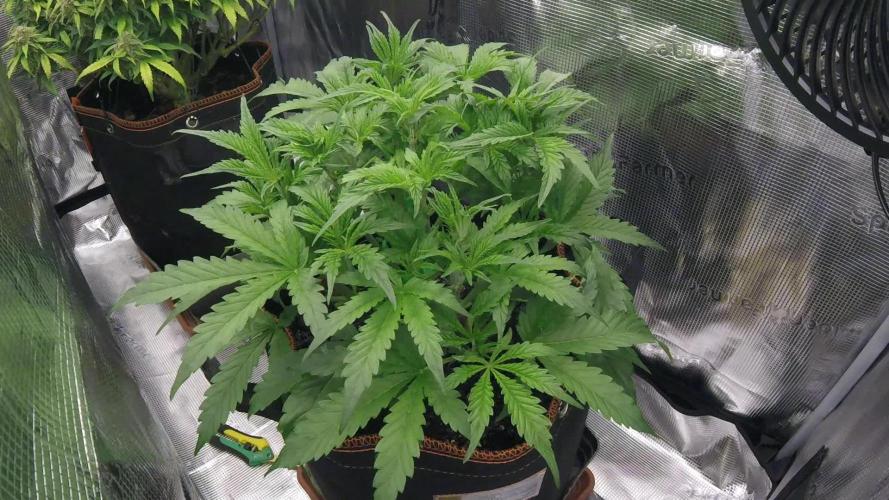
@Knorke14
Follow
EC 1.2
PH 5.8
I am very impressed by the rapid growth. The roots seem to be very healthy. I have raised the light to encourage more vertical growth.

Likes
1
Share
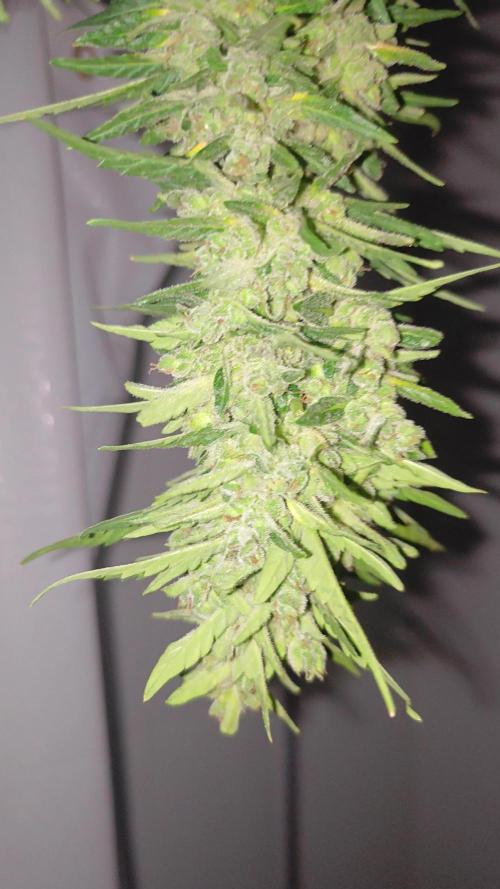

@zelimbo
Follow
Day 69 chop day for the acop n2. It had trichs milky and some (2%-3%) ambar. I was looking to having it a bit more but days till the chop but was noticing that her general aroma was slowly fading away, it must be the instense heat that my balcony receives. Anyways it turned out to be a little harvest haven´t weight it. gonna have that when dried up and ready to smoke for the report of this one.
Likes
15
Share


@bagofbunnys
Follow
Flowers are growing larger with more resin. I am thinking I use CNS17 Ripe next time around instead of bloom.
I will lower PH a bit tonight. It is 6.8 with an EC of 1.7.


Likes
5
Share


@RumplePuffskins
Follow
It’s getting cold and damp. Fingers crossed for a couple warm weeks into croptober
Likes
3
Share


@MadBumbleBee
Follow
1 OG kush Shows Sings of Nitrogen Toxicity (cut most leafs off)
Soil PH: 5.7 - 6.8 (lowest and highest reading)
Flushed all plants with microrayza fungi
Watering with organic bio activated tea every 3 days (potassium = algae, bokashi = nitrogen, worm hummus and molasses)
Day 28 to 35
Day 32: Accidently cut off main stem of a very healthy OG kush plant, let´s see how it bounces back in a few days. Perhaps I just HST´d by accident
Day: 32: Some of my autoflower GSC already started to flower
Day 32: 3 OG kush plants are weak, one has a weak stem, second one had a problem since seedling (grew into the ground), third one i cut off main stem by accident
Day 34: OG kush plant was removed after many tries of getting it back to its feet

Likes
17
Share


@Geili_Seili_fireinfireout
Follow
In woche 5 in flow is mir ein kleines missgeschick passiert. Habe leider einen spritzer pk 5-8 zu meinem gießwasser dazu gegeben. Ec werte und ph waren perfekt. Nur habe ich einen eisen oder magnesium überschuss verursacht. Pflanzen wurden ectrem dunkel und die neuen kleinen blätter in den buds haben sich nach unten gegreuselt. Aber gefahr erkannt gefahr geband.
Habe heute das aller erstemal pk13-14 zum bio gießwasser dazu gegeben. Ec usw.. perfekt. Bin aber gespannt was ich diesesmal weedr falsch gemacht habe.👌😋😁😅😅🙈
Die saubersten und vitalsten stecklinge findet ihr wie immer bei ROOTS-FARMS. The best in austria and maybe europe


Likes
96
Share


@The_Projexx
Follow
Things are going real good with Obi#2 nothing really to complain about other then I'm super excited for the harvest . I will be starting to flush her with just straight PH corrected water for the remainder of her time with me in order to achieve the smoothest smoke and flavour I can . Her main cola keeps swelling daily makes me very happy to see that haha :)
Special thank you to everyone thats coming out to the diary to check it out and a special thank you to everyone that smashes the follow/like button . You guys rock and I wish you all the best !
-Happy Growing!

Processing
Likes
18
Share


@eldruida_lamota
Follow
Buenas tardes familia, actualizamos la semana de las northern light xL, e de decir que es la más lenta del proyecto, aún así se ven como se forman unas buenas flores, por lo general compactas, iremos viendo por que todavía las va quedando.
PH Muy controlado , a estas alturas por encima del 6,2.
Ya les quitamos productos y pronto lavaremos raíces.

Likes
30
Share


@Dr_Nowzaradan
Follow
First signs of flower on the big one ✨
also I lowered and rearranged lights for a better Ppfd
I should have started before but I also added some Voodoo Juice, hopefully it will help with the smaller ones 🤞🏻


Likes
9
Share


@420DeepGrow
Follow
Gracias la equipo de Super Sativa Seeds Club, Marshydro y XpertNutrients sin ellos esto no seria posible
💐🍁 Lava Freeze:
Con el nuevo cruce de Friesland Indica (M33 para los cultivadores de la vieja escuela) con Lava Cake, ha nacido una nueva híbrida muy sabrosa que te pega fuerte y te deja colocado.
En su día, la Friesland Indica original, alias M33, alias Freezeland, se hizo inmensamente popular en América del Norte. En Canadá, se convirtió inmediatamente en una joya entre los expertos de semillas de cannabis. Fue elogiada por su productividad, su efecto y su increíble sabor. Friesland Indica era también muy robusta y capaz de soportar bien el duro clima exterior de Canadá. Esto la convirtió en una variedad recurrente para muchos cultivadores comerciales clandestinos canadienses y todavía se puede encontrar hoy en día en muchas salas de cultivo canadienses.
🚀🌻 Consigue aquí tus semillas:
https://dutch-passion.com/es/semillas-de-marihuana/lava-freeze
💡FC6500: Eficiencia líder en el mercado: la lámpara de cultivo LED FC-E6500, que ostenta un estatus líder en el mercado, es una solución rentable con un PPE de 2,8 µmol/J y un rendimiento máximo de 2,5 g/vatio. Ofrece un PPF alto de 2026 umol/S y es adecuada para una cobertura de vegetación de 1,50 m x 1,50 m y una cobertura de flores de 1,20 m x 1,20 m.
Iluminación versátil y uniforme.
https://marshydro.eu/products/mars-hydro-fc-e-6500-730w-commercial-led-grow-light/?gad_source=1&gclid=Cj0KCQjw1qO0BhDwARIsANfnkv9IIrYSbmJqz8PqpJOIyWwJfp5bc3SGJgUV68USLQ4tjmXDYwoBuAsaAue3EALw_wcB
🏠 : Marshydro 1.50 x 1.50 x 1.80, carpa 100% estanca con ventanas laterales para llegar a todos los lugares durante el grow
https://marshydro.eu/products/diy-150x150x200cm-grow-tent-kit
🌬️💨 Marshydro 6inch + filtro carbon para evitar olores indeseables.
https://marshydro.eu/products/ifresh-smart-6inch-filter-kits/
🍣🍦🌴 Xpert Nutrients es una empresa especializada en la producción y comercialización de fertilizantes líquidos y tierras, que garantizan excelentes cosechas y un crecimiento activo para sus plantas durante todas las fases de cultivo.
Consigue aqui tus Nutrientes:
https://xpertnutrients.com/es/shop/
📆 Semana 5:
Gran semana , he eliminado las ramas bajas y a algunos ejemplares se les ha practicado poda apical.
Voy a dejarlas unos dias mas en crecimiento antes de pasarlas a floración para asi ocupar mas espacio en la carpa.
Continuo con las dosis de nutrientes recomendadas por el fabricante.
Se vuelve a aplicar tierra de diatomeas para evitar plagas indeseadas.
Potencia del foco: 42%
Extra UV: 5min x dia

Likes
5
Share


@TGriner420
Follow
This week they did more stretching as you can see the one on the left is into and above the light! I can't believe this but I'll role with it! I slowly defoliate just a little here and there between watering and filling the humidifiers. They really like to eat! Also, something to note that is they love the humidity as well as the warmth. I had to clean the outside of their grow bags this week. To my surprise the roots are starting to come out the bag! I can't believe it but this is awesome! Now they'll die due to contact with the air, and in return get bigger to take in even more nutrients! As predicted they fell off because their little pieces are on the floor. Well I fed and watered them daily. Like normal whenever I fed them either nutrients or soil amendments I made sure to water the plants with plain pH balanced H2O the next day in order to flush them. Then I would do any soil amendments if needed. After that plain pH balanced H20 and then you could do another fertilizer nutrient for them. After that pH balanced H20 and then you return to the soil amendments if needed.


Likes
3
Share

@Krautis_IndoorFarm
Follow
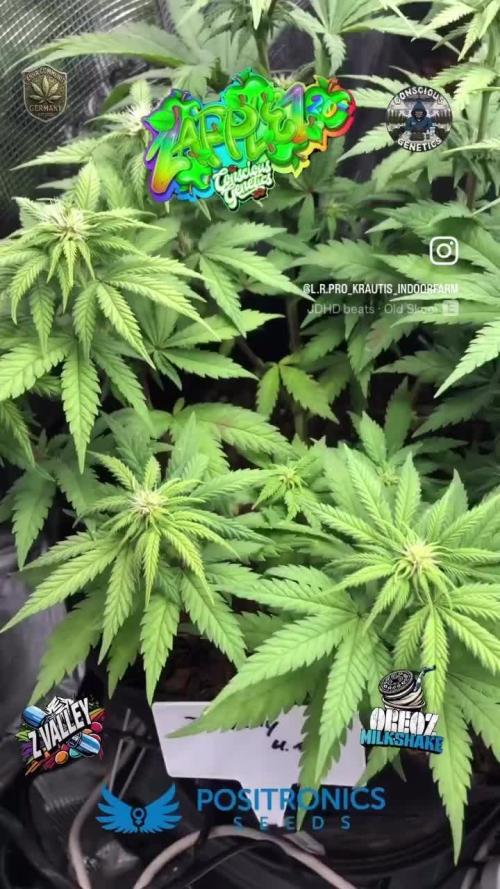
Tag 58 (Blütetag 18)! Licht und Schatten im Living Soil Dschungel 🌿✨
Drei Wochen nach der Umstellung am 19. Dezember zeigt sich im 90x90 Zelt ein faszinierendes Bild. Während einige Mädels bereits voll im Modus sind, lassen sich andere noch etwas Zeit. Das ist die Realität am Berg, jede Genetik hat ihren eigenen Kopf! 🏔️💨
📈 Statusbericht vom Feld:
• Die Überflieger: Die Zapplez 2.0 in der Mitte dominiert das Zentrum mit einer wunderschönen dunklen Färbung.
• Z-Vally Power! Die beiden Z-Vallys (vorne links und hinten rechts) zeigen bereits richtig schöne Blütenansätze und geben ordentlich Gas.
• Die Sorgenkinder!Die beiden OreoZ Milkshakes (hinten links und vorne rechts) zieren sich noch ein wenig und wollen noch nicht so recht in die volle Blüte übergehen.
• Living Soil Resilienz: Trotz des ausgefallenen PH-Messgeräts stehen alle Pflanzen in sattem Grün da – die Pufferwirkung des Substrats von @panova25.de und @living_roots_pro pro rettet uns hier den Arsch!
🌸 Geduld ist eine Tugend
Wir beobachten genau, ob die OreoZ-Damen nur „Spätzünder“ sind oder ob wir noch einmal feinjustieren müssen. Der Komposttee vom letzten Dienstag hat zumindest für eine vitale Grundstimmung gesorgt.
🌱 Die Crew & 🤝 Das Ökosystem
• Genetik: Zapplez 2.0 (@conscious__genetics ),
Z-Vally & OreoZ Milkshake (@positronicsseedsgermany )
@cannacommunity.deutschland

