
Likes
Comments
Share


@MrJones
Follow
OSS Cheese XXL
🔹⊱╮🔹╰⊰🔹 GROW Started 03.10.24 INFORMATION 🔹╰⊰´🔹⊱╮🔹
🌞Environment - Maintaining 80F and 65%Humidity
🌾Training - Nothing this week just letting the seedlings veg out.
⚱️2-Gallon 📊6.2 PH
💧 Feeding - Using Horti Grow 8-11-21, Bloom 5-15-26, Late Bloom 0-24-26, Cal 12-0-0
🌞Medic Grow Smart 8 760 Watts
🕷️ IPM - CannControl from Mammoth and Mosquito Bits as needed
🔹⊱╮🔹╰⊰🔹 PLANT UPDATES 🔹╰⊰´🔹⊱╮🔹
📝 Notes - Starting Dailiy Reduced Volume Fertigations with Hort-Grow @ 3.3 GRMS Per Gal, and Horti-Cal @ 2.5 GRMS Per Gal.
🗓️04.05.24 Today fed with Hort-Grow @ 3.3 GRMS Per Gal, and Horti-Cal @ 2.5 GRMS Per Gal.
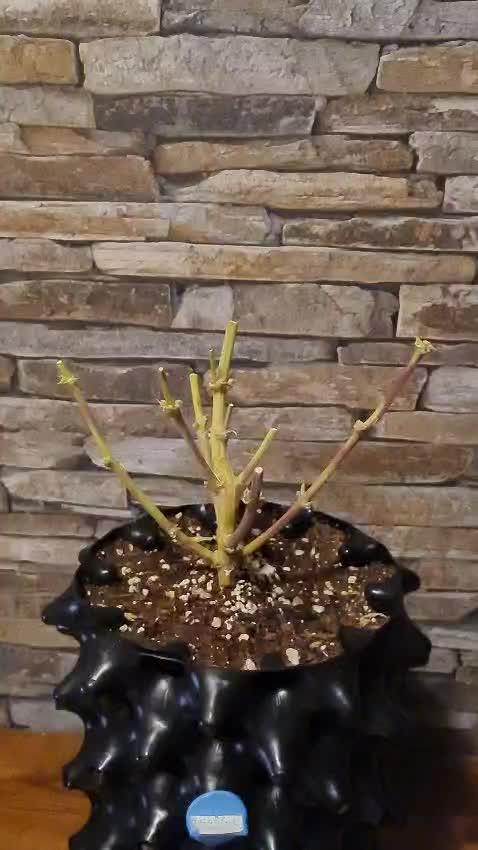
🗓️04.06.24 At the beginning of week 2 I defoliated and now today the beginning of Week 3 I pruned and defoliated again, may look harsh but they will recover quickly!
🗓️04.07.24 Maintaining Temps and Humidity
🗓️04.08.24 Starting Dailiy Reduced Volume Fertigations with Hort-Grow @ 3.3 GRMS Per Gal, and Horti-Cal @ 2.5 GRMS Per Gal.
🗓️04.09.24 Fed with Hort-Grow @ 3.3 GRMS Per Gal, and Horti-Cal @ 2.5 GRMS Per Gal.
🗓️04.10.24 Maintaining Temps and Humidity
🗓️04.11.24 Fed with Hort-Grow @ 3.3 GRMS Per Gal, and Horti-Cal @ 2.5 GRMS Per Gal.
╰⊰🔹╰⊰´🔹⊱╮🔹╰⊰🔹╰⊰🔹STRAIN INFORMATION🔹⊱╮🔹╰⊰🔹╰⊰🔹╰⊰🔹⊱╮
Cheese XXL cannabis seeds are a special blend of Afghan Kush x Super Skunk producing the most pungent dank weed. Cheese XXL is the third commercially available edition released by Original Sensible using and developing these Afghan and Skunk genetics. The first release of these genetics was their Skunk Afghani. The second improved version was Stinkin' Bishop which had an improved and more potent THC content and was more pungent in terms of smell. Now the third and improved release on a similar theme is this Cheese XXL which has a similar THC content but with an improved heavier yield. The smoke is incredible with an outstanding flavour of pungent skunk and spicy, extra strong mature cheese created by the dominant terpene myrcene with its strong earthy scent accompanied by caryophyllene and pinene which combine to create a peppery acrid cheesy odour. THC levels are exceptionally high in this Cheese strain and the effect is well-balanced creating mental and body relaxation with a remarkable alleviation of stress and depression.
The strong pungent aroma starts early in the flowering period, if you're growing Cheese XXL indoors you'll need plenty of ventilation to disperse the stinky "road kill" aroma of these babies! Cheese XXL is a Cheese strain particularly suited to indoor setups but also thriving well outdoors these feminised marijuana seeds are incredibly resistant to mould and disease and produce a substantial harvest that both the professional and amateur growers alike can easily achieve. These Cheese weed seeds are outstanding, break open the buds ready for use and you'll see why, the stench will make your eyes water!
Cheese XXL from Original Sensible Seeds is a great choice to break into the commercial market of growing cannabis so if you're looking to buy something special with extreme yield, potency and flavour then Cheese XXL cannabis seeds are simply the best choice

Likes
14
Share


@benmcintosh
Follow
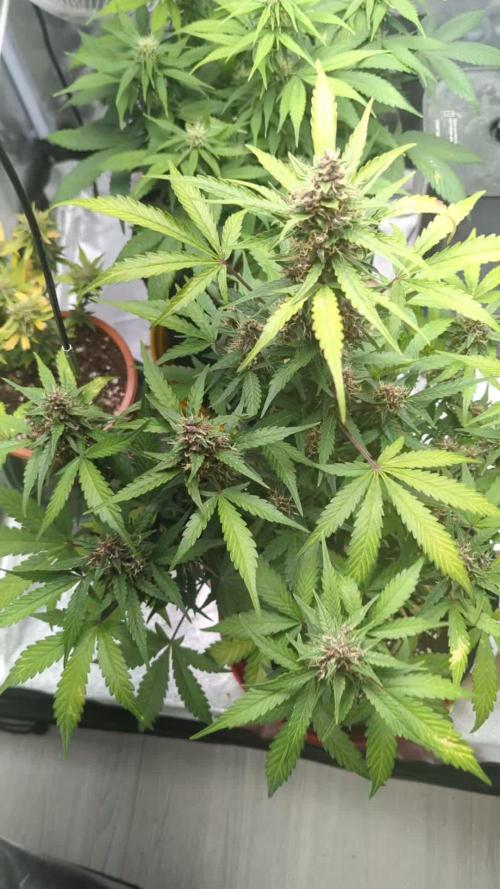
Harvest day 86-84 these girls were great to grow and easy at that. After dry ill get back with final weight. But these were my best yet def should be over a lbs between the 3
Likes
229
Share


@OrganicNature420
Follow
Germination date 🌱 12/07/2021
Day 99 22/10/2021
Strain 🍁 SinCity seeds Frosted Biscotti
(Biscotti Sundae x Whitenightmare)
THC% • Unknown
💡 Mars Hydro FC4800
• Power draw 480W + 5%
• Max coverage 5 x 5
• LED 2070pcsSamsungLM30B1&Osram660nm
• Max Yield 2.5g / watt
• Noise level 0 DB
• Removable Driver +2m cable
• Daisy chain (multiple lights)
https://marshydroled.co.uk/products/mars-hydro-fc-4800-led-grow-light-samsunglm301b-commercial-greenhouse-medical-indoor-kit 🇬🇧
https://www.mars-hydro.com/buy-fc-4800-480w-4x4-energy-saving-full-spectrum-commercial-led-grow-light-mars-hydro-for-sale 🇺🇸
PROMO CODE • (ORG420) DISCOUNT 👍🏻 marshydroled.com
⛺ Mars Hydro 120 x 120 x 200cm
📤📥 AC infinity 6inch
💧 10lt dehumidifier
❄️ 3.1kw air con system
💉 Nutrients GreenBuzzLiquids
Organic Grow Liquid • 1-4ml until 2wk flower
Organic Bloom Liquid • 2-4ml flower stage
Organic More PK • 2-4ml +wk3 of flower
Organic Calmag • 1-2ml/lt whole grow
Fast Plants Spray • first 3days at night lights off
More Roots • 2-5ml veg +2wks flower
Fast Buds • 5ml +wk2 of veg until 1wk flower
Humic Acid Plus • 2-5ml whole grow
Growzyme • 2-5ml whole grow
Big Fruits • 2-5ml flower stage
Clean Fruits • 5ml flush 1wk
Ph powder
Root Gel
Living Organics
https://greenbuzzliquids.com/
PROMO CODE • organicnature420 15% off ✌️🏼
🥥 Growing Media • Coco Coir
Notes 📝
When one wishes he grew all Frosted Biscotti 🍦.. yes I know very english but dam this girl looks 🔥 .. if I can get the bigger tent from mars I will do the other 6 of these and a new and limited batch of bahama bussdown (runtz x bahama mama) .. nutrients killing it. I've learnt a lesson or 2 for the next run as it's a first with Organic and coco. E.c levels brought down as I know there getting enough feed. Light is so powerful, the Frosted Biscotti hasn't had a problem but its sister yuzu sorbet has taken a light battering. So back down to %70. Apart from that I should hopefully have some dank arse sticky nugs in 3weeks 🙌🏻🌱💚
Discount codes in bio for Mars and GreenBuzzLiquids 👍🏻

Likes
72
Share


@BodyByVio
Follow
Day 65 : officially 1st day of flush . Changed the reservoir with fresh water and 1.2g/5 gallons of Yucca extract and 5ml/gallon of Cleanex from Botanicare .
Day 68- I did some defoliate. Few more days until harvest.


Likes
13
Share


@Chubbs
Follow
420Fastbuds
FBT2311/Week 3
What up grow fam. Weekly update for these stunning girls. Up to this point they've been growing picture perfect . Not really doing anything special besides still feeding nutes every other watering 500ml. I'll double the feed this week taking it to 1000ml/1 liter per every other day. Not seeing any burn signs from introducing nutes so will keep that the same strength. All in all Happy Growing
Likes
20
Share


@Foggedaboudit
Follow
10 weeks total for the puzzurple pheno, 11 and 12 for the rest! Terpene levels and stickiness like I haven’t had before from autos!
Likes
75
Share


@ThrashedTV_BakedByGlaze
Follow
Week 8 - Oct 26 to Nov 2nd
Alright so upon reflection in Week 8 of my Chem-Bomb Auto diary it was not the best week but nothing disastrous 🙌
Random November heatwave got the apartment room up to near summer temperatures but the airflow was fine with an open tent + second fan.
Crisped the tips a bit with the heat and upping the nutes. This advanced nutes stuff is very salty for a soil grow and even the small amounts reported above, split between the 4 plants, still end up getting to the fan leaves. Using Molasses and plain water feeds between nute feeds this stuff is still very touchy.
The Chocolate Mint OG Autos are bigger overall plants with more stretch in the last week. A lot more bud sites but overall the buds are still smaller so hopefully it finishes strong and really plumps over the next few weeks.
More in Week 9!
Thanks for checking in! Drop a like and/or follow so I can return the favour 🙌
--
IG: @GlazedGrow

Likes
8
Share

@20SYL
Follow
Début du rinçage pour la petite plante, les trichomes commencent à devenir laiteux donc la récolte est proche.
Les deux autres se portent bien, l'odeur est incroyable j'ai hâte de voir la suite !

Likes
52
Share


@blazin_skywalker
Follow
Fragrances are really starting to develop this week. Both phenotypes smell differently. Leia has more of an earthy vibe going on so far while Maz smells straight up like candy! 🍬
Leia's yellow pistils are still stretching like crazy and her buds are nice and stacked.
The bud structure on the Maz phenotype are very reminiscent of the Skywalker OG that was the mama for this cross. It's really cool to see and appreciate the differences.
I changed my watering practices from 1 gallon every 6 days to 1/2 gallon every 3-4 days. The plants have seemed much happier with the change. 😉
Likes
13
Share


@smokeycropping
Follow
segunda semana de cultivo las luces son muy muy brillantes
la primera semana usando diodos samsung 120w dimmer a 50%
segunda semana aumentamos a 75% dimmer del panel
se rego 1 vez ala semana humedad del suelo duraba y se retenía muy bien,
300cc agua reposada midiendo
plantas sanas todo marcha ok

Likes
Comments
Share

@CeeJayy420
Follow
The plant was harvested and trimmed, yielding a total of 101 grams. Buds are notably dense and carry a satisfying weight, indicating strong structural development and resin content. Their visual quality is exceptional—each nug shimmers with a velvety green glow, reminiscent of fine fabric under light. This appearance may reflect optimal trichome coverage and healthy chlorophyll retention at harvest. The results suggest that the timing was well-aligned with peak maturity. Further analysis during curing will confirm aroma, potency, and terpene preservation.

Processing
Likes
6
Share


@Silverback_Guerilla
Follow
SATURDAY 9/21:
After having had my entire rig and all my cured produce stolen from me by my pardner in crime, I'm starting from scratch.
(That f**king asshole!)
Special thanks to the fabulous folks at Fastbuds for sending me some replacement beans!!!
I mylar'ed up a closet and got a little light to get them started with. It's 3500k with some extra 660nm and draws about 200w from the wall. I am going old-school this time around..no pre-soak and no paper towels. I bought some soluble myco + tricho + all the good beneficial bacteria and mixed a little into a liter of distilled water and wetted rapid rooter plugs. I planted all three Stardawg beans in the rapid rooter plugs and put them in a little humidome under 9w of pink light.
TUESDAY 9/24:
All three emerged with no problems, but one is still wearing a "hat"..
THURSDAY 9/26:
All three had taproots sticking out a few inches, so I planted them in their 3 gallon pots and put little mini-domes over them.
FRIDAY 9/27:
I knew better than to try to start some seedlings with no humidifier, but the asshole stole mine, so I tried it anyway..I have several seedlings that probably aren't gonna make it, but so far all 3 x Stardawgs look fine.
I wet them down and put some trays of water in the closet to try and bring up the RH.
TUESDAY 10/1:
Okay, so only one survived, and she's starting to grow.👍
My soil mix was too hot for them...rookie mistake...
I finished working on my homemade frame and mounted 6 x 120w quantum boards to it, but one of my 3 x 240w drivers failed, so I gotta get a replacement sometime in the next few weeks. I still gotta get my ventilation squared away before I can even run them.😎
FRIDAY 10/4:
She's my lone Fastbuds plants..got high hopes for her.
She'll be surrounded by a bunch of Candy Cane hybrids.
Likes
3
Share

@JamrockGrows
Follow
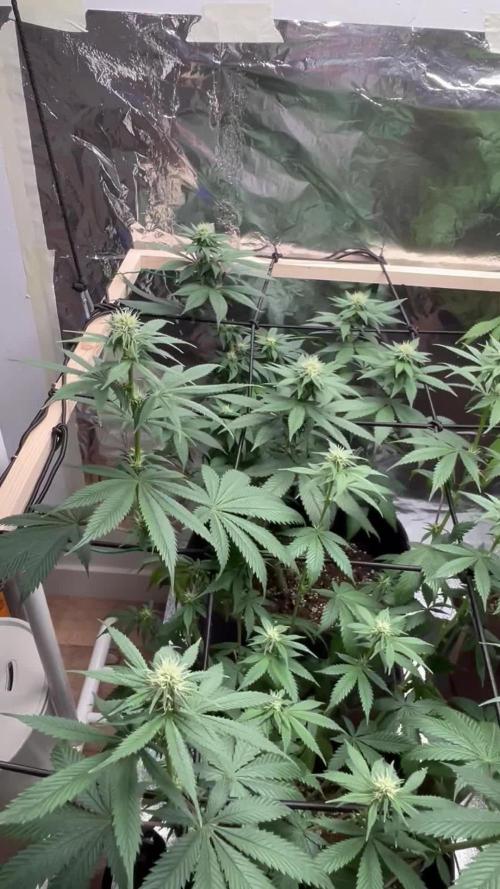
11/08- Week 4 of flower and the buds are really stacking up. The smell is getting stronger and the plants have pretty much reached their final height. The height of the tallest stem is 70cm which is perfect as it gives me about 50 cm of space between the light. I will water them today with some nutes.
16/08 - watered both plants with 1L of water ph 7. Increased amount of nutes as I noticed the plants are demanding more.
20/08 - watered again with 1L of just water ph 7.
Hope you have a great day!
Peace
Likes
55
Share


@valiotoro
Follow
Week 13!🤓
I get the fever every time you cross my mind😳
2 weeks now that she s under the FC1000 EVO @ 100% without any sign of foxtail,nanners or light stress!!!without CO2 or Exhale bags or idk what…it’s a beast🤩
I don’t have a PPFD meter or the app on my phone but it should be around 1000-1400 umol/m2!LOL
I don’t have any secret ingredient the key is to have a good ventilation and a super healthy plant!
Don’t do that if your plant is not healthy or she will burn for sure!🤓
Take care💚
Processing
Likes
28
Share


@GaiaGreenGiant
Follow
New weekly video uploads and more! See what’s happening in the Cabbage Patch! Day 14 Flower! Plants looking very h@ppy. Can’t wait to get in there and give it’s last defoliation.
Day 16 - She’s stacking up nice! Just need to water when dry. She’s on cruise control!
Day 20 - Defoliation video for ya! Cheers 🍻
Likes
31
Share


@The_Doctor_Green
Follow
En esta semana se bajaron los niveles de ph y ppm.
De 6.5 de ph bajamos a 6.2,6.3
Y las ppm de 700 la llevamos a 1080.
Se aumento la dosis de las bases de 2 ml/L a 3ml/L.
Se realizaron todos estos cambios para mejorar la calidad de las hojas, las puntas están con un color amarillo, y no se si es algún exceso o carencia a causa de la calidad del agua.
Pero en términos generales esta muy bien la primer semana de floracion,quedan muchas semanas más por delante.

Likes
2
Share


Likes
79
Share


@JUNGLE_B4RNS
Follow
Week 15, week 5 of flowering.
SpliffSeeds is definitely a recommendable seed bank. I’m very happy with all the plants, they are all making dense and nice buds. See the pictures and the video, they talk by themselves.
Last week at max feeding. Next week I will start to reduce the nootz solution slowly and might give the last feeding just before starting week 7 of flowering, it will depends on the flowers development and the tips of the leaves, we’ll see.
Buds are getting heavier, needed to add bamboo sticks and to tie some tops. Particularly the Lemon Cream Kush. Do not defoliate a canopy at this stage, plants are laying and holding on the leaves of each other !
From now, as I mentioned, I keep an eye on the flowers development and the leaves, particularly the tips of the leaves. And will readjust nootz and watering from these indicators.
That’s all for the week folks 😊
(I’m looking for a job in the Cannabis industry as Master Grower, Mineralogist, Quality Control)

Likes
6
Share


@GrapevineGrower2
Follow
Week 4 flower went fine with all three humming along nicely in living soil. Watered to saturation after applying a 1" top dressing of worm castings, compost, and Langbeinite from Down to Earth. No need for further plant training, defoliation, or pruning. Now, just sit back and let these girls finish their run.

Likes
37
Share


@masterofsmeagol
Follow
8/19 Rained again last night. No damage but medium is drenched. The 9lb kush I've been struggling with seems to be improving. I spent a lot of time on her yesterday and at least an hour this morning defoliating and pruning her. New growth and flowers look promising. I'm cautiously optimistic. I defoliated what needed it. I needcto qpplyvorganocide again. I can see random signs of septoria leaf spot. I really have been off my fame lately. I'm back on it now. This week the garden will be rearranged and I'll pull that big GDP back and better support the blueberry for flower. That NYCSA is a beast. It's resilient as all hell and just continues getting bigger and fuller. Despite pr9blems in the garden this girl seems absolutely fine. At least I don't have that defeated feeling anymore. I've got flowers on a few different plants. I'll try to get a couple pictures. I may take rapacaps advice and add a cheap plastic roof for later flower. I'm not sure if the explosive flower growth is due to the liquid kool bloom but I think I'm going to switch back to tiger bloom as it works better with the other nutes. I'll jeep this updated but I've got work to do.
8/20 Well it Rained again last night. This is getting discouraging. Now my other 9lb kush has the bottom branch all droopy like there's a borer or something. Realistically with the temp swings and the weather I think it's a firm of root rot or pythiym damage which isn't good. I posted pictures of the stalks and would be grateful if anyone has any advice. I'm go8ng back down to look again for a borer hole but i didn't see one. What it looks like to me is that the petroleum jelly I put on the stalks (to battle ear wigs) seems to keep them moist or something inviting mold or fungus. I'm kind of at a loss. I don't really know where to go from here. I don't know if I should just replant the severely damaged plant away from the rest of the grow, bag it and get rid of it or leave it be and hope for the best. I certainly don't want anything spreading. I'm getting tigerbloom today as my plants still need to eat and I'm nervous about the liquid kool bloom. It's probably fine but still. I'll update after I put in more work and research more today. Any advice helps. UPDATE: No borer holes. The stalk looks fucking horrible. It's supposed to rain today. I'm going to give it one more day then I'll amputate that branch and get rid of the other plant if I don't see an improvement. Perhaps I'll plant it in the ground. Don't really know what to do. Family bar b que today so my options are limited.
8/21 FED TWO GALLONS TO THE GARDEN. ONLY USED .5TSP/GAL OF LIQUID KOOL BLOOM. Did not feed dieing plant. Back to super hot weather 80° at 9am. Did a lot of research last night. I also went to several commercial growers and asked advice. What I came up with was a fusarium infection of pythiym infection
(Crown rot). I looked at all my stalks and they all have bark and are darker where I applied the petroleum jelly. I'm also NEVER using DE again. It fucking ridiculous amounts of water. Everyone swears by it bit it's not going in my garden again. Since use I can just watch water sit right on the GD soil. I tried to get some examples of what I'm talking about with the stems. I amputated that lowest bottom branch I trained (which was huge). I didn't have time to dispose of the other plant before my wife's doctor's appointment. I'll update when I go back over. I'm sure this won't help and may hurt but I used Bee Safe 3 in 1 on the wound and around the stalks of the plants I saw discoloration on. I didn't touch the NYCSA even though I see some discoloration. I may just be seeing things. That plant I'd super healthy and I don't want to risk losing it. It doesn't seem to have the stem rot like the others. At least I'm not the only one having problems. I hears some pretty bad stories. Still. I'm heart broken. I'll keep this updated after I go back over. FUCK. I MAY just go back to indoor. UPDATE: Got back from the appointment and the rest of the plant was all droopy just like the other 9lb kush (and the branch amputated). I wondered about that because other branches looked worse. I got the totally dead 9lb kush out and found some root rot. AFTER wheeling the bag out I found earwigs and other insects where the bag had been. Awesome. I used h202 to try to wipe down anything that looked Fingal in the stem. It sucks because it seems like that liquid kool bloom pushed them over the edge into flower. Cotton balls where there was nothing. So that's both my 9lb kush plants and the largest plant of the year the GDP that have all bit the dust. If you grow cannabis you know how I'm feeling. I KEEP TRY8NGVTO UPLOAD THE MINUTE VIDEO I TOOK BUT I CLICK ON SOMETHING ELSE AND IT DISAPPEARS. WIFI SLOW. HAVE TO WAIT FOR 5G
8/22 What do I say? Fusarium? Pythium? Stem rot? I'm going to have to get a tent to do some indoor to get the medicine I need for me and my wife. I took the last 9lb kush out and disposed of it. Well it's still in the bag. I'm hoping maybe it might come out of it (beyond hope and far away from the others (but I'm going to toss it today). This blows so hard. Flowers are just starting to develop. I like the liquid kool bloom. It seems to make flowers explode when there was none before. At least on the plants I have left. Actually even the dieing ones started flowering. I'm really concerned considering that one plant (at least) has septoria and every plant has that petroleum jelly on it. Cautio to people that use that. It seems thats where the rot started or is. In spots I spread the petroleum jelly. Anyway my NYCSA has the smallest amount of "funky looking stuff on the stem" so I'm hoping it will make it. Cotton balls starting to appear. If I lose the whole fucking crop I'm gonna go ape shit. UPDATE: Spoke with a few others and did more research. I removed my braces on the bottom of all the plants. It looks like the pjelly and the brace allowed for some type of contaminate. Other growers think I'm being too bleak. They think things will turn out okay. They are more knowledgeable about cannabis than me but I'm with these particular plants everyday. They're probably right and my anxiety is just getting g to me. It's scary seeing a healthy plant completely die in such a short time. After removing the other 9lb kush I could easily see extreme rootbound roots still too the size of the 1 gallon they came in. The bag was PACKED FULL of tight roots so they definitely made it down. The plant however just fell over when I pushed it. I had roughed it up a big before. Anyway I'm praying to the cannabis gods to not take what I have left.
8/23 Fucking pouring again. This sucks. I've gotten loads of advice and made another friend on here. I forgot my phone so I couldn't take pictures this morning. My spirits are up a little seeing that others are at least attempting to help. I'm headed to the grow shop after a night of research to grab supplies to battle this. I'll update later. EDIT: I picked up plant doctor at the grow shop. It was 50% off and I couldn't find anything with trichodermia. However, I've heard good things about this plant doctor. It's systemic and can be used as a root drench and a foliar spray. BIGGEST selling point for me is that it SPECIFICALLY lists fusarium, grey mold. Pythiym crown rot, black mold and all kinds of other shit. The thing that sucks is it's raining and it's not supposed to stop for a few days. That's going to make application more difficult. Oh well. I think I may do a root drench on the one plant that has a wilted bottom branch. I'll keep this updated. Thank you everyone who reached out. Especially growing grannies and my commercial buddy who is always here for me. However he has no experience with this so I'm kinda on my own here. EDIT: I couldn't find trichodermia and I don't have time to wait around and order. I found plant doctor which literally lists it treats all the possibly pathogens my issue could be. Even has a section for medical Marijuana. I did a root drench on the plant up front in the middle AND I did a foliar spray. Might as well get the septoria too. It's systemic but it gets in faster through the leaves I guess. It started sprinkling and I want to test this stuff out before I go ham with it. I did give some to the to other plants bit left my best AND THE TWO SMALLER ONES alone for now. I'm not seeing those issues on the NYCSA and I don't want to risk damaging it. I chose tge root drench as it's raining and the instructions for fusarium WAS a root drench. Thank you all for your help. I will close out tge question once I know it's figured out. Wish me luck. DID A SHORT VIDEO BUT WIFI IS SUPER SLOW SO I NEED TO WAIT TO UPLOAD IT. Went back over. Finished foliar spraying the other two and left the NYCSA and two Littles alone. Hopefully this works. I did I short video. Who knows if it uploads. UPDATE: Went back over and finished foliar spraying. Took a bunch of pictures and did a video but it didn't upload. I'm hoping this will do it. Plants actually look good. And they're flowering nicely! It's too bad I had to do a foliar bug this us supposed to combat PM and septoria as well.
8/24 It Rained last night but hasn't Rained today yet. It's supposed to and uts overcast. I'm really considering putting a roof on my grow (like rapacap suggested) for flower to decrease mold chances. Plants looked happy. I saw no negative effects from the Plant Doctor. I even sprayed a branch of the NYCSA and the stem and a little around tge roots. I finally feel like I can take a breath. I've been working so hard and worrying about losing g everything. I may have been able to save that 9lbkush but I don't think bit was worth taking the chance. The sun is peaking out now. My buddy at the grow shop called and set a side general hydroponics armor si 0-0-4 silica supplement cause it was 90% off. I pad like a buck sixty lol. I'll incorporate that next feed or water. Whatever comes first but it will be good to get it in the regimen. I was worried plant doctor might hurt but the girls seemed to kike it and I went ham on the worst plant. I mixed according to medical Marijuana guidelines on the label
(Theres another label on the internet, it's not on this one, it's at the very bottom and just recommdations from commercial growers. I hope this stuff works. Things look better already though. That liquid kool bloom is the bees knees. That's making flowers pop up like crazy! I think I'll stick with it. I was going to use beastie bloom and cha ching later on (and still might) but I hate the lockout bullshit. I've done a bunch of videos but most don't get uploaded as i forget to upload when I leave and wifi is slow here. Anyway at least I've got a few good ones left and pleating the words of my commercial poll buddy, "barring anything catastrophic you should be fine. I know your anxiety gets the better of you sometimes." Couldn't be a truer statement. I'm still getting a tent and doing indoor though. I'm going to need to.
8/25 Did some slight defoliation. I think today I'm going to reorganize my grow space. Things are looking better though. Plants look healthier. Flower is on and they are going to beat hell. I'm glad I took a cutting from NY 9lb kush. I also took one from the NYCSA. THose are tge little ones. The 9lb kush is flowering pretty good. Too bad it's just on a 3 gal. The NYCSA us in a 10 gal grow bag though and is doing amazing. I still see septoria on the leaves. I'm sure I'll need to reapply plant doctor but thus far I'm impressed. Things LOOK better. I don't even remember the last time I watered. It Rained last night. Looks sunny today. I'm going to feed tomorrow. I want the soil to dry out though. We usually don't get consistent rain like this. It's a first for me. I'll update later if I get stuff done.still wondering if I should amputate that wilted branch or give it a bit. It's still attached right now. I'll get some sealant and do some more research.

