The Grow Awards 2026 🏆
Likes
Comments
Share
@Roberts
Follow
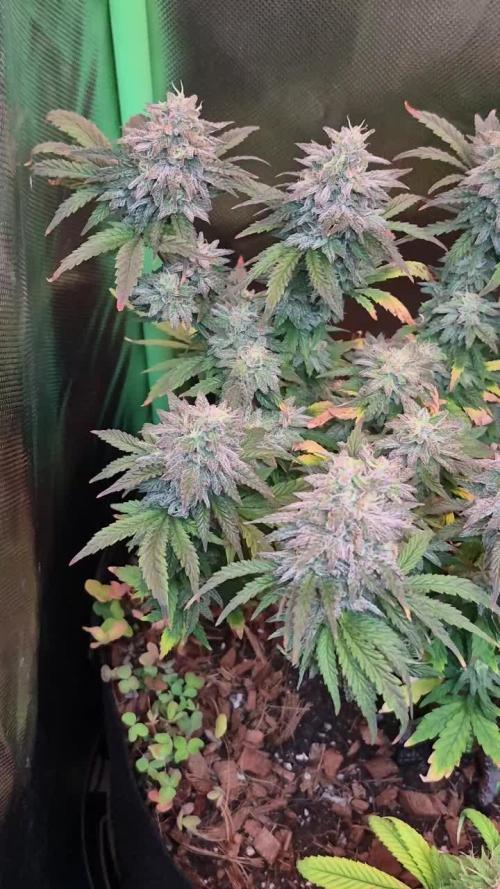
Baked Bomb autoflower grew really well. I had a issue getting a seed going, then some ph issues in vegging. Beside that she just thrived. Big dense colas with a cherry vanilla fruity smell. Loaded with trichromes as well. Can't wait to give her a try. Thank you Bomb seeds, and Spider Farmer. đŸ€œđŸ»đŸ€›đŸ»đŸŒ±â„ïžđŸŒ± Thank you grow diaries community for the 👇likes👇, follows, comments, and subscriptions on my YouTube channel👇. â„ïžđŸŒ±đŸ» Happy Growing đŸŒ±đŸŒ±đŸŒ± https://youtube.com/channel/UCAhN7yRzWLpcaRHhMIQ7X4g
Likes
24
Share
Well guys it's week 8.. I think lol. I'm 100% certain (Not really) that I took clones from 2 different mothers again... like a real cotton-headed ninny muggins. I'm at a loss when it comes to harvesting early what seems to be done, waiting, and how to do it all with flushing. So any help in that practical aspect would be dope. I'm really excited to be rolling out of this one, to be honest. with all the mothers big and clone ready I can finally just ease back into something more beginner level, shorter, whatever you wanna call it haha. The plants all look healthy though. I don't think I really made any big nutrient mistakes. I used LST to get those big colas away from the light and they seem to be fattening nicely making me wonder if I should just leave everything for 2 or 3 more weeks. I decided to throw a PK booster in there. I read online that most in hydro will use it throughout the flower cycle if needed and I was getting weary about the other plants not fattening up. I just keep hearing these things should yield crazy and I'm not seeing it. Then again it has been a bumpy ride. The nutrient change was done on the 14th and the photos are from today. Stay safe yall
Processing
Likes
14
Share
@kevgrow
Follow
Hey friends, end of week 4 from seed :) - I had to transplant plant #2 from a 2 gallon pot to a 5 gallon fabric pot because roots were coming out from the 2 gallon pot, I began noticing some change in the color on leaves so I immediately decided to make the change. - Plant #2 still hasn't revealed its gender to me, I can't figure it out because I see small pistils all around the leafs but there is just one area on the main stem with to very small round balls. I am hoping pistils come out from these balls as it did on other parts of the plant. - Thinking of purchasing a bigger tent, I feel this one will fall short once this plant matures. I might leave it another 1-2 weeks in vegetative stage. - Trimmed some leaves - Performed some LST on plant #2
Likes
8
Share
have not gave any nute will give first feeding on the next watering when i transplant to 3 gallon pot i gave about 4 oz of water today on 5/10/24 i transplanted from the lil pots to 3 gallon pots i amended my soil pro mix organic premium with 1 cup of fox farm happy from all purpose and 4 tbs of bone meal
Likes
13
Share
Plants are finishing the third week of flower, everything seems to be on path . 5 more weeks to go more or less ! Happy growing everybody !
Likes
59
Share
Ho portato le mie piccole amiche che mi ripuliranno la mia terapia .forza belle coccinelle 🐞 mie mangiate tutti. Ragni e uova... gnam gnam gnam đŸ˜‹đŸ€€
Likes
15
Share
@Sid93
Follow
Amazing smell sticky crystal I started giving Big Buds and hopefully in a few days they will be greasy and big đŸ”„đŸ”„đŸ”„
Likes
53
Share
10 September Harvest - see pictures. While some growers leave the plant whole when they cut, I do not. It is a personal preference and situational convenience if your a home grower. I chose to cut large, long branches, and remove any whole water leaves, as long as it doesn’t interfere with the bud formation. I don’t trim yet. This is done for a few of reasons: 1) It’s my last good close-up look at her until another 5 days or more, 2) I don’t want wet leaves drying on my buds if I can help it, and 3) I occasionally like being able to shine a small LED flashlight on the flowers while its drying. Mold is our greatest problem as growers, it can destroy a beautiful grow right up until the end process. Then I hang it in a dark closet, provide circulation and ventilation. Light and heat, anything above 80 degrees F, will start a break down in cannabinoids during the dry, it is ideal to stay away from both. I’m fortunate that a humidity level of 50- 55% and temperature of 65-70 degrees F is fairly consistent and easy to maintain. Anything below 60 degree F will prevent the adequate drying out of chlorophyll. Almost all my flower routinely take 5-7 days, some a little longer, to properly dry out. 15 September Trim - see pictures. First you’ll notice the buds have shrunk up to half their original size. This is just a fact that we growers have to deal with. Due to evaporation without uptake of water, it takes about 3 days for the chlorophyll to dry up, then slowly go through a chemical change. Along with the leaves, cannabinoids also begin a chemical change after 3 days called decarboxylation. A slow process where the THC level increases while curing. You want the leaf to be dry so they can be hand trimmed easily, but you do not want that bud so dry that it starts to fall apart in your hand. Try to handle carefully by the main stem to avoid touching the bud all together. A lot of these cut leaves will be covered with trichomes, good for making oils, or other products, it’s an option worth looking into keeping it. After trimming, I do separate a few premium flowers for my first smoq. Then loosely fill wide mouth quart mason jars with about 1 oz/28 gr of product per jar. I seal the lids for a few hours to determine what relative humidity they are at, see hygrometer pic, before making a decision to put in a 62% humidity control pack of my choice or to wait, then place in secure in a cool dark place with stable humidity and temperature. It is very important to then observe/burp or exchange the air as needed, up to several times a day, until 62% rh is achieved. Once your close to to your mark, put in your desired RH level control terpene shield. If you have a problem getting there: 1) it has dried out too much, no real solution, try to put several large cut stems left over from harvest into the jars with the buds to try and increase humidty, 2) it has not dried out enough, in this case no problem, just remove and dry out a little more. This is also a personal choice, some people like it drier in the 50% plus range. Whatever you do, research and preserve. At that time burping is no longer required. Cannabis will reach its peak potency potential at about 40 or so days into the cure. The finished product should be a perfect grind when cured correctly without clogging up your grinder, this could take a month. Now that I’ve said that, I’m sure someone has grown something that they have not been able to grind. It can remain in this state for an easy 6 months with little change, locking in all the terpenes and potencies. All you need to do is occasionally check the product to ensure there are no molds. If your grow/harvest/cure techniques are good this should not be an issue. It would not be uncommon to find many cannabis strains will last, with small degradable change, for up to one year after being stored this way. Using an airtight glass container, controlled relative humidity, maintained low temperature, and kept in darkness will equal maximum shelf life. Always avoid direct sunlight and temperatures above 80 degrees F. The reasons I’ve ultimately chosen Deep Water Culture as a grow medium. Each has their own pros and cons indeed. I found the most efficient, less maintenance and ideal solution for my situation was DWC. Burdens to overcome depend on size up set-up; initial equipment cost, size of containers, ph monitors, air pumps, type of water to use-reverse osmosis, RO cost/set-up/maintenance, ways to transfer/change water and nutrients, what nutrients to use and schedules, takes several grows to learn and understand, a 1 year learning curv, easy to nutrient burn. The Benefits of growing in water; no dirt, no bugs, no diseases, rare nutrient deficiencies/toxicities, steady and rapid growth that enables the plant to reach its genetic potential. After harvest, there is about a 1 hour equipment cleanup, sterilization and turn around process before replanting. Cannabis will perform in so many different ways and mediums, no one way is the best and the best way is the one you are using, right. Chose what works for you in the long run. There will always be an initial cost in set-up. My advice if one were in need to cut corners, I would not recommend cheap lights. This single factor is the most critical, afford for the best. The notion that organic and water has a different taste, flavor and potency effect is absolutely debatable. The more we learn the better we grow and experience is always the best teacher. This is what works for me and my methods of growing in general from beginning to end. A BIG “Thank You” to everyone who stopped by to take a look. My next diary will start at the beginning of October 2023 with a Forbidden Runtz Auto. There will be minor differences during the grow. I enjoy Auto strains simply by what can be achieved in a short time. No matter the strain they will unveil one thing in common, the demand for attention. Many times over it is the anecdotal gardener that surmount plant scientist. Last should I mention, do not forget to stop and enjoy the fruits of your labour...
Likes
55
Share
@Max1973
Follow
Day 29 - Things going along nicely .... i trimmed down some of the bigger bottom leaves, i didn't have enough soil to fill the pots, and the plants are short, bushy, weird little things, that filled out the inside of the pots..... they are only 15cm tall, but the leaves are 10+ cm .... really weird little plants.... haha.... i decided to trim the fk out of one of the ones in the double pot, and practiced topping on her.... i'll cut her down maybe trimmer her of the pot, and focus on just the 2........ they seem to be still growing upwards, so i'm not in a hurry to put em into flower mode......... on the main one i noticed some neut deficiencies ... so i upped the neuts.... should be ok, i put a good heavy neut and it stopped the spots etc..... i think some bug or something got in the double pot and is livin in there, but he doesn't eat much, haha....... the main stalks are as big as my thumb and under each canopy is all the branches..... it's really strange, to go in under all the growth and see it all .... they look kinda small, but the entire under canopy of leaves is all full .... i'm moving the huge sized leaves out and pulling each branch up over them as they grow..... this is 21 THC and 19 CBD, so it's all the good stuff for medicine ... the smell is getting abit noticable and i'm hoping the exhaust fan arrives from china soon.... just got positive ventilation into a carbon fil. ... and daily air out........ i think i had the led lights too low..... so i'll raise em abit more and see if i can get em to stretch .... Day 30 -- added some video's...... daylight vids... worth watchin for a laugh ...... first grow, so idk what i'm doin, ... any help/comments appreciated Day 32 -- added some pics of the late night trim and LST,... idk looks ok.... Day 34 -- added a video...
Likes
24
Share
@olli0420
Follow
After the repot they looked very much happy 💚 I repotted with biobizz light mix soil and a lot of perlite,as much perlite as soil cause I'm afraid of root rot and it just works for međŸ–€ also I still haven't given any nutrients cause they don't seem to want them yet. I put on the fans so that they have some ventilation and to strengthen the truck. they have grown so much in a week! I'm amazed! I also added another Mars hydro TS 600 so that they get all the light they need and hopefully speed the process up a little.
Likes
64
Share
This is the last week 💀 There are less pictures than usual but nothing special happened except the yellowing of the plants due to the nutrients cut. Wait for the "Harvest" week for the final photo shoot 😎
Likes
22
Share
@Jwjoh
Follow
This was an interesting harvest. Everything was going great and the buds/trichomes were still piling on, when suddenly almost overnight plant "C" shifted to about 20% amber trichomes. So I harvested it, and because the other plant wasn't ready yet I decided to try water curing the first one for 7 days. Then at the end of the 7 days, I figured I'd hack down plant "D" and dry them both on the racks in the tent at the same time before moving into jars. The water curing was a huge success! After the first day, the water was cloudy with a slight green tinge. Second day was about the same. Then the water was just a little cloudy each change, no green tinge. Compare it to the diary I just opened around water re-curing some cannabis I bought from the government store, where the water is diarrhea brown :O On day 7 of my water cure, the water was perfectly clear so I decided to hack down plant "D" and get them both drying on racks in the tent together. While water-curing plant "C", I had its trim sitting in a bowl in the freezer. When I hacked down plant "D", I put its trim in the same bowl. After my typical wet-trimming, I hung up Plant "C"'s water-cured buds on the top rack, plant "D"'s buds on the 2nd rack for an old fashioned cure, and random trim from both plants spread out on the bottom 2 racks. The water-cured buds dried within about 24 hours and went into a jar with a 58% humidipack. The buds are SUPER dense and potent! Nice clean high, doesn't kill my throat. The downside is that the taste is really weak and not that great. But everything has pros and cons. Almost no trichome loss in the bucket during the water curing as well -- I was really worried about that! The other buds dried in about 36 hours and went into a jar with a 58% humidipack, where I burped it many times a day for a week. The smell and flavour are much more potent than the water-cured bud and it's a little harsher on my throat, but otherwise I'm not sure there's a detectable difference. However, you can SEE there's a sharp visual difference between the water-cured buds and the jar-cured :) Of course the jar-cured will mature more with time as well. Once the trim was completely dry, I put it in a bag in the deep freezer and dropped it to about -20. I didn't need to use a grinder this way -- I could just mash it all up in the bag with extreme ease! Sifted it through the kief screen, and pressed down 17 grams of lazy-man's hash! After processing the trim through the kief screen, I decarbed in the oven at 200F for 1 hour (this converts THC-A into THC or something to that effect -- if you don't do this, the edibles won't get you very high). I put the trim into a big mason jar and back into the freezer along with my bottle of Everclear. Once they dropped somewhere down around -20, I poured in the Everclear, put the lid on, and shook as hard as I could, as often as I could, for 5 minutes or so. I noticed that as I shook it around, the contents inside would alternate between solid and liquid which was kinda cool :) Shake it one way and it freezes, shake it the other way and it thaws... or something to that effect, anyway. I was able to use a double-coffee-filter to extract about 2 cups of dragon tincture! I threw everything in the coffee filter out -- next time I'm going to do a better job of it as there's a little pile of trichomes that forms at the bottom of the filter which I could put to use. Once I get that down next harvest, I'll have around 99% efficiency milking every last drop out of my harvests! White chocolate is so yummy, as are candy canes... I wanted to combine the two to make some edibles. Looking around for candy cane crush, I decided to check out Amazon. They had the same candy cane crush I was looking at from popular stores, for only a couple dollars more, so I figured sure why not have it delivered. I was planning to get some white Baker's chocolate, but on checkout of the candy cane crush I got a deal for adding on white chocolate Lindt bars for $1.25 a piece LOL! So I bought 10 of those. When the Amazon package arrived, I slowly boiled down 1/2 cup of my dragon tincture in a pot, then used a double-boiler setup to melt down 4 of the Lindt bars in the same pot. Once it was mixed well with the hash oil, I set it aside to cool for about 3 minutes before stirring in 1/8 cup of candy cane crush (plus I ended up adding maybe like a tablespoon more), pouring into a pan lined with parchment paper, and putting in the freezer for 30 minutes. So now I have a nice big chunk of white chocolate candy cane crunch stuff where a piece the size of my thumb gets me super high for like 8+ hours; 17 grams of lazy-man's hash; and 88 grams of bud :) And still enough dragon tincture left over to make 3 more rounds of edibles -- not sure what I'll make next! From now on I'm going to water cure a large portion of all my buds -- not just the ones I grow myself, but ones I buy from the Gummint too!
Likes
56
Share
Bonjour Ă  tous les padawans et les maĂźtres jedis La semaine 4 est dĂ©jĂ  lĂ ! DĂ©cidĂ©ment cette plante est vraiment exceptionnelle! Elle reprĂ©sente la force et j'en suis fier 😍 Je me donne pour defi que durant mon LST je fasse faire au tronc un tour sur lui meme. Ma plante est saine le LST ce passe relativement bien je l'ajuste tout les jour je le combine avec la technique du pincage d'Apex cela me permettra d'avoir une canopĂ© plus homogĂšne donc une meilleure pĂ©nĂ©tration lumineuse et par consĂ©quent un meilleur rendement. Le pinçage est une pratique courante en horticulture. Beaucoup de cultivateurs l'utilisent pour amĂ©liorer le rendement de leurs plantations cannabiques ou autres. Il est souvent question de 'taille' des bourgeons apicaux. Cette taille se pratique Ă©galement mais il n'est plus alors, Ă  proprement parler, question de pinçage. A l'instar d'une taille, le pinçage va permettre de stimuler le dĂ©veloppement des ramifications tout en prĂ©servant les sommitĂ©s en vue de la floraison. Il est trĂšs utile pour uniformiser une canopĂ©e. Pour rĂ©aliser le pinçage, il vous suffit de presser 'fermement' la tige [entre le pouce et l'index] aux environs de l'apex jusqu'Ă  sentir un lĂ©ger 'crAck'. Cela aura pour rĂ©sultat d'endommager les vaisseaux impliquĂ©s dans la circulation de la sĂšve [situĂ©s dans le pourtour de la tige], la tige conserve toutefois une certaine rigiditĂ©. Pour obtenir le mĂȘme rĂ©sultat, il est Ă©galement possible de vriller lĂ©gĂšrement la tige sur elle-mĂȘme. L'interruption du circuit d'alimentation entre le ou les apex et le reste du plant va provoquer un dĂ©sĂ©quilibre hormonal qui aura pour consĂ©quence le dĂ©veloppement des ramifications antĂ©rieures au point de pinçage. Jour 25 j'arrose mon pot normalement avec un quart de son volume en eau toujours avec un PH de 6.3 Ă  cette eau j'ajoute 0.7 gramme de greenhouse feeding enhancer pour favoriser son dĂ©veloppement racinaire. Par la suite je n'aurai plus qu'Ă  ajuster mon LST jusqu'au stretch et surveiller mon arrosage, Je pincerai mes apex suivant la pousse de la plante pour uniformiser la canopĂ©. Jour 26 Ă  force de patience et de dĂ©licatesse j'ai rĂ©ussi le dĂ©fi que je me suis fixĂ© en faisant faire au tronc un tour sur lui meme (photo jour 26) ce dĂ©fi ma permis d'amĂ©liorer grandement la technique du LST. Au-delĂ  de ça cela ma permis de donnĂ© au tronc une structure en forme de colonne vertĂ©brale ce qui a pour consĂ©quence une meilleure pĂ©nĂ©tration lumineuse et une belle canopĂ© homogĂšne. Que la force soit avec vous đŸ’Ș
Likes
52
Share
You don't become confident by shouting affirmations in the mirror, but by having a stack of undeniable proof that you are who you say you are, outwork your self-doubt. Nitrogen fixation is a chemical process by which molecular nitrogen (N2), which has a strong triple covalent bond, is converted into ammonia (NH3) or related nitrogenous compounds, typically in soil or aquatic systems but also in industry. The nitrogen in air is molecular dinitrogen, a relatively nonreactive molecule that is metabolically useless to all but a few microorganisms. Biological nitrogen fixation or diazotrophy is an important microbe-mediated process that converts dinitrogen (N2) gas to ammonia (NH3) using the nitrogenase protein complex (Nif).[2][3] Nitrogen fixation is essential to life because fixed inorganic nitrogen compounds are required for the biosynthesis of all nitrogen-containing organic compounds, such as amino acids and proteins, nucleoside triphosphates and nucleic acids. As part of the nitrogen cycle, it is essential for agriculture and the manufacture of fertilizer. It is also, indirectly, relevant to the manufacture of all nitrogen chemical compounds, which include some explosives, pharmaceuticals, and dyes. Nitrogen fixation is carried out naturally in soil by microorganisms termed diazotrophs that include bacteria, such as Azotobacter, and archaea. Some nitrogen-fixing bacteria have symbiotic relationships with plant groups, especially legumes.[4] Looser non-symbiotic relationships between diazotrophs and plants are often referred to as associative, as seen in nitrogen fixation on rice roots. Nitrogen fixation occurs between some termites and fungi.[5] It occurs naturally in the air by means of NOx production by lightning.[6][7] All biological reactions involving the process of nitrogen fixation are catalyzed by enzymes called nitrogenases.[8] These enzymes contain iron, often with a second metal, usually molybdenum but sometimes vanadium. Green clover (Fixation) White clover (Fixation) Red Clover. (Fixation) Yellow Clover. (Fixation, deeper roots) Sweet Thai Basil. (Terpenes) Italian Basil. (Terpenes) Chamomile.(Oil production) Borage.(Pest attraction taste) Lavender.(Pest attraction smell) Marigold(Pest attraction visual) Mycorrhizae are beneficial associations between mycorrhizal fungi and a plant’s root system. Mycorrhizal fungi spores germinate in the soil, creating filaments (hyphae) that penetrate the root cells, thus establishing a symbiotic relationship. This collaboration leads to the development of both intra-radical and extra-radical networks of filaments, enabling efficient exploration of the soil for enhanced access to nutrients and water. Consequently, these vital resources are transferred to the plant, resulting in numerous benefits for crop cultivation. Various mycorrhizal products are available in diverse formulations (powder, granular, and liquid), concentrations, and qualities. Ongoing advancements in products, technologies, and research are reshaping our understanding of mycorrhizae. Despite these positive developments, certain misconceptions persist. In the following discussion, we aim to clarify the truths and dispel the myths surrounding mycorrhizae products. MYTH #1 A HIGHER NUMBER OF MYCORRHIZAE SPECIES MEANS BETTER RESULTS. Contrary to common belief, having a higher number of mycorrhizae species in a product does not translate to better results; in fact, it often yields the opposite outcome. A plant can sustain only one association with a particular mycorrhizal fungi species. Introducing multiple species creates competition among them, which is not advantageous for the plant. The initial colonizer does not ensure the highest success; instead, it gains precedence. It is recommended to select a product with a concentrated presence of a single mycorrhizae species known for its effective performance, rather than opting for a product with multiple species at lower concentrations. MYTH #2 ECTOMYCORRHIZAE ARE EFFECTIVE FOR CANNABIS PLANTS. Although ectomycorrhizae can colonize five to ten percent of plant species, cannabis is not among them. Ectomycorrhizae do not penetrate the root cells; instead, they develop around the roots and on the exterior. For cannabis plants, it is essential to seek out endomycorrhizae. Endomycorrhizae are capable of colonizing 70% to 90% of plant species, including cannabis. Unlike ectomycorrhizae, endomycorrhizae penetrate the root cells, forming structures like arbuscules for the exchange of nutrients and water with the plant. MYTH #3 WHOLE INOCULANT (PROPAGULES) PERFORM BETTER THAN ONLY VIABLE SPORES. The propagule count specified on most mycorrhizae products indicates the presence of spores (viable and unviable), hyphae, and root fragments. However, it is crucial to note that only viable spores, those with the capacity to germinate, can successfully colonize a plant’s root system. Spores are to mycorrhizal fungi what seeds are to cannabis plants—a fundamental component enabling fungi reproduction. Consequently, even if a mycorrhizal product boasts millions of propagules, its effectiveness hinges on the presence of viable spores. Without viable spores, the product will not contribute to plant development. Therefore, the genuine value of a mycorrhizal inoculant lies in the quantity of viable spores it contains, as only viable spores can efficiently initiate symbiosis. MYTH #4 ALL METHODS OF APPLICATION YIELD IDENTICAL RESULTS. To establish the symbiosis, mycorrhizal fungi spores must be close to the plant roots. The optimal recommendation is to directly apply mycorrhizal inoculant to the roots, either in powder, granular or slurry form. This method ensures maximum proximity between the spores and the roots, facilitating a rapid establishment of symbiosis. Particularly with crops like cannabis, which have a short growing cycle, employing this technique is the most effective way to obtain optimal benefits. Alternatively, techniques such as blending the inoculant with the soil are effective, but there may be a delay in the establishment of symbiosis. This is because the roots need to grow and come into contact with the dispersed spores throughout the growing media. MYTH #5 MYCORRHIZAE CAN ONLY BE GROWN ON LIVING PLANTS. While the predominant method for commercially producing mycorrhizae involves growing them on the root systems of living plants (in vivo production), it is not the exclusive nor the optimal technique. In fact, this production approach has notable drawbacks that the “root organ culture” method just does not have (in vitro production). In vitro production occurs in meticulously controlled, aseptic laboratory conditions, allowing for the consistent generation of products that are viable, highly concentrated, species-specific, and free from pathogens. Achieving such precision and quality is impossible when relying on the cultivation of mycorrhizal fungi on plants exposed to external conditions. In conclusion, it is crucial to take all these factors into consideration when choosing the appropriate product for your crop to fully harness the wide array of benefits provided by a high-quality mycorrhizal product. STRONGER PLANT – Stress resistance. FASTER GROWTH – Improve plant structure and shorter veg time. INCREASE YIELD – Overall more biomass. IMPROVED QUALITY – Increase cannabinoids and terpenes content.
Likes
6
Share
I cut another part of the girls, and the total is even greater than the first part! We wait another week for the final sums, but right now the flavor is unique.
Likes
4
Share
@Coopmc
Follow
Ya buddie got a cut of this to throw in with FruitWalker 50/50 I’ll be reversexig for pollen! Hell yes😍😍😍