The Grow Awards 2026 🏆 


Likes
14
Share
@GoldenWeedGrower
Follow
D78/F34 - 17/06/23 - I changed light schedule hoping she's going better. (6 only red ligh and 7 red-white)
D79/F35 - 18/06/23 - New lights schedule is running
D80/F36 - 19/06/23 - Added water and integrators EC 1.0 and pH 6.4
D81/F37 - 20/06/23 - Nothing to report
D82/F38 - 21/06/23 - Added water and nutes EC 1.0 and pH 5.7
D83/F39 - 22/06/23 - Temp is too high for both water and environment. I see signals of suffering on the flowers (foxtailing)
D84/F40 - 23/06/23 - I'm trying to keep the Tremp under control but isn't easy. To lowering water temp (that now is about 26 °C) I'm adding some ice to the water

Likes
65
Share
@bypado_farm
Follow
Day 84:
Watered the plants 0.5L with nuts
975 ppm, 2070 us/cm, PH 6.4
Flushed plants with 10L clear water
Day 86:
Watered the plants 0.5L with nuts
955 ppm, 2029 us/cm, PH 6.4
Flushed plants with 10L clear water
Day 88:
Watered the plants 0.5L with nuts
980 ppm, 2089 us/cm, PH 6.4
Added 1ml of bloom/top mix (5 ml/l total)
Flushed plants with 10L clear water

Likes
9
Share
@GrowPassionItalyChris
Follow
È stata una settimana bellissima! Il caldo estivo italiano finalmente è arrivato con temperature alte di giorno e fresco di notte. Queste varietà sono perfette! Ogni banca dei semi di queste varietà merita il mio applauso di cuore! Alcune sono più alte di me cioè superano il metro ed ottanta centimetri di altezza! Molto diramate tutte si stanno riempiendo di infiorescenze dure, appiccicose e molto resinose con odori intensi e fruttati! Ogni varietà sta sviluppando il suo aroma in maniera impeccabile! Gli insetti e parassiti ormai non sono più un problema, la resina appiccicosa non è gradita dagli insetti! Sono cresciute molto ed in circa tre mesi verranno raccolte, adesso si riempiono fino a che possono, le infiorescenze si stanno gonfiando ed iniziano a prendere forma. Abbiamo iniziato con un po' di Atami bloombastic assieme al top max e biobloom e se continuano così tra circa 4 settimane raccoglierò alberi XXL di altissima qualità biologica con aromi speciali! Odore nauseante in giardino! Un abbraccio a tutti e complimenti ai creatori di queste varietà!


Likes
12
Share
@Smokwiri
Follow
welcome to my seedstockers blackberry gum diary
only growcaps feeding
you should read first couple of weeks to get an overview of how this bud has been fighting for it's life since day 1.
This one managed to survive and give us some small but beautifull trichome packed dark purple coloured bud.
She seems to be finishing already, so when she's ready I'll cut the stem

Likes
18
Share
@Spliffing_Around
Follow
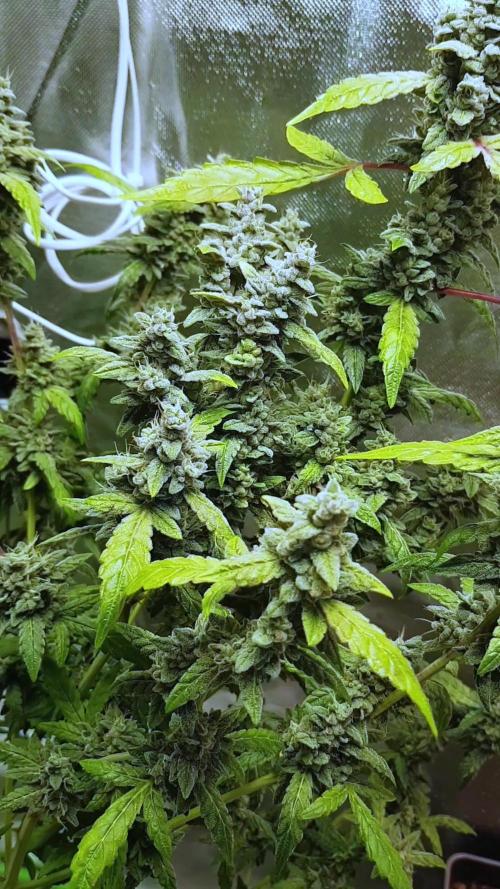
The white coverage is diatomaceous earth against gnats. Flipped them couple days ago , still nothing ,waiting
Likes
51
Share
@Seldom_Seen
Follow
Day 43: Week 7 off to a good start. Watered with just PH’d water. The soil PH is reading 7.0 so I’m bringing the water/feeds closer to 6.0 to try bring it down a bit. Took nearly 4ltrs again. Moved around another 5 cm away from light, just to be safe. I only have around 20cm left to play with so hopefully it doesn’t get much taller.
Day 45: Watered with nutrients (1ml SR, 5ml B) with PH @ 6.3. Took 3ltrs. I measured the PH of run off and it’s reading 7.0. It’s fairly dark down below the canopy and I want to give the plant a break from me clipping leaves off so I’ve added in one 23watt Warm White (2700k) standard home CFL bulb down low. I don’t know how much it will help but it won’t hurt so no harm in sticking it in.
Day 47: Watered with nutrients (1ml SR, 5ml B). Took 3ltrs, run off measured at 7.0. Plant looks happy and healthy which is great considering how much defoliation I’m having to do. I’m thinking now that two 9ltr pots might be too big for my space.
Day 49: Seven weeks old today and looking happy and healthy. Watered with nutrients and added Green Sensation to the feed (1ml SR, 1ml GS, 2ml B). Plant grew 10cm this week. I think the main stretch is over now.


Likes
25
Share
@pifflestikkz
Follow
Day 29
29/07/24 Monday
Nice feeding today with De-chlorinated tap water pH 6.
Gave her 300 ml and she had a small run off.
Getting chunky in the stem now 💪💚
Day 31
31/07/24 Wednesday
De-chlorinated water pH 6 today with Plagron pk13-14 5ml to 5L
Plagron power buds 5ml to 5L
Used 300ml of the 5L solution.
I will be using these on water days from now on as they are advised to be used every irrigation.
We'll see how they perform 💪💚
Day 32
01/08/24 Thursday
Another feed today using de-chlorinated tap water pH 6, there now taking 300ml every evening.
Day 35
04/08/24 Sunday
END OF WEEK 😁
De-chlorinated tap water pH 6 today with Plagron products. 300ml each.
Had a issue with leaf invaders this week, I have treated and am checking every 48 hrs so far seems ok and not progressive.
All plants look great, very healthy, one of the Overdose is way behind and due to space maybe culled at flower I'll see how she gets on.

Likes
4
Share
@Hix57
Follow
Au 27ème jour, la strawberry Gorilla se porte à merveille. Je suis convaincu qu'elle présente un phénotype indica, étant donné sa forme plutôt compacte. Il est difficile de ne pas remarquer la nécessité d'attacher les branches...
J'attends maintenant avec impatience de voir la préfloraison se poursuivre et l'étirement de la plante perdurer, en espérant une multiplication des sites de tête.
Engrais : je continue à utiliser un mélange comprenant du seaweed, de l'humic, et un booster à moitié dosage recommandé, sans ajout de NPK.


Likes
3
Share
@Esjey
Follow
I have first time plant like this.
This dragon take 4 liters in 20-24 h 🧐🤴
I put some new stuff from GREEN PLANET -nutriens and microbs. I put too nutriens for leavs from OPTIC FOLIAR.
Cleaning box with alcohol "IPA" 99% 🤮

Likes
18
Share
@eldruida_lamota
Follow
Que pasa familia, vamos con la cosecha de estas Tropicana Cookies Fast Flowering, de FastBuds.
Por dónde empezar, las flores son bien compactas , y van repletas de resina, tienen tonos rosados por dentro muy bonitos, y tiene un aroma súper dulce aunque engañar engaña porque saber sabe más tropical y cítrica.
Es muy sencilla de cultivar, es de ciclo bastante corto aunque también si le dais una semana más no pasa nada agradecer se agradece al final.
Mars hydro:
Code discount: EL420
https://www.mars-hydro.com/
Agrobeta:
https://www.agrobeta.com/agrobetatiendaonline/36-abonos-canamo
Hasta aquí todo, Buenos humos 💨💨💨
Processing
Likes
2
Share
@sanchelos
Follow
ростишка радует,замечаний нет,Шишка живёт со мной в комнате,вазон установил за системным блоком дабы создать обдув!
Likes
36
Share
@paulino27
Follow
Everything good for now,plant reacts good to nutrients 😍
Continuing with bit of lst.
Likes
3
Share
@Modulway
Follow
Can´t tell if the Charlotte got any problem. Just went back to the normal feeding. I guess a week more till flushing.

Likes
7
Share
@UnkleSkunk
Follow
unfortunately😂😂 I do not have much to say
the plant is healthy and has an excellent fragrance
no problem detected ....

Likes
29
Share
@JeyGanesha
Follow
Un altra settimana è passata senza problemi...grazie alla mia perseveranza nel curarla e debellare i ragnetti Rossi che bastardelli mi sono arrivati anche dentro al box... sicuramente c'è li ho portati io involontariamente quando sono andato a vedere delle piante di un amico che erano impregnate di ragnetti e ragnatele sui fiori....vabbè ora devo sbattermi un po' più ma non lascerò che mi rovinino la mia terapia 💪👍🙏🕉️🙏... Boom Shiva Shankar 🕉️ belle le mie coccinelle 🐞 che mi tengono pulita la mia terapia

Likes
29
Share
@GERGrowDesigns
Follow
Growers ,
Welcome to Harvest of Sensi Seeds Berliner Automatic 2025 Release
With dedication, knowledge, and hands-on practice, we’ll guide you step by step through the journey—watch with us as growth, development, and small wonders unfold before your eyes.
Whether you're a beginner or an expert, you are warmly invited to join, ask questions, and share your own experiences along the way!
Project Setup & Conditions:
• Brand/Manufacturer: Sensi Seeds
• Tent: 120cmx60cmx80cm
• Light: 2x 200 Watt Full Spectrum
• Humidity: 45%
• Soil: Narcos Organix Mix
• Nutrients: Narcos Products
• pH Value: 5.8
A Special Thanks To
Sensi Seeds
for the amazing collaboration, trust, and generous support in making this project possible. Your contribution is truly appreciated!
Congratulations on Your Own Projects!
We celebrate your growth, your creativity, and the passion you bring to the table. It’s truly inspiring to witness at Each visit .
Stay curious and keep up Growing —we look forward to welcoming you back for the next chapter soon!