
Likes
Comments
Share


@MrJones
Follow
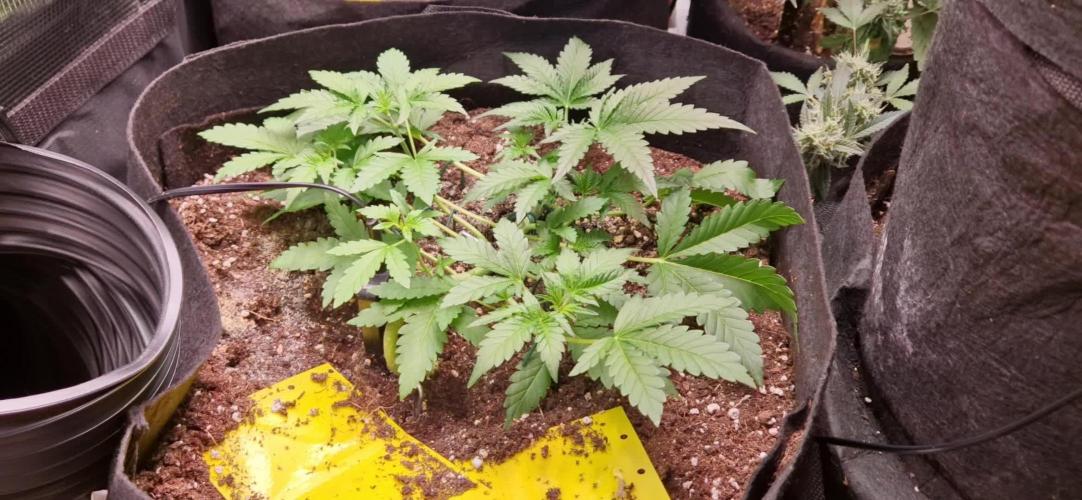
OSS Cheese XXL
🔹⊱╮🔹╰⊰🔹 GROW Started 03.10.24 INFORMATION 🔹╰⊰´🔹⊱╮🔹
🌞Environment - Maintaining 80F and 65%Humidity
🌾Training - These ladies are Pruned and Defoliated and ready for flower.
⚱️2-Gallon 📊6.2 PH
💧 Feeding - Using Horti Grow 8-11-21, Bloom 5-15-26, Late Bloom 0-24-26, Cal 12-0-0
🌞Medic Grow Smart 8 760 Watts
🕷️ IPM - CannControl from Mammoth and Mosquito Bits as needed
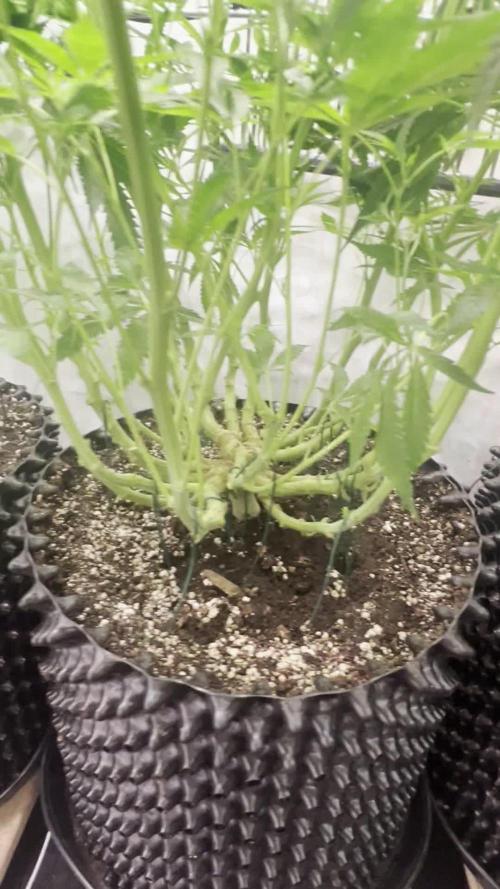
🔹⊱╮🔹╰⊰🔹 GROW Started 03.10.24 INFORMATION 🔹╰⊰´🔹⊱╮🔹
🌞Environment - Maintaining 80F and 65%Humidity
🌾Training - The girls are recovering from last week's Pruning and Defoliation,
⚱️2-Gallon 📊6.2 PH
💧 Feeding - Using Horti Bloom and Horti Cal 12-0-0
🌞Medic Grow Smart 8 760 Watts
🕷️ IPM - CannControl from Mammoth and Mosquito Bits as needed
🔹⊱╮🔹╰⊰🔹 PLANT UPDATES 🔹╰⊰´🔹⊱╮🔹
📝 Notes - On 🗓️05.11.24, This week, we are on Auto-Pilot and just Fertigating as needed; the ladies are stacking up nicely, and the leaves have grown back not sure if it is the genetics or the new nutrients; I would like to see less and will evaluate if more defoliation will be needed.
📝Fertigation injects fertilizers into an irrigation system to supply dissolved nutrients to crops.
🗓️05.11.24 Just feeding daily, sometimes twice; today, fed with Hort-Bloom @ 2.7 GRMS Per Gal and Horti-Cal @ 2.5 GRMS Per Gal.
🗓️05.12.24 Just feeding daily, sometimes twice; today, fed with Hort-Bloom @ 2.7 GRMS Per Gal and Horti-Cal @ 2.5 GRMS Per Gal.
🗓️05.13.24 Just feeding daily, sometimes twice; today, fed with Hort-Bloom @ 2.7 GRMS Per Gal and Horti-Cal @ 2.5 GRMS Per Gal.
🗓️05.14.24 Just feeding daily, sometimes twice; today, fed with Hort-Bloom @ 2.7 GRMS Per Gal and Horti-Cal @ 2.5 GRMS Per Gal.
🗓️05.15.24 Just feeding daily, sometimes twice; today, fed with Hort-Bloom @ 2.7 GRMS Per Gal and Horti-Cal @ 2.5 GRMS Per Gal.
🗓️05.16.24 Just feeding daily, sometimes twice; today, fed with Hort-Bloom @ 2.7 GRMS Per Gal and Horti-Cal @ 2.5 GRMS Per Gal.
🗓️05.17.24 Just feeding daily, sometimes twice; today, fed with Hort-Bloom @ 2.7 GRMS Per Gal and Horti-Cal @ 2.5 GRMS Per Gal.
╰⊰🔹╰⊰´🔹⊱╮🔹╰⊰🔹╰⊰🔹STRAIN INFORMATION🔹⊱╮🔹╰⊰🔹╰⊰🔹╰⊰🔹⊱╮
Cheese XXL cannabis seeds are a unique blend of Afghan Kush x Super Skunk, producing the most pungent dank weed. Cheese XXL is the third commercially available edition released by Original Sensible using and developing these Afghan and Skunk genetics. The first release of these genetics was their Skunk Afghani. The second improved version was Stinkin' Bishop, which had an enhanced and more potent THC content and was more intense in terms of smell. The third and improved release on a similar theme is this Cheese XXL, which has a similar THC content but an enhanced heavier yield. The smoke is incredible, with an outstanding flavor of pungent skunk and spicy, extra strong mature cheese created by the dominant terpene myrcene with its earthy solid scent accompanied by caryophyllene and pinene, which combine to create a peppery acrid cheesy odor. THC levels are exceptionally high in this Cheese strain, and the effect is well-balanced, developing mental and body relaxation with a remarkable alleviation of stress and depression.
The intense solid aroma starts early in the flowering period; if you're growing Cheese XXL indoors, you'll need plenty of ventilation to disperse these babies' stinky "road kill" aroma! Cheese XXL is a cheese strain suited to indoor setups and thrives outdoors well. These feminized marijuana seeds are incredibly resistant to mold and disease and produce a substantial harvest that professional and amateur growers can quickly achieve. These Cheese weed seeds are outstanding. Break open the buds ready for use, and you'll see why the stench will make your eyes water!
Cheese XXL from Original Sensible Seeds is a great choice to break into the commercial market of growing cannabis, so if you're looking to buy something special with extreme yield, potency, and flavor, Cheese XXL cannabis seeds are simply the best choice.


Likes
16
Share


@Cauli
Follow
Week 4 of little Guava.
She is finally speeding up a bit, but the weather was still far from good. Very cloudy at day, too cold at night – so she still was allowed to sleep inside.
When it's raining she can hide under a table, but it's not ideal.
Started to slowly feed her a bit, seems to take it well.
Hoping for betten weather now.

Likes
12
Share


@Rich_Kolas
Follow
Week 3, Day 15 of Veg. Looking good and healthy so far. When they reach 6" I should have enough nodes to start LST.


Likes
13
Share


@DrewbieDoobieNoobie
Follow
kind of a dud It might be a dwarf gene or it might be harder to grow than I has the ability to I have 5 seeds left I will try these again and see if I have the skills to get a better yield out of them.


Likes
15
Share


@Kelloggs420
Follow
First pistils appear with purple hue even tho my temperatures are pretty high. They're loving the sun

Likes
31
Share


@BigBadLion
Follow
Heeey! 👋
Here's the third week of flower or the 2nd with actually visible buds! And some have grown quite a lot in such little time, nice! 😁 And the plant stretched a lot too!
Sooo, everything is going well, or it seems that way! If anything what's happening is that I'm still taking too long to water my plants (but they do recover fast!) 😖 and I'm also giving them all the proper nutrients they need (I was missing one last week, oops!). I also defoliated my babies this week. Hopefully the lower buds will thank me later! 😃
I'd like to add as well that all the previous issues that were visible on Matcha seem to be gone, which is good! Her leaves are healthier (a little too dark maybe) and there is no more "tigering" in her leafs!
Once both stop growing I'll start giving them the rest of the nutrients to fatten up the buds, but I'll let you all know before I do it!
Thanks for reading and I hope you all enjoy the photos!

Likes
174
Share


@Roberts
Follow
Well 85.9 grams of goodness. Has a great smell and flavor. Very head heavy smoke. If you like high thc or even fruity buds this is a good one to grow. If anyone is interested in any fast buds strains my affiliate link is
https://myfastbuds.com/?a_aid=60910eaff2419
If anyone is interested in a Viparspectra light I can send you to a affiliate link, and look for discounts though my affiliate program as well. Please direct messages me for more information please.
Thank you grow diaries community for the likes, follows, and subscriptions on my YouTube channel. I really appreciate the support. 🌱🌱🌱 happy growing 🍓🍌🍓🍌🍓🍌🍓🍌
Likes
59
Share


@Hashy
Follow
Grow diary 11 stage 8
Day 71 to 80
This west coast o.g is attempting to flower after I knocked an hour off the lights. I'm thinking she needs me to go 12/12 so really her autoflower gene is redundant. She is taking over the tent and I'm having to move plants to another tent to finish them off. But on the bright side once the other 3 plants are out I can go back to adding a bit more nitrogen get it healthy and throw my net over her and switch to flower.
Likes
25
Share


@Kakui
Follow
Veg22, riego con 3.0 EC y pH 5.9, drenaje promedio de 5.8 pH y 2.6 EC(muy bien), primer riego con Sensizym para limpiar un poco las raíces, y este será el último riego de vegetación con Voodoo Juice, Tarantula y Piranha.
Se hizo una pequeña defoliación de las hojas abanico más bajas y se volvió a ajustar el LST, ya van tomando la forma final.
Veg23, creciendo bien.
Veg24, se mide la temperatura de las hojas 22°C y se compara con la temperatura del indoor 23°C, con una humedad de 50% RH, la calculadora arroja un valor de VPD=1.24 kpa, lo que está dentro del rango óptimo.
Veg25, hoy toca una pequeña defoliación y probaré también hacer un último apical en 2 o 3 plantas a modo de prueba.
Al final, tomé un gran riesgo, y hice varios apicales extra y una defoliación más grande de lo que tenía en mente, tengo fe que resultará bien 😎👌
Veg27, riego con 0.8 EC y pH 6.0, drenaje de 6.0 pH y EC 2.0, se están alimentando y creciendo bien, quedan casi 2 semanas para pasar el fotoperiodo a 12/12, espero que crezcan suficiente para esa fecha.
Veg28, un par de hojas de 2 plantas presentan mordidas tipo oruga, revise y no encontré nada, aplique spray insecticida, espero no siga pasando. A parte de eso siguen creciendo bien, quedan un poco más de 10 días para el paso a 12/12.

Likes
30
Share


@TightNugs
Follow
Plants looking awesome and packing final weight.Flush and fade starting Tuesday for plant 1 for 5 days with plain water.
Plant 2 needs another 2 weeks so will be moved elsewhere till I can get more nutes into her.
No issues through grow so happy days
💪🤞🏴🍁
Breeder-White label purple bud auto x2
🍁🍁🍁
Light-Voost VST 120 veg VST 240 for flower discount code- TightNugs
https://voost.com/
🍁🍁🍁
Update 06/12/21
Plant 1 harvested,pulled 26.2oz wet
Plant 2 still in flower


Likes
55
Share


@Max1973
Follow
Day 79 - Another week passes, not much to post, normal feeding, 1000 ppm 6.2 PH, normal lights,
the girls are fattening up nicely...... 😎
Day 84 - some pics/vids.... pics of a Test Bud (ready for curing)......doing some experimentation..... read up about drying and curing,
but i don't have a set method, so test abit..... never grown bud before..... 👍
my tent is really small, i think 50x120x160 or something... and it's tight in there, i have no other source of
herb, so i'm going to start getting into the smaller one, and focus the light on the larger one..... i've been trimming and drying all during the grow....
there's really only enough room for the big one, and it's really squishy in the tent........ 😎


Likes
3
Share

@CaveGanja
Follow
I think she is done trichomes are all milkey and i go for a few days on vacation so i cant water the plant
other plants are fine but she needs water all 1-2 days.
The only thing that keeps growing are foxtails on every bud.
I give her 5 days more but i think trichomes wont change a lot and i dont want risk budrot for some foxtails.
Likes
2
Share

@LegacyGrow
Follow
Englisch version below
Tag 70 Grow:
Tag 15 Blüte:
Bis auf die RLF% läuft alles wie geplant. Nach dem Lollipopping schafft es der Entfeuchter nicht mehr unter 65% - entsprechend wurde die Umluft durch einen zusätzlichen Ventilator ergänzt.
Alle 2 Gießvorgänge bekommen die Ladies Composttea und jeden ersten Vorgang Wasser mit etwas angepasster Nährlösung.
Die Trauermücken breiten sich auch stark aus - Gestern wurden mit dem Tea auch Nemathoden gegossen - Zwar sind die Tierchen in der Blüte nicht mehr sooo schlimm (Vorallem für junge Pflanzen mit schwachen Wurzeln gefährlich) - aber Wer will schon Fliegen im Endprodukt.
Wie im Video zu sehen ist - habe ich die Stärksten Triebe der linken Pflanze ge-supercropped - der Strech hat gewonnen - das Zelt ist ausgereizt.
--------------------------------------------------------------------------------------------------------------------------------------------
Day 70 – Grow
Day 15 – Flowering Phase:
Except for relative humidity, everything is running as planned. After the lollipopping, the dehumidifier is no longer able to reduce RH below 65%, so air circulation was increased by adding another fan.
Every second watering the plants receive compost tea, while the first watering in the cycle is plain water with a slightly adjusted nutrient solution.
Fungus gnats have also been spreading significantly. Yesterday, nematodes were applied together with the tea. While these insects are not as problematic during the flowering stage (they are mainly dangerous for young plants with weak roots), no one wants flies in the final product.
As can be seen in the video, the strongest shoots of the left plant were supercropped. The stretch has won — the tent space has been fully utilized.

Likes
16
Share


@Mrs_Larimar
Follow
2022-10-09
Everything is fine here
with the 2 Plants
one is growing in aglassbottle formed like a Skull,
the other one into a Skullshaped Cup
Training will start next Week, Plants established very well
and working on 4 th Node
Still having problems with Video upload
website for for my Fertilisers:
https://greenbuzzliquids.com/en/shop/
Code: mrs_larimar
Breeder Info:
👉Black Sugar is an indica dominant hybrid of Black Domina, L. A. OG and Critical.
It has kept the medicinal properties of L. A OG, a good flowering rate on the Black Domina lineage,
and the compact size of the classic Critical strain. With its small growth, the strain produces large yields
of up to 600gr/m2 on bushy branches. The buds are very dense and stinky.
Black Sugar has a high THC level. The variety has a fruity citrus aroma. Dense smoke gives the effect of relaxation and body buzz.
Good for Smoking before going to bed. It can become one of your favorite Seedsman strain
Genetics Black Domina x L.A OG x Critical
Harvest 450 - 500 g/m²
Flowering 50 - 55 days
THC 20.0%
CBD 1.0%

Likes
4
Share


@Flavors
Follow
🌱 Sticky Broccoli – Grow Diary 🌱
Week 5 | Vegetative Stage | Coco + Perlite
Sticky Broccoli continues strong vegetative growth this week 🚀
Canopy is thickening with multiple healthy tops forming 🌿
Leaves remain a vibrant green with no visible deficiencies.
Branching is becoming more aggressive and the plant is widening.
Stem structure is strong and supporting new growth well 💪
Roots should now be filling the current container
Likes
7
Share


@eldruida_lamota
Follow
Vamos familia actualizamos la cosecha de las gelato Olandese de Dutchfem .
La verdad que el secado muy bien 7 días en Malla y a los botes, 40% humedad y 24 grados es la temperatura ambiental que han tenido en el secado.
Por lo demás de miedo os la recomiendo.
Gracias a DutchFem, Agrobeta y Mars hydro , sin ellos este proyecto no sería igual 🙏.
Agrobeta:
https://www.agrobeta.com/agrobetatiendaonline/36-abonos-canamo
Mars hydro:
Code discount: EL420
https://www.mars-hydro.com/
Buenos humos.
