
Likes
Comments
Share


@Kagesan
Follow
Hello Grow friends.👋👋
➖➖➖➖➖➖➖➖➖➖➖➖➖➖➖➖
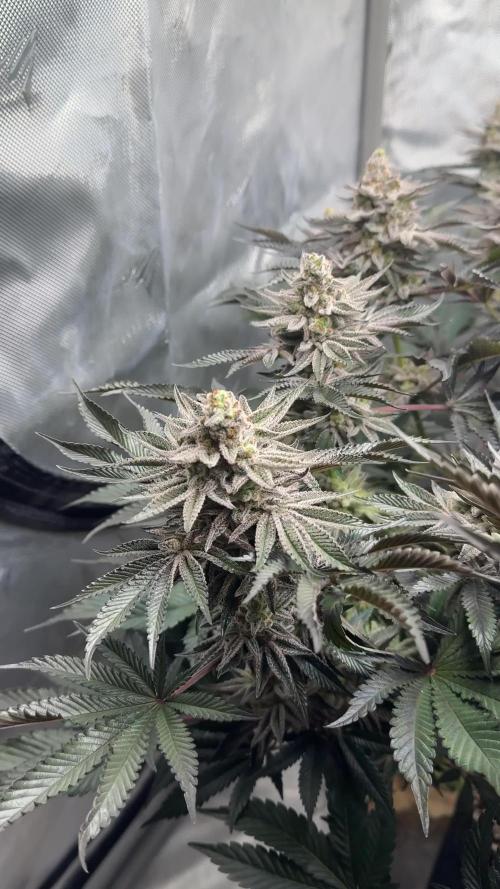
The little one is now in the flowering phase.
She is developing into a pretty little bush. I'm curious to see how much more height it will gain.
➖➖➖➖➖➖➖➖➖➖➖➖➖➖➖
💚💚

Likes
1
Share


@BillyBillyCultivations
Follow
3 seeds germinated in glass of water tap root came within 24hrs potted im


Processing
Likes
31
Share


@CerebroVerde
Follow
day 35:
finally they are flowering,
they are drinking 1 liter every 2 days
today i broke the main cola of the TM im still crying, use duct tape to repair, will try to update the recovering


Likes
11
Share


@BalconyWiTCH
Follow
Week 12 9th of may:
I cut off the main cola of the Green Gelato and left smaller buds to grow more.
Hulkberry is Sativa dominant so I will give her more time
Royal Gorilla is almost ready
Likes
11
Share


@Thigh
Follow
- she was plant instant after germination.
Pott size 11 Liter. Soil is Biobizz Allmix. 👨🏽🌾
-Habe sie sofort nach dem keimen in den Eintopf gesetzt (11 Liter ). Substrat ist Biobizz Allmix. 👨🏽🌾
Likes
14
Share

@HanzzCZ
Follow
Servus, šestnáctý týden, osmý týden v květu, máme za sebou. ✌️🌼
Tento týden holka dala další boost do šišek. 👌 Jantar se už objevuje na listech, na palicích jen místy. Ještě chvilku a bude sekec mazec! ? sedmilitrový zálivka upravena na dozrání v dávce 2ml/l základu.
Uvidíme jak to bude vypadat o víkendu! 🍾🍾🌼
Ať se daří! ✌️kdyby měl někdo nějaký typy/rady uvítám váš komentář. 😂🔥
EN
____________________________________________________________________________________________________________________________________________________
What’s uppp! Week sixteenth (eight in bloom) is behind us.✌️🌼
This week the girl pushed the buds even further. 👌
Amber is already showing up on the leaves, while on the buds it’s only appearing here and there. Just a little longer and it’ll be chop chop time! ?
The 7-liter watering was adjusted for ripening with a 2 ml/L dose of base nutrients.
We’ll see how she’s looking over the weekend! 🍾🍾🌼
Good luck every one! ✌️
Any tips or advice are always welcome 😂🔥

Likes
16
Share


@GreenMesa
Follow
En esta semana día 33 de vida de las cepas aplique la técnica de cultivo súper cropping para aprovechar la iluminación 😛🇦🇷🇦🇷

Likes
188
Share


@DeepWaterGrower
Follow
WEEK 3 FLOWERING = 28/4/2023 (DAY 15 FLO) ---> 4/5/2023 (DAY 21 FLO)
[DAY 64 - 15° FLO] - 28/4/2023
⚡ - TS1000: 40 cm distance / 100% dimmer = 150 watt;
⌛ - 12/12 light cycle;
🌡️ - 27° C - 50% RH during light / 23° C - 58% RH during night;
📑 - PH 5.9 - EC 2.3 in DWC;
🍔 - For the third week of 12/12 I decided to decrease N a little and increase P and K: Micro 2ml/l, Grow 1.8 ml/l, Bloom 2 ml/l;
💧 - Solution in DWC is getting warmer: 22° C;
🥅 - I'm using the second SCROG net to even out the canopy. I bent the topmost branches and spread the branches further towards the sides of the box. The branches are still flexible enough to bend without issues;
🌱 - No marks on leaves, the plant has a nice green color. There are at least 30 flowering sites popping out of the second SCROG net. As already said, it's my first time with photoperiod and I don't know what to expect in terms of stretch, I'll try to manage it as best I can. ↕️ 43cm;
🔜 - Bought and mounted my new 3x3 tent. Next time I'll use that with my 2 TS1000!
[DAY 65 - 16° FLO] - 29/4/2023
🌡️ - 27° C - 55% RH during light / 23° C - 55% RH during night;
📑 - PH 5.8 - EC 2.3 in DWC;
💧 - Keeping an eye on the PH and EC values I noticed that in this 50 liter configuration the EC is very stable while the PH slowly drops day after day. I manage it don't using PH down when I top up. In this way I bring the PH levels to 6.1 and need to correct it after 3 or 4 days;
🌱 - Look at the day 65, done? Now go to last week and look at day 60. In 5 days the plant has filled the box again, amazing!
🌸 - Pre-flowers are forming, between tomorrow and the day after the flowering sites will be full of white pistils.
[DAY 66 - 17° FLO] - 30/4/2023
🌡️ - 26.5° C - 60% RH during light / 22.5° C - 57% RH during night;
📑 - PH 5.8 - EC 2.3 in DWC;
✂️ - Removed about 20 big fan leaves;
🌸 - Flowering sites are filling up with pistils.
[DAY 67 - 18° FLO] - 1/5/2023
🌡️ - 26° C - 64% RH during light / 21.5° C - 60% RH during night;
📑 - PH 6 - EC 2.3 in DWC;
🌸 - Pistils everywhere!
[DAY 68 - 19° FLO] - 2/5/2023
🌡️ - 26° C - 65% RH during light / 21° C - 65% RH during night;
📑 - PH 5.8 - EC 0.4 in DWC;
💧 - Flush for 24 hours, tomorrow she'll get full flower blend;
🌱 - Plant got 6 cm in the last 48 hours.
[DAY 69 - 20° FLO] - 3/5/2023
🌡️ - 26° C - 65% RH during light / 21° C - 65% RH during night;
📑 - PH 5.8 - EC 2.4 in DWC;
🍔 - After 20 days, DWC change: 40 LT flower blend. Silic (1ml/l) + CalMag (1ml/l) + Micro (2ml/l) + Grow (1ml/l) + Bloom (3ml/l) + Fulvic (1ml/l) + Atazyme (3ml/l). Added about 100ml Ph down Flower by Canna, to be honest I don't think it's very effective, I had to use a lot to lower the PH and I hope it's stable. Only plus side: is just phosphoric acid and is very useful in this phase!
💧 - Not a single dead root at the bottom of the DWC, I hope the old roots are at least rotting away. On the bright side, they're not causing any problems;
🌱 - Plant looks pretty fine, perhaps there is some slight light burn. I'll check tomorrow and, if necessary, raise the lamp by a few centimetres. The branches are still quite flexible but I have no more space to bend them 😅
[DAY 70 - 21° FLO] - 4/5/2023
🌡️ - 27° C - 60% RH during light / 22° C - 65% RH during night;
📑 - PH 6 - EC 2.4 in DWC;
🌱 - Week 3 flowering is done. Big change this week! I don't know if I'm talking bullsh*t, but since the switch I have noticed an important change in the leaves, they seem much thinner and longer, typical of Sativa dominant plants, and I like it!


Likes
15
Share


@Sevikannabis
Follow
Increíble como esta florando esta gorila☺️ La aparición de terpenos estaba al llegar
Likes
20
Share


@Master_weeda
Follow
Bonjour à tous les padawans et maîtres jedis
Pour cette semaine ce sera le début du rinçage j'arrose donc la plante avec 5 fois le volume du pot avec de l'eau ph6.3 pour bien drainer la terre
Les prochains arrosages s'effectueront normalement et ce pendant une dizaine de jours
Le rinçage ce passe bien le pot est vite devenue léger (3 jours) je continue à arroser à l'eau claire toujours avec un quart du volume du pot soit pour celui ci environ 40 centilitres
Au jour 76 la sénescence commence à bien ce voir
Likes
126
Share


@WhiteWidow
Follow
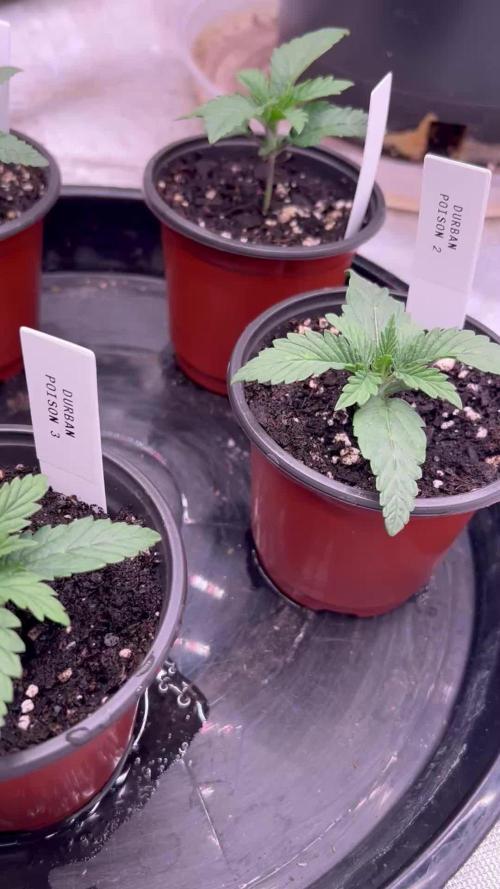
You can find tbe first week of all girls on my profile, second week is missing coz its just boring and now i start week 3 so its day 15 today from placing seeds to germination.
Uploaded a video of their habitat, i still wont name each one indifidually coz i still didnt choose winners / keepers.
Unfortunatelly i have a bit low RH for this stage of growth but they obviously dont mind, i spray them twice a day, no burns from spraying with lights on, no electroshocks caused by spraying so all good now.
I tried it all enough to be able to say i cant be assed anymore :D
Since @growdiaries are not keen on resolving a problem with uploading each pic individually on androids, i will keep one diary for all girls, dont even mind not being able to compete in dom.
Stay tuned these girls will rock.


Likes
2
Share

@Kcnvp
Follow
Week 2 veg.
Mixed 3 drops of Botanicare cal-mag plus and 10 drops of Flora Nova Grow into 500ml of water. Ph’d the water to 6.5. Based on the general hydroponics feed chart, it should come out to about a medium strength feed.
Still happy with the growth under the 24hr schedule.

Likes
3
Share


@Joaka
Follow
como preventivo aplique tierra de diatomea via foliar. solo realice un apical por variedad de semilla ya que las otras aun según mi criterio les faltaba. se espera realizar la otra semana apical en las otras dos para dejar 2 sin manejo para comparar.
Processing
Likes
1
Share


@MG2009
Follow
08/18/2019
Hope for some decent growth in next couple of weeks.🙏


Likes
22
Share


@BruWeed
Follow
☘️04/11 - Empieza su tercera semana en Etapa de crecimiento.
☘️Su crecimiento es muy notorio de una semana a otra, esta creciendo fuerte y su desarrollo es muy bueno. Esta creciendo de forma correcta sin ningún problema.
☘️Este diario es para participar en el sorteo de "Best Rarest & Smallest Pot by seedman".
☘️Esta es su última semana en Etapa de crecimiento, ya el 09/11 comienza en Floración.
☘️Estos días seguiré subiendo más imágenes de como viene.

Likes
5
Share


@Nemessis
Follow
I think the green is a bit very dark. I did not increase the dose of nutrients, I stay on the same doses. LST on my baby's. Another good week of growth and I'm going into flowering