Likes
Comments
Share


@Dunk_Junk
Follow
Wow well she has jumped up!!
A week ago I scraped off a couple of inches of the soil/perlite mix and replaced it with brand new compost. My grows for the last few months have been unimpressive to say the least and I've been trying to figure out the problem. I've had a few theories but the one I've settled on is my soil. I think I need to change it much more often than I have been doing previously.

Likes
4
Share


@Huckleberry39
Follow
She is starting to come together finally. Ive never seen a plant like this one. But, I love an underdog. She is getting some nice trichome production already, which is always good. Taking a full dose of nutes and loving it. So far so good. I am loving 420 Fast buds!!!


Likes
82
Share


@Streptokok
Follow
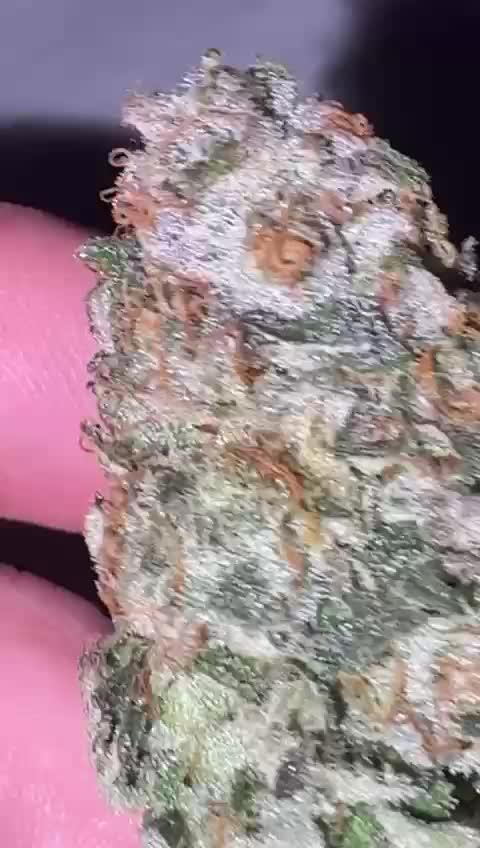
Purple Buds are amazing.I could not be happier with their color, buds are chunky and frosty, the smell is indescribable. It reminds me a certain sweet from the childhood :) and I bet it will taste even better. Later, I will show some more pictures for Industrial CBD which is doing fine. I will move Purple Buds tomorrow out of my tent for two days in the darkness and then - harvest time :) CBD has got one more week to go I think. Happy growing to everyone.


Likes
11
Share


@YourBro
Follow
🤤🤤🤤 Finishing flowering... Five days gave her Overdrive💪💪 , and the last two days - already started with flushing with Flawless 💦
The buds became STONE 🗿🗿 The most of the trichomes became MILKY 😍😍
The smell has intensified 👃 All the time before this week I felt a SOUR 🍋🍏 smell, and literally, this week I felt that a VERY SWEET 🍓 aroma was added, and sour and sweet mixed in a FRUITY mix 🍌🍊🍇🍋
The last two days the baby has become ALL SUGAR 🤤🤤, just like a very sweet candy. Just a VERY-VERY SWEET 😁😁
The final week is ahead - the week of flushing 💦💦
Likes
11
Share

@SecretHerb-Sanctuary
Follow
Es ist vollbracht.
Die 21 Tage seit Umstellung auf 12/12 sind vorbei
und die Babys sind untenrum ein wenig kahler und sind insgesamt etwas luftiger.
Ich habe beim Lollipopping nicht ganz so viel weg genommen,
da die Pflanzen ja so oder so schon nicht all zu groß geworden sind.
Außerdem soll ja auch noch ein bisschen was für die Weiterverwertung übrig bleiben :)
Die Blattmasse war sehr dicht, deshalb habe ich einiges weg genommen,
um die Luft besser zirkulieren zu lassen und so dem Schimmelrisiko vorzubeugen.
Jetzt können sie sich komplett auf die Entwicklung und den Boost der wichtigen Buds konzentrieren
und all ihre Kraft dort hineinstecken um schön dick und fett zu werden.
Das war dann vorest die letzte große (geplante) Stressaktion, die sie durchmachen mussten.
Bin gespannt wie die Ganja Farmer Ladies den Eingriff wegstecken und wie stabil die Genetik wirklich ist...

Likes
10
Share


@3lementa1
Follow
The colas keep filling out and getting longer and smell amazing. It's been warmer and more humid outside so RH in the tent has gone up. I added a mini air purifier I wasn't using (no ozone) as an extra precaution against mildew.
I woke up in the middle of the night on Monday and realized that the air purifier has a light on it so I got up and turned it off. I was worried that I'd messed with the dark cycle so I left them in darkness for an extra 2.5 hours.
My cool tube fan fell off the next day, onto my plants. They look undamaged. I taped it up again and set up a safety wire like the filter and fan have. I need a better solution for next cycle.
The buds are beautiful and having an even canopy is great. It's hard not thinking about the end result. The buds still look small compared to the big colas of a traditional grow shape but there's still a couple weeks left. There is some bud formation under the canopy but it's a little light. The tops of the colas are fat but short on the 7 gallon plants and taller and thinner on the 5 gallon plants.
I did leave a couple offshoots on that developed in late veg/early flower. By the time I caught them, I felt they were too mature to chop and I thought they helped fill out certain areas. But those ones have fewer bud sites and tend to be just a cola on a branch that shoots straight up which is still good. I do wonder if less crowding would have given me bigger buds, but I think it has more to do with pot size.
This is week 7 of flower. I switched to half strength nutes and started adding fancy molasses (18ml/gallon). I broke my pH tester and didn't replace my SCROG net until after I finally watered the next day so the canopy changed a bit. I took the opportunity to rearrange the plants a bit.
Crystal formation increased a crazy amount the day after I started adding molasses. I think I'll keep adding molasses even during flush.
The CBD Blue Shark has this really beautiful white glow. The pistils are very strong and white and the trichromes reflect back this silver light. The leaves are a nice semi-glossy dark green which gives great contrast. It's just a beautiful plant.
The Wedding Cake has a lot more colour with lots of red hairs and some yellow tones in the pistils. The fan leaves are more prone to yellowing and death than the leaves on the CBD BS. The buds seem more structurally dense and are really working on these pyramid shapes that look like delicious orange and green snacks. The buds on the CBD Blue Shark are more symmetrical and kind of otherworldly like some kind of sea creature.
Processing
Likes
43
Share


@Eyeduno
Follow
Tried taking a photo with the lights on all you can see is a blur so ain’t no point in putting one up lol just lights off

Likes
10
Share


@I_roll_my_own_420
Follow
Net installed, last week of 18/6. I expect a lot of stretching starting this week, as a "pre-flower time" begins.

Likes
18
Share


@ApothecAries
Follow
Thank you everyone for following along ! This is it for this fine lady but I got some more beans to experiment with. See you guys another time ! It may be awhile before I get situated! I will be around though!
If you can show some support for a little project me and a friend came up with for each grow !!
https://www.youtube.com/watch?v=lhQWMl7kjLg&lc=UgwRIkWLHVSlsOJWXlx4AaABAg&ab


Likes
15
Share


@Nmatz
Follow
No disease & easy strain to grow so far (even for beginners)
Got some little balls in the lower buds sadly but the tase, smell & high are so epic that i dont care 🤪
Some friends described the taste as something like pepper, others as something like lavender, but hey, we smokin on killer weed :o
Lovely dense buds covered in trichs ty HSO

Likes
13
Share


@The_Good_Twin
Follow
6/18/22
Today starts week 5, and the beginning of the mid-bloom nutrients, step 3. Jackie has had a little explosion in growth the last few days, and is now standing 16 inches tall. She is currently positioned 14 inches below the light at 100% power.
She took half a gallon of water mixed with the following nutrients:
CALiMAGic - 2 ml
FloraMicro - 4.7 ml
FloraGro - 3.8 ml
FloraBloom - 8.5 ml
Floralicious Plus - 2 ml
Liquid KoolBloom - 2 ml
The pH was 6.2, and was not adjusted. She had plenty of runoff with a pH of 6.0.
The tent temperature was 86.9F, and humidity was 40%.
Jackie is doing wonderful, and her small size is growing on me when all of her tent mates are giants!
Happy growing everyone!
6/20/22
Jackie is doing awesome! She’s grown another 2 inches in just 2 days! She’s now 18 inches tall. I made a video log today, and I believe that I mistakenly said she is 19 inches, but I was incorrect. She’s 18 inches tall. No biggie, but I do like to be precise.
I defoliated her today, taking most of her larger leaves off to open more space for light to get to all her buds. This little auto is starting to grow on me with the ease of growing that she provides. She’s small, but still looks like she’s going to produce a decent amount of bud.
I’m still using the same level of nutrients as the previous note, so I’m not going to repeat them here.
The initial pH was 6.2, and was not adjusted.
Runoff was sufficient, and the pH was 6.1.
The tent temperature was 84.2F, and the humidity was 52%.
Things are going well in my grow room, and I hope the same for all of you. Happy growing everyone!
6/23/22
Despite my not giving her any attention for 2 days, Jackie is continuing to grow and develop her buds into pure goodness. At least I hope it’s pure goodness! She’s a new cultivar for me, and I’m looking forward to getting acquainted with her soon.
Jackie has grown another 1.5 inches in the last 3 days, and is now 19.5 inches tall.
She received half a gallon of water mixed with the following nutrients:
CALiMAGic - 2 ml
FloraMicro - 4.7 ml
FloraGro - 3.8 ml
FloraBloom - 8.5 ml
Floralicious Plus - 2 ml
Liquid KoolBloom - 2 ml
The pH was 6.3, and not adjusted. She had plenty of runoff, with a pH of 6.0.
The tent is crowded, but she has her own spot and gets plenty of airflow. The tent temperature was 85.1F, and the humidity was 51%.
She continues to do well, which gives me joy. I wish joy upon each of you and your grow rooms!
Happy growing everyone!

Processing
Likes
32
Share


@Platinouuu
Follow
Saludos, por aquí mis hijas, que opinan amigo? Estoy muy deseoso de cambiarlas a floración. Buenos humos

Likes
5
Share


@GuroKC
Follow
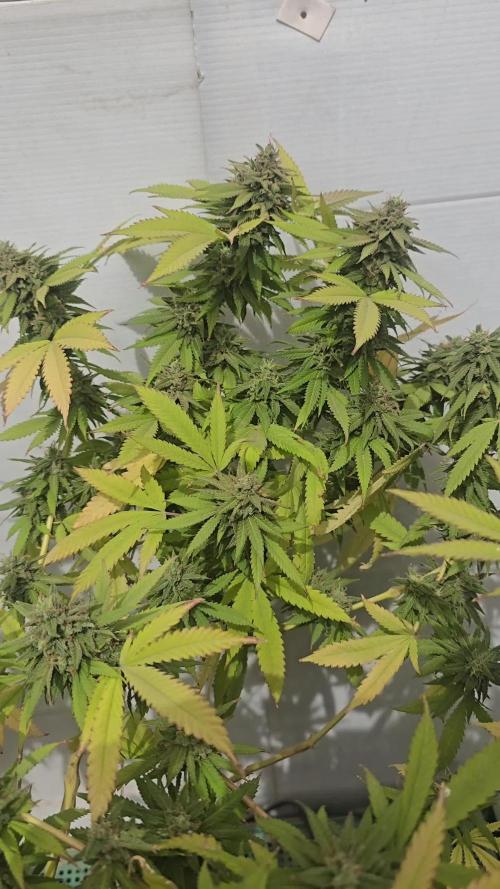
Week 7 and 8 in the bag. One more light feed then the flush. Fall colors are coming in nicely and they are starting to purple up. They seem to have wanted a bit more water this week, had one plant start to droop before the watering but everyone perked up. Last dose of Great White microbes this week as well.


Likes
10
Share


@DeepRootsGrowTrees
Follow
APRICOT GORILLA AUTO /
GANJA FARMER
Week #9 OVERALL
WEEK #3 FLOWER
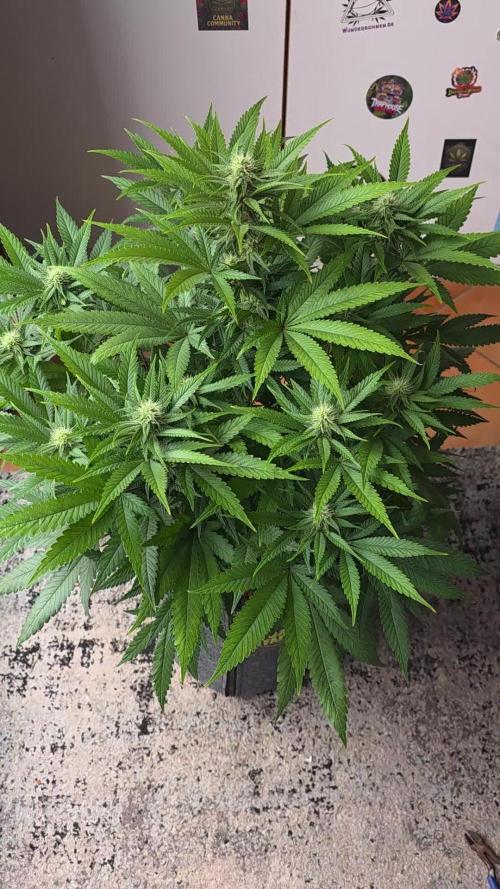
This week this lady had no issues and continues to shine her buds are forming nicely and she's looking healthy 👌!! Stay Growing!!
Thank you for stopping by and taking a look it's much appreciated!!
Thank you GANJA FARMER!!
APRICOT GORILLA AUTO / GANJA FARMER
Processing
Likes
5
Share


@CityFarmer
Follow
Hello everyone,
Not much to say about this girl. This week I started giving her some nutrients so lets see how she turns out now...
See you guys next week.. 🤘🤘👊👊👊
Likes
115
Share


@DogDoctorOfficial
Follow
Harvesting the Bounty of Cherry Cola Auto
Dear fellow cultivators, we've reached the triumphant culmination of Cherry Cola's journey as we delve into Week 13 – Harvest Time! Join me in celebrating the fruition of our labor and the bountiful rewards awaiting us as we harvest the radiant buds of Cherry Cola Auto.
As the sun sets on Week 13, the air is filled with anticipation and excitement. Harvest season has dawned upon us, marking the culmination of Cherry Cola's remarkable journey from seed to harvest-ready beauty.
In the heart of the garden, Cherry Cola stands tall, her branches heavy with the weight of abundant buds. Each bud is a testament to her resilience, her vigor, and the care and dedication invested in her growth.
With meticulous care and precision, the time has come to harvest Cherry Cola's radiant buds. Each cut is made with reverence, ensuring that only the finest, most pristine flowers make their way into our stash.
As the buds are trimmed and cured, an aromatic symphony is unleashed, filling the air with the tantalizing scent of Cherry Cola's terpene-rich profile. It's a sensory experience like no other, a celebration of nature's bounty.
As we gather the fruits of our labor, let us take a moment to reflect on the journey that has brought us here. It's been a labor of love, a testament to patience, perseverance, and the boundless wonders of nature.
In conclusion, let us raise a toast to Cherry Cola Auto – a true champion of the garden, a symbol of resilience, and a source of boundless joy. May her harvest be plentiful, her flavors unforgettable, and her legacy enduring. Until next time, happy harvesting, fellow enthusiasts! #CherryColaHarvest #BountifulBuds #GrowersPride
Nutrition: @aptusholland @aptus_world @aptus_
Love, Care, and Attention: @dogdoctorofficial
As always, thank you all for joining me on this journey, for your love, and for it all. My horticultural odyssey would never be the same without you. Your love and support are cherished, and I feel both honored and blessed to have you in my life
Friendly reminder all you see here is pure research and for educational purposes only
Growers Love To you All 💚 💚 💚