Likes
Comments
Share
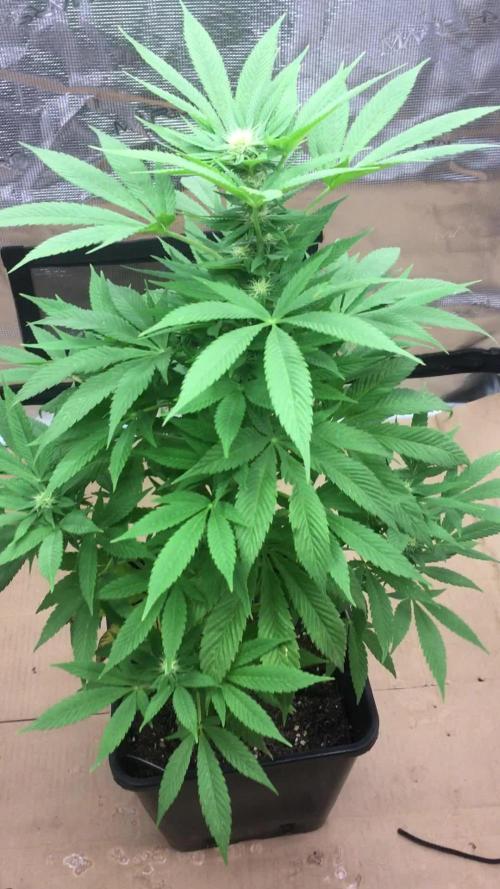
Second week of rinsing. The trichomes have finished developing. And I like the appearance of the plant. I place the plant in the dark for around 5 days. Period during which there will be no watering to allow the soil to dry and be able to Cut. See you in a few days!
Likes
5
Share
@Ensign420
Follow
Week 02 Introduction This week has been a bit of a struggle. Had my first experience dealing with slime and brown algae. But I think adding enzymes and increasing the beneficial bacteria helped to fix the issue. Also experienced nutrient burn for the first time. My nutrient solution strength got as high as 671 PPMs. So backed it down to about 430 PPMs during the end-of-week reservoir change. Also cut Hydroguard (expired?), CaliMagic, and Superthrive from this grow. Now she's still stunted, but is starting to recover. Hopefully... [START OF WEEK 02] Day 01 - Monday - 08/10/20 - Total Days: 008 ----------------------------------- - [0830]: Still looks a bit yellow. But getting larger! --- Solution strength was at 248 PPMs. --- Just topped off with a bit of distilled water --- PH went up to 6.1 so PH'd down to 5.8 --- Ran the top feed for a bit to wet the hydroton. - [2130]: She's looking even more yellow now. --- Even the new leaves are really yellow. --- Decided to add more base nutes. --- Added 4ml of Sensi A --- Added 4ml of Sensi B --- Now at about --- Solution Strength went up to 304 PPM. --- PH was at 6, --- Also raised the water level a bit more. --- I really hope it's a nutrient deficiency and not an over-watering issue. --- Please live! Day 02 - Tuesday - 08/11/20 - Total Days: 009 ----------------------------------- - [0830]: Looking less droopy. But still yellow. --- Decided to do a reservoir change. --- 4.5gal of distilled water --- 8ml of Sensi Grow A --- 8ml of Sensi Grow B --- 8ml of Voodoo Juice --- 4ml of B-52 --- 4ml of CaliMagic --- 4ml of Hydroguard --- 4 drops of Superthrive --- PH'd down to 5.8 --- Solution strength: 302 PPM --- Since I didn't want to risk over-watering the rockwool, I did not to do a top feed, may do one tonight after the sleep cycle (lights are still set to go off at 10am and back on at 4pm). --- As I was doing a reservoir change, I noticed that the tubes and bucket were a bit slimy. Didn't really stink or anything. Is this normal? Maybe due to the Hydroguard and Voodoo Juice? --- I hope she gets better soon! - [2215]: Getting larger! But still yellow. --- Also can see a root growing through the net pot! Tiny little thing but it's there! Will have to start dropping water once more appear. --- After looking over a few DWC diaries using AN nutes, seems like my solution strength is still too low. Most around this stage average around 500 PPMs with about 4ml per gallon. --- Top fed for a minute to wet the top of the hydroton. --- Solution strength went down to 263 PPM. --- Added 8ml more of Sensi A --- Added 8ml more of Sensi B --- Now base nutes are at 16ml for 4.5 gal of water. --- PPMs went up to 411. --- Still lower than 500 PPMs, but that's okay. --- PH was at 6. Not sure if I should adjust PH using AN nutes. So going to not ajdust unless PH goes above 6.1. Day 03 - Wednesday - 08/12/20 - Total Days: 010 ----------------------------------- - [0830]: Looks like more root growth! --- She still looks yellow. But leaves are perky. --- PH was at 6.2 so lowered down to 5.8. --- Solution strength was at 394 PPMs --- Since roots are still growing, I decide to lower the water level a bit. Now water level is a bit below the net pot. - [2200]: Root is getting longer! --- Slime is returning. Not sure why. --- Solution strength: 357 PPMs --- PH: 6.1 --- Decided to add an enzyme along with more beneficial bacteria to hopefully cure the slime. --- Added 16ml of Sensizym --- Added 5ml of Hydroguard --- Added 8ml of Voodoo Juice --- New solution strength: 430 PPMs --- New PH: 6.1 --- Top fed for a minute. --- This slimy residue is really freaking me out! I hope the added enzymes will help eliminate the slime. --- Going to do a full reservoir sterilization/nutrient change over the weekend. Please survive until then girl! Day 04 - Thursday - 08/13/20 - Total Days: 011 ----------------------------------- - [0930]: I think the enzymes worked! There is little to no slime now! --- Although I think the root was also dissolved in the process. It's now just a little stub sticking just below the net pot. The enzyme is also suppose to dissolved dead roots too but guess that root was too weak? Not sure what happened there. But I think the slime is cured! --- Solution strength went down to 395 PPMs. Decided to add more base nutrients. --- Added 8ml of Sensi A --- Added 8ml of Sensi B --- Added 4ml of B-52 --- Solution strength went up to 598 PPMs. --- PH was at 6.1 --- As long as the PH is between 5.5 and 6.3, I'm not going to use PH Up or Down. But still will monitor PH levels. - [1715]: Checked up on her after her nap and shes looking alive but stunted. But no slime! --- Decided to add some sugars to help maintain the enzymes and beneficial bacteria. --- Solution strength was at 587 PPMs. --- PH was at 6.2 --- Added 8ml of Bud Candy --- Solution strength went up to 671 PPMs. --- PH also went up to 6.3 --- Lowered water level a bit to hopefully promote more root growth. --- Top fed for a minute. --- She is getting bigger, but still looks yellow. Day 05 - Friday - 08/14/20 - Total Days: 012 ----------------------------------- - [0915]: Leaves look a little burnt on the tips. Still no slime. --- Going to back off on the PPMs to hopefully fix the nutrient toxicity. --- Solution strength was at 632 PPMs --- PH was at 6.3 --- Added/Removed water until PPMs were at 536. --- PH was still at 6.3 --- Raised water up a bit, then top fed for a minute. - [2200]: Looking better. Still yellow though. --- Solution strength: 514 PPMs --- PH: 6.5 --- Added PH down. --- New solution strength: 518 PPMs --- New PH: 5.2 --- PH was kind of high. So decided to PH down. Had to use quite a bit to bring it down. But eventually got it to drop down to 5.3. A little low, but so far, the PH has always gone up so wanted to start it really low. --- Ran the top feed for a minute to re-saturate the top of the hydroton. Day 06 - Saturday - 08/15/20 - Total Days: 013 ----------------------------------- - [0830]: She looks stunted. leaves are still yellow. --- Solution strength: 514 PPMs --- PH: 5.6 --- Top fed for a minute. --- Not sure what to do at this point. Going to do another reservoir change soon. Hoping she lives until then. - [2145]: Looking pretty much the same. --- A bit of slime has returned. Since I've been diluting the nutrient solution, the enzyme ratio has dropped. So I guess this is expected. --- Also noticed that slime build up was on the air-stones. Never really checked the stones so not sure how long that has been there. Looks brown too, which can't be good. --- Going to do an H202 sterilization of the system (minus the net pot) tomorrow so did not add anything. --- Lowered the water level to below the net pot. --- Then top fed for a minute. Day 07 - Sunday - 08/16/20 - Total Days: 014 ----------------------------------- - [0900]: STERILIZATION DAY! --- Decided to skip today's night cycle for a deep clean. --- I'm hoping that skipping a night cycle won't be too stressful. --- Temporarily moved her to a new bucket. --- Used about a half of gallon of straight distilled water to flush out the net pot. --- Drained the system and wiped up all the brown sludge. Also removed the air stones and cleaned up all the goo. --- Filled the system with 2 gallons of distilled water and at least 30ml of food grade hydrogen peroxide (35% strength). --- Yea its a lot, but since I'm not going to sterilize the system overnight, I went with a really high doseage. Basically I kept adding until I started to see little bubbles start to form. --- Then I ran the water pump. - [0915]: Boiled the air stones in tap water for about 10 min. Then reconnected them to the airlines. --- I let the air stones and hose soak in the sterilization solution for about 5 minutes so the peroxide can absorb into the stones. Then ran the air stone to help mix and agitate the solution. --- Occasionally, I'd repeat the process of turning the air pump off for a few minutes to let the stones soak. - [1000]: Covered the top two row of holes of the net pot with some aluminum tape. Hopefully this solves the light leaking in through the hydroton. - [1200]: Used an old toothbrush and scrubbed the pump clean. Then drained the system. --- Refilled with more distilled water and peroxide. Again added a lot. --- Ran system again to sterilize even more. - [1530]: Drained the system and refilled with distilled water to rinse. --- Ran the system for a few minutes, then drained and rinsed again. --- Did this a few more times over about an hour. - [1630]: Added 4 gallons of fresh distilled water. --- Added 15ml Sensi Grow A --- Added 15ml Sensi Grow B --- Added 12ml of B-52 --- Added 16ml of Voodoo Juice --- Added 16ml Sensizym --- Solution strength was at 430 PPMs --- PH was at 5.6 --- I was going to add Hydroguard, but I think the bottle is expired. Since 2017 or 2018!? I think Hydroguard is good for up to 2 years from the date on the bottle or 6 months after opening. So not going to use from now on. I wonder if this could have contributed to the slime build up. --- Also removed the CaliMagic and Superthrive too. Going to only use AN products to eliminate the chance of incompatible nutrients. --- Placed her back in the bucket and top fed for a minute. --- Here's hoping for the best. Going to let it ride until morning! Please feel better! [END OF WEEK 02]
Likes
7
Share
@Redweasel
Follow
Tent Entry Time-85 minutes Total for Week-85 minutes Removed straw mulch from each container & soaked each in separate containers filled with 1/2 gallon reservoir water mixed with 1/2 tsp each of coconut water powder, aloe powder, 1/4 tsp quillaja & recharge. Using a flame sterilized utility knife, removed all mature fan leaves, beginning from the bottom of each plant, working upwards. Three clones taken from each plant. Topped both main stems of each plant above the third node, removing everything below. Bud clips attached to each branch, spreading at 90° angles. All removed plant material salad chopped, mixed with 4 cups of original custom soil blend & a handfull of Kashi Gold, returned to respective container. Hand watered each container with 1/2 gallon 6.5 ph 13ppm reservoir water mixed with 1/2 tsp each of coconut water powder, aloe powder, Azos, & 1/4 tsp quillaja saponaria extract powder. Wetted & soaked straw much returned to respective container. DLI-30 VPD-0.90 -Expression #1- Week Prior Height-5" Width-14"×13" Pre-Cut Height-9.5" Width-25"×20" Post Cut Height-5" Width-9"×6" -Expression #2- Week Prior Height-6.5" Widht-12"×11" Pre-Cut Height-9.5" Width-22"×17" Post Cut Height-3" Width-8"×7"
Likes
18
Share
9/18: New week...fed with Boomerang and Kangaroots 9/19: Applied Axiom harpin proteins and boomboom spray 9/20: Fed full strength TPS One...decent growth on both, but the small one seems more than just a couple of days behind. 9/21: Tucked a few leaves and took some photos and a video. Looking good. Just a couple more days of 24/0... 9/22: Switched out the 560w of 5000k CCT lighting for 720w of 3000k CCT lighting and set the timer for 12/12. Decided against 13/11 with emerson effect...trying to save a few bucks on electricity. I'm keeping the lights at 30" from the tops for a day or two. 9/23: The girls loved their first night of sleep...so perky!
Likes
4
Share
Ya estamos en plena floración y con las luminarias a max potencia... Evidentemente el aire acondicionado también está trabajando durante la fase de encendido. Flowa-Bloom es la estrella de los nutrientes a incorporar, pero todos son importantes... Así que sigo la tabla de fertilización de JUJU Royal al pie de la letra. Eso si, primero humedezco bien el sustrato con agua, para aprovechar bien la solución con los nutrientes y que no filtre por las macetas textiles. Riego cada cuatro días.
Likes
25
Share
Not every plant turns into a perfect showpiece — and honestly, this Critical run was a bit janky from start to finish 😅 She never really grew evenly, reacted strangely to feeding at times, and definitely kept me guessing throughout the whole cycle. But despite all the weird growth patterns and little setbacks, she still made it to harvest day covered in frost and carrying that classic heavy Critical aroma. This grow was a good reminder that not every run has to be flawless to be worth it. Sometimes the messy plants teach the most. Learned a lot about patience, recovery, and just letting the plant do its thing instead of forcing perfection. In the end, she still delivered some chunky buds, beautiful resin production, and another valuable lesson for the next round 🔥
Likes
5
Share
@Naujas
Follow
I visited her for the last time today, and I'm going on vacation, I'll be back in 3 weeks, I think she'll be ready :) I hope the weather won't rain :) so next time I think it'll be harvest time:).
Likes
2
Share
@XTheJX
Follow
After several methods of much appreciated advice I chose to:- 1. Cut off all the s**te 2. Let fully dry out. 3. Water only. 4. Lowered light. I had noticed a faint mark on inside of plant pot of which I had a previous grow (from clones, I only supplied the room) so topped soil up to that mark also. Quite happy with results
Likes
13
Share
@Lfuego22
Follow
It’s officially week 4 of flower. It’s day 36 since I flipped to 12/12 and day 25 since we began seeing flowers
Likes
Comments
Share
2/11: Now officially been 3 weeks since plant. Overall pretty happy with how things are going. I realized I had been slightly overwatering the plants a week ago, so I left them to dry a bit for 5 or so days, and watered them lightly yesterday morning. Will probably water them tomorrow, and this time I'm thinking of adding in a very light dose of nutrients for the first time. Overall, plants look fairly healthy. We have 2, maybe 3 phenotypes, one being super bushy and dense, the other less so but still fairly compact. The plants had been a bit droopy the last week, which is why I waited to water for a bit, but it seems they are perking back up slowly. The bushier phenotype also seems to droop a bit more. One of the plants is significantly smaller than the others, while still looking fairly healthy. Its somewhat on track in terms of number of fan leaves, it just doesn't have the vertical and horizontal growth of the others. My roommates said they kinda fucked up the roots when transplanting, so i'm hoping its just a bit stunted and will reel the others back in soon. Oh, and when I walked in the tent a few days ago in the morning, the temp was at 102f. I have no idea how it got to that, but it musn't have been for long because the plants seem fine other than maybe 4 tiny bleached spots on 2 of the plants. I'm hoping the plants get a bit leggier, as the new nodes under the bigger fan leaves are really struggling to get any light. I don't think I will do anything for now besides a very light dose of nutrients next feed, but might get into some lst, topping, and defoliage in the next week. Need to do some research to decide if we try mainlining, scrog, or other techniques. Light settings still the same also, might raise them a few inches in the next week. 2/15: Topped all the plants. Didn't have time to get lst material but will start that hopefully tomorrow or day after. Not sure if we should defoliate some of the upper fan leaves that are fully covering the new nodes coming in from under. Plants looked fairly droopy all day, I'm hoping its from underwatering, and i'm fairly confident it is. Watered them tonight, this time 0.75 gallons each, so almost double the amount of last time. Will probably stick to this amount for the next week or two. Still stuck to the same nutrient ratio: 5 tsp big bloom and 2.5 tsp grow big per 2 gallons (our watering bucket is 2 gallon). I think next feed will probably be straight water to flush the soil a bit, but not completely sure yet. Was also pretty confused as to why some of the pots had significantly more runoff than others. Hoping to continue to see growth, and less droop. The straggler is also finally starting to speed up a bit. Most plants are around 8-9 in tall besides the straggler, about half as tall. 2/17: Plants look very healthy overall. A lot less droopy, and definitely got some decent size now. Noticed one plant has some sort of bleaching that I'm fairly certain is cal mag deficiency. Makes sense since we haven't introduced any cal mag at all, so I will go buy some today. Gonna water tomorrow as the pots are already pretty much dry. Trying to add a video with detailed view of all the plants from different angles but doesn't seem like uploading is working
Likes
18
Share
@Dunk_Junk
Follow
18cm growth this week. She got bushier too. Doing her own thing.
Processing
Likes
11
Share
What a fantastic week. Very impressed with the progress of the ladies. Still no nutes added to the Plagron soil mix, will probably start them on a light dosage of the Top Crop auto feed in the next few days if they look like they're calling for it. Wedding Cheesecake particularly vigorous. Amazingly, one of the Orange sherbert is popping pistils and all four smell surprisingly strongly of orange sweets at only 14 days old!! Can't wait for the next week.
Likes
4
Share
This plant literally outgrew a 4 by 4 at 87 inches tall I had the light at the top and quickly realized I had to toss her in the greenhouse about halfway through her life. Super happy with the size of it 43 inches tall exactly. Not sure if shes gonna stretch more but lmao the biggest auto I've ever grow. Mad respect to ILGM genetics right now. Check back next week to see how much her buds swell! Remember it's always 4:20 somewhere once an hour every hour!!!!!!
Likes
11
Share
@Beedog
Follow
Day 63 have to harvest day 77 cause have to move house hope they be ready the small ones be ready any day but don’t know about the big ones 🤞 growth continues anyway hopefully fatten up nice by next week
Likes
38
Share
@Roberts
Follow
Fruity Pebbles autoflower is growing great I the Athena blended line nutrition. She is starting to go into a bulking stage. She has a layer of frost started. Everything is looking good. Thank you Athena, Medic Grow, and ILGM. 🤜🏻🤛🏻🌱🌱🌱 Thank you grow diaries community for the 👇likes👇, follows, comments, and subscriptions on my YouTube channel👇. ❄️🌱🍻 Happy Growing 🌱🌱🌱 https://youtube.com/channel/UCAhN7yRzWLpcaRHhMIQ7X4g
Processing
Likes
1
Share
@Ferenc
Follow
Hi! In this diary I will grow 5 Sativa and Indica dominant Auto Feminized Strains: Sour Orange Auto Feminized Seeds (2 seeds.) By The Bakery Seed Co. Sour Orange Auto Feminized Seeds are a cross of the famous Sour Tangie and the Bakery’s in house Ruderalis. Also a 80% sativa dominant strain with 56 to 70 day flower period. Tested at 17% THC this genetic is highly stable and the Bakery are very happy with the results. This Auto Feminized seed can be cultivated indoors as well as outdoors but definitely prefers a slightly warmer climate to gain the best terpene profile possible. An uplifting effect with a sweet and sour aroma of tangerines. This auto flower seed is another great addition to the Bakery Seed Co’s Automatic Range Auto Critical Orange Punch Seeds By Dutch Passion. Auto Critical Orange Punch Seeds are Dutch Passions first Critical Autoflower. A cross of (Grandaddy Purps x Orange Bud) x XXL Auto Kritical Bilbo, creating an easy strain to cultivate. Expect a full life cycle of 75 days from sprout to harvest with impressive XXL yields. She thrives with 20 hours of light and can grow up to 70-100cm indoors. Certain phenotypes can flower for an extra week or so to gain the XXL yields! Sweet skunk aromas with a hint of rich Afghan hash. Sour Stomper Auto Feminized Seeds are an example of what careful selection can achieve with breeding. A fruity style pheno of the Sour Crack female crossed with the Grapestomper OG male from Gage Green then crossed with ruderalis by Mephisto. This 50/50 Indica Sativa hybrid has a great stretch contributing to large yields. Due to cooler conditions late in flower, this dense canopy can produce beautiful blues and purples. A great genetic for indoor and outdoor cultivation and all finished and ready to harvest in just 65 to 70 days. This hybrid is popular with extracts and has Grape aroma in bloom. Auto Lemon Zkittle Feminized Seeds are made from quality USA genetics. It is an Overall Highlife Cup Winner 2018!!! It has won 1st prize in Sativa category and also was awarded the Overall Highlife Winner Trophy. Lemon Zkittle Auto retains its high THC and yields even in automatic form. Due to the lineage, this hybrid is very simple to cultivate and a great choice for beginners. Fruit and skunk aromas combined with citrus flavors and long-lasting effects. 20 Hour light cycle is recommended as well as a minimum of 75 days from seed. Some phenos can take a week longer to produce the massive yields. Outdoors this variety can take up to 100 days from seed to harvest. With THC levels tested 21% as well as minimum yields of 400g/m2, this automatic hybrid is a great addition to Dutch Passion Automatic range. 24 hours light schedule, 90 percent humidity, trigger spray, no fertilization. 15th of August: Girls are ready for germination, tonight I will place the seeds to be in water at least for 12 hours :) 15th of August: I put the seeds in the water. 16 of August 2019: Seeds are placed between damp paper towel :) 17th of Augsut 2019: All good so far, They are ready to be planted tomorrow;) Day 1: They are in the soil. Hopefully they will come out soon :) 60W LED for 5 plants and the humidity is very high 98 percent. I give 5 ml water a day per plant and plus triggering to keep the humidity very high. All the holes are closed. Day 2: Non of them are out yet but I think by tomorrow it will happen:). Day 3: All out :) Day 5: Sour Stomper and Lemon Zkittle a bit slower but all of them grow nicely. Babies ❤️ Day 6: They are coming! Critical Orange Punch is growing very quick she is already 10 cm but the rest of them are 6-7 cm.
Likes
6
Share
Blir flyttet ud fra solen er oppe og indtil ved 21 tiden og ud igen ( indtil nattefrosten er over) jeg har VIRKELIG SET FREM TIL AT LAVE DISSE Dagbøger og VIDEOER OG EN MASSE ANDRE GODE FRØ FRA KANNABIA 🖤🧡🖤🧡💚☮️🖤💚🖤🧡🖤🧡.
Likes
1
Share
Week 9 Day 5 Bloom now 48h darkness
Likes
Comments
Share
Heute hab es satte 20L Wasser für die gutenund davon waren 10l Komposttee. Bevor es ans LST ging und etwas entlauben ging
Likes
15
Share
And it starts like this. an official collaboration starts with the friends of Zamnesia, from today I will only grow, grow and flower Zamnesia Seeds plants and I really like it. We are close to a flowering in the extreme heat and therefore we opted to start with 4 very fast F1s, they are not joking guys when they tell you that they are made to be more resistant, stable and fast they are not telling you something false. The girls are super fast, even those from other brands tried in the past are excellent and a sliver and this one from Zamnesia have all it takes to be the best autoflowering on the market. The Wurlz F1s were also born at the speed of light, 18 hours in water, 24 on land and we were already born, both of us. Oh yes, a lot of research is being done on autoflowering plants, you have all noticed monstrous improvements compared to Low Rider and subsequent derivatives. Whoever works best wins and from what I have been able to see so far Zamnesia is working very well. I know, there is a group of sceptics, friends I'm here on purpose, give me a couple of months and we'll see. Zamnesia is the best online shop in the situation, you can find everything from seeds, to mushroom kits, through vaporizers and a thousand other things https://www.zamnesia.io Wurlz F1 seeds specifically https://www.zamnesia.com/10669-zamnesia-seeds-wurlz-f1-automatic.html Site Description ZAMNESIA SEEDS - WURLZ F1 HYBRID AUTOMATIC: EFFECTS TO LEAVE YOUR HEAD IN A WHIRL! As the end product of combining Runtz with Watermelon Candy, Wurlz F1 hybrid Automatic showcases a reliable, uniform, and, above all, easy growing experience. The resulting buds offer mind-blowing flavors and soothing effects, making Wurlz F1 Automatic more than worthy of being on your radar. GROWING WURLZ F1 HYBRID AUTOMATIC As an autoflowering strain, it takes just 9–10 weeks for Wurlz F1 Automatic to move from germination to harvest. Fortunately, there's very little required other than a bit of maintenance along the way. This is partly due to the F1 genetics that make this strain robust and uniform, resulting in plants that reach a similar height and provide a similar (large) yield. Moreover, Wurlz F1 Automatic is highly resistant to disease, pests, and other ailments. Reaching heights of about 65–80cm, Wurlz F1 Automatic is not an overbearing plant and can fit into smaller spaces with zero fuss. Once ready to yield, growers have the potential to see a return in the region of 450–500g/m² indoors and 50–150g/plant outdoors. AROMAS, FLAVORS, AND EFFECTS OF WURLZ F1 HYBRID AUTOMATIC After Wurlz F1 Hybrid Automatic wows you with its easygoing growing experience, the best is yet to come: the smoke test. Teeming with terpenes, this cultivar offers a fruity and candy-like flavor tinged with just a little bit of pine for good measure. In terms of effects, Wurlz F1 Automatic is bolstered by 24% THC and a finely tuned array of cannabinoids, making for a soothing, physically relaxing, and, in larger amounts, couch-locking high. So settle in with some of your favorite friends, snacks, and movies; this is relaxation at its finest.