The Grow Awards 2026 🏆 


Likes
Comments
Share
@Cultivandomedicinanatural
Follow
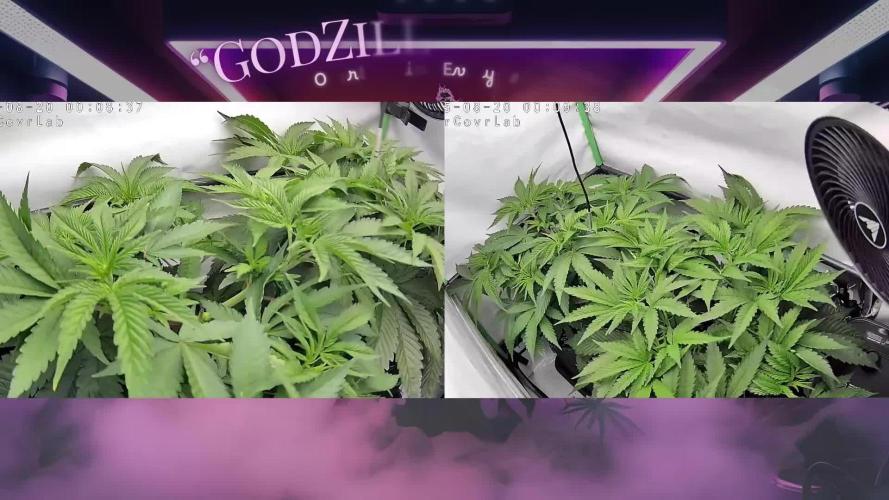
Por una parte tenemos la que llamaremos Biscotii 1:
Tiene un tamaño monstruoso, que tuve que doblar en varias ocasiones el tallo porque no me daba más el foco para subirlo. De hecho una de las ocasiones me quemo una hoja del puntal y un pelín la puntita y como se puede ver hizo que la punta parezca un monstruo!! enorme, grande y de forma especial.
Hay gente en instagram que me pregunta que si lleva anabolizantes jajaajja lo más parecido a eso es los nutrientes de plagron!!! Que las revienta a las pequeñas
Esta tiene unos tonos morados que la hacen muy atractiva y una resina generosa. El olor es fuerte y la altura estirada es una pasada!!
Por otra parte la Biscotti 2:
El tamaño es inferior que la anterior, pero no por eso diría que poco productiva... Tiene un central que da miedo igualmente, los satélites son una pasada llena de resina.
En esta ocasión no tiene tonos morados, pero tiene mayor resina.
En general ambas dos tapan la botella de litro y medio de agua, prieta, olorosa y con resina para aburrir!!
😍😍😍😍😍
El peso le pondré en seco en cuanto lo pese 😇

Likes
21
Share
@Cogollo_eu
Follow
(Encontrarás la traducción a "Español" en la última parte de la descripción)
31/August/2018: (Video 1)
02/September/2018:
Foliar application of Helps and preventives from B.A.C. (0.33 l water + 0.33 ml Foliar Spray + 0.33 ml Plant Vitality Plus @ 8 P.H.), at this time the GSCookies is full of white flies. I will apply harder foliars later on.
Flowering phase has begun!, is at least curious that yesterday i started to use "Bud Ignitor". Wooohoooooo!!!👌
04/September/2018:
Foliar application of Neem oil and Potassium Soap MIX to combat Trips and white flies. I sprayed 1 l of water with 3 ml N.Oil + 3 ml P.Soap @ 9 P.H. in 5 days i will use a harder product with this same mix.
05/September/2018: (Photo 1, 2, 3 & 4)
** WEEK 4 EXACT WATERING CALENDAR **
31/08/18 - Drought
01/09/18 - 0.5 l of water + 2 ml of Bud Ignitor @ 6.4PH
02/09/18 - Drought
03/09/18 - 2 l of water + All week nutrients (- Bud Ignitor) @ 6.4PH & 0.95 E.C.
04/09/18 - Drought
05/09/18 - 1 l of water + Bud Ignitor @ 6.4PH
06/09/18 - Drought
----------- ESPAÑOL ------------
31/Agosto/2018: (Vídeo 1)
02/Septiembre/2018:
Aplicación de ayudas y preventivos de B.A.C (0,33 l de agua + 0,33 ml de Foliar Spray + 0,33 ml de Plant Vitality Plus @ 8 P.H.), en este momento la Cookies está plagada de mosca blanca. Aplicaré foliares mas potentes en adelante.
Comienza la floración!, es notable que ayer comencé a usar "Bud Ignitor". Wooohoooooo!!!👌
04/Septiembre/2018:
Aplicación foliar de Aceite de Neem y Jabón Potásico para combatir Trips y mosca blanca. He echado 1 litro de agua con 3 ml de Aceite de Neem y 3 ml de Jabón Potásico @ 9 P.H., en 5 días usaré un producto más fuerte junto a esta misma mezcla.
05/Septiembre/2018: (Foto 1, 2, 3 & 4)
** SEMANA 4 CALENDARIO DE RIEGO EXACTO **
31/08/18 - Sequía
01/09/18 - 0,5 l de agua + 2 ml de Bud Ignitor @ 6,4PH
02/09/18 - Sequía
03/09/18 - 2 l de agua + Nutrientes de la semana (- Bud Ignitor) @ 6,4PH & 0,95 E.C.
04/09/18 - Sequía
05/09/18 - 1 l de agua + Bud Ignitor @ 6,4PH
06/09/18 - Sequía

Processing
Likes
7
Share
@vertex8
Follow
Start of week 2 flower today, introducing big bud this week, gave them the full 4ml per litre recommend on the bottles and noted a small mute burn on a few of the leaves but nothing major.
Switch to larger reservoir (25l -> 100l) and added bubbler stone as I'll be keeping the feed over 3/4 feeds, this should help keep the food solution oxygenated and fresher.
Overall the plant is looking very healthy and seemed to transitioned to bloom food v. nicely.

Likes
11
Share
@Suchy329
Follow
Leuft alles super ich bin sehr zufrieden
Ich hoffe das die nächste Woche genau so gut wird
Likes
5
Share
@Dsant
Follow
D65 - 23/03
Did a cleanup on the bottom part of the bigger girls, to avoid any issues in these last weeks.
Not much to update, just watching them grow and admiring them gaining weight.
Aiming for a 80~85 day harvest, so we got around 20 to go.
Likes
Comments
Share
@MagCBD
Follow
Les plantes sont dans des conditions parfaite pour le moment pas de pépin
Il y en as une qui a un peux de retard ( en haut à gauche ) car elle n’as surment pas assez de limi
Likes
5
Share
@AlpenZilla
Follow
🌸 Week 5 Complete – First Week of Flower Phase
The light cycle has been switched to 12/12 since the start of the week. No clear signs of flowering yet, except for a slight preflower showing on the Seriotica. However, the stretch has definitely kicked in:
📏 Current height:
• Seriotica: 42 cm
• Cherry MAC: 46 cm
• MAC n Cheese: 50 cm
MAC n Cheese is stretching nicely and looks strong – just like the rest of the tent.
💧 Watering & Feeding
• 6 L per plant every 3 days
• Feeding at ~50 % of the Advanced Nutrients schedule
• Input EC: ~1.3
🔍 Drain EC readings:
• Seriotica: 1.1
• Cherry MAC: 1.0
• MAC n Cheese: 0.92
Still very happy with the medium mix (Plagron Lightmix + Coco) – especially because the runoff EC is consistently measurable and reliable.
Looking back, I probably could’ve flipped to flower a week earlier – the tent is really filling up now! 😄

Likes
5
Share
@TheBulldozerSicily
Follow
Risultato finale inaspettato! Questa è la prima volta in outdoor, e pensare che le volevo regalare perché non me la sentivo di farle crescere a casa perché troppi vicini di casa, poi mi sono affezionato ed eccole qua, le più grandi piante mai riuscite!! Sono molto contento!!

Processing
Likes
15
Share
@420Consinc
Follow
Week 5
----- Day 29 -----
Fed 1100ppm at 6.4ph 23 Liters
Everything's good.
No real updates. Front right Glookies stretched a bit but has stopped.
Plants are perfect, couldn't ask for a better beginning to week 5.
*Update*
Easy day, end of light cycle. 3 new pics.
---- Day 30 -----
Some fun photos today for this easy day.
Humidity in basement FINALLY hit 40% this morning. Within 5 days it should be 30-35% residual basement and 45% tent for a good residual humidity.
The hand shot has my fingers and palm forward from the bud tip, the bud tip is actually past my hand but it's nearly impossible to get a perfect shot with my arm in the tent and my other one far out trying to take a photo i can't see.
The Tropicanna Popcorn nugs are already bigger than my thumb... gonna be fun in 4 weeks to see bud finishing sizes
Wedding Cake - Cherry HubbaBubba smell
Tropicanna Glookies - Pink Bubblegum with a strawberry like hint peaking through.
Tomorrow is feeding.
Today is just emptying water from buckets from dehumidifier.
*knock on wood* it's easy streak from here on out... 35~ days roughly left. here we grow!!
*** Update ***
Took some measurements. Wedding cake is monstrous already. Upto 1.5 inch wide, 14inch long (it was longer than the 12" ruler). Popcorn nugs on Tropicanna Glookies already 1inch wide 3 inch long at the top.
Beaaautiful.
Slow and steady from here on out.
----- Day 31 -----
Beautiful as usual. Fattening up nicely.
1200 ppm 6.4 pH 23 Liters
If anyone is wondering why I switched to Blackstrap Molasses I put up the Nutrition Facts..
in 20 grams you have carbohydrates, potassium, Calcium, Iron, B6 Vitamin, Magnesium, Zinc.. and that's only the "significant" nutrients (Human based for that picture) It also contains micro traces of copper and more.
pH is quite nice too, with the nutrient regiment i'm on, it finishes itself at 6.4pH so I don't have to manipulate it with pH up/down...
Loving everything so far.
Humidity in basement was 39% today, SO damn close. Tent closed at lights on (highest residual humidity point) was at 48% ... woo hoo 3% more to go!!!
------ Day 32 ------
Wow. Wedding Cake larger buds I can't even wrap my hand around.. These buds are going to be mooooonstrous.
Humidity was under 40% in basement, tent was 48% this morning. Great news for me.
Easy day, pretty much standard operating procedures from here on out.. feed, drain dehumidifier, strengthen stems by shaking plants, open/close tents... rinse repeat.
Both plants are amazing, great genetics so far regarding bud structure building/plant size.
----- Day 33 -----
47.5% residual humidity
Fed at 1150ppm 6.4pH 23L
Everything's perfect, 30~ days left.
----- Day 34 -----
48% humidity in tent, i'm a happy camper.
Everything's perfect. Bulk has started, front right Tropicanna Glookies had double in thickness and diameter top buds of most stems.
Wedding cake 14 inch stem I've named Big Bertha. Excited to watch her fatten up on the couch so-to-speak.
I'm now on autopilot. Fed yesterday while half asleep, didn't even remember doing it. Thank god I take pics of ppm/pH before every feeding for data.
One more feeding this week before week 6 happens tomorrow.
This week Liquid Koolbloom ends, KoolBloom Dry begins for maximum bulk on week 6 first feeding (2 days into week 6)
----- Day 35 -----
Last day of week 5!!!
Fed at 1150ppm 6.4ph 23L
Plants are perfect, humidity is great.
Smell is RAMPED up now. Strong candy weed smell.

Likes
29
Share
@growsmoke420
Follow
Not much to Update. Still Growing along n filling in. Still Watering Her every other Day with Note Feedings every 3rd Watering. Leaves are Yellowing so Hopefully She'll Ripen n Come Down soon.

Processing
Likes
4
Share
@TheIceCreamParlour
Follow
Went a little crazy on the nutes this week so had to flush her out. Shes bounced back now so hoping it doesnt have any effect on the end product. Very easy to grow. No where near as bushy as my other plants so I'm not having to do any defoliation at all.
She just keeps soldiering on. Looking forward to the next few weeks of flower.
Likes
35
Share
@GODSGIFT_2005_JM
Follow
🍼Greenhouse Feeding BioGrow & Bio Bloom
⛺️MARSHYDRO
The ⛺️ has a small door 🚪 on the sides which is useful for mid section groom room work. 🤩
☀️ by VIPARSPECTRA (models: P2000 & XS 2000)

Likes
18
Share
@Sti_Cazz
Follow
More defoliation and nutes this week, they are seriously getting hungry now! I ordered a new 30cm honeywell ground fan and dehumidifier to quickly solve the RH issues, I don't want to risk mold or other surprises.

Likes
9
Share
@Flixus
Follow
Leider heute nicht so viel Zeit darum die kurz Fassung, nächsten Sonntag wird gelollipoppt, for Pflanzen sehen Mega aus und sind voll im Stretch. Ich bin super zufrieden und finde die Sorte echt Hammer, macht Spaß sie zu growen und ist sehr Anfängerfreundlich.


Likes
24
Share
@Firepharmer
Follow
Rock hard buds Miicrobialmass for the win and the new led is killer. The knobs like knots grow out of the sides of the buds are something to look at wow !!! Monkey berries is in flushing mode , slurricane won’t be far behind in the next week or 2 I’ll flush


Likes
4
Share
@Jahrulez
Follow
AAAAh Fastbuds, End of WEEK 11 Beginning of week 3 and shes BIG.
The beginning leaves are a biut fucked up but the new ones look great so thats nothing rll that worries me.. had it often on the first few leaves but ittl grow out of that.
Everything going great :D
Likes
1
Share
@BruWeed
Follow
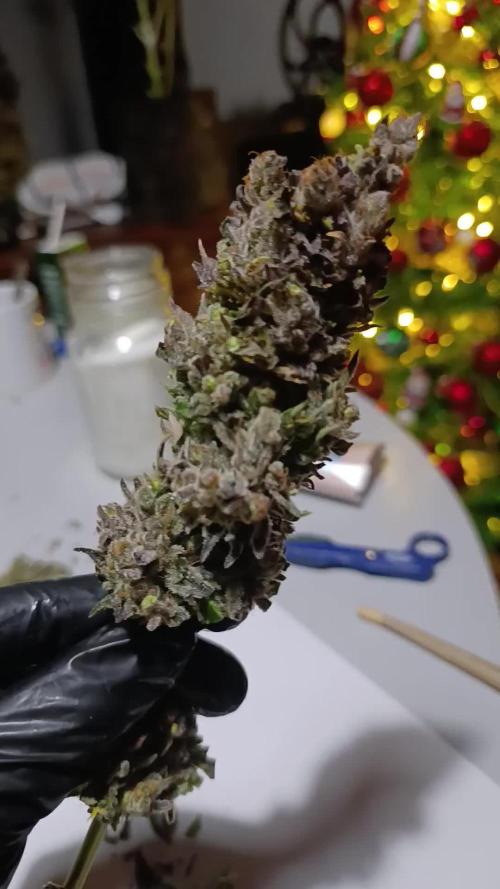
Esta semana ya realice la poda. Se encuentra en estos momentos en etapa de secado dentro de una caja especial para secados de flores que uso siempre y nunca me falla.
En humedo hay 195g y utilice una lampara led de 150w en todas sus etapas.
Próximamente estaré publicando cuando este en curado.


Likes
150
Share
@RussianGrower
Follow
I welcome you from Russia my friends from different parts of the world. The end of 16 weeks has come. Plants already fully show their ripeness, and buds SAG from their weight. Soon I will be harvesting, as soon as I get the final dry product I will make the last update of this diary.


Likes
4
Share
@420DeepGrow
Follow
📆 Semana 11
La Ice Cream Haze cierra el ciclo con una madurez redonda. La segunda tanda ha terminado de compactar y muestra los tricomas en su punto exacto, con ese brillo denso que anuncia potencia. Los matices morados están totalmente fijados y el aroma cremoso-afrutado se ha intensificado tras estos últimos días de afinado.
La planta ha entregado justo lo que prometía: volumen, color y un perfil aromático limpio y marcado.
✂️ Cosechada: ciclo completo, doble tanda afinada y resultado a la altura.
¡Seguimos creciendo fuerte 💪!
