
Likes
Comments
Share


@DTHGenetics
Follow
Training main stems down to expose second ones looking good week 8 they are in 10 gallon now watering 2 cups or more if needed every 2-3 days

Processing
Likes
32
Share


@Leafy_Team_Green
Follow
Quiet week with a few temperature issues.
Temperatures are fairly stable now. Took me a while to dial everything in as I've changed to an 18/6 schedule now.
running around 22-25 Celsius now.

Processing
Likes
72
Share


@DreamIT
Follow
🐩👤Sirius Black👤🐩 by 🌍🌱WeedSeedsExpress🌱🌍
👤 26.1 ...
👤 27.1 We enter the heart of the vegetative phase. the seed has not yet wanted to detach but it is also fine hanging there where it is: p
👤 28.1 ...
👤 29.1 ...
👤 30.1 ...
👤 31.1 ...
👤 1.2 It is a few weeks old but already proves resistant. The lamp works beautifully, I see the results day after day with plants already in bloom. Compared to the previous lamp always make it bloom even faster in terms of time. Can't wait to try the XS series
____________________________________________________
👀Are you looking for a good lamp to start?👀
Viparspectra in my opinion has something more than the others, take a look at their site.
➡️ http://bit.ly/pro-seriesproductspro-series-p1500
⏩Use " GDVIP " for an extra discount💯
____________________________________________________________________________________
📜👀 A look at the details of what I'm growing 👀📜
🐩👤Sirius Black👤🐩 by 🌍🌱WeedSeedsExpress🌱🌍
📋 Details 📋
⚧ Gender
▪️ Feminised
➰ Genes
▪️ 70% Indica / 30% Sativa
🎄 Genetics
▪️ Sirius Black
🚜Harvest
▪️ 450 g / m²
🌷Flowering
▪️ 63 - 70 days
✨THC
▪️ 25.0%
✅CBD
▪️ 0.5%
🏡Room Type
▪️ Indoor
🌄Room Type
▪️ Outdoor
🕋Room Type
▪️ Greenhouse
🎂Release Year
▪️ 2020
____________________________________________________________________________________
👀📷 Follow the best photos on instagram 📷👀
https://www.instagram.com/dreamit420/
🔻Leave a comment with your opinions if you pass by here🔻
🤟🤗💚Thanks and Enjoy growth 💚🤗🤟

Likes
32
Share


@FlynnRyder
Follow
ugh just hate myself right now lol. I feel like it would have done AMAZING had I flipped sooner and SCROG way better. I was timid and had a lot of personal obligations preventing me from staying in the garden as much as I would have liked. Its a grower! and stretches so much in early flower. Stay on top of her but I think she may make some amazing bud based on what I did have drying recently. I wish I didnt mess up the timing but I just couldnt have the second wave be held up by these mistakes and felt it best to let it go

Likes
107
Share


@DogDoctorOfficial
Follow
Greetings, dear plant companions! Can you believe it? Week 17 has unfolded, and our journey with Purple Lemonade Fast Flower reaches its climax—a splendid harvest at day 69. As I stand here, reflecting on the wait and the wonder, let's delve into this momentous update.
The Ultimate Waiting Game <3
Oh, the extra waiting time felt like a lifetime, didn't it? But you know what they say—the best things in life are worth waiting for. And let me tell you, this journey has been an ode to patience and a symphony of anticipation.
A Marvel to Behold <3
Behold our Purple Lemonade in all her glory! If beauty could be bottled, she'd fill an entire garden. Her buds are a testament to love, care, and the dedication poured into this journey. It's like witnessing a masterpiece in horticultural art.
The Trichome Revelation <3
As the days stretched, the trichomes prepared for their moment of glory. And what a sight it was! I took a sneak peek under the microscope, and oh my, the colors and trichome numbers are beyond imagination. It's like peeking into a secret universe of brilliance.
A Full Cycle: The Journey Revisited <3
From seed to this awe-inspiring harvest, our journey has been a symphony of growth, learning, and beauty. Every week, we embraced new lessons, nurtured each phase, and reveled in the miracles of cultivation. The cycle is a testament to our connection with the plant world and the wonders it bestows.
Time to Rest and Reflect <3
Now, our Purple Lemonade enters a period of rest on the drying rack. For about two weeks, she'll transform further, preparing for her final debut. It's a time of patience once again, as flavors deepen, aromas evolve, and magic intensifies.
The Upcoming Full Report <3
In the near future, get ready for a comprehensive report on the fruits of this labor. We'll explore the buds, savor the tastes, bask in the effects, and celebrate the cycle as a whole. It's a chapter that encapsulates the essence of this cultivation journey.
A Thank You to the Community <3
A heartfelt thank you to the @Fast_Buds team for crafting this botanical marvel. @aptus_holland, your support has been integral. And to @grow.diaries and the entire community, your camaraderie has fueled this journey.
Cultivation, Celebration, Connection 💚🌿
As this chapter concludes, let's celebrate the culmination of growth, the dance of patience, and the connection we share with the natural world. From seed to harvest, we've written a story of love and green magic.
Thank you for being part of this journey. Until we reconvene for the final chapter, let's continue to nurture, learn, and celebrate the beauty of plants.
Genetics - Fast Buds Purple Lemonade FF
Ligth - Lumatek ZEUS 465 COMPACT PRO
Food - Aptus Holland
#aptus #aptusplanttech #aptusgang #aptusfamily #aptustrueplantscience #inbalancewithnature #trueplantscience #fastbuds #dogdoctorofficial #growerslove
With true love comes happiness <3 <3 <3 Always believe in your self and always do things expecting nothing and with an open heart , be a giver and the universe will give back to you in ways you could not even imagine so <3 <3 <3
All info and full product details can be find in can find @
https://2fast4buds.com/
https://aptus-holland.com/
https://autopot.co.uk/
https://lumatek-lighting.com/
<3 <3 <3 Growers love to you all <3 <3 <3
" Arising from a cross between purple and citrus Cali genetics, Purple Lemonade FF (Fastflowering) offers a complex high made up of perfectly balanced cerebral and body effects that are ideal for daytime use. Expect an extremely enjoyable high that boosts your mood while deeply relaxing your whole body and getting rid of muscle pain. This meticulous cross produces up to 550 g/m2 of some of the most beautiful purple buds, with pinkish and reddish hues that will catch everyone’s attention. The beautiful purple buds are ready for harvest in 7-8 weeks and come hand-in-hand with unbelievably sugary citrus terps that are just as refreshing as a cold lemonade on a hot Summer day. It’s the ideal variety for the sweet-tooth stoner seeking strains that deliver both in quality and quantity of resin.
Bud Description
Purple Lemonade FF grows chunky, spade-shaped buds that boast a whole range of pinkish-purple hues with rich, dark orange pistils shooting out of every direction. This variety stands out for the, oftentimes, lilac trichomes that give them a gorgeous pink tint and make for outstanding purple concentrates. The buds give off a delicious tart lemon aroma that reveals a sweeter, more fruity scent as you break the buds open. Definitely a must for flavor chasers and those looking for pungent terpene profiles. Smoke Reports
Purple Lemonade FF offers an effect that’s just as unique as the flavor. Expect a potent uplifting high that gives you that energy boost you need to get things done while 100% happy and stress-free. The effect gradually transforms into a wave that works its way along the limbs and through the muscles, deeply relaxing your body and putting you in the right mindset to go through a busy day with a huge smile on your face. This is an excellent all-day smoke as it not only increases energy but can also help combat chronic pain, migraine and stress. Plant Appearance
This feminized photoperiod variety develops a thick and strong structure, growing a medium-sized main cola with multiple shorter side branches, typical of hybrid strains. Purple Lemonade FF develops fairly short internodal spacing with gorgeous purple buds growing stacked on top of each other, making it the perfect choice for growers of all levels looking to get lots and lots of top-shelf purple weed, as this variety can produce up to 550 g/m2 in a 7-8 week flower cycle.
Grow Tips
This is a super fast feminized photoperiod version that takes approximately 7-8 weeks to flower with a 5-week vegetation cycle,, this means you can have faster harvests by shortening the veg cycle or have a longer veg cycle for bigger yields. Purple Lemonade FF (Fastflowering) makes for a great candidate for growers of all levels as it’s a vigorous strain that will thrive with basic maintenance both indoors and outdoors. This is a resin powerhouse so make sure to have your trim bin close by as all the resinous sugar leaves will make for the most mouth-watering hash and extracts. Flavor
Expect a long-lasting citrus zest that taste just like it smells. Purple Lemonade FF reeks of a delicious blend of sweet fruits and tart citrus that’ll make your mouth water. On the inhale, expect sour flavors that taste just like lemon candy with hints of orange and a really subtle earthy background. And on the exhale, the citrus flavors open up, giving place to a more sugary berry fruitiness that leaves your whole mouth tasting like an extremely sweet weed-infused lemonade.
Likes
2
Share


@Marynightlove
Follow
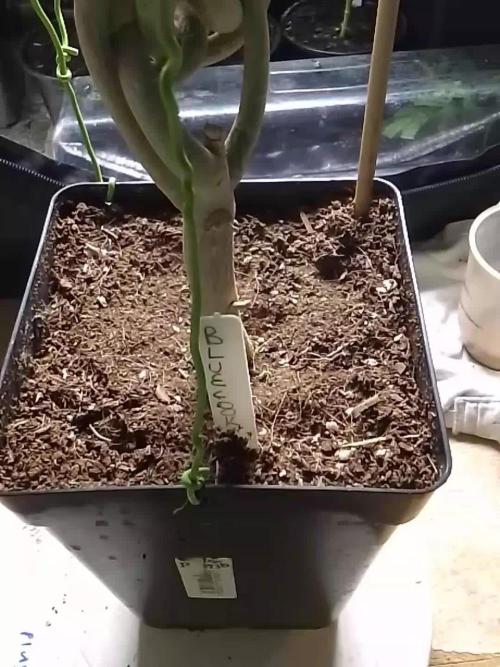
This strain is growing well and fast I’m it. The images with the damaged stem came from the ties I used they were too tight and it shouldn’t have done that much damage but it did so. But that’s some stress training and it’s healed nicely.
Likes
3
Share

@Pompeyblue
Follow
Managed to start two crosses on her and done a few more plaits and spring's around a few branches


Likes
13
Share


@Limelight
Follow
Hello 👋… This week kicks off w8 of flower for unknown but, again I’m a few days behind. As the pics and vid for this week suggests she’s, fading quite well and looks to be ready in maybe a week or so. Temps have been under control this week and with that being said she’s still packing on “frost” and her smell is something that, definitely rocks in a very stink but amazing way 😷🤤🤤. She’s also finished with recent end of 3w nute feed (Dr. Earth 💪) so I’m just letting her, finish up depleting what’s left in the medium.
This week kicks off (few days behind as well) w13 for wwa. As you can see still fattening up and packing more frost on as well. I’ve been checking for maturity of trichomes (still very new) and haven’t seen any majority of, milky cloudy or amber trichomes. I’m basically waiting for her to show me she’s ready and I believe that, maybe another week will do the job 🤞🤞🤷♂️. Also stopped feeding nutes as well. Oh yesssss and it’s VERY obvious that wwa will be producing some purple excellence 🤩😎😎.
Thanks for stopping by reader/fellow growmie. If you feel that I’m wrong please help a noob out! Will post more picks and some of trichomes ✌️.
Ps…. Soooo this part is actually an edit in which, I added more photo’s and most definitely believe both girls to be ready, judging by recent look at trichomes. However looking for more amber even though it isn’t necessary because, I prefer a “certain” relief 😮💨


Likes
21
Share


@420DeepGrow
Follow
Este sueño es posible gracias a Royal Queen Seeds, Marshydro, XpertNutrients y Trolmaster, sin ellos esto no se podria cumplir .
💐🍁 Dynamite Diesel:
Royal Queen Seeds se ha asociado con Tyson 2.0 para ofrecer la genética desarrollada por este campeón en forma de semillas.
La Dynamite Diesel recibe su nombre en honor al apodo de Mike Tyson al inicio de su carrera, Kid Dynamite. Es un cruce entre dos variedades míticas, la Sour Diesel y la Skywalker OG, que son conocidas por sus intensos sabores y sus efectos estimulantes,tiene un 22% de THC, lo que la sitúa en la categoría de peso crucero.
En interior, esta variedad crece a alturas de 100-150cm y produce hasta 550g/m² tras una fase de floración de unas 9 semanas. Al aire libre, puede alcanzar hasta 2m de altura y produce una cosecha máxima de 675g por planta.
🚀 Consigue aqui tus semillas:
https://www.royalqueenseeds.es/rqs-semillas-cannabis-tyson/664-dynamite-diesel.html
💡TS-3000 + TS-1000: se usaran dos de las lámparas de la serie TS de Marshydro, para cubrir todas las necesidades de las plantas durante el ciclo de cultivo, uso las dos lámparas en floracion para llegar a toda la carpa de 1.50 x 1.50 x 1.80.
https://marshydro.eu/products/mars-hydro-ts-3000-led-grow-light/
🏠 : Marshydro 1.50 x 1.50 x 1.80, carpa 100% estanca con ventanas laterales para llegar a todos los lugares durante el grow
https://marshydro.eu/products/diy-150x150x200cm-grow-tent-kit
🌬️💨 Marshydro 6inch + filtro carbon para evitar olores indeseables.
https://marshydro.eu/products/ifresh-smart-6inch-filter-kits/
💻 Trolmaster Tent-X TCS-1 como controlador de luz, optimiza tu cultivo con la última tecnología del mercado, desde donde puedes controlar todos los parametros.
https://www.trolmaster.com/Products/Details/TCS-1
🍣🍦🌴 Xpert Nutrients es una empresa especializada en la producción y comercialización de fertilizantes líquidos y tierras, que garantizan excelentes cosechas y un crecimiento activo para sus plantas durante todas las fases de cultivo.
Consigue aqui tus Nutrientes:
https://xpertnutrients.com/es/shop/
📆 Semana 9:
El engorde de los cogollos está prácticamente terminado y solo falta que maduren un poco antes de ser cosechada.
Gran trabajo por parte de mis colaboradores, estoy bastante contento con este grow, el próximo tendré más atención en la etapa de crecimiento, la cual es muy importante si quiero obtener una cosecha de calidad.
A partir de ahora agua hasta el fin.

Likes
422
Share


@Crashoverite
Follow
Hi all 🧑🌾
Welcome to my 🍌💜👊 week update.
Hope everyone keeping well and having a great week😁
Thank you so much for so much support on this bananas ride 🙏💜💚💜💚
Everything still going pretty well. Girls are developing and stretching like crazy. Athena currently Dec 14 90cm and main stem of Xena is not far of this height either. Unfortunately noticed first signs of calcium deficiency(my opinion) on Athena. Thankfully started feeding both girls with calmag weeks back but the dosage wasn't not enough for Athena. Started small treatment very next day on Dec 11 (see description below) I belive got my baby back on right track.
Week 9
Dec 11-17
Dec 11
Watering was planned for Tuesday but due to calcium deficiency decided for a little treatment. Watered both girls with mixture of reduced content of growth nutes by 50% calmag at 1.2 ml per ltr. Reduced solution PH to 6.2 as apperently it's ideal for calcium consumption. Over period 4h I have watered Athena with 5ltr with couple runoffs. Xena 3ltr. Total of 7-10 leaves affected mainly at top colas close to the light.
Dec 12-13
Purely observation and all looking well. Of course all affected leaves will progres of showing signs but good news is that growth and development booming and don't see any new leaves with symptoms.
Very nice trichomes development in recent days and more and more colours.
Dec 14
Second watering for this week 6.5l Increased calmag to 1.4ml per ltr and if still things will be looking well reduce to 1 or 1.2 on next feeding.
Dec 15
Very nice respond on yesterday feeding. They definitely fatten over night and getting more and more frosty. Will need to remove some foliage soon as getting extremely bushy again.
Dec 17
Xenas main stem top cola almost touched the light today. Tied her to left side of the cabinet, applied selective defoliation on both girls, tied few branches to netting and on the end of this busy day a third watering for this week. 7 ltrs beetwen both. Runoffs Xena PH6.4 Athena 6.3.
Very nice week have to say. I belive that calcium deficiency on Athena is no longer a case here and both girls developing very nicely. Both are still stretching, buds are gaining in size and both girls started exploding with trichomes,
Thank you all again for such amazing support 🙏peace and love brothers and sisters ✌️💚💜💚💜💚
Stay tuned for new week update 😉🧑🌾✌️💚


Likes
9
Share


@Wenz004
Follow
Experiment explanation see week1
Tried Fiming...let see what will happen...ok Autos dont like HST but I dont go on height...to have only one ripe big main cola...to go on height indoor/led does not make sense for me...
Transplantation end of week3...autos dont like it but i had no choice technically
So already 2 things autos dont like😃
The two tropicals in different ling soil get only water
Gelato got plagron sugar royal 1 ml/l and plagron alga grow 1 ml/l for the start...the soil (plagron royal mix) should have some nutrients as well
Likes
16
Share


@cheetah844
Follow
She's starting to show me why she's called Sherbet... getting some orang-ish throughout the buds & leaves are starting with a hint of deep purple.
Using dirty aquarium water has been going great through flowering so far, no nitrogen toxicity.
3/11/22 - Defoliated for the last time!
Defoliated so there's no moisture buildup between leaves, preventing PM. There were so many leaves, it looked pretty like a beautiful bush - but my intuition told me that those are going to hold too much moisture. Now there is enough space for the buds to fill out with even airflow throughout.
They don't look as beautifully full after defoliation but they'll be cleaner & easier to trim come the end of flower.
Aquarium water before nutrients:
6.82pH
395 PPM
73.4⁰F
Nutrients added:
5Tbsp unsulphured molasses
¼tsp raw potassium
¼tsp raw phosphorus
2Tbsp concentrate Seaweed
1tsp mycorrhizal fungi powder
Aquarium water after nutrients:
5.83 pH
787 PPM
73.4⁰F


Likes
14
Share


Processing
Likes
1
Share


@Cis420
Follow
El sustrato que estoy probando lo preparé yo y al parecer lo hice mal, estoy con deficiencias.
Regando con agua purificada e instagreen de grotek intercalado de calmax, improvisando ....
Enzimas también agregue.
El sustrato no retiene nutrientes y tiene una textura que no aporta humedad en la capa , estoy regando a diario con pocas cantidades de agua como se hace con la fibra de coco. A ver que tal...
Processing
Likes
14
Share


@OilyEliteOrganics
Follow
Smells sweet and robust.
A birch bender at the sight of the crown.
Growing heavy and dense .
Smeels like strawberry with a dab hint of coffee .