


Likes
Comments
Share


@ToastFarmer
Follow
No deficiencies thus far adding some molasses each feeding 1 tbls per gal water

Likes
8
Share


@HowtoBubatz
Follow
The plants are doing amazing! Both are producing more and more trichomes, and the buds are noticeably thickening up.🌱
#1 (the tall one) continues to impress—it’s now giving off a strong tropical mango scent! The aroma is so sweet and fruity, it’s crazy.
Meanwhile, #2, despite being so small, has developed a surprisingly large main bud!
The smell is completely different, though—leaning more towards a hazy, complex scent that’s hard to describe.🤔
Super happy with the progress so far—let’s see what the next weeks bring!😊

Likes
89
Share


@BioBuds
Follow
The enormous growth and bud development this week is unbelievable. This strain keeps pushing and pushing, I can see already that these plants will be covered in bud.
Also, these plants are in size what my previous photoperiods grow in 8 weeks and some flowering.
Really amazing to see. So far my experience with autos has been meh at best. These plants are nothing like that and are resilient and forgiving.
The Mars Hydro SP-3000 is now on full blast, it gives me some white pointies and the temps go up in the tent. I'm on the threshold of heat stress and light burn.
I'm trying to push it maximally and to get to know the boundaries.
Thanks again for checking out my grow!


Likes
25
Share


@XperencdGmanXG
Follow
right in 2nd week of flower and they have lost their smell? prob because it is so dry and they have started flowering. I gave them bloom amendments last week. lets see if they are in a better place next time i see them. These were clones from a grow buddy but it looks like the pheno was not really deserving of cloning. hope it smokes well.

Likes
12
Share


@2Byte
Follow
Coming up on third base! No issues at all from the recent wetness and really getting some nice purps on the GG4xGSC and the Green Gelato. Ironically nothing yet on the Ayahuasca Purple.

Likes
69
Share


@JohnnyBlaz3
Follow
Ok now this is a canopy to be proud of! This looks incredible woot woot! Did a massssive and final defoil about 3 days ago and cleaned up anything that isnt going to be a smokable flower. Took some contortioning i dont care to admit but its all good 😂 So today I started using some koolbloom to start really plumping these flowers up. Also as expected, that twin stem cola is looking like its gonna be crazy big 😃 The whole tent looks very healthy and i'm hoping for a smooth sailing to harvest!!!
Likes
65
Share


@Natrona
Follow
Week 12 Flower 8
Pink Rozay This week was all about checking trichomes. Pink Rozay trichomes show mostly milk and amber. There are a few heads that are dark brown that indicate too late to harvest. The older pistils are turning orange brown and water consumption is slowing down. These and the trichome indicators indicate readiness. Based on this, I put Pink Rozay in the cool garage with low light and ice on top of the pot at night this week.
Pink Rozay feeding and pics on March 23,& 26
Bloom Juice 120 ml
Royal Rush 0 ml
Power bud 15 ml
Green sensation
15ml
Cal Mag
20ml
Recharge 5ml
Ppm ranged from 676-777
Ph 6.5
Temp 68
Your likes and comments are appreciated. Thanks for stopping by.
Growers love 💚🌿
💫Natrona💫


Likes
20
Share


@Robin87
Follow
Last day of veg ( 18/11 ) all plants had a few leaves snipped here and there, plants looking the healthiest I’ve ever seen them, responding very well to the HST given throughout the week, all ready to switch 12/12 tomorrow morning!
Likes
9
Share


@Soskar69
Follow
The plant is big enough, so I've done some LST :)
Also this is the last week that I can spray the mixture with neem oil because from the next, this girl will start flowering.
Likes
Comments
Share


@JardineiroBr
Follow
Os fertilizantes tenho usado alternadamente em intervalos de 3 a 4 dias entre as regas . Pois tive que recolher as plantas para a estufa.
Quebrei as ponteiras para não alongar muito a planta pois tenho limites de altura da iluminação e quero ver se ela fica mais cheia de botões no caule .

Likes
8
Share


@DaddyPrime2
Follow
1/29/25
oh my goodness, that heavy diesel gas smell i is really coming through on the nose right now.
1/31/25
buds are starting to get heavy and leaning a bit
2/3/25
ive got spidermites again

Likes
9
Share


@Cannabot
Follow
Awesome plant,smell is super sweet yeah.Seems to be a bit nute sensitive so I've slacked down a bit.Buds are very dense hard nugs.Not too many leaves etc so trimming shouldn't be an issue.
Likes
13
Share

@masterofsmeagol
Follow
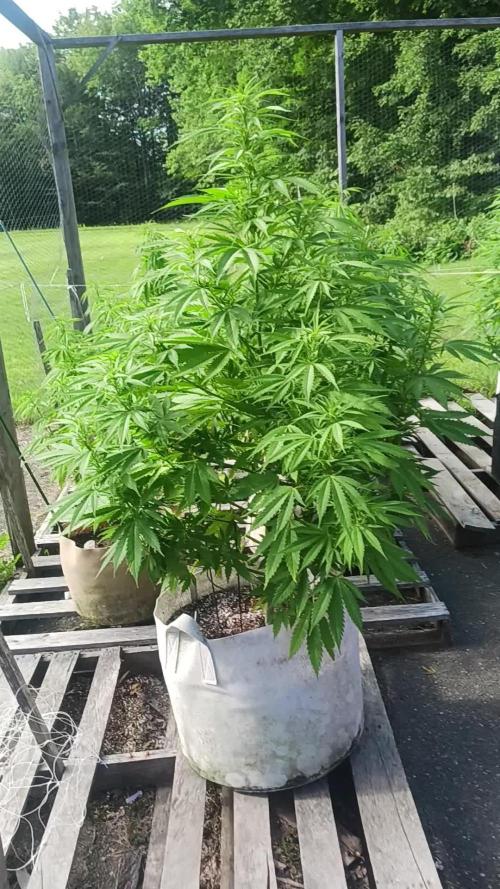
7/20 Went over this morning to plants soaking wet and heavy rain. Went back around 4pm and plants actually look really good. The rain has stopped for a bit and the girls looked great. Apart from some septoria leaves I needed to defoliate on the first plant I treated. I also noticed a few others on other plants so it's spreading albeit slowly. I treated the three in the middle with their second dose of Plant Doctor at 3tsp/1gal. One gallon administered to each plant via root drench. I think I may treat the other plant showing signs with a diy Dr. Zymes using citric acid as the active ingredient. That way I Gould start treatment right away without having to rely fully on plant doctor. Plus it would kill any pests. Ive seen damage but the birds do a number on them. I dont want to spray my plants with a bunch of chemicals if I don't have too. I shouldve replaced the pallets and cleaned the cage better. I think I did a good job sanitizing as I have no wpm. Just this septoria I probably got when the lady mowing the lawn cut all tjis fucking grass and blew it in my pen, throwing bird seed and I'm sure tons of disease into my grow bags. I literally had to harvest a bunch if fucking sunflowers. It looked like my plants had been mulched. Just with small disease carrying shrubs. At some point some of this stuff has to be on purpose. You CAN'T be that stupid. A couple kushes in the back look hungry. I think I may need to up my feed. I've written to much. I'll keep this updated. Thanks if you made it this far.
7/21 I guess it rained last night. Oh well. It was blue skies for hours before dark. It must've rained late/early morning. I'm sure the app of plant doctor will be fine. Like I said I'm considering using citric acid as a foliar spray to help with the septoria and clean up any pests. I don't have enough pests to warrant spraying. I just don't want to put all my eggs in the plant doctor basket. Today is overcast and windy. The wind has really assisted in spreading this virus. I remove anything I see infected immediately and since these plants are reveges they have plenty of leaves. Plants are really stretching. I know I talk about the septoria a lot but realistically if someone looked through my garden they'd have a hard time spotting it. I don't want to exaggerate the problem but I don't like dealing with ANY fungus or molds.
7/22 It was 55° this morning when I went over. I defoliated some septoria leaves and a few that were fading or damaged. I saw almost a whole leaf eaten so it's probably a good idea to move forward with citric acid. I can add that to the plants I've already treated with plant doctor. This is the first year it's been so noticeable. It's the reveg 10th planet that started this off. Oh well. I've dealt with MUCH worse. Plants LOOK good (other than septoria leaves (on bottom of plant). Today is water day for me but it's been raining and it's a lot cooler today. Bags still had weight to them. I want them to have a proper wet dry cycle. Temps top out at 75° so I'll monitor during the day and if something NEEDS WATER I'll give it to it. I'm suprised I have ZERO WPM. The septoria is much more identifiable but pm is usual present in these conditions bur I don't have a spot of it. I may do some defoliation today. I also need to add supports for flowering but one thing at a time.
EDIT: Went over around noon. 70°. Bags seem to be holding weight (it was easier to tell as ONE plant was substantially lighter than the rest) so I decided to hold off on watering. At least until tonight. There are three plants (at least that are going to NEED water). They look phenomenal now though and we've had lots of rain. Plan is to go over later and get the light ones and mix the water for the others so I can administer it in the morning quickly. I have an early doctor's appointment but I don't to overwater or water unnecessarily just because. But when you grow alone sometimes you need to do things when your able. I have people there that would help if I asked. And I have before but its late . I'm very grateful. I defoliated quite a few septoria leaves. They were all from the bottom of the plant. A couole wete bottom interior. I know there are worse things to contend with but still a pain.
EDIT #2 WENT BACK AT FOUR AND PLANTS LOOKED FANTASTIC AND STILL HELD WEIGHT. THE REVEG MK ULTRA IN EARLY FLOWER "MAY" HAVE STARTED TO DROOP AND "SEEMED" LIGHT. THE LARGE SPECIAL KUSH FUETHEST IN FLOWER BY THE DOOR WAS ALSO EXRRENELY LIGHT. I HAVE AN EARLY DOCTORS APPOINTMENT BUT DONT WANT TO OVER WATER MY PLANTS JUST BECAUSE IM IN A HURRY. ITS COOLER THIS WEEK. 70 TODAY AND HIGH OF 80 TOMORROW BUT DAD SAID THATS NOT UNTIL THE AFTERNOON. I MIXED UP ENOUGH WATER TO WATER EVERYTHING IN THE MORNING IF IT NEEDS IT. I HAVE AN IMPORTANT DOCTORS APPOINTMENT EARLY THAT WILL TAKE ME AWAY AND IM FEELING A LITTLE ILL SO I WANTED TO GET DONE WHAT I COULD TODAY. WATERED THE TWO THAT NEEDED IT WITH TWO GALLONS A PIECE (30GAL REVEG MK ULTRA AND THE BIG SPECIAL KUSH IN FRONT I DIDNT TOP THATS FLOWERING THE FASTEST. EVERYTHING ELSE CAN WAIT.
7/24 Surprisingly the plants still held weight this morning! The looked pretty good too! However its going to be highs in the 80's for the next 7 days. Since the plants still had some heft to them I watered everything just a gallon. I gave the 10s a half gallon and skipped the 50gal container plant. I think this is a good happy medium. I'm still seeing random septoria leaves but still no WPM. I defoliate daily sometimes a couple times. I need to get a minute to myself and add a foliar spray. I'll start with a dih Dr. Zymes while I'm looking into other products like bicilus (i have bt but its a different bicilus) or trichodermia. I need to feed sometime this week too.
7/25 Plants looked great this morning. I watered the 10th planet on the end that hadn't been watered in forever. I think I had been overwatering during those 100° days. I didn't water today as everything looks great and they don't seem to need it. I'll check later today. I did water the pink kush beside the 50 as it was much lighter (1/2 gal) to get it on par with the others. I'm starting to see pest damage as well so I think an app of Dr. Zymes would be a good idea. Both for pests and septoria. Plants are REALLY stretching. One special Kush is far ahead of the others.


Likes
10
Share


@mingokoon
Follow
Week 7 Oct 26 - strong growth this week.
They grew from 18.5" to 28" last week. I' m letting them grow into the light and today the middle plant is at 18" from the light. started adding there flowering nutes this week.
I started using Terpinator last grow (in photo -used on chem dog left, not used on right on chem dog from previous grow grow). it really seems to work

Likes
3
Share

@RooftopFarmer
Follow
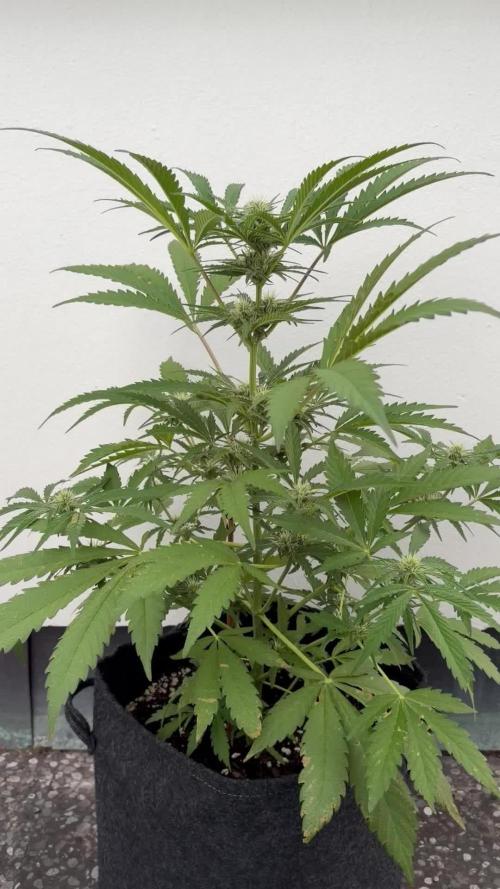
Guava Runtz – Week 8 (Fast Buds Outdoor 2026)
The weather was okay. Guava Runtz is being fed regularly and gets lots of sun. There are only a few small leaf issues, otherwise she is doing well.
She is now around 45 cm tall with lots of leaves and is fully in the flowering stage. A light scent is starting to appear, somewhat reminiscent of sunflowers. Nice growth.


Likes
7
Share

@Samsationalseeds
Follow
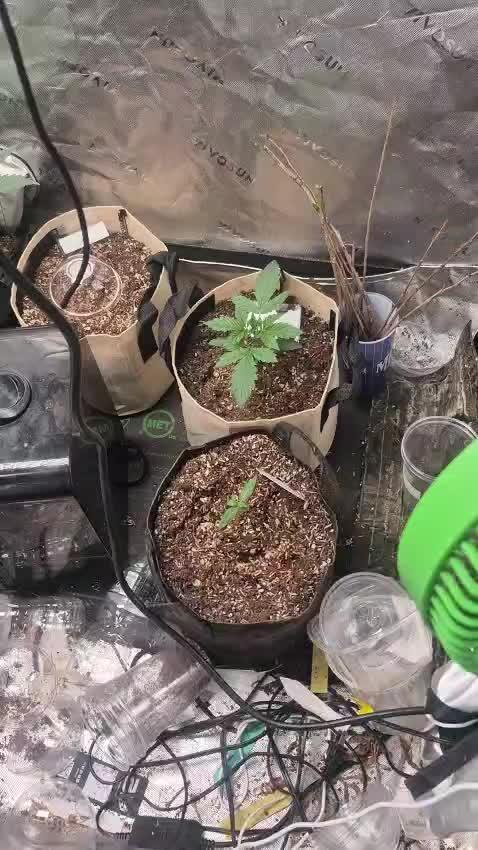
On the outdoor rotation on the left side are my bread.F one auto photohybrids, which should be photoperiotic.
They could have the potential to be fast flowering.
On the right side are the crescendo r x one by ethos.And I believe the g p a and game cookie hybrid by them as well.
As for the ones in my room, I think only the super lemon hayes r x three hyper died. I believe one of the autos.There is gonna die, but it's okay.
That tent is to set up mother plants that I should be able to clone and grow.


