
Likes
Comments
Share


@Juschiln420
Follow
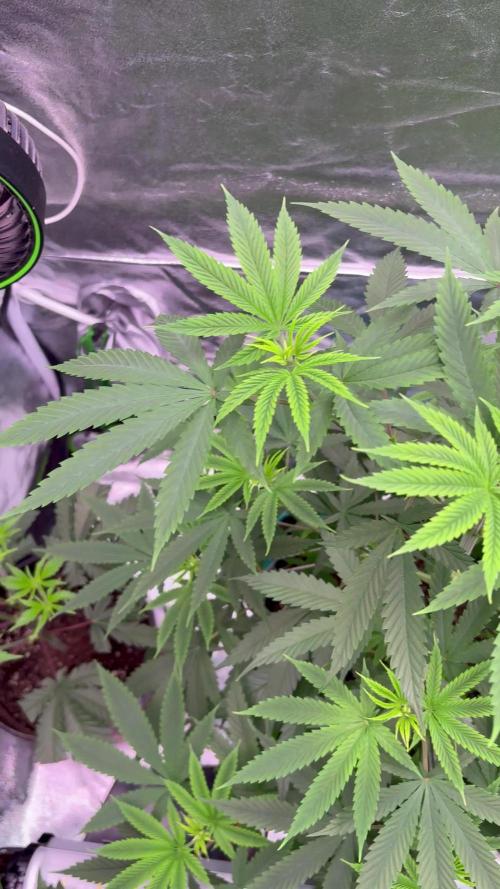
Well, she has not been happy with me for a little while now. I'm not sure if it's a potassium deficiency or a cal mag issue. I've been adding more and more cal mag and slightly upping the potassium so idk. Hoping I can get her happy again so she will produce but she hasn't been working with me. We will see
6/25 added 2L
6/26 added 2L, 3ml micro, 3ml bloom, 3ml koolbloom, 1ml gro, 10ml Seaweed extract, 2ml orca, 2ml calmagic, 3ml Floralicious
6/27 added 2.5L
6/28 added 2.5L
6/29 added 2.5L
7/1 refreshed, gave 8ml hydroguard, 8ml orca. 20ml Seaweed extract, 4.5ml calmagic, (wk8) 2.25ml gro, 9ml micro, 15ml bloom, 5ml Koolbloom, 4ml Floralicious,
Record kept here:
https://1drv.ms/x/c/fa218bbdbbfbd064/EZcr2ra_BRhPpa2h_1UbO8MB5taPKHGbugxYoEcQivqWMg?e=ZAvS9Q
👋👋👋 Hello, Thanks for checking out my grow!! Please like and follow I really appreciate it!🤟 Please feel free to leave questions and comments below!!👇 I really appreciate all advice!!! Check out my Instagram, you can message me there too! And check out my youtube for more content! Mistakes were made, but what better way then to live it and learn it yourself!!!!

Likes
1
Share

@Ninjabuds
Follow
I like the structure of this plant it starting to look pretty healthy ima hook up the watering system soon and flip to flower soon aswell

Likes
2
Share


@Mr_nugs_lover_David
Follow
She grew up nicely very healthy and strong and she produced a decent amount of organic clean cannabis, It's great and just what I work for because I'm a patient that needs to grow his weed and doing it making sure I grow them naturally and organically. The result is a very fruity and and tropical aroma, the purple color makes her even more beautiful. It's just a dream man, I love it, I just love to grow this strain, the 4 plants I grew had the same aroma very tropical and fruity, super sweet.


Processing
Likes
17
Share


@Doobiefumes
Follow
week 2 day 3. maybe 200 ppm is a bit too much im actualy seeing tip burn on 2 of them i might remove 50 % water and add reverse osmosis water tomorow to lower nute concentration to around 100 will see how night goes.did the 50% water change and readjusted ph now everything looks fine. also iv lowered water level to 1 inch above bottom of net pot to promote more root growth i need to buy a par meter asap im scared to lower my veg led lower.some little issue with minor tip burn maybe from stress from power outtage or potassium deficiency from nutrient lock out ph went to 6.7 for a day cant get it stable so far.seems like ph as finaly settle down go check my video from grow room.2 of them are doing really well but 2 are in bad shape newbie mistake my ph pen was way out of range went to 4.8 for 2 days i calibrated it 2 days ago flushed system and ran revive only for 2 days ph has been spot on at 5.8 since flushed again yesterday and started adding nutrient back in very low dose 1/4 strenght plants now seems to thrive as roots entered the system today they already are like 6 inch long light just shut off i might do another foliar spary with revive and sensi cal mag extra and wet betty to help with damaged leafs from bad ph pen mistake next week if they have not fully recovered already in case 1 of them does not make it i have a spare 1 growing in coco whos ready to drop in system im still learning feel free to leave comments


Likes
26
Share

@valiotoro
Follow
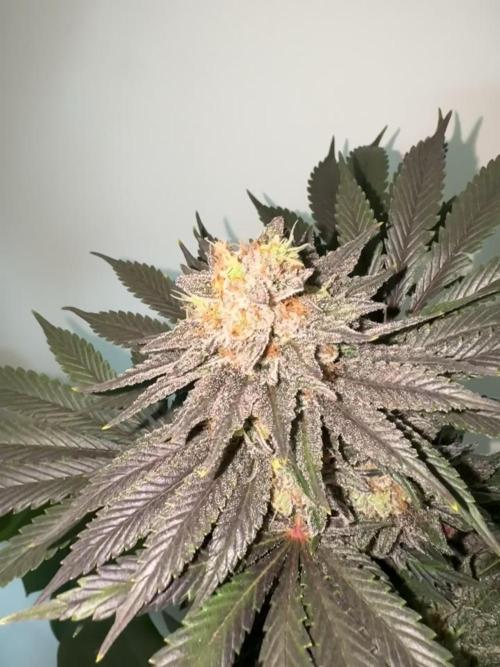
I got two different phenos from this run.
One green pheno with a more gassy and funky smell, and one purple pheno leaning more toward strawberry diesel.
The buds are super compact and absolutely covered in trichomes. Really beautiful flowers. 🔥🤩

Likes
14
Share


@Dunk_Junk
Follow
Wow... She's really entered flowering this week!
I've had to bend over her main cola so is could receive light as opposed to growing above it 😂 😕
Also she's been stretching like crazy. I have backbuilt quite a few bud sites. We will see in the coming weeks how effective this has been.


Processing
Likes
9
Share


@MG2009
Follow
03/20/2020
Week3 flower did light defoiliating and watering(plain water). I did notice some sweet citrus aroma just slightly orange but not to much, (tangie) is too citrusy to me, hope more blue berry hazy flavor comes out but I'm sure it will be great
03/22/2020
Top 1/2 inch soil is drying out quicker she be getting thirsty! Should see some nice changes this week.watered till 5% run off 2lt.plain water. Uploading video enjoy.🙏 She is stacking up
Likes
223
Share


@GERGrowDesigns
Follow
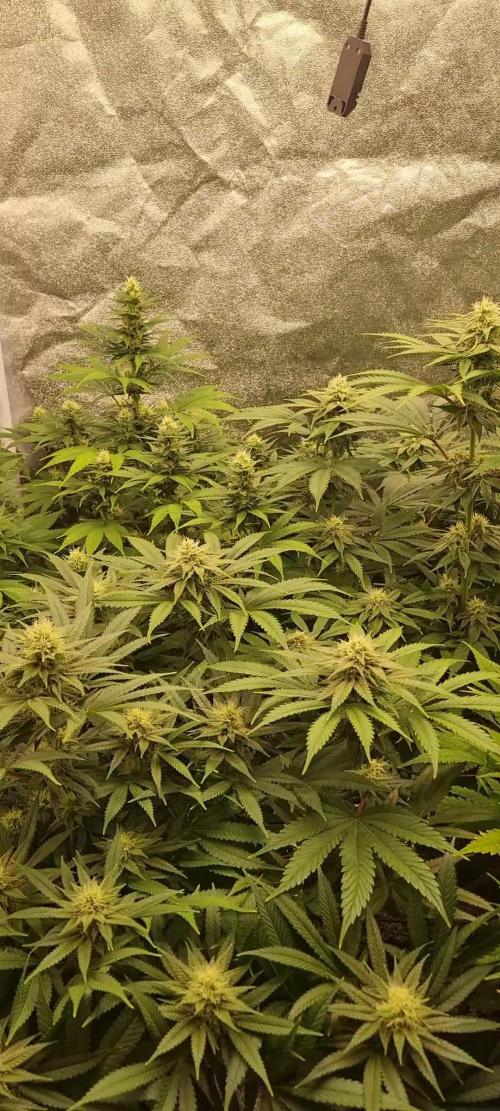
Welcome to week 8 or Flower week 3
The Strains from Sweet Seeds doing Amazing !
4 x gorilla Girl f1
6 x tropicana Poison F1
-Gorilla Tent 4x8 Shorty
-2x 600 watt lights
-20 Liter pots with Narcos Organic Mix
-Narcos organic Nutriets With every water for the Plants
- 2-3 Liter every 1-2 day Each plant
- 28 day temperature
- 55 % Humidity
The plants Stretching a lot . The tropicana more then the gorillas .
Every Plant looks Healthy and im doing a bigger defoliation the next days for Each plant .
Tempartures are betwenn 27-30 and the Humidity about 50-63%
Keep up Growing everyone !

Processing
Likes
26
Share


@Char23
Follow
Hi everyone,
Buds are swelling nicely on the blueberry and gorilla. The gorilla is starting to smell amazing.
I am hoping that all 3 will have been cut down within the next 4 weeks.
The zkittlez hasn't seemed to have done too much and I have kind of given up on the buds fattening up at this stage.. I'm putting it down to this being my first run and the fact that I should have raised them closer to the light earlier as the others were so much taller.
I'm thinking to feed the zkittlez plain water for the next 2 weeks to flush before harvest and feed the other 2 for a further 2 weeks before doing the same. what do you think?
I'm going to have to make a drying box for outside the tent and fix this to the tent via ducting to create an environemnt for the zkittlez to dry. Does anyone have any advice here seeing as my tent is still going to be in use?
Thanks for reading :)

Likes
21
Share


@Bluemels
Follow
Seit ein paar Tagen duftet die Cookie Gelato, der Geruch ändert sich von Tag zu Tag.
Sie entlaubt sich sogar selbst, ich hatte das eh nicht mehr vor😁

Likes
7
Share


@Nikkov
Follow
the other two strains didn't resist the cold during the week, the two CBD strains that got lost in the cold.
i will try another strains next week.
Likes
68
Share


@MOSS_FIGURE
Follow
.. Week2 start to use beneficial nutrients and switch the light only 18 hours per day.⏰
{Activities}
(Day 8) First day of the week, i dont't water the plants.
(Day 9) Second day use some nutrients, there're Cal-mag 0.3ml./L. , Bio-heaven 2ml./L. , Acti-vera and Fish-Mix each 1ml./L.
(Day 10) ....Practice the dharma So calm🧘♂️..Just observe them. Nice growing
(Day 11) Use a Root-juice 4ml/2L. I think the roots will not walk to the bottom of the pot if the watering does not reach so I should add 1 liter of water per a plant.
(Day 12) Today I should add more fan for my grow tent so today I'm buying new one , switch the light to 75% and Lamp To Plant Distance 24-26inches .
(Day 13)...This day I'm not do anything about my plants but learning about toping and cloning a plant or other training a plant.
(Day 14) The last day water the plants but use only water.🚿
Hope you like and enjoy my diary.
Thank you so much for checking out my grows. Feel free to leave a comment, push the like or give the follow.

Likes
2
Share


@Archimedes
Follow
stoked to see the effects of the pk booster, the overall growth seems quite dense and stacked for a 80% sativa autoflower. Lowering CogR Flores to 3ml/l in anticipation of a harvest within the next 3-4 weeks. The Smell is getting more intense now and is not as a flat anymore. Nice and juicy Sweetness, some skunk and hints of chocolate or candy.
Mixed 10l of Nutemix with the Redboom a couple of days ago, mixed another 10l todays and once the 10l are gone i will stop using it until next run - so a total of 20l for those 2 plants, ph regulated water once inbetween both applications


Likes
12
Share


@tsf_homegrow
Follow
Erdmischung: 50l Torf freier light mix, 6l Wurmhumus, 3l Aktivkohle, 4-5l Perlite.
bevor alles vermischt wurde habe ich 5x0,5l Töpfe mit dem light mix befühlt.
Für die Autos kommt 0,5l vom light mix oben in einen 11l Teku, der Rest wird mit der Erdmischung befühlt, da die Autos nicht umgetopft werden sollen.
Die Photoperiodische Kmintz kommt vom 0,5l light mix dann in 3,5l - 11l - 20l mit der oben genannten Erdmischung.💛🏼
Likes
21
Share


@Staffedition
Follow
Привет друзья. Моей растихе сегодня 146 дней
20.10 перевёл свет в режим 12/12
Начал применять LST технику на 19 дне, а 18 августа добавил ДЕФОЛИЗАЦИЮ
С 20.08 ДЕФОЛИЗАЦИЮ
С 20.08 LST технику
На сегодняшний день влажность 54%
5.09.2023 заметил высокий Ph 7.9
С 48 дня Ph не ниже 5.8
На сегодняшний день Ph 6.0
Начал кормить с 60 дня Canna Terra Vega
PPM 870
Всем мира и добра!
Не забудь поставить лайк❤️, если понравилась как прошла неделя
И читайте наш TELEGRAM: https://t.me/smail_seeds
#Smail_Seeds 😀
Likes
141
Share


@WhiteWidow
Follow
I provided you with a close up video of each plant and one video where i go through tent and try to focus some nice buds individually..
Flushing her for 5 days already with a mild 400 ppm solution of terpinator and mammoth.
Very sweet orange / apricot / melon smell to her, not the biggest buds in the tent bud definitely with the best aroma..
I would recommend this strain to everyone who loves sweet sugary fruity smell, its insane.
Likes
37
Share


@RFarm21
Follow
Boas growmies!
O gráfico representa a nutrição misturada em 2,5L de água da Royal Gorilla 1.
03/08/2021 - Alimentaçao das Royal Cheese's (4L): EC = 0,74mS; pH 6,1
-BioGrow - 5,5ml; BioBloom - 3,5ml; TopMax - 4,5ml; BioHeaven - 5ml; Activera - 2ml; Calmag - 1,2 ml;
Alimentação Royal Gorilla2 (2L): EC = 1mS; pH 6,1
- BioGrow - 2ml; BioBloom - 2ml; TopMax - 1,5ml; BioHeaven - 2,5ml; Activera - 1,5ml; Calmag - 1,5 ml;
---------------------------------------------------------------------------------------------------------------------------
05/08/2021 - Alimentação Royal Gorilla 1 (2,5L): EC = 1,12; pH 6,3
- BioGrow - 3,5ml; BioBloom - 3ml; TopMax - 3ml; BioHeaven - 3,8ml; Activera - 3ml; Calmag - 0.6ml
Alimentação Royal Cheese 1 e 2 (4L): EC= 1,10; pH 6,3
BioGrow - 6ml; BioBloom - 4,5ml; TopMax - 4ml; BioHeaven - 5,5ml; Activera - 5,5ml; calmag - 1ml;
Alimentação Royal Gorilla 2 (2L): EC =0,98; ph = 6,3
-BioGrow - 2ml; BioBloom - 2,5ml; TopMax - 1,5ml; BioHeaven - 2,5ml; Activera - 2,5ml; Calmag - 0,7ml