The Grow Awards 2026 🏆 


Likes
Comments
Share
@daRealOG
Follow
07/07 beginning of week 3 of flowering watered + nutes 🤞🏻
As this is my first grow ever, i need to improve the height control on the next runs...
09/07 critical 1 main cola started touching the led, tried to bend the stem but snapped it 💀
12/07 super cropping on critical 1 ok, critical 2 supercropped yesterday for the same reason, reaching way too close to the led


Likes
12
Share
@GYOweed
Follow
Gave it 3 days dark and dry.
Cut it today to hang and quick dry.
Probably get 2oz.
Sadly the lowers are very soft.
One of the main reasons iI hate indica grows.
Very bushy even trimming fan leaves lowers still have no light and inners in the middle too.
She looks like a bitch to trim hopefully i can use my silicone brush.
Next time Ill ask for their most sativa meow strain.
Likes
8
Share
@MoneyGrows
Follow
Germinated in water (shot glass)
Planted in coco / happy frog mix . Added Myco fungi , worm castings , root starter powder on Rapid Rooter plug . Watered with GH root starter. Growdots
Likes
7
Share
@GTools
Follow
Flushing has started and I expect to harvest within the next days.
Mostly all the trichomes are milky. Not many clear trichomes left, and some older sugar leaves have have trichomes getting yellowish amber.

Likes
27
Share
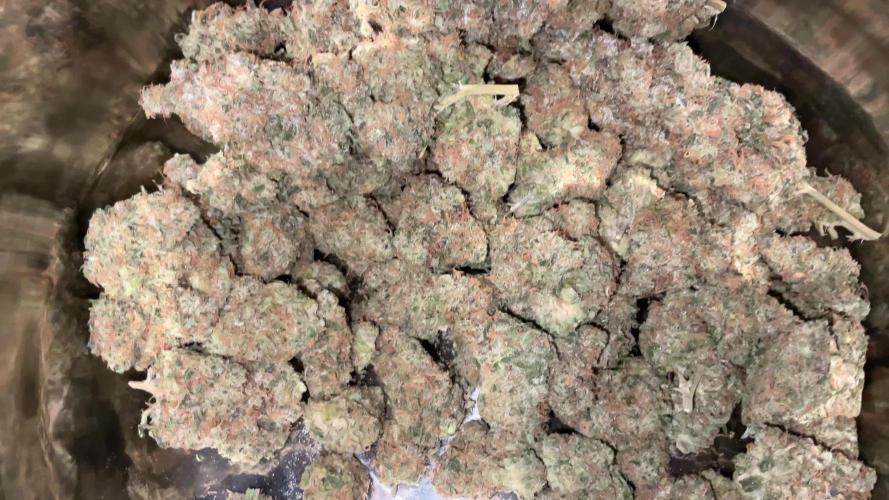
@Ganjagrandaddy
Follow
Data....
So there we have it. Another harvest in the bag and some very nice nugs of Zamnesia Biscotti to wait to dry and cure to perfection. The strain has been great to grow with no issues with anything I threw at it. I didn't see the need to use anything to minimise the iverall size of my plants but went with the nutes to see what the results would be. We will get a better idea once dried and cured with a yield per plant to go with too. I am not expecting g a huge yield based on their overall medium size bit rhe buds look so sweet amd smell amazing of a pineapple type sweet and a fuel type undertone. I think a cure will really bring out the best in these. Roll on the final report. Thank you Plagron and Zamnesia for the opportunity to try these out.
Thanks for sticking g with me for this one and hopefully some nice bud porn in the last post once finished. Be

Likes
4
Share
@Ninjabuds
Follow
A really smelly and strong growing auto this plant definitely has potential for topping several times


Likes
18
Share
@MisterAeroponics
Follow
Broke a branch this week pretty upset about it was a large branch. Other than that everything is going well slight deficiencies here and there just gotta watch and correct them. We should jump into flower here in 3-5 weeks i will do my final trims in roughly 2 weeks 🤙🏻

Likes
12
Share
@Canadian_Jeff
Follow
First feeding on day 8. I will be watering with nutes and plain PH's tap water every other watering as required by the dryness of the soilless mix. Watering until about 10% runoff each time.
Current lighting: mix of LED & CFL- total wattage 71 watts.

Likes
4
Share
@StonedRAGE
Follow
Same as stated above. Not my all time Favourite, but was nice to grow this oldschool genetic


Likes
3
Share
@Purplepassion
Follow
I guess the plant is one week younger then I've described here, not 100% sure cause I just used my past pictures on my phone , but the last Picture this week and following pictures are in present time.
Enjoy

Likes
13
Share
@raulmoat123
Follow
Well I have took down the phoenix seeds super kush clones which is are absolutely fire they have all turned purple and bursting with thc super kush was actually a freebie and is one of the most fire strain I ever have grown, also I took down the the platinum gushers both fire phenos one has totally turned purple one is more orange both smelling fire , this harvest is going to take me about 3 days to take down everything haha . I think I should start getting sponsors from these seedbanks


Likes
57
Share
@LockDownGrow
Follow
Finally at the swelling stage and growing out nicely , this lady has been a joy too grow , no decency's what so ever , she really did stretch in here flower stage going from the size of the Zkittlz plant into a plentiful branched beast she is today stacked with bud sites and let me tell you she smells absolutely amazing !
her buds look frostie already and are starting too swell lovely and there are plenty of them too ,
Likes
10
Share
@The_Chef_420
Follow
The cold weather is coming and I'm hoping these girls will finish up soon. One has such dense pre-flowers, another has your typical indica characteristics and the last has many similarities compared to her ancestor, Dark Devil like her leaves and sativa like structure. I increased the amount of Nirvana used to the manufacturer's recommended dose once I saw that they handled close to a tsp with no negative effects on their roots. This is the first time I've used Bio-cozyme, I assume to cut its use in a week or so when I begin supplementing with Overdrive. Also I learned that from pruning the inside leaves and small branch growth prior to flowering has increased the size of each branch, increasing yield. I make a lot of concentrate so I usually leave some of the smaller lowers and inside buds but I experimented with these girls by clear cutting their lowers or "lollipopping" them 🍭. The middle girl is going to have a massive cola. Been spraying with neem, geraniol, thyme, cinnamon and peppermint oils daily diluted in distilled water with the forecast of the next few days of cold and wet weather, hopefully protecting them. I bought some aquarium heaters today for the cold weather for each bucket, wasn't fun, kinda expensive and they didn't have enough of one wattage so I used another store too and they vary in wattage but should all have some sort of improvement in temperature.🌡️❄️


Likes
3
Share
@All_about_420
Follow
Leider hat mir diese Woche die Zeit etwas gefehlt, um mich etwas ausgiebiger um mein Mädchen zu kümmern.
So konnte sie in Ruhe noch etwas wachsen und sich auf die bevorstehenden Strapazen vorbereiten,
indem sie ihr Wurzelwerk noch mehr ausbilden konnte und etwas an Größe zulegen konnte.
Das ist auch gar nicht schlimm, da sie sowieso getoppt wird...
Likes
4
Share
@blaze_fpv
Follow
Started off week 2 with heavy defoliation // they took it like champs // they instantly started to fill the space again // back right corner is still a bit behind but the rest of the canopy looks crisp 👌🏼
End of week 2 // kolas starting to form up // currently 27° at 60% // gonna lower the temp to 25 very soon // also collecting the water every day and then water them daily // gonna start using green power phosphor booster in the next week

Likes
49
Share
@masterofsmeagol
Follow
6/23 Due To The Two 8 Day weeks this week will only consist of five days to get me back on track. SEE LAST WEEK FOR DETAILS. I DID ANOTHER EIGHT DAY WEEK. I'LL DO THIS WEEK AS SIX DAYS. THAT WAY IM BACK ON SCHEDULE. WATERED 6/22. WENT BACK AT NIGHTCAND WATERED ANOTHER GALLON WITH 1/3 TSP Armor Si. I mixed the solution with kelp you kelp me but I dumped it out. I've mixed silica with other nutes before but I had read something earlier about bioavailability issues and I didn't want to risk it. My plants are the healthiest I've ever grown. I'm considering transplanting the large 10th planet that I'm light depping. I also need to develop my ipm and my nute schedule. Still gonna have to keep an eye onvthe water situation. Luckily I have a buddy in my corner that's co tinualkt Bern a great help.
WENT BACK OVER AROUND NOON. BEAUTIFUL OUTSIDE AND THE PLANTS WERE LOVING THIS SUN. I DEFOLIATED SOME BURNED LEAVES AND MIXED A SOLUTION IF KELP ME KELP YOU THAT I PLAN TO FEED TO THE GARDEN TODAY. IM HAPPY WITH HOW THINGS ARE GOING. WE HAVE SOME RAIN AND THINDERSTORMS COMING. I NEED TO GET MY IPM UP AND RUNNING AND THE NUTES ONLINE. I ALSO NEED TO DECIDE IF IM GOING TO TRANSPLANT THE LIGHT DEP 10th PLANET. Went back over to put the girls to bed at six and if was still 90 degrees. The water from yesterday had dissipated. The tops were dust dry. I mixed two gallons of kelp you kelp me and fed it to the garden. Afterwards I pointed qbd found a couple plants that were more open to the wind were a little lighter. I know tomorrow will be very hot. Maybe quarter inch of rain. However after that it will rain (showers) off and on for days. I wanted to make sure the girls had what the needed to make it through tjis heat wave until they get that rain. I had another gallon mixed up and I'm thinking I should've given it to them. Oh well. I'd rather underwater than overwater any day. I did notice a burnt top on the plant furthest from the tarp that the sun JUST BARELY TOUCHES when the rest are in shade. I'll just raise the tarp a little. These are tiny problems. Can't upload video until tomorrow.
6/24 Good thing u gave the plants that water. I know it wasn't much but we didn't get any rain. Suppised to get a qtr in today and another qtr in tomorrow. Then rain a couple more days. It's working our really good for my watering schedule lol. Yesterday the girls got there first dose of a bottled nute. They got two gallons of kelp me kelp you (1/3 tsp per gallon) and another gallon of just phed water. I was going to do another gallon but held off due to the threat of syring rain. Didn't get it bur it looks like the plants loved the kelp. It had reached 90 yesterday. They look better today. It's 70 at 9 today. I LST the 10th planet in the 3 gallon. It's getting huge. I should start a separate diary for those three light dep plants. Its cool as hell watching this. One of the purple punches is flowering pretty good. I probably should start another diary for them. I'll be starting to feed my plants soon. Wondering if I should pinch plants again. TUCKED THE LITTLE GIRLS IN AT SIX AND SHOT A VIDEO AND TOOK SOME PUCTURES. PLANTS LOOKED PHENOMINAL! GOT HOME AND AROUND SEVEN IT JUST STARTED RORREBTIAL DOWNPOURS! THE TYPE OF RAIN THAT BREAKS STEMS. I SHOULDVE PUT MY OTHET TARP UP BUT I DIDNT. I WISH I HAD. IM A LITTLE NERVOUS. I KNOW THESE GIRLS ARE STRONG THOUGH! TOMORROW. ILL ROLL THE RARP UP AND SECURE THE BOTTOM FOR FAST ACCESS. IM ALSO GOING TO KOOK INTO FINDING A TOP FOR MY CAGE I CAN USE IN INCLIMENT WEATHER.
6/25 That little qtr in of rain we were supposed to get turned into torrential downpours and high winds. Luckily no REAL damage. If you watch the video you'll see what I mean. I'm going to havecto be cognizant moving forward. Noticed a few chunks from leaves butvplants are still healthy. I'm surprised how well these girls withstood this storm. They are certainly resilient. The 2 purple punch 1 10th planet that I'm light depping are flowering nicely now. They missed all the commotion from the storm as they were inside. It's smelling good. I'm happy.
6/26 It's what a friend would say is "maineing") out. That mistcthe plants love. I'm surprised the plants are doing as good as they have been considering the wind. Will be adding nutes soon. Need to add extra supports too. Light dep
6/27 Brief periods or torrential downpours. Light depped 3 gallon 0lants are under an overhanfcwhete the hatsxrain can't hurt them but they still get sun. They are really starting to flower now! I'm going to begin feeding with a base nute and a flower nute I think. I'm thinking about giving the light dep some open sesame or something similar. I need to set up a nute program soon but the plants ALL look so healthy! And it's been raining! I've only watered like once or twice since they've been in the big pots. I've seen zero pests aside from a chunk missing from a grasshopper. Usually by now I'd have battled half a dozen things and be battling another half dozen. However I was posing from clones. These are seeds and boy don't I see the difference!


Likes
12
Share
@ZzTooRightOGzZ
Follow
She's doing so well not doing much but feed her and got her a wee defold.
Likes
294
Share
@StarLorr
Follow
Welcome to my Ðivine ØĠ Ķush diary.
In this diary:
Seeds: sponsored by Ðivine Șeeds
Media: Promix HP
Nutrients: Advanced Nutrients, Diablo Nutrients, Gaia Green Power Bloom.
Light and Weather: Şun☀️and Mother Earth.🌎
___________________________
Feeding:
Tue 06Aug: 4L nutrients pH'd 6.5 and 4L water not pH'd
Wed 07Aug: 8L water not pH'd
Thu 08Aug: top dressed Gaia Green Power Bloom 6 tbsp
Sat 10Aug: 2L water not pH'd
Sun 11Aug:6L water not pH'd
Mon 12Aug: 8L water not pH'd
___________________________
*please note that most water only feedings are 2L at the time throughout the day in bottom saucer*
___________________________
Ķush Ķush survived the wrath of Debby(Tropical Storm)she stood her ground(in her pot)😂she did very well, check out the video😉
______________________________
Ķush Ķush and other sisters got the defoliation treatment, mostly fan leaves.
_______________________________
Top dressed her up with Gaia Green Power Bloom about half a 3/4cup as i can't keep up feeding her liquid nutrients in such industrial amounts😅but the results are already showing and she seems to like it, i will continue liquid nutrients feeding once or twice a week.
______________________________
Thanks for stopping by, likes and comments are appreciated!👊🏻😎
Keep on growin!
Keep on tokin!!!
😙💨💨💨💨💨
