


Likes
61
Share


@PEAKYPLANTERS
Follow
FUCK BOYS .... AND ONLY A LOOK TO LOOK AT THEM ... THOSE SUGARS FILLED WITH SUGAR MAKE YOU WANT TO EAT THEM ... I ALREADY FEEL A GOOD SMELL !!! .... I CAN'T WAIT TO TASTE THEM ALL
* THE CENTRAL PLANT ENDED TO BURN HIMSELF ... BUT THE IMPRESSIVE THING IS THAT, AFTER HAVING SPACED THE LAMPS, THE LATERAL ROPES ARE COVERING THE SANDED PART
* THE STRAIN ON THE RIGHT AND GROWING SELF-DRIVEN AND HAS DEVELOPED TWO APICAL TOPS WITH TWO DIFFERENT BRANCHES .... I AM IMPRESSED BY THE RESISTANCE OF THESE CHILDREN .... @FAST_BUDS YOU ARE A GREAT

Likes
12
Share


@TheNug
Follow
growing bushy as all hell, lifted lights to try get them to grow vertically more , we got some chubby plants right now lol

Likes
86
Share


@DogDoctorOfficial
Follow
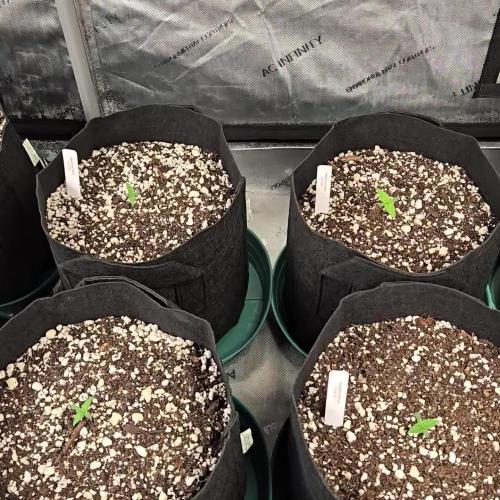
Apolo F1 Mission Diary - Week 2: The Rise of the Green Titan
Greetings, fellow growers and botanical enthusiasts! Our Apolo F1 has sprouted into a verdant marvel, standing tall and proud, like a green titan rising from the soil. Join me in this second-week report as we explore the wonders of growth, the magic of transplantation, and the botanical symphony of nutrients.
This week marked a significant milestone – the grand migration to an 11L fabric pot, generously provided by the good folks at Royal Queen Seeds. Now, let's talk fabric pots and why they're the VIP treatment for our plant's roots.
Fabric pots, oh, they're like the five-star hotels for roots! Unlike their traditional counterparts, fabric pots offer superior aeration. The porous fabric breathes, preventing the soil from becoming waterlogged and ensuring oxygen reaches every nook and cranny of our Apolo F1's root system. It's like giving our plant a breath of fresh air, quite literally.
But the benefits don't end there – fabric pots also prevent roots from circling the container, promoting a more extensive and fibrous root system. This, my friends, translates to a happier, healthier plant with increased nutrient uptake and overall vigor. It's like our Apolo F1 is getting a botanical spa day every day!
Now, let's dive into the alchemical mix that accompanied this transplantation – my special Aptus Holland super soil blend. Picture this as the magic potion for plant prosperity.
First in the concoction is Micromix Soil, a blend of microorganisms and stimulants that's like a botanical feast. These microorganisms act as the unsung heroes of the soil, enhancing nutrient availability and fostering a symbiotic relationship with our green companion.
Next up, enter the Substrate Buffer Powder – the pH conditioner extraordinaire. Unstable pH conditions begone! This powder, featuring micronized calcium, acts as the stabilizing force, ensuring our plant enjoys a balanced pH banquet.
And let's not forget the All-in-One Pellet – the time-released 100% organic pellet fertilizer. Packed with a compounded NPK fertilizer, magnesium, sulfur, and organically chelated microelements, it's like a gourmet meal for our Apolo F1. The L-amino acids are the chef's kiss, enhancing nutrient absorption and overall plant health.
During the transplantation spectacle, I introduced Mycor Mix once again. This blend of endomycorrhizae, fixed on a vegetal carrier, is like the entourage for our Apolo F1, feeding and protecting the fungi that, in turn, support our plant's growth. It's the ultimate teamwork, a botanical Avengers assembling to ensure our green hero thrives.
And the best part? Our Apolo F1 is reacting with sheer botanical enthusiasm, reaching for the stars and soaking in the nutrients like a plant on a mission.
Before I conclude this week's report, a heartfelt shoutout to Royal Queen Seeds for the royal treatment in the form of fabric pots, to Aptus Holland for being the architects of this nutrient symphony, and to Grow Diaries for being the virtual arena where our horticultural tale unfolds.
Stay tuned for the next chapter in our Apolo F1 Mission Diary – where we'll witness the continued ascent of our green titan.
As always thank you all for stopping by and for supporting me on this journey, i am super passion about growing and fell blessed to have you all with me on this new journey <3 <3 <3
Genetics - RQS APOLLO F1
Ligth - LUMATEK ZEUS 465 COMPACT PRO
Food - APTUS HOLLAND
All info and full product details can be find in can find @
https://www.royalqueenseeds.com
https://aptus-holland.com/
https://autopot.co.uk/
https://lumatek-lighting.com/
With true love comes happiness <3<3<3 Always believe in your self and always do things expecting nothing and with an open heart , be a giver and the universe will give back to you in ways you could not even imagine so <3<3<3
<3 <3 <3 Growers love to you all <3 <3 <3

Likes
16
Share


@bigbootybotanist
Follow
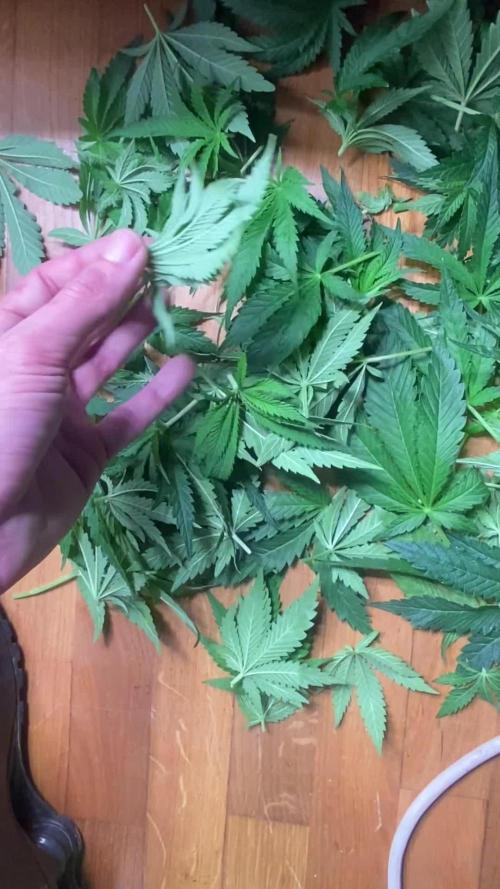
Finally coming to an end this week, didn’t get to properly flush the nutrients out to see the leaves begin to fade but next grow i will pay more attention to this. Definitely needed to hold the plant up using chopsticks but hey it worked
Likes
11
Share


@Bonders23
Follow
Put in grow cages and tied main branches down for LST or Mainlining . Continuing Boogie Brew and Wallace Wonder Grow alternating each brand every other week. Weeks 13 through now have deployed 1/2 strength Earth Juice Original 5 w/ Hi Brix. I trim cover crop when needed to slowly add mulch/slow release notrogen as clovers, vetches, millet cowpeas, lentils flax and peas are broken down by tons of bugs in the living soil.
Processing
Likes
34
Share


@timbarin
Follow
The plants are growing and getting fatter and thicker by the day. I can see shoots of red pistins on the flowers and they are very sticky.
The smell starts to be noticeable but I have a carbon filter so I'm sorted for now
I do consider to bring ac unit
Likes
2
Share


@High_Grade_Dadli
Follow
Was a kinda busy week kinda lapse on #1 got a bite of spider mite prob from a near by tree...also breed a branch will see how successful that was
#2 is jus doing her thing can't complain no issus
Likes
11
Share


@Madman2020
Follow
Week 1 Aiming for:
Generative steering VPD 1.18
DLI=44
37-53luxx
Day 3
Irrigation system did not produce runoff. I will hand water them all untill runoff.
Dripper uses 4.224gl per day
Plants are 14-18inch tall
(4 minutes is a shot)2%= 220ml
4minutes to hit 220
8.64*110=950
4 events of 220=880
Early flower schedule
(Generative 4 minute water)
6:30 220 P1
6:49 440 P1
7:09 660 P1
7:24 880 P1
7:43 1000 P1
03:00 1220 P3
36.8klux(40.8DLI)is minimum(940umol)
40klux (44.37DLI) is Perfect(1027umol)
53.2klux(59.18DLI) is maximum (1370umol)
They say PPFD of at least 800-1100 (800-1100) micromoles/m2/s-1 for perfect optimal lighting without additional CO2.
PPFD of at least 800-1500 (800-1500) micromoles/m2/s-1 for perfect optimal lighting WITH additional CO2
Day 6
Plants are good for LST
Day 7 looking like we need to defoliate. 4 plants still look sick
WAtering is going well

Likes
18
Share


@TheCannaProphet
Follow
~ FASTBUDS TESTER #2204 ~
Well friends, here we go on another 'canna-venture' together!
The grow room has had a complete remodel and some upgrades done to it including brand spanking new 4x8 and 4x4 tents and a Trolmaster Hydro X controller along with a new Control Panel.
This tester strain is one of six tester strains that FastBuds has graciously provided me with and I'm looking forward to seeing what this girl has to offer when she's grown to her full potential!
One drawback of 'testers' is I have little to no information on it other than its number and that it's an autoflower... 🤪 But, it's ALWAYS a blast growing them for me because not knowing a lot allows me to just concentrate on the essentials: Light, Environment, Water, Nutrients and possibly a bit of LST... not complicated, just basics like keeping a constant temperature and RH in the tent at a level that gives a good VPD, watering when almost dry and maintaining proper light levels according to their stage of growth.
____________________________________________________________________________________________________________________________________________________________________________________________________________________________________________________________________________________________________________________________________________________________________________________________________________________________________________________
~THE SETUP~
~Initially seeds were lightly scuffed, then soaked for 3 hours in 78℉ distilled water after which they were transferred to moist paper towels laid out in a Jiffy Pellet plastic starter tray with lid. Underneath the tray was placed a Vivosun Heat Mat with Controller that was set to 78℉ where they stayed until their tap roots emerged.
~Planted into Jiffy Peat Pellets that were hydrated with distilled water warmed to 78℉ with a 7.0 ph.
~Once roots emerge from the Jiffy Pellet they're transferred to their fabric pots.
~Grown 100% organic in a 4g Gronest fabric pot and a 3g fabric pot by Wraxly filled with Mother Earth 70/30 Coco/Perlite medium and initially amended with Dr. Earth 4-4-4 / Earthworm Castings / Dr. Earth Flower Girl 3-9-4 and Coast of Maine Stonington Blend Organic Plant Food 5-2-4.
~19/5 light cycle for the entire run with supplemental UVA added during flower. Lights are controlled by a Trolmaster Hydro X controller set for a 15min Sunrise/Sunset simulation.
~Top dressing every 3-4 weeks with slow release dry amendments and Earthworm castings.
~Straight water ph'd @ 6.2-6.8 when needed and bi-weekly Compost Tea's.
____________________________________________________________________________________________________________________________________________________________________________________________________________________________________________________________________________________________________________________________________________________________________________________________________________________________________________________
Weekly Updates:
12/29- Here we go into Week Four of Vegetation but I'm somewhat relieved that they haven't started flowering yet as they are only 5" & 6" respectively so some more time to grow is a good thing right now! It's been a month since these pretty ladies popped out of the ground and other than being short, they are both looking perfect!
The #1's 4g Gronest pot was heavy when lifted as was the #2's 3g Wraxly pot and they both looked happy, so I skipped watering today and will check them tomorrow morning after the lights come on.
Since being topped for the first time a week ago, they both have two new shoots that are emerging and have new growth sprouting out all over with extremely tight node spacing making them definitely Indica dominate, and will most likely result in very short stocky cultivars from this strain which would be ideal for someone with limited grow space. 😎💚
Both of these girls are extremely healthy with excellent vigor and color and I can't wait to see if they get any taller and for them to begin flowering! 🧐💚
12/31- Today was a 'dry day and all I did was refill the humidifier and some canopy maintenance, tucking shade leaves and gently bending branches.
It's been a little over four weeks since they were planted in their amended medium and it's time to give their microbes a good feed so they can continue to provide them with all the macro and micro nutrients they need so, yesterday they got a good watering with 0.5g of de-chlorinated water with GreenGro's Veg, Flower, Green Aminos, Natures Brix and Granular Myco added to it @ 1.5 tsp/g and then ph'd to 6.4 @ 73℉.
Still no signs of flowering on either tester but I anticipate it will be any day now!
01/02- Yesterday I finally saw signs of flowering on the #1 tester! The #2 is still a no-show but as short as she is it's probably for the best!
Today I watered them from the bottom with 0.5g of de-chlorinated water to which I added 3ml/g of Earth Juice OilyCann cal-mag to prevent any Cal-Mag issues they may encounter before they arrive.
I also have the HLG 650R set 36" above canopy and it's set at 60% power which is being controlled by a Trolmaster HydroX controller. The tent environment is on point with temp's running 70 when the light's off and 74℉ with the light on. I'm keeping the RH at 55-60% right now but will drop it as flowering progresses. Finally, I've been keeping the VPD in the tent running 0.85 - 1.05 which I'm happy with!
01/04- They have both been doing really well getting watered every other day and yesterday they received 0.5g each of de-chlorinated water with 3ml/g of Fish Head Farms Fish Sh!t Soil Conditioner which was then ph'd to 6.3 @ 72℉.
The #1 tester is on her fourth day of flower and looking great! Because she's so bushy and was getting choked with growth, I removed a few shade leaves to open her up and get some light penetration down into her canopy.
The #2 tester has yet to show any signs of going into flower which I won't be concerned with unless it persists for another week or so, at which point I'll make a decision on how to deal with her.
😎💚 Thank you for checking out my passion in life! Please visit as often as you wish and I hope you enjoy this journey as much as I know I will! Grow Strong! 💪😎🤙
Likes
6
Share

@Chubbs
Follow
Let's go. Started a couple more of these I had. The last time growing them I thought they'd make an exception extraction strain for fresh frozen rosin. The flowers where nice and pungent smelling but not to dense. Heavy Yileder as well. Will see how they do this run. All In all Happy Growing.
Likes
4
Share


@UKBUDBROS
Follow
First 2 weeks only give light watering every 2 or 3 days, kept the lights on 24hr, kept humidity to 50% with average temp being 23 Celsius. Canna coco professional soil meant I didn’t have to introduced nutrients until roughly day 15 - 20
Likes
7
Share


@ZombieKushAddicted
Follow
to view this lamp or any other marshydro product go to: https://instagram.com/marshydro_aliexpress?igshid=YmMyMTA2M2Y=
Likes
10
Share


@HideAndFly420
Follow
Day 64 my baby is going really well by now, she s been running fast until now and I think that’s enough with fertiliser. From today o start my flush, I will give today my last dose of regulator and from next irrigation just on controlled water until the end of maturation, I want this baby to eat everything .
day 65 started flushing. ph controlled water at 6.0 i think 20 more days at max before m
Day 68 First check with micro today. The baby looks already milky and amber on the top buds but the rest of the plant is still transparent. I’ll wait at least until this weekend for a re check maybe I’ll cut her in two rounds. As I be been watching a lot with micro I noticed so many dust and other stuff on the buds so I think I’ll wash her in water.
Today watered ph 6.
Let’s see!
🌱🔥🌱🔥🌱🔥🔥
Processing
Likes
1
Share


@Lukazw
Follow
Semanas finales endulzado los cogollos con melaza y maca peruana.


Likes
3
Share

@Lahuertacannabica
Follow
Comienza oficialmente la fase de floración.
Esta semana realizamos el cambio de fotoperiodo a 12/12, dando inicio al stretch prefloral.
💡 Iluminación:
LED ajustado al 90% de potencia
Aumentamos la distancia de la luminaria para favorecer un stretch controlado sin estrés lumínico
💧 Riego y nutrición:
Fertilizantes: Atami – tabla completa + gama B’Cuzz
Incorporamos Bloom Bastic a 0,3 ml/L
EC final: 2.0
pH: 6.0
Solución preparada: 10 litros
🌿 Manejo de planta:
A final de semana realizamos poda de limpieza, retirando hojas grandes y ramas bajas poco productivas, enfocando la energía en las puntas principales.
Las plantas responden con fuerza, entrenudos abriéndose bien y estructura perfecta para una floración explosiva.
Seguimos documentando semana a semana


Likes
10
Share


@Stickygreens420
Follow
3/11/2024: Start to week 7 flower. She is getting close to being done. Most of the pistols have turned orange, and the tricomes are getting mainly cloudy. Plan to give her another week or two in hopes she will swell a bit
Processing
Likes
14
Share


@Godsgrower316
Follow
I love this strain cant wait till she finished. Never done it by crop king before. Not to familiar with there genetics. Heard there pretty good and have some dank.
