The Grow Awards 2026 🏆 


Likes
38
Share
@Green_Mountains
Follow
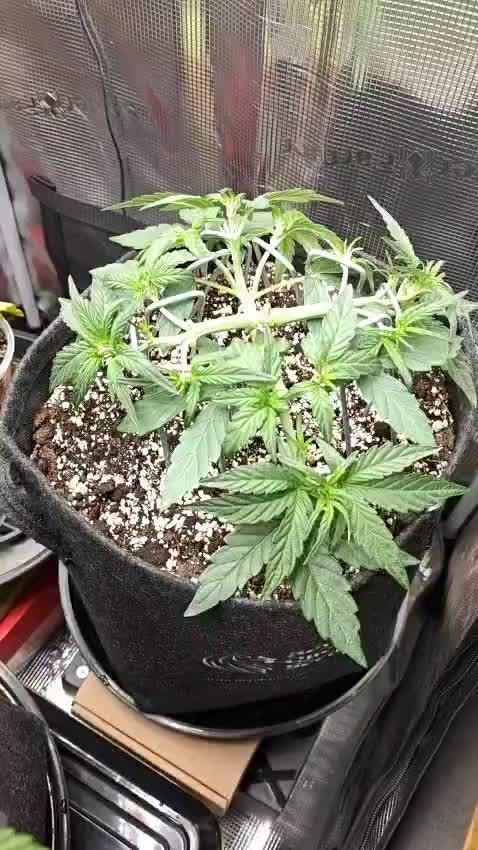
A lot going on this week!! Feeding 3 quarts every Sunday and Wednesday at this point. I did a light defoliation on Monday and did a more thorough defoliation on Friday! I opened up a lot of bud sights and it shows in the pics from late in the week!!
I just turned the fan and carbon filter on. Temps are currently holding at 73-74F and the humidity is between 43-45%. I'm very happy with that!
I hope to keep them both happy!!
Enjoy!


Processing
Likes
71
Share
@Wicked_Stix
Follow
This girl is moving along. Thinking she will start to ripen up in the next couple weeks. I switched my photos to 12/12 today so she will be getting the same light. Watering her twice a day about a cup each time. The aroma still bursts like fresh lemons. Excited to taste this girl and even more excited to run one of these on a proper grow in a dutch bucket next round.
Likes
8
Share
@Kardo
Follow
Amnesia Haze XXL sieht bis jetzt sehr gut aus und hat eine sehr schöne Farbe die buds werden kräftiger
Likes
44
Share
@Chedderbob112
Follow
Waiting on a full plant hang dry so will wait at least two weeks maybe three hope ma vegging station holds up n can dae tge damage the now as av said guys this is definitely not the perfect set up am not on good terms with land lord so basically squatting here lol and growing and a got caught with one in this house the land lord doesn’t even know lol 😂


Likes
26
Share
@NorseGrower
Follow
Week 7: Well after accidentally super cropping the White Widow, splitting a branch then taping up on the Blueberry Big Devil and then mass defoliation, the ladies have coped well. I feel like I have watering dialed in now with a combination of using a soil moisture meter and picking up the pots, I have faith I am close to right with timing. The last feeding in week 6 I used full strength nutrients. This resulted in some nutrient burn with some tips of leaves changing colors. I feed just water the next go around and yesterday feed again with 1/2 strength nutrients. I will stick with that until flush. I am going to switch to dry amendments for my next grow and try that out. Temperatures are coming down into 60s at night and topping out in low 80s. Humidity has been hovering between 45-50 without any need for equipment to run. I did some lollipoping and cut lose all the secondary popcorn buds that weren't seeing the light of day. I can't think of anything I could have done physically to stress them beyond this point than I have, so from this point on out I am just going to water and feed. No more LST, adjustments, etc.. I have already been way too active in flower from my understand of autos anyway.


Likes
Comments
Share
@ChubbyBudBros
Follow
-
Day 22
Some new nodes are developing at the ends of each branches. Decided to defoliate some of the big fan leaves as it was starting to get way too bushy and smushed on to each other. Now it's a bit easier to put in some extra LST stakes and get direct light on all those nodes. I'm expecting the preflower stretch to happen at any time now so trying to get the LST optimal right now.
Day 23
Watering day for her! Gave her 1.1L's of water (6.4 ph) with root-juice. bio-grow, bio-bloom, bio-heaven & alg-a-mic.
Day 24
I placed the last LST stakes today, and will now let the stretch do it' thing with minimal corrections!
Day 25
She recovered very nicely from the LST yesterday and I can definitely tell the stretch has begun now with how much longer some of the branches got.
Day 26
Letting the stretch do it's thing and increased PPFD to 700. The first pistils on the flowering sites are really starting to show now.
Day 27
Might've been a bad too late with the watering, pot was really dry but the leaves still looked good. Gave her 1.5L (6.4ph) containing silica force, cal-mag, bio-grow, bio-bloom, top-max, bio-heaven & acti-vera.
Processing
Likes
3
Share
@Kushizlez
Follow
Day 42-49
(Day 43) I was at the dollar store today and I found the best little plant risers. And they all link together in perfect 12” squares. Fits in my tent perfectly and only spent 15 bucks. That should help the dry downs quite a bit.
I’m going to transplant the euro genetics into 1.7g pots with amended sunshine mix #4 for their final containers.
I moved all of the non-marijuana seedlings into a small greenhouse out of my tent so I have some more space and light per plant.
I also set up an exhaust fan to keep the humidity at a perfect 65-70% night and day.
(Day 44) Everything is looking a little nute burned and droopy. The garlics are showing signs of overwatering and nitrogen toxicity. They look like they want to flower so badly. Node spacing is weirdly short too. I picked up the American genetics to look for roots and they were busting out of the bottom. They’re definitely not rootbound as they’re not even a foot tall yet. This is likely from having soil that is too compact (from using too much rock dust and not enough drainage) causing my waterings to not even reach the bottom of the pot. This was also happening to my other grow. I will make sure to very lightly pack soil into pots for now on because you can always add more later. I’m going to fluff up the pots and see if I can loosen the soil a bit. If that doesn’t work I’m going to look at transplanting into 3g fabric pots and lightly shaking off most of the old soil. Luckily I added a shit ton of drainage for the euro genetics when I amended the sunshine mix so they won’t need a transplant.
(Day 46) The fluffing didn’t do much. In fact it might have made it worse lol. I just went to the store and bought some Destiny Organics soil and have decided to transplant.
I dusted off 90% of the old soil down to root ball which will cause an insane amount of stress to the plants. The plants started in the aero garden were being choked out by the shitty sponge plug it was germinated in. I took a razor blade and carefully cut them down the middle so the stem can expand. I might have cut a few major roots one or two plants. Other than that everything is transplanted. I cut all my amendments in half and I packed the soil very loosely this time.
The situation is not ideal by any means but I’m hoping they will bounce back in the next week. This should at least set them up for a more successful flower. I can’t really expect much quality from botched run but who knows. I might come out with some fire. Since this is my last grow here I don’t even have to pay the power bill for the next few months! (I have a very generous landlord as he’s letting me finish my grow until mid September now 😂)
(Day 47) I’m going to give them their first good watering and test my fluffy soil. I watered in approximately 700mls each making sure it soaks to the bottom of the pot.
(Day 49) All the plants have bounced back except for the ones with root damage. They are still looking droopy and sad. The black garlic #1 has recovered really nicely and is looking happier than ever. The apical growth tip is so tight it has like 4 nodes within an inch somehow. I recently learned that hormones contained in kelp and seaweed extracts can act as plant growth inhibitors and shorten node spacing drastically. I only added a very small amount of kelp meal to the soil so it must be leftover from the previous foliar sprays Velokelp. I’m going to pinch the top off bg1 and see if the lowers can catch up. Sucks to do that so close to flip but oh well.
The euros are looking fully recovered from their burn a little while ago. The sunshine mix is quite thick and water retentive as well but at least it has some extra drainage. They’re all looking quite healthy.


Likes
16
Share
@Naturalist
Follow
Runoff PPMs are at 876/pH 5.9 average last watering, so back in range
Gelatos are stretched to 32" now LSDs remain 24"
Gelato kolas are starting to show color.

Likes
12
Share
@Zer0xKira
Follow
Amazing told this run 110 grams of bud and 80 grams of shake. An amazing pungent fruity citrus cream cheese aroma eminates out of my cure vault. The high has been described by my friends as a creative uplifting high followed by intense couch lock.
The grow itself was a breeze. The only real issues i had in the hydro grow was that i needed to to add cal mag because it was growing so fast and i was using distilled water. I basically did not train my plants other than defoliating to make space for air flow and light penetration. I would recommend this for any first time hydro grower that has a decent amount of space.
Likes
68
Share
@Prototype0181
Follow
The cherry's are doing great and they look phenomenal 👌 With their next transplant to 7gal airpots, i gonna put 1 in plagron bat-mix combined with the bio tabs range for optimal taste👌

Likes
8
Share
@4F1M6
Follow
The ladies are starting to flower and the male is starting to drop some pollen. Most his more developed pollen sacs will be ripe and dropping in about a week a couple were aheadand already dropped. Giving the females plenty of time to throw a bunch of stigmas out there to catch it. Blessed.
I super cropped his main stalk over top of the ladies. I also added a clone from him in there for some more pollen for storage. For future crosses. All in all this breeding tent is doing swell. I also snipped of a couple really ripe sacs. Than dusted a couple sweet and sour buds with it. Get 1 more extra cross going.
Until next update. Happy growing and stay lit fam.

Likes
10
Share
@GoldenWeedGrower
Follow
📅 D57 - 10/10
📜 I added 2 Liters of water with EC 1,5 and pH 5,3.
✍️ 1,5 EC
♒ 6 pH
🌊 10 L
📏 110 cm
📅 D58 - 11/10
📜 I tied the buds to stay away from each other. Also I moved a little bit the lamp. Now seems better. Added 1 L of water with only pH-
✍️ 1,5 EC
♒ 5,9 pH
🌊 10 L
📏 110 cm
📅 D59 - 12/10
📜 Added 2 liters with EC 0,5 and pH 4,9. Nothing else to report
✍️ 1,5 EC
♒ 5,9 pH
🌊 10 L
📏 110 cm
📅 D60 - 13/10
📜 Added 2 liters with EC 0,5 and pH 5,3. Flowers became bigger.
✍️ 1,5 EC
♒ 5,9 pH
🌊 10 L
📏 110 cm
📅 D61 - 14/10
📜 Nothing to report
✍️ 1,5 EC
♒ 6 pH
🌊 9 L
📏 110 cm
📅 D62 - 15/10
📜 Added 1 L of water to keep stable EC and pH. All seems ok, so far. I made same nice shots.
✍️ 1,5 EC
♒ 6 pH
🌊 9 L
📏 110 cm
📅 D63 - 16/10
📜 Last day of 4th week of bloom.Tomorrow I wll change the res as the new week starts, with the same EC and pH.
✍️ 1,5 EC
♒ 6 pH
🌊 10 L
📏 110 cm


Likes
24
Share
@TrueNorth
Follow
COMMENTED BY TrueNorth TrueNorth 4 days ago
-Strain: Orange Sherbet 🍊 - Fast Buds
-Tent: 5x5 Gorilla Grow Tent
-Lights: Budget LED Grow Lights 2 x 250 Watt
LED Full Spec/Red Spec mixed boards
-Light Cycle: 18/6
-Soil: Fox Farm
-Air Circulation: AC Infinity Cloudline T6 Inline Duct Fan
March 31, 2020 - Here we are growmies! Week 3 already, this morning (9am) i put her into this 5G grow bag, here she will flourish to be the beast i am hoping the PURPLE LEMONADE was in the same bag!!! Started feeding today nice and light! Love you guys!
Likes
28
Share
@Schneidersitz
Follow
Die Miniermotten lassen dieses Jahr einfach nicht locker. Aber halb so wild. Bokito war ein starker Kerl mit einem breiten Kreuz.

Likes
6
Share
@S3phwea
Follow
Hoping these girls start to bulk up soon. This is all organic- just being fed with water, glucose, and the Gaia Green soil bloom nutrient top dressings every other week. Goal is to see what I can do with bare minimum and then press the yields with nutrient feedings in the future. Anyone with organic growing experience - these look normal size for where we are at in flower? I know we have a month or so to go but the roots seem to be pretty compacted at this point in 5 gallons pots. I think I’d go to 3 - 10 gallon fabric pots for next grow. Let me know what works best for you.
Processing
Likes
17
Share
@Canadian_Steelheader
Follow
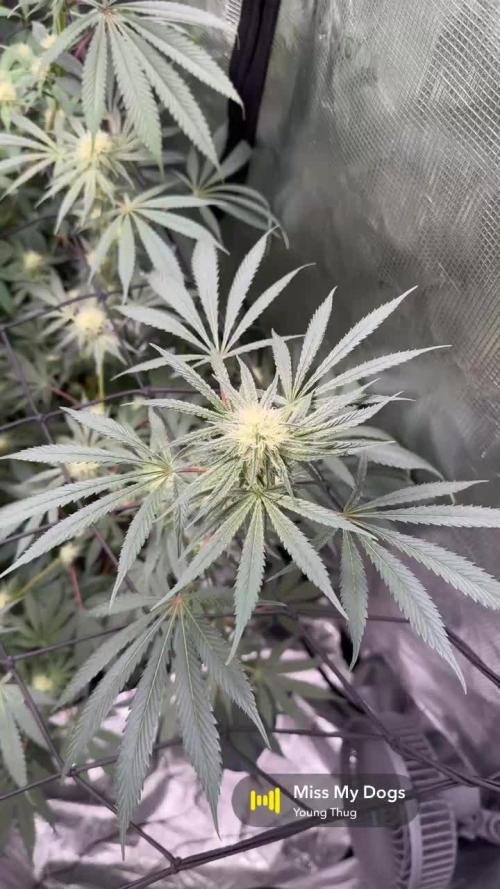
End of Week 3 of Flower, lots of buds showing, trichomes developing, stretching for the light. Layed of the Flora Gro and micro this watering. Added a drop per gallon of Superthrive. Light defoliation as well to open up inner bud sights.
