


Likes
25
Share

@Agrocann
Follow
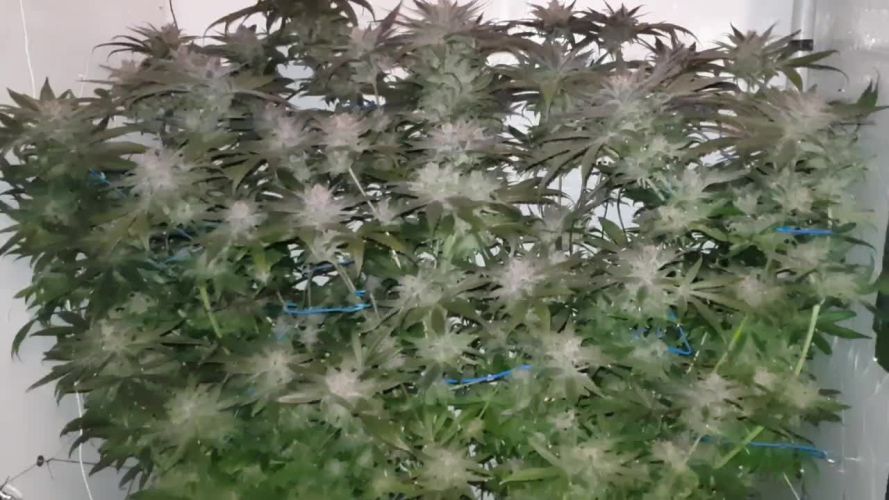
Looks like a harvest is close!
95 Days / 60 Days on 12/12 - Looks like a Lady is ready!!!
Started watering with tap water only. Will water her for a few days and then HARVEST TIME!

Likes
1
Share


@theVotanaGarden
Follow
Didn’t post some of the final weeks but this is the end. It was a tough grow - I don’t love 100% coco in the autopots and will be doing a 70/30 mix moving forward. Got a pound of great smoke from this one. Hadn’t gotten a pound off a plant before so it was nice to get this yield
Likes
16
Share


@BB_UK
Follow
Been a working week! Defoliated twice! First I did lower fan leaves, waited a few days and snipped the Rest to allow light to reach all news growth! Dynomyco is a banger it’s got these girls so sturdy! Just look at the stems and how much growth I have already and this is just day 28 in veg! A lot more to come! I can’t wait! Still continuing with foliar sprays a few times a day!

Likes
15
Share


@Homegrown93
Follow
160 days of life harvested on day 63 of flower. I don’t have photos of her vegging but she started off great. About two weeks in, she started having some major issues. Her leaves started atrophying, curling up at the borders, growing 3 finger leaves, all new growth was deformed and twisted and growth in general almost stopped completely, to what I suspect was from broad mites. These fuckers are nasty! I dm’d my local grow shop and tried out some Neem Oil. I diluted it in water like they recommended and sprayed that baby every day for one week, then every other day the following week, then down to once a week. I sprayed her leaves stem and surface of the soil. I also cleaned the entire grow space with some bleach solution. Doing this allowed her to really bounce back, growth started to take off again! So I vegged for a few more weeks and trained her as much as I could to keep her uniform but short, she responded well to this. During flower, she was very happy. I had two main issues during this time, one was being too hot in Nitrogen and a week of very hot temperatures which burned her a slight bit, although she didn’t seem to mind much. I also could’ve continued a once a week spray of Neem oil because I think they might’ve started to come back on the lower and younger leaves that weren’t getting much light. Overall it was a dope grow and hope to do better on the next one!

Likes
67
Share


@EasyName
Follow
Welcome to week4!🤠
Fixed her discoloured leafs, it was due to frequent watering🌊
She entered vegetative stage only after 3 1/2 weeks of growing, so very impresive!😯
And I'm using a humiditor to keep the air at 60%😋
See you very soon!🤠❤️

Processing
Likes
1
Share


@Ganjagrandaddy
Follow
Day 43 veg. These two girls are finally starting to get their feet planted and growing. I have been a little worried that having to hold the. back as I did the room upgrade and waiting for their NFT set up. C Banana has grown a lot of new growth Thisbweek and been stretching upward . I have been softening their stems and bending in the same place to encourage a nice thick repair and knuckle. I am planning to quadline them out and maybe a few 6-lined . The monster has been going well too. she is quite bushy now so hopefully will be a many headed beasty. The room is all set for the move to their NFT know so hopefully be in tomorrow and flipped in about 2 weeks time all being well.

Processing
Likes
6
Share


@Silverback_Guerilla
Follow
11/10 - 11/17:
She's fattening nicely and has a super pungent aroma. She's tiny compared to most of my hybrids from this grow, but she's gonna be special.

Likes
422
Share


@Crashoverite
Follow
Hi my friends!
Thank you all for such amazing support on this sweet journey 🙏✌️💚
I'm updating and uploading daily so if week not completed yet. Please revisit to see full week content.
So far everything is going great. Girls are are stretching nicely approx 2cm per 24h. It's looking that will cover entire scrog net with these 2 beauties. Simple plan for the week. Training on the net and maybe selective defoliation on week end.
Week updates:
20-26 Nov.
20/11 day 43
Girls adapting well to net😁
21/11 day 44
First watering for this week.
2.5 ltr each pot. Runoff approx 200-300ml from each. Runoff Ph Xena 5.9 Athena 6.0.
23/11 day 46
It's seems that they stretched at least an inch overnight 😁 absolutely love my 🍌💜👊 girls.
25/11 day 48
Second watering for this week. Approx. 3L each 🤤 runoff 150-200ml.
26/11 day 49
Athena was stretching so much that decided for sort of heavier selective defoliation and cleared good bit under the net. Xena is at the same stage of flowering as sister but she is still much smaller, branches are shorter and tinner, will wait bit longer before go any heavier on her. Was able to nicely relocate longer branches of Athena all over the net.
It's the end of this amazing week 😁
Thank you all for stopping by and for such amazing support on this bananas ride 🍌💜👊
Love you all brothers and sisters 💚💚💚
Likes
12
Share


@fivegrow
Follow
Fast cycle, no disease or nutrition big problems. Pretty good harvest for one computer space.

Likes
1
Share

@Organic_G
Follow
Wachsen wirklich perfekt, keine Mängel, super fette Stämme, extrem vital und gut am Stacken die Ladys…
Die Automatics sind auf einem Rekordrun wenn es so weiter geh, für 2. Woche Flower sind die extrem robust geworden…


Likes
16
Share


@Mrg7667
Follow
Still see nitrogen toxicity so im going cut biogrow down to half dose and see how it goes! Besides that all looks well
Smells are stepping it up in a couple pheno!
On the Chocolate Marshmallow side we have a intense sour fruity pebbles on a pheno that is just unreal
And on the double d side we have some rotten tooth chem smells coming through!

Likes
88
Share


@Kitties_and_Colas
Follow
~_~_~_~_~_~_~_~_~_~_~_~_~_~_~_~_~_~_~_~_~_~_~_~_~_~_~_~_~_~_~_~_~_~_~_~_~_~_~_~_~_~_~_~_~_~_~_~_~_~_~_~_~_~_~_~_~_~_~_~_~_~_~_~_~_~_~_~_~_~_~_~_~_~_~_~_~_~_~_~_~_~_
❤️💡🌱😽💨
It been a great week..Bud sites are prominent now and I love the node spacing, these should be some top heavy girls very soon lol.. we noticed some yellowing on some of the taller plants, we attributed this to our earlier PH drama but its likely light stress so we moved the fixture up a few more inches (no light meter 😞 ... ).. They're beginning to smell like citrus/ lemon but its mild atm.. not too much else to report but we'll update if anything changes, thanks as always for dropping by and happy harvests everyone!! ❤️🌱~_~_~_~_~_~_~_~_~_~_~_~_~_~_~_~_~_~_~_~_~_~_~_~_~_~_~_~_~_~_~_~_~_~_~_~_~_~_~_~_~_~_~_~_~_~_~_~_~_~_~_~_~_~_~_~_~_~_~_~_~_~_~_~_~_~_~_~_~_~_~_~_~_~_~_~_~_~_~_~_~_~_
01/31
We're still yellowing some but mostly on the larger plant..I'm not entirely sure what's going on.. I lifted the light a little more and raised PH to 6.8 for last watering, we'll see what happens
😺👍
~_~_~_~_~_~_~_~_~_~_~_~_~_~_~_~_~_~_~_~_~_~_~_~_~_~_~_~_~_~_~_~_~_~_~_~_~_~_~_~_~_~_~_~_~_~_~_~_~_~_~_~_~_~_~_~_~_~_~_~_~_~_~_~_~_~_~_~_~_~_~_~_~_~_~_~_~_~_~_~_~

Likes
Comments
Share


@BackdoorMan
Follow
The girls are coming out of their second topping very well. I will increase their fertilizer going forward as they are taking their current level with flying colors. I was very careful with the identification of my seeds through planting, and yet I am concerned a couple may be mislabeled. I will continue the investigation. lol

Likes
15
Share


@Nimas
Follow
Hello everyone 🍀
The girls are in pre flowering stage!
So far so good 🙏
Cheers 🍀 ❤️

Likes
37
Share


@MrJones
Follow
MrJones Pink Sugar Breath F2 by VMAN - ViparSpectra XS2000 240W Infrared Full Spectrum LED Grow Light
´🌿⊱╮🌿╰⊰🌿 WEEKLY GOALS 🌿╰⊰´🌿╰⊰´🌿
🏡Indoor - 3"x4"x8" Custom Built Grow Closet
🌞Environment - 80F and 65% Humidity - using Humidfyer as needed.
🌾This strain likes to stretch during flower, so a heavy training regiment will be needed.
🗓️Vegging
⚱️1-Gallon 📊6.4 / 6.8 PH
💧 Feeding / Dry Amendments using Dr. Erth Live all Purpose and Using Up my Mr. B's Green Trees ORGANIC BLOOM 2-8-6
🌞ViparSpectra XS2000 240W x2 Infrared Full Spectrum LED Grow Light
🕷️ IPM - We will be using Green Cleaner" 1 OZ per Gallon, and CannControl from Mammoth alternating between products each month for Integrated Pest Management.
🌿╰⊰´🌿╰⊰´🌿 PLANT UPDATES 🌿╰⊰´🌿╰⊰´🌿
📝 Notes - A good friend of mine gave me some of his crosses, please read below for his amazing details, I am very excited to see what I can accomplish with these genetics and my cannabis gardening approach.
╰⊰´🌿 ╰⊰´🌿 ╰⊰´🌿 ╰⊰´🌿 ╰⊰´🌿 ╰⊰´🌿 ╰⊰´🌿
🗓️Sunday 09/05/22 - A week in their new pots and this strain is doing very well, they are stacking very tightly. odd because they have a strong Sativa trait, so I am still trying to figure out my training process, I started a compost rea yesterday and will be ready tomorrow, and hope the plants have dried out a bit from my watering on Friday. I have placed a recipe for my Nitrigeon Rich Tea Below, I am hoping it really supports the natural organic soil and activates the microbes to help the plants blow up! The plants are starting to develop a nice sweet smell, very fresh!
🗓️ Wednesday 09/07/22 Fed the Sugarbreath the Compost tea on Monday, they are looking great, decided to do defoliation on Tuesday, and the plants are bouncing back and looking amazing! I am going to give them the remainder of the week and decide if to top or just do some LST, the plants are stacking, the internode spacing is very tight, and would like to see how I can open this up. Stay Tuned!
📝 Saturday - 09/10/22 Thursday I topped dressed with the first-time feeding of Dr. Earth Life, watered in with dechlorinated H20, these ladies are really starting to explode!
╰⊰´🌿 ╰⊰´🌿 ╰⊰´🌿 ╰⊰´🌿 ╰⊰´🌿 ╰⊰´🌿 ╰⊰´🌿
Breeders Notes by VMAN
Pink Sugar Breath is a creation of Platinum Kush Breath x Pink Sugar cookies originally Bred by UFO Genetics.
Pink Sugar Breath F2 is the second filial Generation that was hunted and creates by Visions.
The vigorous cultivar takes 63 to 75 days to flower with various phenotypes. These phenotypes can express terpene profiles ranging from Bakery Dough, Sugar, Og Funk, Fruity, Gas, Dank, Chemical Floor Cleaners, and much more. Expect Purple and Pink Phenotypes to pop up fairly easily. Color starts to show within 7 to 8 days of flower for the purple and pink phenotypes. Green phenotypes have more of an OG Funk/Floor Cleaner presence
╰⊰´🌿 ╰⊰´🌿 ╰⊰´🌿 ╰⊰´🌿 ╰⊰´🌿 ╰⊰´🌿 ╰⊰´🌿
Compost Tea
1 Cups Worm Casting
1 Cups Lobster Compost
1 Cups Home Made Compost
2T Molasses
2 T Alfalfa Meal (DTE)
2 T Kelp Meal (DTE)
1 T Bat Guano (DTE)
1 teaspoon Rootwise Bio Elixir
I used a small paint strainer to hold my composts, placing an air stone right in the bag and zip-tie it nice and tight - this allows air bubbles to really agitate the micro matter off of the compost and into your tea
I like to mix in the molasses (microbe food) and start my main air stone, the dry amendments and Rootwise can be just measured in the bubbles
Keep the temp of the water warm 75F/85F - too cool and the microbes reproduce too slowly and too hot will kill them.
I do not delete my teas and let the plant pots dry out slightly before feeding.
I try to do this weekly - as we get further into the growth during the flowering stage I will add DTE Seagull Guano increasing the phosphorus.
If any questions post up in the comments and will do my best to answer them for you


Likes
12
Share


@MaxMo8
Follow
I will be careful every time I encounter an insect problem and use an insecticide, I will eventually get rid of it with a water care method

Likes
2
Share


@Mytrichomedgarden
Follow
Estoy en la ultima semana todo salio genial vamos por ese secado y curado
Likes
2
Share


@narniamars
Follow
Will update further after cure complete.
Harvested at beginning of 14th week from seed. Of the three plants that finished in this run, this one probably got the best flush even though it wasn't the longest. Started to see yellow and blue by the time it was cut. Mild trimming at harvest. Went 10 days drying at around 60-70RH. Dried on string in boxes, dry trimmed some, moved to paper bag for a few days where RH ended up at 58. May have over dried slightly. Sealed paper bag inside a plastic bag for a few days before continuing to jarring. My drying process was experimental, but wanted better smell from buds than what I'd achieved with other plants grown with this one. The smaller stunted cheese smelled amazing, but the smell faded during dry/cure and it didn't taste the best. That one got the least days flush, but its potential was still evident.
This cheese had more dense buds (still not as dense as Early Miss). Some of the buds turned out bluish, most likely because night temps were 57-60F and it was colder during 48 hours dark. It smells just like the other cheese--both Canuk freebies from separate orders. The smoking experience is mild to moderate with a heavy indica lean. Mild-to-moderate head. No anxiety. Heavy body. Too much and it can cause drowsiness. Good night cap cultivar for me. At first, I thought this one didn't smell as strong as the first cheese, but I must be getting desensitized because others say it reeks.
I would definitely grow this again, but I doubt mine got up to the advertised 22% THC. More like 15. Yes, this plant was stressed in early grow, but rebounded nicely. Relative to the Early Miss from CKS also in this grow, this cheese is maybe a little less potent even though the Cheese is supposed to be more potent according to the respective company's information. It would make sense that Canuk's cheese is similar to other/original cheese strains which seem to be listed around 15% THC, but who knows, maybe it could become killer with a better grow/grower.
