
Likes
Comments
Share


@Skunkiest_bender39
Follow
Lampe 80% power und nur noch 20cm platz, muss wohl nachbinden…
Die krumbles haben einen Weg, sieht mir nach generellem Defizit aus aber vor allem wenig CalMag, oder war schon zu viel und ein lockout könnte durch Zugabe von CalMag provoziert werden. Wir werden sehen. Blätter sehen mies aus Blüten wachsen super, Harzproduktion geht weiter, Geruch wird immer stärker. Mycrene und Limonene liegen in der Luft;). Die Zake stinken extrem nach rohrzucker-hopfen leicht bitter, die krumbles sind beide sehr süs die b2 hat einen mehr als intensiven citrus Duft. Die Zake sind alle sehr unterschiedlich, nur der Geruch ähnelt. Z1 110cm , z2 95cm z3 85cm. Musste sie unterfüttern. Buds an jeglichen wichstyp angepasst. Hatte Glück 3 phänos zu treffen sativa lastig, ausgeglichen, indica lastig. Hoffe die Damen haben genau so viel Spaß wie ich :D


Likes
17
Share


@420DeepGrow
Follow
Gracias al equipo de Seedsman Marshydro XpertNutrients y Trolmaster sin ellos esto no sería posible.
💐🍁 Tangerine Snow F1 Fast:
Esta gran cepa es un cruce de cuatro vías 75% sativa de (Boost x Tangelo) con (Lavender x Power Plant). Este híbrido Fast F1 proviene de la genética Cali y cuenta con excelentes terpenos cítricos, alta producción de resina para extractos, altos niveles de THC, muy buenos rendimientos y excelente resistencia al moho. Tangerine Snow F1 Fast se puede cultivar tanto en interior como en exterior. Los tiempos de floración en interiores son de entre 8 y 10 semanas, mientras que el tiempo de cosecha en las latitudes del norte es en septiembre, mientras que en el hemisferio sur los productores cosecharán durante marzo. Las regiones climáticas recomendadas son cálidas, secas, húmedas y cálidas. Se trata de plantas altas, semiramificadas, que superan los 200cm y que presentan un alto vigor con muy buena uniformidad. Al igual que muchas otras variedades con fuerte dominancia sativa, Tangerine Snow F1 Fast ofrece una excelente resistencia al moho, así como a las plagas y enfermedades de las plantas. La combinación de terpenos cítricos y mucha resina la convierten en una cepa de muy buen extracto, cuyo método de "lavado" produce muy buenos rendimientos de hachís. El perfil de terpenos cítricos recuerda a las mandarinas y mandarinas y también tiene notas dulces. La producción de THC ha sido verificada en laboratorio en un fuerte 24%, mientras que el CBD es bajo. El efecto es edificante y energizante, perfecto para usar durante el día y las primeras horas de la noche.
🌻🚀 Consigue aqui tus semillas:
💡TS-3000 + TS-1000: se usaran dos de las lámparas de la serie TS de Marshydro, para cubrir todas las necesidades de las plantas durante el ciclo de cultivo, uso las dos lámparas en floracion para llegar a toda la carpa de 1.50 x 1.50 x 1.80.
https://marshydro.eu/products/mars-hydro-ts-3000-led-grow-light/
🏠 : Marshydro 1.50 x 1.50 x 1.80, carpa 100% estanca con ventanas laterales para llegar a todos los lugares durante el grow
https://marshydro.eu/products/diy-150x150x200cm-grow-tent-kit
🌬️💨 Marshydro 6inch + filtro carbon para evitar olores indeseables.
https://marshydro.eu/products/ifresh-smart-6inch-filter-kits/
💻 Trolmaster Tent-X TCS-1 como controlador de luz, optimiza tu cultivo con la última tecnología del mercado, desde donde puedes controlar todos los parametros.
https://www.trolmaster.com/Products/Details/TCS-1
🍣🍦🌴 Xpert Nutrients es una empresa especializada en la producción y comercialización de fertilizantes líquidos y tierras, que garantizan excelentes cosechas y un crecimiento activo para sus plantas durante todas las fases de cultivo.
Consigue aqui tus Nutrientes:
https://xpertnutrients.com/es/shop/
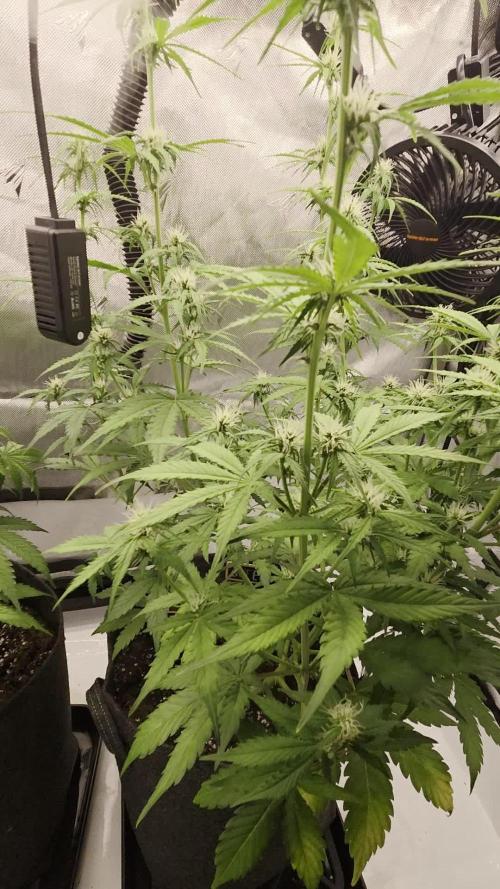
📆Semana 12:
Definitivamente ella está en fase de floración, cambio el abono de crecimiento por abono de floración, está cargadisima de resina.

Likes
Comments
Share

@Kardo
Follow
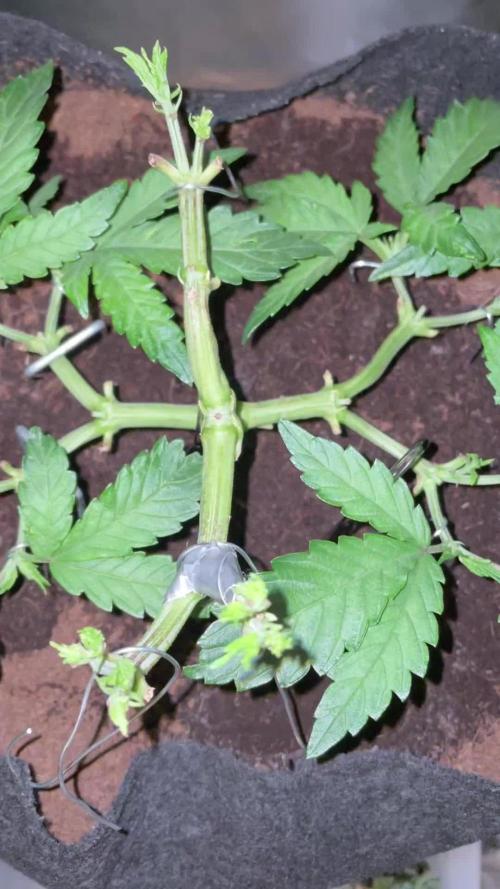
Die Purple wird nicht mehr getoppt wir schauen jetzt was die Triebe für eine Kraft bekommen
Likes
15
Share


@Growgirl1114
Follow
My little Solo Cup Red Poison ☠️ Loving the color on the baby buds, so excited for the next month for sure. PH is solid and she’s loving the @foxfarm neutrinos. Our cat had to get a nibble the other night, She says it’s tasty ✌️😆✌️

Likes
5
Share


@thenotillwizard
Follow
This strain is very heterozygous. 4 seeds were started. The 4 phenos were very different. I saved 2 of those phenos for my arsenal, which is quite exceptionnal. I ususally save just one pheno from a strain.
The Pheno #1 was mainly sativa (75%). Long branches. Lots of fluffy buds. The more resistant to mold, but it has to be with the fluffiness.
The taste was cheesy and spicy, which has nothing to see with the 3 other phenos. Not a single ressemblance with ak-47 parents as well.
It shares the musky undertones of the strain, but nothing else.
That pheno is gone. Not enough potential. Terpene profile was deceiving, just as the cannabinoid content.
The Pheno #2 has more indica in it (45% indica). robust and tall plant with dense heavy buds. No mold resistance at all. Biggest producer.
The taste was earthy and musky with hints of wood.
That pheno is gone. Not enough potential.
The Pheno #3 is my favorite one. It reminded me of the good old Ak-47, with her flowery/sweet/skunky smell and taste. Pure nostalgia!
Tall and quite robust plant with huge fluffy buds coated with trichomes. She grows pretty similar to Lemon Skunk if you know the reference. Great producer of top quality buds. So sticky! In my top 3 sativa for 2 years.
The aroma is very close to the old school Ak-47: sweet, flowery and skunky.
It tastes like sweet lemon on the inhale, with a sharp touch of spicy lavender and earth on the exhale.
IMO, that is the pheno we want to save from that heterozygous strain.
Backcrossing this one would be a very good idea.
The Pheno #4 is just as interesting as my favorite #3. The only issue with this one is about mold resistance.
Crazy compact and heavy budst! One of the most productive I’ve ever seen too. More traits of the Ak-47 in the aromatic profile, but nothing like the #3.
On the structure side, we can immediately recognize the sturdy and bushy structure of Ak-47.
THC content is very high too. I suspect the CBD content to be high as well.
The effect is a mood elevation, with good focus and a deep body relaxation; a bit similar to what White widow does.
The aroma is earthy and pungent. Very skunky and musky.
It tastes very sweet and earthy on the inhale, with hints of skunk on the exhale.
That pheno #4 expresses the best traits of the Ak-47 in its structure, while pheno #3 kept the aromatic profile.


Likes
10
Share


@Kali_DC
Follow
Plants drinking as fast as I can refill the DWC pH fluctuate cause leaf tips to burn. Coming along nicely 😆


Likes
4
Share


@Budking420
Follow
I'm going to probably have to check with the tape measure for next week shes still stretching! Its definetly the most massive auto and I am looking forward to doing the same strain with low stress straining fully indoors.
Some trichomes and definetly a very strong diesel undertone for aroma. Last night the low was 59 degrees in the greenhouse I believe one of the warmest nights we have had this summer. 4 days ago it was 34 outside for a low and I assume around 40 or 45 in the greenhouse. I have been feeding heavy with warm worm casting tea that I brew up 5 gallons at a time and i use 3 cups of castings. Check back next week to see how big this bud gets! And remember it's always 4:20 somewhere

Likes
17
Share

@420DeepGrow
Follow
Gracias al equipo de Seedsman Marshydro XpertNutrients y Trolmaster sin ellos esto no sería posible.
💐🍁 Tangerine Snow F1 Fast:
Esta gran cepa es un cruce de cuatro vías 75% sativa de (Boost x Tangelo) con (Lavender x Power Plant). Este híbrido Fast F1 proviene de la genética Cali y cuenta con excelentes terpenos cítricos, alta producción de resina para extractos, altos niveles de THC, muy buenos rendimientos y excelente resistencia al moho. Tangerine Snow F1 Fast se puede cultivar tanto en interior como en exterior. Los tiempos de floración en interiores son de entre 8 y 10 semanas, mientras que el tiempo de cosecha en las latitudes del norte es en septiembre, mientras que en el hemisferio sur los productores cosecharán durante marzo. Las regiones climáticas recomendadas son cálidas, secas, húmedas y cálidas. Se trata de plantas altas, semiramificadas, que superan los 200cm y que presentan un alto vigor con muy buena uniformidad. Al igual que muchas otras variedades con fuerte dominancia sativa, Tangerine Snow F1 Fast ofrece una excelente resistencia al moho, así como a las plagas y enfermedades de las plantas. La combinación de terpenos cítricos y mucha resina la convierten en una cepa de muy buen extracto, cuyo método de "lavado" produce muy buenos rendimientos de hachís. El perfil de terpenos cítricos recuerda a las mandarinas y mandarinas y también tiene notas dulces. La producción de THC ha sido verificada en laboratorio en un fuerte 24%, mientras que el CBD es bajo. El efecto es edificante y energizante, perfecto para usar durante el día y las primeras horas de la noche.
🌻🚀 Consigue aqui tus semillas:
💡TS-3000 + TS-1000: se usaran dos de las lámparas de la serie TS de Marshydro, para cubrir todas las necesidades de las plantas durante el ciclo de cultivo, uso las dos lámparas en floracion para llegar a toda la carpa de 1.50 x 1.50 x 1.80.
https://marshydro.eu/products/mars-hydro-ts-3000-led-grow-light/
🏠 : Marshydro 1.50 x 1.50 x 1.80, carpa 100% estanca con ventanas laterales para llegar a todos los lugares durante el grow
https://marshydro.eu/products/diy-150x150x200cm-grow-tent-kit
🌬️💨 Marshydro 6inch + filtro carbon para evitar olores indeseables.
https://marshydro.eu/products/ifresh-smart-6inch-filter-kits/
💻 Trolmaster Tent-X TCS-1 como controlador de luz, optimiza tu cultivo con la última tecnología del mercado, desde donde puedes controlar todos los parametros.
https://www.trolmaster.com/Products/Details/TCS-1
🍣🍦🌴 Xpert Nutrients es una empresa especializada en la producción y comercialización de fertilizantes líquidos y tierras, que garantizan excelentes cosechas y un crecimiento activo para sus plantas durante todas las fases de cultivo.
Consigue aqui tus Nutrientes:
https://xpertnutrients.com/es/shop/
📆 Semana 7:
Ha sido una semana algo complicada, tormentas, frio y lluvia han ralentizado el crecimiento, espero que pronto lleguen dias soleados, continuo con 1/3 nutrientes recomendados en cada riego.
Likes
48
Share


@TheIceCreamParlour
Follow
Sorry for the late update. It's been a hectic week at home and I barely had time to do the basic work. Bit of a nightmare also. These Pinapple are flying along and probably have 2 mabey 2,1/2 weeks left until harvest. I'm now getting leaf damage on both plants despite keeping EC below 1.8 at all times. Really cant put my finger on it but I've decided just to let them run out and ill try and be more thorough on my next attempt with this strain.
Really happy with them despite that and bud structure is looking really great.
Likes
21
Share


@Bak2Blk
Follow
Yall see the yellowing of the leaves closest to the top? I've since switched my nutes over to Tiger Bloom and I've thrown in some Cal-mag into the mix. They'd gotten kinda droopy but since I changed their nutes up a bit, they've been perky af even tonight as it's getting close to lights out. I switched them over to flower on Sunday. They're already starting to stretch in just a few days which tells me that they're feeling much better. My last video... even though it's not loaded correctly is from tonight. It's 11pm, lights are out in an hour and they're still perky. Love it!! 😍😍😍
4/6/23: Yall.... the plant in the back right hermied!!! OMFG. The 2 tallest branches had seeds on them... just popped up because they weren't there yesterday or at least I didn't notice. The seeds were concentrated at the top, I didn't find any on the rest of the plant but with as bushy as they are, there may be more. I cut those 2 tallest branches down to below where the seeds were but I will be watching that plant and the rest like a hawk for more seeds. I didn't find any on the other 3 plants but still I'm saddened. Unsure of why this one plant is hermie'ing. Smh
Likes
5
Share


@AustinRon
Follow
TH 1Q2025 - Week 7 - Flower 4
(ON Haze X Original Haze) X Northern Lights #2
“Todd’s Haze”
Objective
- 8 Female Plants, Topped ONCE @ Flip, 12” when topped
- Modified Sea of Green
Seeds Wet: 1139PM, 28.2.2025
Germinated: 2.3.2025
Flip: 21.3.2025
Harvest: 77 Days, DATE: 6.6.2025
_________________________________________
Initiate Auto-Fertigation
LightDistance: [ 19.5, in] # We’re in STRETCH, ~1.5”/day!
11” Top Canopy
- [ ] TM-7: [ 0.125, g] # Prep
- [ ] Fertigation: [12, 12, 6] # [Primer A, Primer B, Silica Skin], Dilute to EC
- [ ] Photosynthesis Plus: [ 6, ml]
__
Fri Apr 18, 2025
TH 1Q25 29:F:4:1
__
Sat Apr 19, 2025
TH 1Q25 30:F:4:2
2000 Watering w/ PCAL 1660
Fertigation: [ 1, gal]
RLA: [ 8.5, 4.2, 3.4]
PCAL 1660: [ 2.5, ml] # Micronized Powder
__
Sun Apr 20, 2025
TH 1Q25 31:F:4:3
Light Distance[TOP]: [ 11, in] # Still Stretching
LightIntensity[TOP]: [ 925, µ], [ 40, mol/day]
LightIntensity[Main]: [ 801, µ], [ 34.6, mol/day]
We’ll Raise EC by 0.1 mS/cm/day till we’re comfortably ~ 2.4 (IFF They’re happy) …
Would like to see overall GREEN both darkening & evening out . . .
Defoliation
- [x] Remove Fan Leaves below Node 7 # Preparation for Understory Lighting
- [x] Remove Branches with TOPS bottom 25% of canopy
Auto-Fertigation Today
- [x] CLEAN Chiller
- [x] Vinegar
- [x] H202
- [x] High Throughput (Blast the interior AFTER Vinegar & H202)
Initial Reservoir Fill: EC: [ 2.0, mS/cm]
- [x] 4 Gallons (Dehu, RO, or Distilled)
- [x] Primer A & B: [ 54, ml]
- [x] Silica Skin GEN 3: [ 27, ml]
- [x] Photosynthesis Plus: [ 24, ml]
While configuring - Ran 2 Gallons of Feed Before UNPLUGGING. ;-}
__
Mon Apr 21, 2025
TH 1Q25 32:F:4:4
- [x] Light Distance[TOP]: [ 9, in] # Still Stretching 1.5 - 2”/Day
Reservoir Fill: EC: [ 2.1, mS/cm]
- [x] 4 Gallons (Dehu, RO, or Distilled)
- [x] Primer A & B: [ 54, ml]
- [x] Silica Skin GEN 3: [ 27, ml]
- [x] Photosynthesis Plus: [ 24, ml]
- [x] SLF-100: [ 20, ml]
We’ll take EC to 2.4 mS/cm (Relatively Heavy) IFF They’re all happy with the ‘upgrade’. ;-}
Picked up 8 gallons of Distilled from HEB. Used for to refresh tank after last nights flush.
Going for NO MORE than 2 Gal/Day.
We’ll feed MORE than necessary to get DOWN TO Optimal delivery.
Irrigation Timer is set to Every 3 Hours, 1 min flow, four times a light period.
__
Tue Apr 22, 2025
TH 1Q25 33:F:4:5
Observation
Vibrant, Uplifted, Rockin’ - 1250 runoff, Grew TWO MORE INCHES, Light Distance 6”
1900: Measure Runoff
- Amount: [ 1250 , ml]
- EC: [ 2.1, mS/cm]
- [x] Harvest Dehu
- [x] Refresh Reservoir - 2 Gallons
- [x] EC: 2.1
- [x] Primer A & B: [ 27, ml]
- [x] Silica Skin GEN 3: [ 14, ml]
- [x] Photosynthesis Plus: [ 12, ml]
- [x] SLF-100: [ 10, ml]
__
Wed Apr 23, 2025
TH 1Q25 34:F:4:6

Plants Look GREAT!
Plants stretched 2 - 3” last night. If we don’t stop, we’ll need to supercrop the Exceptions.
Cleaned MANIFOLD FILTER - Had GRANULAR feel, on top of a little slime. Will check Thursday.
Doubled IRRIGATION TIME from one to two minutes x 5 Irrigations. We had negligible runoff last night.
1900: Measure Runoff
- Amount: [ negligible, ml]
- EC: [ ? , mS/cm]
- [x] Harvest Dehu
__
Thu Apr 24, 2025
TH 1Q25 35:F:4:7
- [x] Harvest Dehu
- [x] Refresh Reservoir - 2 Gallons
- [x] EC: 2.3
- [x] Primer A & B: [ 31, ml]
- [x] Silica Skin GEN 3: [ 16, ml]
- [x] Photosynthesis Plus: [ 12, ml]
- [x] SLF-100: [ 10, ml]

Likes
17
Share


@NuttyYeti
Follow
She was getting a little pale so I added a bunch on nutes last week to see if it would help. Doesn't seem like it did so I tested the pH and it was pretty high. Added some pH Down this week and got the pH down to 6. She got a good dose of nutes after that. We will see how the week goes. Hopefully next week she'll be a lot happier. 💚
Likes
4
Share

@Professor_Little
Follow
Looks like she ran outta nutes, leaves are showing some deficiency signs (in my POV nitrogen). So I started feeding her with a diluted mix I normally use for my bigger girl in bloom — around 500 PPM. Let’s see if she bounces back. Honestly, I’m not a fan of growing in soil… but that’s probably ‘cause I don’t fully get it yet. You gotta stay on top of things and fix issues as they come. In coco? It’s pretty much autopilot.

Likes
38
Share


@Skunkman
Follow
The buds are coming on nicely now 😎 another week and a half and the overdrive starts hopefully they’ll fatten up good and proper ✌️🏻

Likes
5
Share


@MrsGreen_98
Follow
24th - start of week 3. No water today as I watered yesterday. Added a fan to the tent. Happy Christmas Eve!!
27th - watered around 500ml. Happy growing
29th - growing well new growth looks fine in comparison to the first leaves that came out. Can see a difference between days 🍃 🍃
Likes
5
Share


@Gingercannacat
Follow
Week 10 total life
Week 5 flowering
The stretching stopped and the energy is spent on bud formation.
Fertilizer. Plagron
Boom 5 ml, power bud 1 ml and green sensation 1 ml
Stopped the vita race this week.
Happy with the way it's building up it's bud density. leafs and flowers are turning purple and the resin production is great......4 weeks to go...can't wait 😶🌫️


Likes
4
Share


@FlowerForYou
Follow
20/06/24 (FD 22): Stretch is about done, the smaller skunk plant decided to overtake it's sister and measures now nearly 60cm!
I felt like the ladies really needed a haircut, so I gave them a nice one. Took off ~1/3 of the lower leaves + shoots and a bunch of upper fan leaves to bring down humidity & allow for a better air circulation!
Weather is still quite shit and it's hard to get dry air during the night time, I just hope I have a good enough ventilation system to prevent mold...
Also cranked up the mars hydro TS1000 to 100% and I hope buds will swell nicely from now on!


Likes
3
Share


@Ogbangbang2981
Follow
it's only the beginning on week 6 and are in flower stage, tree looks good loving her feed, loving her space just loving life. Today I decided to put her outside in the sun such a beautiful Sunday it was, I'll keep this updated with more pics by Saturday on the closing of week 6 .
