
Likes
Comments
Share


@Archimedes
Follow
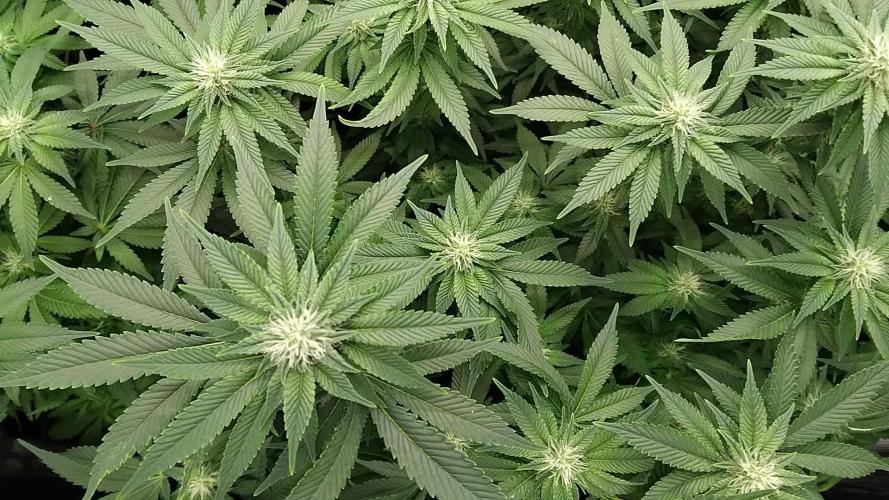
Some nice Balcony Bombs forming, internodial distance is still very short and i did not notice much of a stretch overall to be honest.
The Smell is getting more intense day by day, but the profile is kinda flat, albeith sweet. Excited to see it further down the road

Likes
9
Share


Likes
29
Share


@Prilyfe13
Follow
April 5, 2024 Day 50
This week will focus mostly on ScrOG and watering. The lighting will stay roughly the same as the net will be keeping the canopy a bit lower for a bit longer. Nutrients have changed as well.
The SCroG net has been installed at 19" from soil. Both plants, again, are the same size and shape and structure and leaf coverage and all. So I had to pull down about 3 tops per plant. The rest of the canopy is just at 19". I plan to keep it that way for at least this week. Hopefully they don't get away from me.
The nutrients have been changed around a bit as well. I removed the Big Bud and Sensizym and replaced them with Overdrive at 8 ml/gal and increased Bud Candy to 8 ml/gal for the next 2 to 3 weeks. Then we are looking at flushing for the rest of the grow. So maybe a week and a half of flushing.
The lighting was adjusted to match the SCroG net. It is now perfectly set to 24" with the power remaining at 90%. The DLI is at 45 mol/m²/d through most of the canopy. With the net in place, I have a couple extra inches to work with above the light. Plenty of space now.
The environment will also be tweaked a bit this week as well. I'm going to try to get the humidity down to 50% by the end of the week, but I always have trouble controlling the environment. I don't expect this to be any different. We shall see. As long as the weather doesn't go insane like it did for my last run, I should be able to keep it steady. Maybe not exactly where I want it, but steady as she goes. I'm also planning on dropping the temp down to 75° for the rest of the run. I'll also be running slightly cooler night temps at that time as well. Maybe 66° would be good. Maybe 65° to bring out that beautiful purple.
Update: I forgot to say that I took off a few leaves that were blocking other bud sites. Not many, just to help a bit.
Grow System Environment:
Temp: 75.2°
RH: 54.3%
VPD: 1.32 kPa
April 6, 2024
Watering day today.
Both ladies got a full gallon refill today. I also did a bit of research on the Advanced Nutrients feeding schedule. Of course I have an autoflower, so it's not quite the same. But I can follow a different schedule that matches my 5 week veg stage. I'll be adding the Big Bud back in and removing the Overdrive for this week. I'll review what the plants are doing and decide what action to take next week. I'm pretty sure I'll need to wait another week before adding the Overdrive and pulling out the Big Bud. I did leave the Bud Candy at 8 ml/gal though. They are definitely in need of more candy.
Again, both plants are basically the same. They are both sticky all over now. Even the stems are covered in trichomes. Especially so early in the flowering stage.
I didn't check the roots on Tropicana Cookies, mostly because with the net in there I have extremely limited space to work. But we all know the roots are everywhere on the bottom of the container.
Tropicana C, on the other hand is starting to show more on the outside of the container. I'll check the bottom tomorrow along with Tropicana Cookies.
The lighting hasn't changed at all. Mostly because I brought the tops back down under the net. So the DLI is the same at 45 mol/m²/d and 24" from the canopy. Perfect.
Now, I don't really understand how to SCroG really. I know to bring the tops back under the net, but what about raising the net to accommodate the growth of the tops after everything is level again.
There are some tops that aren't quite at the net yet, but the whole tent is like that, hence the net in place.
The environment is pretty good today. The temp is spot on at 75.6° and the humidity is a bit high at 56.7%. But the VPD is still in that perfection range at 1.30 kPa.
Update: I ended up snipping some leaves from both ladies. There were a few massive ones that were covering multiple bud sites. There were a few others in the lower part of the canopy that were blocking the lower bud sites. Now there's a good amount of leaf coverage.
Grow System Environment:
Temp: 76.3°
RH: 54.6%
VPD: 1.36 kPa
April 7, 2024
Looking good today. Both ladies had a couple tops pulled back down. I think I'll continue to pull them down until the rest of the plant starts to grow above the net. It's very close. Maybe another couple of days.
Tropicana Cookies looks great! Excellent leaf coverage and bud sites developing everywhere. There really isn't much else to say about it. Roots are inaccessible to me now with the net up and the plant being in a rear quadrant.
Tropicana C is starting to develop a beautiful root structure along the bottom of the container. All the way around the bottom outside and the very bottom is coming in super evenly. She also had a couple tops pulled down. The rest is catching up. I'm expecting great things.
No watering needed today. I'd say another couple of days, then a full reservoir top off for each.
Lighting won't be changed for a few more days. When the tops all start climbing over the net, I'll have to either raise the light or drop the power. I still have plenty of space to lift the light, so I'll leave the power the same unless I need to. Let's hope it only needs to be to 80% if need be.
The environment is basically perfect with the temp being at 77° and the humidity at 55%. The VPD is perfect at 1.33 kPa. I couldn't ask for better conditions. I'll be gradually dropping the humidity down to 50% and raise the VPD to 1.45 kPa starting next week. Eventually, I want the humidity down to 40% and the temp around 75°. I should be able to pull it off. Especially if I do one final defoliation. I'm not sure that I will to be honest. Unless these leaves get massive, the coverage is excellent.
Update: As I did yesterday, I was further inspecting both plants and discovered a few leaves that needed to go. Just a few km each plant. I had to note it though. Cutting leaves is an important thing to note and a step to be careful with. Too much and the plant could get stressed out. So far I'm seeing zero signs of stress. I don't take a lot though, so I don't expect any stress at all. This is only based on my past experiences. I learned that lack of defoliation can be a bad thing. Not for air and light, but for bud formation. My ants would get so full, they overlapped and left no space for the buds to fully develop. It resulted in airy loose buds. Tasty though. Anyway, the lesson was that I don't take enough off. This time around I'm taking just a bit more and the plants seem to be loving it. Lots and lots of well formed buds deep in the canopy. I'm honestly not too sure how tall they will get. The buds are developing quite nicely, but I can tell they are still very new and have a lot of growing to do. That being said, this should be around when the plants take off. We shall see how things go over the next week or so.
Grow System Environment:
Temp: 76.1°
RH: 54.4%
VPD: 1.36 kPa
April 8, 2024
Not a lot going on today. Both ladies look the same still. No issues, no stress, just growth. Nearly all the tops are breaking past the net now, so everything is wonderful.
No watering today. They have about 2/3 water left, so maybe another day or so. We shall see.
With the plants breaking past the net, I had to lift the light today. Not only did I have to lift it, I also had to drop the power down to 80%. No idea why the DLI was so high, but it was at 50 mol/m²/d. Now it's back down to 45 mol/m²/d. Interesting though. I wonder if my meter needs calibration. Maybe. I'll check it out later. For now I'm looking for slight praying.
The environment today is just as good as it has been for most of the grow. The temp is at 76° today. It dipped down to 74° for a couple hours, but picked back up a little while ago as I thought it would. The humidity has been wonderful as well. It's fluctuating between 54% and 56%. Wonderful!
Update: The light changes were perfect. Just enough to get some slight praying. Everything is good in the world.
Grow System Environment:
Temp: 76.5°
RH: 53.9%
VPD: 1.41 kPa
April 9, 2024
Nothing to do today except water. Both plants needed a full reservoir refill. So it's taking them roughly 2 days to empty now. Good to know. They are getting thirsty and that means more growth and production. They both have a decent amount of trichomes coming through now. What a wonderful aroma coming from them. Crisp and sour with a fruity base. Very nice indeed.
They don't have any differences, so I can't really make a report about each one without writing the same thing, so I'll just describe them as a whole. Both plants have nice roots coverage on the bottom and lower sides of the containers. Their leaf coverage is basically perfect for what I'm looking for. Plenty of foliage to catch the light, but not too much to overshadow bud sites. There's barely any overlapping leaves and zero clusters. The color is wonderful and they are super healthy. The branches are a bit thin and still very pliable. I think I can expect that to change in the next few days or so.
I also took just a few leaves off both plants total. Nothing much, but there was a cluster and an overlapping leaf. Just enough to keep the lower tops free and clear of extra foliage.
I didn't move the light today. There aren't enough tops over the net to justify it yet. When the stretch finishes up, I'll reevaluate the light position and power to best cover the whole canopy without over doing it with the taller top sites. I may have to move the light up tomorrow though. Either way, it'll need to be paid attention to over the next week or 2.
The environment is still fantastic. And it's beautiful out today. The tent is feeling it and is happily at 75° and 51% humidity. The VPD is very happy at 1.42 kPa. For this exact age of the plants and their progress, the VPD should start to rise a bit to 1.40, so it's now spot on. I think I can bring it up to 1.6 without any issues. That should be around 75° and 45% humidity. I'll see what I can do over the next 2 weeks or so. It should be very simple to bring it down to that temp and humidity. Especially if I do a final defoliation. Honestly, I don't think I'll need to do a defoliation at all. Maybe remove a few overlapping leaves and any clusters that pop up. Other than that, it should be fine.
Grow System Environment:
Temp: 74.7°
RH: 50.3%
VPD: 1.42 kPa
April 10, 2024
A little bit of change today. Both plants are completely through the net with Tropicana Cookies suddenly slowing down a bit. Or it's Tropicana C that has sped up. Either way, Tropicana C has completely cleared and stretched above the net. They are solid tops and don't want to risk breaking them, so they are growing straight up now. Honestly, I think it's time to let them finish stretching.
Other than the slight height difference, there isn't anything else to mention. They both look super healthy and are growing quite nicely. I can't wait to see what they end up like.
The light was raised an inch today. That's specifically due to Tropicana C and her stretch. Unfortunately, I'm nearly out of space for the light to go. Either way, the DLI is back down to 45 mol/m²/d. I am also debating on shrinking the footprint a couple inches. Mostly to increase the intensity for better canopy penetration. I may drop it to 22" instead. The canopy isn't all that deep, so this should give some pretty good bud throughout the whole plant.
I'm also considering the SCroG net. Frankly, I would like to pull each plant out for inspection and maintenance. With the net there, it cannot be done. However, if the plants stretch in such a way that I can safely lift the net up and off, I will. It all depends on how they look after stretching has finished up. And of course to make sure the buds aren't weighing down the whole branch. I will say, the internodal spacing is really nice.
The environment is way off today. The humidity is high at 58° and the temp is low at 74°. It's definitely hurting the VPD at 1.14 kPa. I'll have to mess with it more to see what I can do.
I also didn't snip any leaves off today. They really don't need it. However, they may need it in a couple weeks. We shall see.
Grow System Environment:
Temp: 77.5°
RH: 52.5%
VPD: 1.49 kPa
April 11, 2024
A bit of a trimming session today for both ladies. Not a full session, mind you, but some trimming was done. Mostly leaves in the lower canopy. I also removed a few leaves that were being crushed against the walls of the tent. Those came off as well. I also removed a couple tie downs to allow for those branches to lift up a bit. With the net in place, there is plenty of space in the canopy for light and airflow. Especially from the original training and the way I defoliated.
Both ladies are now covered in sticky and sweet smelling trichomes. I was kind of hoping for the trichomes to show up a week ago, but this is fine. I mean, the stretch isn't even done yet, so I can expect even more trichomes. Speaking of trichomes production, my last grow didn't have much in sticky trichomes. I'm thinking it had to do with the light being entirely way too close. It just burned off the trichomes. This round should be much better with the light so far away.
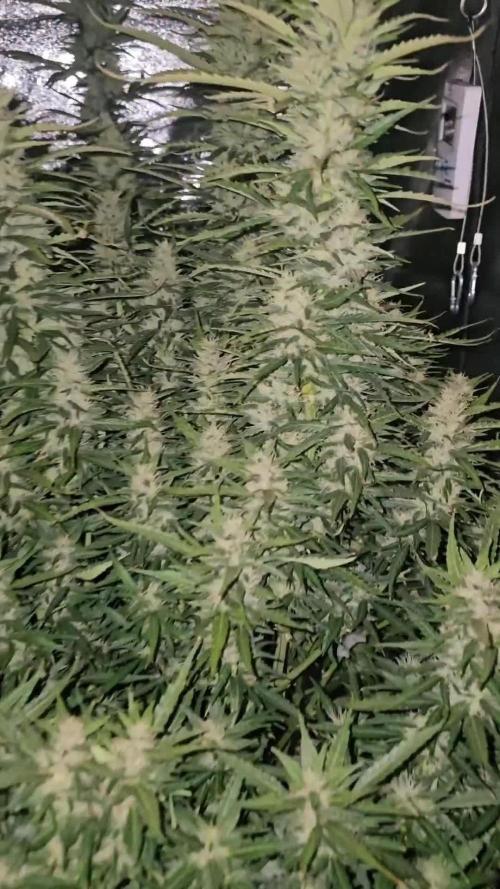
Tropicana Cookies looks fantastic. She has wonderful bud to leaf ratio. Great colors and stretching quite nicely. Her tops are completely level and about an inch above the net total. So e of the tops are taller, but not by much. I'm hoping for at least 24" from her.
Tropicana C also looks great. It officially has to tallest cola in the tent. I tried to bend it down into the net, but it's just too stiff and tall now. I may tie it down into the tent. I'll check back later today and decide then. She should hit 24" by the end of the stretch.
The lighting will need to be changed I think starting tomorrow. With the height where it is and the intensity, it may need a power increase. I also might drop the light an inch. One or the other. The DLI is a tiny bit low, just below 45 mol/m²/d. The outsides are at 38 mol/m²/d, so the intensity needs to be increased.
I'm struggling with the environment today. It's super rainy out and it's causing the tent to be a bit too humid. The temp is fine at 75°, but the humidity is a bit high at 56%. It should be around 50% to 53%. The VPD, of course, is a bit low at 1.33 kPa. It should be above 1.40 kPa at this stage. I'll continue to fight with it for the rest of the day. Although, the forecast says rain for a few days, so that may be a pain in the ass. Don't get me wrong, the humidity will drop down in a couple hours, but the exhaust fan power is at 100%. I'd prefer it down to 50%. Less power and much quieter.
Grow System Environment:
Temp: 75.6°
RH: 53.9%
VPD: 1.36 kPa

Likes
5
Share


@Bluethum94
Follow
Plants are taking off but started showing signs of stress not for sure what the issue it is but since I’ve noticed I moved the light up and have only been giving clean water phed to around 6.5 I’m watching new growth to seen if the stress has lightened up
Likes
152
Share


@Qutro
Follow
Hallo Growmies,
Welcome everyone to the third week of the trip to Japan. This week the adventures started and we still have a bumpy road ahead of us before we reach the final destination.
After we changed the nutrient solution she definitely seemed more happier .💦
So decided to start with the trainings, on Day 25 topped her and right after started with LST. I expect her to recover quickly from the early stress and start growing strong in the next 2 weeks. 🌱
On day 27 took off 4 big fan leaves.
Till day 29 we continued tying the branches and checked and corrected the PH daily. Let the branches up for 2 days to regenerate then we tied them again.
PPFD is around 600. Will keep this until the end of the veg period.
Everything is going well but there was something to worry about again. I started giving powder silicate to the mix and left a gap between the net pot and the water. In the second day checked the root and noticed that silicate deposited in clumps on the part of the root which is between the net pot and the water. Luckily could wash it off with a shower.
So that’s all for this week.
See you soon!🌞🌱

Likes
Comments
Share

@Topshelf_only
Follow
Light defoliation this week very couple of day's. Humidity up too at weeks end due to rain not to worried . Get it 1 maybe 2 weeks and if not down below 60 will have to set up dehumidifier.


Likes
6
Share


@Ieiogrow94
Follow
Eccoci qui...
Per problemi di lavoro ho tardato un pò la pubblicazione delle foto, la piccola è molto vigora ed emana un forte odore.. Già si può vedere la resina che si inizia a formare sulle cime in alto...
Sono estremamente soddisfatto della sua crescita finora e sono sicuro che mi riserva sorprese, odore veramente intenso.
Grazie a tutti per il supporto, NON VEDO L'ORA DI RACCOGLIERLA 🔥🌲❤️

Likes
29
Share


@Jjthejetplane79
Follow
Everything is smoothly sailing. I had to raise my lights and do a little defoliating. Still need to do a little more defoliating but I'm lazy
Likes
8
Share


@Lickey
Follow
After 5 weeks of flowering we are in week 6. Grape Apes need water every -45 days and just 1.7L. That ain’t much. Tangerines are about 1.8L every 3 days.

Processing
Likes
13
Share


@kevgrow
Follow
Hey Friends, end of week 9 from seed
Plant #1 is growing big, not too much flower yet
I started noticing a weird smell coming out from the plant. The nutrients I use do not have a pleasant smell but this smell coming out from the plant smells very weird. When i touch the leaf with my finger it leaves a strong smell like Lemon and green mango which is good, but when I put my nose close to the cola it smells weird like wet socks. I searched for mold and didn't see any signs.
The plant looks healthy, humidity is at 51%
Temperature 76 f
This week I also noticed some of the leaf stems close to the light were turning red, only the top ones were turning red so I lowered light intensity and the stems are slowly turning back to green.
Looking forward in seeing some flower development in week 10, will keep you guys posted, see you next week 😊
Likes
1
Share


@DillyGenetics
Follow
Week 1 germination 100% 1 shot glass of water was maker sure the soil was damp with sprayed around soil
Likes
12
Share


@bonemealheavenly
Follow
things are getting out of control. finally seeing signs of flowering. water every 3 days or say about 2 gal. each
will top dress with some more 2-8-4 in a couple weeks


Likes
15
Share


@Lontra
Follow
Tag 22:
🌱: LST wurde etwas nachjustiert, um die Verschattung zu minimieren. Leider habe ich dabei eines der größeren Fächerblätter eines der Haupttriebe beschädigt (Stiel gebrochen) und musste dieses nun doch entfernen.
💧: Die Erde war trocken, daher wurde gegossen. Den Angaben meines Wasserversorgers und meinen Berechnungen zur Folge, habe ich das CalMag weggelassen und nur 0,25g/l Bittersalz hinzugefügt. Auch das Bio Grow wurde wieder auf die ursprünglichen 50% des Düngeplans reduziert. Insgesamt gab es ca. 2,5l bis zu einem ersten kleinen Drain.
💡: Die Beleuchtung wurde hochgeregelt, auf einen DLI von ca. 40 bei ca. 40cm Abstand zur Pflanze. Update: Abstand auf 35cm und Leistung etwas verringert (weiterhin DLI ~40), da sonst Temperatur zu hoch steigt.
Tag 24:
🌱: Heute wurde erneut die Schere angesetzt (leider etwas verspätet, aber ging nicht anders). Entfernt wurden die unteren und somit innersten und äußersten neuen Triebe an den 4 größeren "Haupttrieben" und deren Fächerblätter. Um den Schock nicht zu groß zu machen, dürfen die nach innen wachsenden Fächerblätter noch 2-3 Tage dran bleiben. Zusätzlich wurde das LST noch etwas angepasst.
💧: Die Erde ist noch nass.
💡: Die Beleuchtung ist unverändert.
Tag 26:
🌱: Heute wurde erneut die Schere angesetzt und die nach innen wachsenden Fächerblätter entfernt. Zusätzlich wurde das LST noch etwas angepasst.
💧: Die Erde ist noch nass.
💡: Die Beleuchtung ist unverändert.
Tag 27:
🌱: Es ist der Beginn von Tag 27. Es wurden nur kleinere LST Anpassungen vorgenommen und das Blattwerk etwas sortiert um die Ausleuchtung zu verbessern. Die kleine Lady denkt anscheinend bereits daran in die Blütephase zu wechseln, zumindest zeigen sich die ersten zarten Pistillen.
💧: Die Erde ist noch immer feucht.
💡: Die Beleuchtung ist unverändert.
Tag 28:
🌱: Das LST wurde für ein einheitlich hohes Blätterdach erneut leicht angepasst. Ich überlege in den kommenden Tagen auch noch einige der unteren Fächerblätter, die mittlerweile ziemlich im Schatten liegen, zu entfernen. Zunächst jedoch schaue ich, was der Stretch die nächsten Tage so bringt. So langsam macht sich auch ein leichter Duft bemerkbar.
💧: Die Erde war trocken, daher wurde gegossen. Heute gab es insgesamt 3 Liter der gleichen Wachstumsmischung wie letzte Woche. Das Bittersalz scheint auf jeden Fall zu helfen.
💡: Die Beleuchtung ist unverändert.

Likes
25
Share


@Ganjeiro420
Follow
Eai comunidade GD, sejam todos bem vindos a mais uma semana dessa bela menina.
Essa semana tive alguns problemas com falta de nutrientes, as folhas deram uma amarelada, agora corrigi na rega e acredito que daqui uns 3 dias já teremos a melhora.
Os botões estão crescendo bastante e o cheiro está incrível, não vejo a hora de experimentar essa maravilha!!!🍌✅
Likes
45
Share


@BodyByVio
Follow
Beautiful flower full of trichomes. Smell and test fantastic. Very fast flowering. She was done on day 49 but I cut her down few days later.
I love the strain, the only thing that I will like this strain to have is a better yield. Beast quality buds I ever grew.

Likes
4
Share


@Nillenium
Follow
Sie wächst weiterhin prächtig!
Ich lass sie einfach ihr Ding machen und passe nur regelmäßig den Lampenabstand an.
Likes
27
Share


@eldruida_lamota
Follow
Vamos familia, hora de cosechar estas Biscotti de RoyalQueenSeeds.
No veáis que pinta que tienen las flores están bien formadas y repletas de tricomas.
Después de 70 días de floración obtengo estas flores tan increíbles que huelen pfff.
Es una variedad un poco complicada de cultivar pero, que al final si da sus frutos.
Bastante contento con este primer cultivo de la temporada de indoor.
Dar las gracias a james por las genéticas dé RoyalQueenSeeds, y a todo el equipo de Agrobeta, que sin vosotros parte de estos proyectos no son posibles 🙏
Agrobeta:
https://www.agrobeta.com/agrobetatiendaonline/36-abonos-canamo
Mars hydro:
Code discount: EL420
https://www.mars-hydro.com/
Hasta aquí es todo , espero que lo disfrutéis, buenos humos 💨💨.
Likes
1
Share


@walterwhiteee
Follow
Aug 13th transplant day
Using Gai Greens Organics 4-4-4 with worm castings and mykos for root structure
Aug 15th Start of LST

Likes
2
Share

@PlantMike
Follow
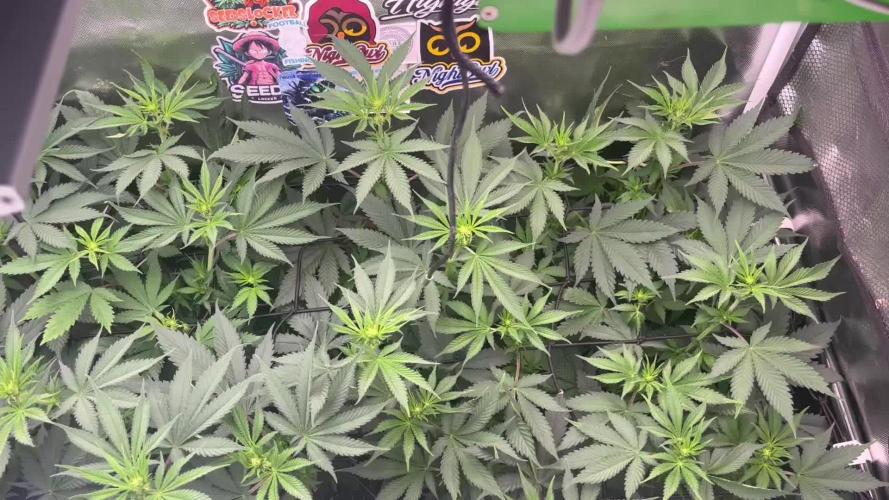
The BMR sisters are in overdrive, it's looking like stretch has stopped now that we're 14 days into stretch, and the canopy is wonderfully uniform, nothing else to say this week except everything is looking great!
