
Likes
Comments
Share


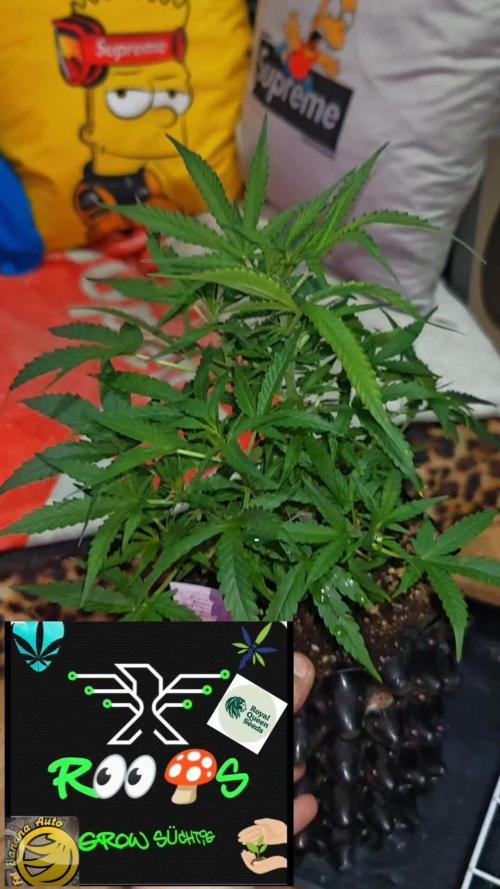
@Nicogreen
Follow
Hhhar lige 6 dagbøger til der skal laves dagbog på. Det bla frø fra Barneys farm sweet seeds og mafia seeds cphseeds.dk fastbuds og zamnesia. 😉 Er meget begejstret for især zamnesia og barneys farm indtil videre

Likes
43
Share


@Esoteric_growing
Follow
Height has almost doubled in one week, 2 of them are a bit bigger than their siblings but all looking very good although the front right plant seems to be the runt of the family although it’s improving.

Likes
3
Share


@Weedzoks
Follow
Welcome everyone
Here is the diaries of a friend, this is his first culture.
He chose for this session five Hulkberry from Royal Queen Seeds, a BubbleGum offered by Zamnesia, as well as a Big Bang Auto from GreenHouseSeeds.
All these ladies are under HPS 600W, 150cm square area.
Here we go!


Likes
48
Share


@TheCannaProphet
Follow
~ WEDDING CHEESECAKE FAST FLOWER by FastBuds ~
Well fam, here we go again with another epic strain from FastBuds Fast Flowering stable. After having such tremendous success growing their Gorilla Cookies Fast Flower outdoors last year, I've decided to run another of their fast flowering strains outdoors this year... Wedding Cheesecake Fast Flower!
The best description of this awesome cultivar comes directly from my friends at FastBuds which is as follows:
"A delight for the mind and body: Wedding Cheesecake FF (Fast-Flowering) is a delicious strain that offers XXL yields in a 7-8 weeks flowering cycle. This terpene powerhouse produces loads and loads of mouth-watering vanilla-creamy-cookie-scented terps with hints of citrus and cinnamon. In addition to its delicious aromas, this variety grows very well in both indoor and outdoor setups, yielding up to 650 g/m2 without extra maintenance, making it the ideal strain for beginners as it allows you to maximize yields while minimizing work. This super-fast feminized photoperiod version offers upbeat and energetic yet deeply relaxing effects that are perfect for consumers looking for a heavily focused, motivating, and creative high. It’s the ideal strain for those needing that extra energy boost to start a busy day on the right foot.
Wedding Cheesecake FF boasts chunky, large-sized buds with a thick layer of silvery-white resin and bright orange hairs scattered all over: that just screams ‘quality’. The lime-green flowers sparkle with an array of hues ranging from dark to light green, to magenta and purple, and reek of a delicious aroma that’ll remind you of fresh store-bought cheesecake.
This is an XXL hybrid that grows extremely tall in height, reaching up to 3m with one huge main cola and multiple long side branches that can withstand enormous yields of up to 650 g/m2 with ease. Wedding Cheesecake FF is extremely resilient to the elements and can be grown in almost every climate as long as you’ve got the space and basics covered, making her an excellent choice for those looking for large-scale harvests with a quick turnaround time without much effort."
________________________________________________________________________________________________________________________________________________________________________________________________________________________________________________________________________________________________________________________
The Setup:
This is going to be an outdoor grow, but I have started the Wedding Cheesecake FF indoors as our weather is still too cold to put her outside (nighttime temp's dipping regularly into the 30's℉).
The plan is simple... let her grow inside under a 19/5 light schedule until the nighttime temperatures stay above the mid 40's℉, at which point she'll be moved outside and transplanted into the soil which I have already setup and inoculated with beneficial microbes, and then let the fun begin!🤪💚
________________________________________________________________________________________________________________________________________________________________________________________________________________________________________________________________________________________________________________________
Weekly Updates:
6/18- Week 12 and the Wedding Cheesecake Fast Flower from FastBuds is on a mission! The amount of growth happening right now can only be described as explosive, with new shoots appearing and existing branches going crazy with growth!
6/20- Our summer is here and we're under an early heat wave this week with daytime temp's hitting the mid to upper 90's ℉ with heat indexes in the low 100's ℉... in short, IT'S FNG HOT!🔥🔥🔥
I'm watering the Wedding Cheesecake FF daily now with 5-7g of straight well water from the garden hose. I'm watering at sundown so that the water will have some time to soak down into the soil before the heat evaporates it. The coating of straw that I previously spread over the soil has helped a lot as well.
6/22- The weather continues to relentlessly bake everything outside... many thanks for a good A/C!❄️
The daily watering continues and I also went ahead and removed a bunch of foliage that was below the trellis net.
6/24- Today I top dressed the FastBuds Wedding Cheesecake FF with 2 cups each of Gaia Green 4-4-4 and 2-8-4 along with 1 cup of Down To Earth Bio-Fish 7-7-2 and 1/2g of Wiggle Worm castings. After top dressing and working the amendments in by hand I replaced the straw coating over the soil and watered them in with 5g of straight well water via garden hose as usual.
There goes another week for the Wedding Cheesecake FF and it won't be long before she begins to show signs of pre-flowering!
Thank you for checking out my diary, your positive comments and support make it all worthwhile! 💚Growers Love!💚😎🙏

Likes
19
Share


@Comfrey
Follow
Day 64
🌤️🌥️☁️☁️ 11-19 degrees and the humidity is around 65%. I started into the tenth week with an intense check of the main buds. Some of the trichomes are milky but the most are still clear. Maybe I‘m wrong. Some days ago I could spot some amber trichomes but the flowers expanded and it‘s not possible to find anymore amber ones. Watered 500ml pure rainwater.
Day 65
🌤️☁️🌥️☁️ Today Tropicana needs a rest. She just want to sit and do nothing except waiting for sunshine warming her heart. In the evening she asked for water, potting soil lost enough weight. 600ml with 60ml light fermented flower and herb tee. ~100 ml drainage with PH 6,2. In the main flower it was possible to find a small amount of amber trichomes.
Day 66
🌤️⛅️🌤️🌤️ 10-21 degrees, humidity 45-65%. This morning I understood, that Tropicana was not thirsty yesterday, she need to breath oxygen with her roots to feel happy. The beautiful smell is way not so intense since last night. I missed the strong smell when I opened the door to our balcony in the early morning. So no watering yesterday would be better. And my banana peel tee is not free of nitrogen, same with the herb and flower tee. Less is more will be written in my diary in the next days (weeks). Watching Trichome TV: I see more amber and I see that she needs more time after all this stress which I made for her. She told me that she is not only sick of water, she told me, that she hate to be moved all the time, too. Every move from A to B she would loose tiny roots and this would stress her a lot. When I checked the moisture I spotted too many of this root fly castings. Their mamas and papas had their orgie about a week ago and now they are eating the mulch layer roots as if there will be no morning. This is not Tropicanas day. But the sun is shining and tomorrow will be another day. Hopefully with a nose full of this tasty fruity and woody citrus smell.
Day 67
🌧️☁️☁️☁️ 13-19 degrees, humidity 42-80%. This morning the smell was more intensive like yesterday but still not like before. The leafs show the first signs of fading and I‘m very nervous. This night will fall a lot of rain for several hours. But a part of our balcony is canopied, so Tropicana will be a little bit protected by me this night. I don‘t want to make another mistake, so I use this possibility. Anyway the plants are always wet after a strong rain, it‘s just a little canopy, but not soaked with water.
Day 68
🌧️☁️⛅️🌤️ 15-21 degrees and the humidity is 74-85%. Tropicana feels better. The smell this morning was much more intensive then the days before.
Day 69
⛅️🌤️🌥️☁️ 15-22 degrees, humidity 46-89%. Tropicanas flowers are swelling and while she is maturing her smell is getting more intense and complex. Right now mandarin and an earthy woody smell, sometimes even a bit sour like a mixture of pineapple and lime juice. It‘s possible to find new colors in the flowers. There’s purple and pink, orange and ocher brown appeared. Tropicanas main flower looks like the harvest time is near, but the trichomes are still clear and just started to get milky. Anyway she is incredible fast, especially if to remember the extrem conditions with minimal temperature around ten degrees in the early mornings.
Day 70
🌧️☁️☁️🌧️ 17-23 degrees, humidity 63-94%. In the next days we will have humid thunderstorm weather. There is even a warning for huge hailstones for tomorrow. So there is a risk of damage and mold because of high humidity. I will have an eye on this. Tropicana looks healthy, so I‘m not worrying too much anymore.
Likes
5
Share


@HomeToGrow
Follow
Moin,
Wir befinden uns mittlerweile am Blütetag 12 und der Stretch ist voll im Gange. Von der Wachstumsstruktur würde ich die White Sweet Candy OG wie eine klassische OG beschreiben starke, dicke Haupttrieb, mittelgroße Internodienabstände (finde ich persönlich sehr angenehm), starke Seitentriebe und generell eine sehr buschigen Pflanze. Durch die starken Haupttrieb eignet sich die Sorte für mich nicht um die Triebe mit Budclips auf eine Höhe zu bringen, dafür ist dann eher das Herunterbinden der Triebe geeignet. Setzt man etwas früher als in meinem Fall ein Scrognetz ein erreicht man ein wirklich schönes und homogenes Blätterdach der Triebe. Auffällig ist, dass die ersten Pistils sich erst ab den 10 Blütetag zeigten und der Übergang von der vegetativen Phase ins Blütenwachstum etwas verzögerter abläuft. Aus meiner Erfahrung spielt das keine große Rolle bei der späteres Blütenentwicklung. Schon jetzt zeigt sich, dass die 4 Haupttriebe massive Buds produzieren werden. Ich freu mich auf die kommenden Wochen und vorallem auf die ersten Trichome und der damit beginnende Geruch, ich bin mehr als gespannt und bis jetzt ist dieser Strain im Wachstum und der Performance allgemein einer meiner Favoriten der letzten Jahre! Respekt an SSSC für die Tolle Arbeit. :)
Hey,
We’re now on day 12 of flowering, and the stretch is in full swing. In terms of growth structure, I’d describe the White Sweet Candy OG as a classic OG with a strong, thick main stem, medium internode spacing (which I personally find very pleasant), strong side shoots, and overall a very bushy plant. Because of the strong main stem, I don’t think this strain is suitable for using bud clips to keep the shoots at the same height, tying the shoots down is a better option. If you set up a SCROG net a little earlier than I did, you’ll achieve a really nice, uniform canopy. It’s noticeable that the first pistils didn’t appear until the 10th day of flowering, and the transition from the vegetative phase to flowering is somewhat delayed. In my experience, this doesn’t play a major role in later flower development. It’s already clear that the 4 main shoots will produce massive buds. I’m looking forward to the coming weeks and especially to the first trichomes and the scent that comes with them I’m more than excited, and so far, this strain is one of my favorites of recent years in terms of growth and overall performance! Kudos to SSSC for the great work. :)
Likes
7
Share


@agustinnnv
Follow
Buenos dias a todos. Es la primera vez que cultivo, en este caso es una Sour Compassion CBD. Esta planta fue un esqueje que me regaló un amigo. Cuando me lo dio estaba espigado en un vaso de plástico con 1 mes de vida. La pase a una maceta "Mad Rocket" de 16L. La hice vegetar 2 meses y luego la pase a florar el 8 de Marzo. Tuvo 111 días de vida y 71 días de floración. Con respecto a la fertilización que aparece, hace referencia a toda la vida de la planta. Saludos cannabicos
Likes
46
Share


@Mosquito_Haarlem
Follow
Echt een dikke koningin.
De Power Buds van Plagron doet echt wat het beloofd, superveel bloemknoppen!
Ik heb wel schutbladen weggeknipt die veel licht blokkeerden voor de lager buds.
Laten we kijken hoe ze zich deze week ontwikkeld.
Ik zal gedurende de week nog verse foto's updaten dus hou het in de gaten 🧐
Likes
22
Share


@medicalhydro
Follow
Flush week
Total system power 230w
Dim %10
UV-IR-FR Dim %100
PH:6.0
PPM 285


Likes
43
Share


@GODSGIFT_2005_JM
Follow
🍼Greenhouse Feeding BioGrow & Bio Enhancer
⛺️MARSHYDRO
The ⛺️ has a small door 🚪 on the sides which is useful for mid section groom room work. 🤩
☀️ MARSHYDRO FC 3000 LED 300W
☀️Also special thanks to VIPERSPECTRA P2000 (200W) & XS2000(240w) LED growlights
🌱 FastBuds 420

Likes
31
Share


@XperencdGmanXG
Follow
just getting to the end here, which is good because i seem to have a breakout of TSM. Looks like I am going to have to clean the tent with a high mix peroxide and wash the netting. oh well almost done and the weed smells so good. 1 week left
Likes
2
Share


@Trinidad
Follow
15.06.25. Day 30.
Plants are looking healthy. Lots of growth in past week. She is showing preflower so I switched to flowering nutrients. First reservoir change out since I placed them into buckets. One plant topped herself because of rapid growth, I did not pull back training wire on main node and so the branch snapped where it was tied down. She is entering stretch now so I took of training wire on all plants.
18.06.25. Day 33!
Defoliation, lilipop.
22 06.25. Day 37
Plants are now taking up all the space in tent. They need to stop growing. I think I should take out some more vegetation from the bottom.
25.06.25 Day 40
Fresh reservoir change out.
Likes
119
Share


@Natrona
Follow
***DIVINE SEEDS *****
*****OPIUM*****
Sponsored grow
Week 4
Germination April 6.
Week 1 water only
Week 2 water only
Week 3 added recharge and* TPS1 increasing ppm to 570.
Week 4 added calmag, did LST and defoliation. Before & after pics. Increase ppm to 685
This week 4/28-5/4 consisted of plain ph 6.6-6.9 water with recharge, calmag and TPS1.
4/24 updated my ACInfinity app and started using the advanced programming settings for early vegetation. This is keeping humidity in 70% with temps in 80.
What I don't like is using advanced programming, the humidifier is at level6 . This spews moisture directly on my plants, into the drain tray and floor.
5/1 I did some LST and defoliation. Before and after pics above.
Until the plants are big enough to go outside, I will be using my AC Infinity tent and equipment. Once outside, I will be watering with well water and recharge and any additional fertilizers or amendments will be determined at that time.
Thank you @DivineSeeds
Thanks for the likes and comments, I appreciate all the plant love💚.
Have fun & love what you grow 💚
Sending love and light 💫
💫Natrona 💫
DIVINE SEEDS
***OPIUM***
Harvest:1000 g/m2
Divine Seeds developed Opium as a new champion strain, unprecedently powerful and loaded with unbelievable quantities of resin. Certainly, no average genetic base could be behind such brilliant parameters! Several Afghani Indica landraces, recognized as most potent and resinous, were bred together with a mighty Brazilian Sativa which Opium inherits its bright berry taste from. Then a great deal of work followed aiming for the highest THC level and endurability as well as a branchy structure that would provide maximal yields. Now we can proudly title Opium the best Indica you could dream of growing!
Indoors these plants mostly stay mid-height (1.5 m), reaching up to 2.0 m out of doors. Depending on your height limitations, Opium flourishes universally in grow boxes, balconies, green houses and terraces. Due to its Afghani parentage, this strain can stand hot weather if provided enough water and some shadow. Responds well to any training techniques: ScroG and SoG, LST, topping and FIM, supercropping. The start of blooming is marked with a rush of growth, when plants stretch almost 1.4x. Expect heavy colas that often require additional supports. Whilst ripening, Opium gives off a pungent earthy stench with fruity and berry undertones, also a bit of pine. Ready for outdoor harvesting in October.
The stoning psychedelic impact of Opium is like being hypnotized (unless you’ve had too much, then it feels more like a blackout). Stone-lovers will appreciate every minute with Opium: its spicy taste immerses your mind into daydreaming, while the body rests flat. Recreation with this psychedelic Indica means silent tripping from one insight to another. Mighty enough to kill chronical pains, Opium is also medically efficient against insomnia, nausea, appetite disorders, muscle spasms, headaches, irritation, fatigue, panic attacks, epilepsy. Best consumed at night time, the effects keep going for up to 4 hours.
Equipment and nutrients
Pots: 5gallon Air pots
Soil Fox Farm Happy Frog Amended with worm castings, dolomite lime and mychorihiza Recharge
Seeds provided by Divine Seeds
Divine Seeds breeding company
The link to Opium Feminized Seeds
Opium - Divine Seeds breeding company
The link to Opium Auto Seeds
Auto Opium - Divine Seeds breeding company
=================================
Equipment: AC Infinity
CLOUDLAB 844 – Advance Grow Tent 48”x48”x80”
CONTROLLER 69 PRO – Grow Tent Controller
CLOUDLINE LITE 6 - Inline Fan 6"
IONBOARD S44 – LED Grow Light Board 400W
CLOUDRAY S6 – Oscillating Circulation Clip Fan
Carbon Filter 6” 4

Likes
9
Share

@PPFDaddy
Follow
Hey Growers! The girls have officially packed their bags and moved into a much fancier place.
The new setup comes loaded with perks: an automated controller that keeps the environment dialed in 24/7, managing every device so the VPD stays exactly where it should be (because apparently plants are picky like that). Drainage? Automated. Irrigation? Also automated. Basically, the grow room is now smarter than most of us on a Monday morning.
Thanks to multi-frequency fertirrigation, the girls are getting up to 6 daily watering cycles, keeping the substrate pH stable and nutrient-ready at all times. Less babysitting for me, more thriving for them: a deal I'm very happy to sign.
Now, onto the Mental Rainbows, and things are finally looking up. After slightly bumping up the Calmag base to 0.6 EC and doubling the daily watering frequency, something seems to have clicked. The new growth is no longer twisted and curled, and honestly, that's enough to give me hope. Now that I'm pushing irrigation up to 6 times a day, I can only expect things to keep improving.
A few of the smaller, slimmer plants don't seem to have developed a main cola: their internodes are all growing at roughly the same pace. So while I'll be topping the bigger, more advanced girls that do have a clear main shoot, I might skip the topping on the slimmer ones and let them take their time catching up in height instead. No point rushing what doesn't need rushing.
That said, even though these plants had a bit of a rocky start (likely due to a slightly more delicate genetics), I'm still very confident in them. As proven in my last run, plants that struggled early on ended up delivering even better results than the ones that looked bulletproof from day one. So, as they say: never judge a book by its cover, or in this case, by its baby seedling! 🌱
Tips, tricks, and roasts are always welcome. Happy growing everyone!

Likes
15
Share


@DOOBS_N_BREWS
Follow
My overall impressions of this strain from MSNL:
Ive noticed that MSNL genetics tend to switch to flower earlier than all the ther autos i've grown. The initial growth on the plant starts out small headed into flowering but then explodes during flowering. Because of this I start my feed at week 3 and I used the full NFTG advanced feed but only at 1/2 the recommended amounts of the early veg schedule they made. This works out well with these plants and by week 5 they can handle the full Nute schedule. A proper flush was needed at-least twice a week during the flowering period. It is a lot of work to maintain PH and soil PPM but its essential with the NFTG and if you do it right you WILL get rewarded with Danky goodness.
Last time around I grew three plants and tried 3 different training techniques to see which method worked better for this strain. I learned that LST with minimal defoliation is the best route and I stuck with what I knew and im pretty sure it worked out great! I got nice uniform growth growth and 4 truly massive main bud stalks with very dense growth even below the canopy. I virtually had no popcorn nugs, I think I had one! I also contribute that to my NFTG nutrients and Spider Farmer sf2000 202 W qb, that thing kicked some serious ass during flowering, although it is relatively strong and some of my other autos seemed to be affected by the intensity but this Purple Hulk was very heat resistant through it all.
Overall I would definitely recommend using LST to some extent with these genetics because of the small initial growth you will get at first. Start the nutes sooner than later. maybe week 3, but at half the strength. Feeding the soil would be a good idea right from the get go . Mammoth P is a cool microbe that targets phosphorus directly and recharge will slam pack your substrate with beneficial microbes and ive noticed a very clear difference after incorporating these into my NFTG feed. Another thing I did that seemed to help was weekly epsom salt (magnesium sulfate) sprays on top of my bloom khaos foliar sprays. I didn't deal with any deficiencies at all this time around following this feeding regiment 👌
I do not have taste/aroma info for this specific plant just yet but I will update this frequently with new information when I get it including dry weight, taste, and aroma, more photos, and overall impressions of its medicine. so please stay tuned!!
Dubes~
*UPDATES*
March 3- I removed the PHULK from 32 hours of darkness and chopped branches. 19.5 oz wet on the scale!! Im attempting hang drying for the first time because of my dry conditions.


Likes
21
Share


@TriangleBotanistProject
Follow
I hit it with a top dress last week after i posted:
Top Dress:
Earth dust 2-3-6 boost 2 cup per plant
Down to earth 4-8-4 1 cup per plant
20g w-20 wollastonite
20g epsom salts
4 cups black kow manure compost
Then i watered with molasses water.
Day 21 is today and resin almost doubled overnight on the acapulco gold. Its getting white out on the leaves and looks so beautiful.
I think the strawberry cough was getting bleached on the tops so i cut it back to about 60% and moved it up and will readjust once it heals up a but. still getting 1000-1200 ppfd evenly

Likes
27
Share


@LSchnabel
Follow
This plant is really starting to pack on the weight now. Buds are getting dense and absolutely covered in frost. The smell is phenomenal and very very strong now.
I had to take out a few fan leaves that started to cover up some bud. Doesn’t look like this one will be too hard to trim after the dry.
Light is sitting around 950 PPFD so she is getting absolutely blasted to the max without adding in CO2. No signs of stress ever in this plant.
I’m guessing roughly 1-2 weeks before she gets cut. Will start checking at the end of this week.
Next feed will be just CalMag and Silica.
Likes
7
Share


@Hangman
Follow
This Strain stood strong even though I threw a lot of stress at her with moving into a new box and changing lights. 2/3 hermed a bit but it looks like there are only a few seeds produced.
Very happy about the harvest when looking back at her come up.