


Likes
30
Share


@PrairieFrostGrow
Follow
***** Week 5 December 12 to 19, 2020 - Days 29 to 35 from germination *****
Going to call this a veg week at the start. Will see how she progresses in the next two days if we change it to a flower week. She is transitioning but not knowing this strain, she may take a full week to do or may only be a couple of days and she popping hairs everywhere😀 She will tell us......just be patient and watch😳 Either way i expect her to take off in growth over the next 14 days and should be fun to watch based on other diaries. She has a great canopy at the start of the week and her branches have grown laterally very well.........giving her the width to open up and let more light down the middle in the weeks ahead👍
She has reacted very well to LST and her side branches have shot up! Noticed at watering today that her main stem is getting a good girth on her already as well.........reminds me of my Zkittelz which was another Fast Buds awesome run!!!! She is set up to do very well in the days ahead. Leaf colour is spot on and we have stoped veg nutrients already.
This week we will be stepping up the watering I can tell and likely move to daily watering by the end of the week.......again, if the pots heavy - don’t water - let the roots breath baby😀 Will be slowly working up the light intensity in the days ahead as well.....might be next week though. She has not been to excited about extra light intensity and had to keep it calm and under 20,000 because going over that caused her to react. If she is drooping, then back down the power or increase the distance👍
Slow and easy.......slow and easy.......she is happy and we move forward with week 5.......Flower is upon us and she is looking good😀
Little more daily detail.........
Dec 12/20, Day 29
- dry out day
- basically left the auto girls alone today.
- she is forming an even canopy......just caught my today how she is coming together👍
Dec 13/20, Day 30
- 2L watering with MagNifiCal @ 1ml, Microbes @ 2ml = 100ppm and 5.7pH
- giving her a plain watering but since RO water added some CalMag and their allotment of microbes for the week!!
- adjust LST on the girl again and was able to get further out and keep pulling her down. She letting me get her wide👍
- she is really looking nice today!!
- keep it going girl......she is going to explode with growth this week and next 💪👊
Dec 14, Day 31
- her pot was fairly dry in evening.
- 2L feed with Micro, Bloom, Magnifical, Velokelp, Natures Candy @ 1.5ml = 800ppm and 5.8pH
- she has some runoff but didn't check the numbers tonight.
- her leaves were more droopy than expected in the evening so I think she is looking for nutrients today.
Dec 15/20, Day 32
- she is feeding well and the pot is lighter again today.
- 1L RO water with enzymes Komplete @ 2ml = 45ppm and 5.6pH......chose not to adjust it.
- enzymes to help clean up the root zone and timing it flower change and nutrients.
- she is forming buds and have switched this week to a flower week from Veg👍👊
- moved ties further out a couple of branches and pulled a couple down further.
Dec 16/20, Day 33
- dry out day to let the pots get really light.
- want to make sure the pH stays in line so drying out a little more today.
Dec 17/20. Day 34
- 2L watering with RO water and Rhinoskin, Magnifical, Microbial Mass @ 2ml
- 350ppm and 5.8pH.
- pot is lighter today and don't think I should go another day so feeding today.
- she is happy and all her leaves are up and her canopy looks good.
- I did push her nute levels and a lot of tips are burnt but its all good....not to far over😀
Dec 18/20, Day 35
- dry out day for her today as well.
- bringing down the moisture in all of the pots.
- she is going to sleep a little early......
She is a very nice looking girl Fast Buds. I have had other strains from FB that also at this point doing well and showing similar characteristics......those runs all ended very well😍.......hoping the trend continues👊🙏

Likes
18
Share


@DogDoctorOfficial
Follow
🌱✨ Super Sativa Seed Club Week 5 (Pre-Flower) Report! ✨🌱
Hey fellow green thumbs! 🌿 We’ve just wrapped up the first week of the flowering phase with our Auto Fast Pete and Auto Northern Dragon Fuel from Super Sativa Seed Club. This week has been all about preparing for an explosive flowering phase and optimizing our grow environment. Let’s dive into the details!
🌟 Week 5 (Pre-Flower) Progress:
Day 29-31: Transition to Flowering
• Auto Fast Pete: Our fast-growing friend is transitioning beautifully into the flowering phase. Pistils are emerging, marking the beginning of bud development. The plant is showing strong, healthy growth and a robust structure. 🌿🌸
• Auto Northern Dragon Fuel: This resilient plant is also entering the pre-flower stage. The first pistils are visible, and the plant is stretching and preparing for full bloom. The vegetative growth has set a solid foundation for a bountiful flowering period. 🌱✨
Day 32-34: Room Organization & Autopot System
• Room Setup: This week, we reorganized the grow room, placing our Auto Fast Pete and Auto Northern Dragon Fuel to the far left of the tent. This strategic placement ensures they receive optimal light and airflow. 🌿💡
• Autopot System: We turned on the Autopots, an innovative system that automates the watering process, ensuring the plants receive consistent hydration. The Autopots use gravity to deliver water from a reservoir to the plants, allowing them to take up water as needed. This method promotes healthy root development and prevents over or under-watering. 🌱💧
Day 35: Nutrient Changes & Environmental Conditions
• Nutrient Strategy: We’ve stopped direct feedings and are now testing how the plants do with only the organic nutrition in the soil, supplemented by regulator and CalMag in the reservoir. This approach aims to maximize the benefits of organic soil nutrition while ensuring the plants get essential minerals. 🌿
• Reservoir Details:
• TDS: 400
• Temperature: 18°C
• pH: 6.2
• Environmental Conditions:
• Temperature: 31°C
• Humidity: 51%
These conditions create an optimal environment for flowering, ensuring healthy development and growth. 🌡️💧
🌟 Care Tips:
• Light: Keeping our full-spectrum LED light at an optimal distance (18-24 inches) to ensure even light distribution. The plants are responding well to the consistent light schedule. 💡
• Autopot System: The Autopot system ensures a steady water supply, reducing the need for frequent manual watering. This system is great for maintaining consistent soil moisture, which is crucial during the flowering phase. 🌊
• Nutrient Monitoring: Keeping an eye on the reservoir’s TDS and pH levels to ensure the plants receive the right amount of nutrients and minerals. This week, we’re focusing on organic soil nutrition supplemented with regulator and CalMag. 🌿
• Environment Control: Maintaining a stable temperature of 31°C and humidity around 51% to create the perfect conditions for flowering. Adjusting airflow and positioning to optimize plant health. 🌡️💧
🌟 Genetics Spotlight:
Auto Fast Pete:
• Characteristics: Rapid transition to flowering, strong structure, early bud development. This strain is a reliable and fast-growing option for any grower.
• Future Expectations: Swift bud development and resin production in the coming weeks. Anticipate a dense and flavorful harvest.
Auto Northern Dragon Fuel:
• Characteristics: Resilient transition to flowering, robust structure, visible pistils. This strain promises high yields and resilient plants.
• Future Expectations: Significant bud growth and increased resin production. This plant is gearing up for a heavy yield.
🌍🌿 Fun Fact:
Did you know? 🌿✨ Autoflowers begin flowering based on their age, not light cycles. This means they transition to flowering typically around 4-5 weeks after germination, making them a great choice for quick harvests!
For all the in-depth action and detailed explanations, head over to my YouTube channel! 🎥✨ I’m sharing all the tips, tricks, and step-by-step guides to help you get the best results from your grow. This week has been particularly exciting, and there’s so much more to explore and learn together!
👉 Join me on YouTube Link is in my profile 👈
🌟 Conclusion:
Week 5 marks the beginning of the pre-flower phase, with both Auto Fast Pete and Auto Northern Dragon Fuel showing promising signs of bud development. With the Autopot system in place and our focus on organic soil nutrition, we’re set for an exciting flowering period.
Stay tuned for Week 6, and happy growing! 🌿💚✨
#SuperSativaSeedClub #Week5Report #FastPete #NorthernDragonFuel #PlantMagic #GardeningJoy #NatureLovers #PlantPower #Inspire #GrowYourOwn #YouTubeChannel
Germination method 🌱 @thecannakan
Genetics @supersativaseedclub_official
Nutrition
@aptusholland 🌿
@aptus_world 🌎
@aptus_es 🌍
@aptusbrasil 🌱
@aptus_thailand 🌿
@aptus_portugal 🌳
@aptususa_official 🍀
@aptusplanttechnz 🌺
@aptusplanttechaus 🍃
Ambient controls🎮
@trolmaster.eu @trolmaster.eu.support @trolmaster.support @trolmaster.agro
Soil @promix_growers_eur @promix_cannabis
LED - @lumatekeu
Watering- @autopot_usa @autopot_global
Love and attention- @dogdoctorofficial
As always thank you all for stopping by, for the love and for it all , this journey of mine wold just not be the same without you guys, the love and support is very much appreciated and i fell honored and so joyful with you all in my life 🙏
With true love comes happiness 💚🙏 Always believe in your self and always do things expecting nothing and with an open heart , be a giver and the universe will give back to you in ways you could not even imagine so 💚
More info and complete updates from all my adventures can be found ⬆️link in the profile description ⬆️
Friendly reminder all you see here is pure research and for educational purposes only
💚Growers Love To you All 💚

Likes
29
Share


@HighZenBerg
Follow
Welcome back at week 6 in vegetative stage of my Sensi Amnesia feminized by Sensi Seeds.
She does great and almost the whole 60x60 space is filled with the 8 new mains.
I will give her one more week and a defoliation in a few days.
I am amazingly happy with her and can’t wait to start flowering stage.
Day 44: defoliation
Day 47: I flipped the switch to 12/12 ! Let the flowering begin
Keep in touch !
Cheers, HighZenBerg


Likes
2
Share


@Juschiln420
Follow
Well, I'm definitely very impressed with the Gen1:11 results! Glockies is beautiful! The tip burn was me trying to add not realizing it was a day early to do so... so she burned a little but over all she is big and beautiful! I'm sooo stoked! She still has a full month to spread her wings yet!!! OMG!!! I'm still making mistakes but I'm pretty happy with my results so far! Only wish Gen1:11 wasn't only available from over seas the shipping is alone...
6/25 added 2.5L
6/26 added 3L, 2ml calmagic, 4ml wholly base, 4ml solid green, 4ml early bloom, 4ml bloom big, 10ml Seaweed extract, 2ml orca
6/27 added 3.5L
6/28 added 3.5L
6/29 added 2.5L
7/1 refreshed, gave 8ml hydroguard, 8ml orca, 25ml Seaweed extract,(wk6) 26ml wholly base, 16ml solid green, 16ml bloom big, 4.5ml calmagic
Records kept here:
https://1drv.ms/x/c/fa218bbdbbfbd064/EQGXQOoUaN9PvUu5YXxpAVQBkjmdLpHB2Q8tLy2hGpZH_w?e=LSVapP
👋👋👋 Hello, Thanks for checking out my grow!! Please like and follow I really appreciate it!🤟 Please feel free to leave questions and comments below!!👇 I really appreciate all advice!!! Check out my Instagram, you can message me there too! And check out my youtube for more content! Mistakes were made, but what better way then to live it and learn it yourself!!!!

Likes
44
Share


@Cogollo_eu
Follow
**Encontrarás la traducción a español al final de la descripción**
From/Desde: 03/05/19 || To/Hasta: 09/05/19
From day/Desde día: 71 || To day/Hasta día: 77
You can find the Money Maker Diary here:
** Podéis encontrar el diario de las Money Maker aquí:**
https://growdiaries.com/diaries/25667-gorillamakingmoney-gorilla-vs-money-m
-----IMAGES & VIDEOS-----
4, 5 & 6: Same tail
10: Leaves affected by CO2 in the roots commented in previous weeks
-----WEEK SUMMARY-----
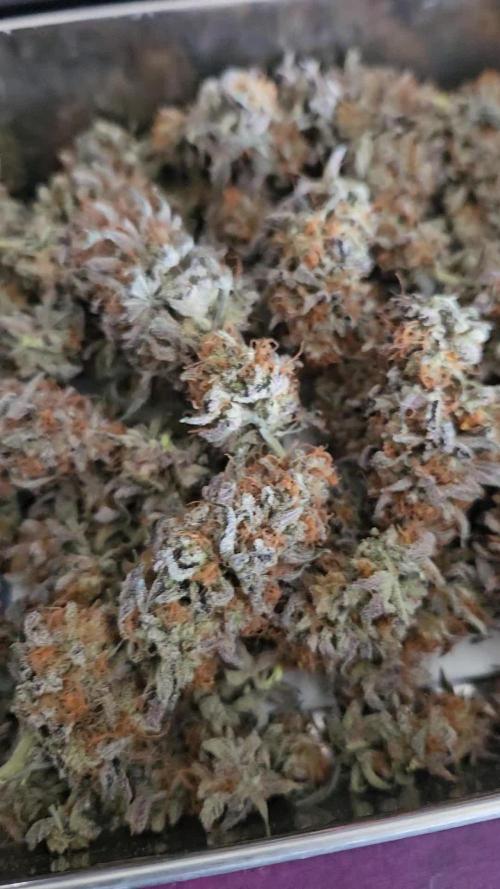
As you can see in the videos, the buds are creating massive amounts of crystals. As I already mentioned, due to the short time of growth I gave them and the massive defoliation, the tails are not coming together from bottom to top, however, the buds are growing and fattening very well, so much that they make you want to eat them. Besides, they are not only full of crystals, they are also extremely sticky much more than the plants that I've had so far.
On the other hand the smell is already super intense this week, it's difficult to hide it on the apartment, although it's something that I don't care about.
-----WATERING CALENDAR-----
05/04/19 - 1,250 ml with All week nutrients -(Nirvana, B52 & Blombastic) also Big Bud half dosed @ PH6.4 & 1.7 E.C.
08/04/19 - 1,250 ml with Bud Candy, Big Bud, Nirvana, B52, Bud Factor-X, Sensizym & Blombastic @ PH6.4 & 1.7 E.C.
*****ESPAÑOL*****
-----IMÁGENES Y VÍDEOS-----
4, 5 & 6: Misma cola
10: Muestra de las hojas afectadas por exceso de co2 en las raíces que he comentado en las semanas anteriores.
-----SUMARIO SEMANAL-----
Como podéis ver en los vídeos los cogollos están creando cantidades masivas de cristal, como ya comenté debido al corto tiempo de crecimiento que les di y a la defoliación masiva, las colas no se están juntando de arriba abajo, no obstante, los cogollos están creciendo y engordando muy bien, tanto que dan ganas de comérselos. Además no solo están llenísimos de cristales, también son extremadamente pegajosos mucho más que las plantas que he tenido hasta el momento.
Por otro lado el olor ya es super intenso esta semana, se hace difícil ocultarlo en el piso, aunque es algo que no me importa.
-----CALENDARIO DE RIEGO-----
05/04/19 - 1,250 ml con todos los nutrientes semanales -(Nirvana, B52 y Blombastic), Big Bud sólo media dosis @ PH6.4 & 1.7 E.C.
08/04/19 - 1,250 ml con Bud Candy, Big Bud, Nirvana, B52, Bud Factor-X, Sensizym y Blombastic @ PH6.4 & 1.7 E.C.

Likes
35
Share


@Dilphoducus
Follow
This grow is over. Both plants have been processed & after drying for 14 days (trying to stay 60/60 as much as possible) Each plant has been bagged and locked into it's cure phase via Grove bags. Both phenos were absolutely phenomenal specimens & growing them out was an honor. Pheno one dominated her sister in every aspect except for Terps. She grew faster , was more resilient , developed denser trichome coated flowers and ultimately yielded more @ 220g. Her smell is bright Citrus with Skunky undertones.
Now the shorty pheno may not have yielded as much as her taller more vigorous sister, but her terps were off the charts! Pungent sweet Citrus that almost burns the sinuses. She came in @ 147g with 60g of floof that I've arranged for pressing in the nearby future. Her buds were not as dense as her sister's but notably stickier.All in all I'm very pleased with a total yield of 428g. I got both plants divided into four 1/4 LB Grove Bags with RH locked at 60-62%RH . Smoke report coming after a minimum 2 week cure.
Thank you to everybody who stopped by to check this grow out. I hope this diary can be used as a reference to those who wish to try growing in living soil and sub irrigated planters. Pineapple Runtz grow underway!

Likes
1
Share


@thefrozenking
Follow
Day 49... the plants have taken over.
gave the plants some cal-mag
-grow-dots and recharge

Likes
7
Share


@CheeRz
Follow
WEEK 12 - FLOWERING: Resin Production Peak
🌼 FLOWERING PROGRESS
Entering Week 8 of flower, the Papayton shows significant trichome coverage. Environmental parameters are kept at a VPD of 1.71 kPa. The buds are well-developed and are beginning to display light purple shades. The plant is showing a natural progression into the late flowering stage.
👃 TERPENES & AROMA
The aroma is a combination of sweet papaya and creamy, gelato like notes. The scent is balanced and complex.
💧 NUTRIENT FEEDING & WATERING
Feeding remains at 1.67L according to the BioBizz schedule. Two more feedings are scheduled for this week before moving into the final ripening phase.
Current Feeding Schedule:
Calmag: 0.5 ml/l
Acti-Vera: 5 ml/l
Bio-Heaven: 5 ml/l
Bio-Bloom: 4 ml/l
Top-Max: 5 ml/l
Bio-Grow: 1 ml/l
💭 GROWER'S NOTE
Week 12. Environment is dialed in (VPD 1.71 kPa). Strong resin production and a stable terpene profile. The first purple tones are becoming visible. Development is consistent with the genetics.
Likes
2
Share


@DogDoctorOfficial
Follow
Amnesia Skunk — Week 4 Report
1. Week 4 Context (12/12 Cycle)
• Same room conditions as the rest of the garden.
• Same environmental parameters.
• Same nutrition, same measurements, no changes introduced.
• Stability across the room remains the guiding principle.
This consistency allows true genetic expression to be observed.
⸻
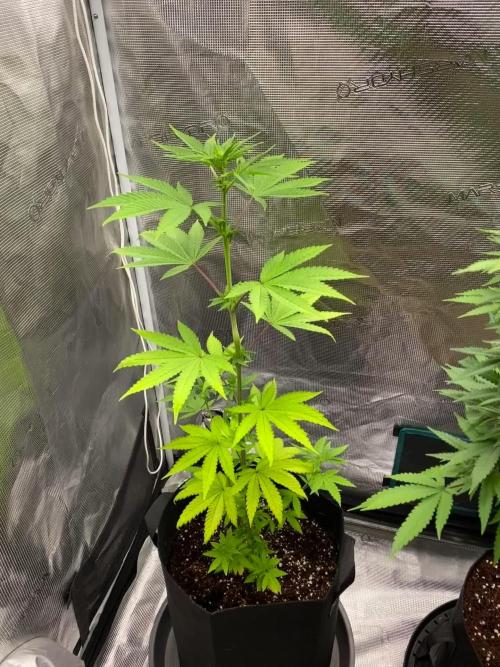
2. Growth Pattern & Structure
Amnesia Skunk is expressing very differently from other cultivars in the room:
• Node count: ~6–7 nodes
• Internodal spacing: Extremely compact
• Overall stature: Short, tight, and powerful
• Architecture:
• Dense vertical core
• Controlled lateral branching
• Strong apical presence without excessive stretch
This is a stocky, high-density phenotype, showing clear indications of structural strength.
⸻
3. Main Stem & Vascular Development
One of the most striking features this week is the main stem:
• Notoriously thick compared to other plants at the same stage
• Strong lignification already visible
• Suggests:
• Excellent nutrient transport capacity
• High future flower-support potential
• A plant built to carry weight
As you beautifully put it — this is the kind of stem that looks like it will harvest as timber.
⸻
4. Branching Behavior & Phenotypic Consistency
• Both phenotypes are:
• Very similar in overall structure
• Expressing healthy, proportional branching
• Producing smaller but well-defined side branches
This indicates genetic stability, not randomness.
Branching is present without chaos — everything feels intentional in how the plant is stacking itself.
⸻
5. Training & Plant Handling (Week 4)
• No aggressive training introduced
• No topping, no hard interventions
• Only:
• Gentle leaf bending
• Minimal leaf redirection
• Very careful handling to improve light exposure
Philosophy for this cultivar:
Let her grow as she wishes, without stress, and observe her natural form.
This approach respects her compact nature and avoids disrupting her internal balance.
⸻
6. Plant Health & Visual Quality
• Color: Deep, healthy green
• Leaf posture: Relaxed, confident, no stress indicators
• Growth rate: Steady and strong rather than fast and stretchy
• Overall vitality: Excellent
Amnesia Skunk is not racing — she’s building.
⸻
7. Studio Observations & Documentation Value
• Plants were taken to the studio for photography.
• Under controlled lighting:
• Structure becomes even more apparent
• Stem thickness and node density stand out
• Branch symmetry and internodal compression are clearly visible
Photos captured:
• Against the light
• On dark backgrounds
• Close-ups of stems and branching
• Full-plant context shots
This makes Week 4 documentation especially valuable for educational reference.
⸻
8. Pre-Flower Status
• No clear pre-flower signs yet.
• Development remains firmly in the transitional vegetative phase under 12/12.
• This slower, compact progression aligns perfectly with her morphology.
Nothing is rushed — and nothing needs to be.
⸻
9. Outlook Moving Forward
• Expect:
• Powerful flower support later in bloom
• Dense, structured stacking rather than long spears
• A cultivar that rewards patience
Training will remain soft and respectful, with future adjustments based on how she chooses to open up.
FOR DISCOUNT CODES AND MORE JUST FOLLOW THE LINK https://website.beacons.ai/dogdoctorofficial
📲 Don’t forget to Subscribe and follow me on Instagram and YouTube @DogDoctorOfficial for exclusive content, real-time updates, and behind-the-scenes magic. We’ve got so much more coming, including transplanting and all the amazing techniques that go along with it. You won’t want to miss it.
GrowDiaries Journal: https://growdiaries.com/grower/dogdoctorofficial
Instagram: https://www.instagram.com/dogdoctorofficial/
YouTube: https://www.youtube.com/@dogdoctorofficial
⸻
Explore the Gear that Powers My Grow
If you’re curious about the tech I’m using, check out these links:
🔆 Lighting & Environmental Control
• Future of Grow — Advanced LED lighting technology
https://www.futureofgrow.com/
DISCOUNT CODE: DOG20
• Lumiflora — Under-canopy LED lighting
https://lumiflorade.com/
• TrollMaster — Environmental controllers and automation gear (past collaboration)
⸻
Genetics
• Zamnesia Seeds — Genetics used in this project
https://www.zamnesia.com/
⸻
🌱 Soil, Substrates, Boosters & Root Support
• Plagron — Substrates, bio mixes, and supportive products
https://plagron.com/en/
⸻
🎒 Storage, Curing & Preservation
• Grove Bags — Curing and storage solutions
https://grovebags.com/
⸻
📸 Photography Equipment & Tools
(Not sponsors, but part of my creative toolkit)
• Sony A6700
• Sony full-frame macro lens + few more
• Stacking photography workflow - learning
• iPhone (for behind-the-scenes shots)
We’ve got much more coming as we move through the grow cycles. Trust me, you won’t want to miss the next steps, let’s push the boundaries of indoor horticulture together!
As always, this is shared for educational purposes, aiming to spread understanding and appreciation for this plant. Let’s celebrate it responsibly and continue to learn and grow together.
With true love comes happiness. Always believe in yourself, and always do things expecting nothing and with an open heart. Be a giver, and the universe will give back in ways you could never imagine.
💚 Growers love to all 💚
📸 P.S. – The Eye Behind the Lens
All photos in this diary (for now — except for the ones showing the camera, which I took with an iPhone) are taken with a Sony A6700 paired with a Sony full-frame macro lens and a few more.
Photography is part of the story — it’s how we share the fine textures, the glow, and the quiet details that words can’t always capture.
I’ve also started experimenting with photo stacking — a technique where multiple images, each taken at a slightly different focus point, are layered together to create one perfectly sharp image from front to back.
It’s not digital enhancement or AI; it’s pure photography — a way to reveal the plant’s beauty in microscopic depth, from trichome to petal.
You’ll even see a few shots of "ghost me" capturing the shots — camera, lens, setup — because every grow deserves not just to be cultivated, but documented like art.
FOR DISCOUNT CODES AND MORE JUST FOLLOW THE LINK https://website.beacons.ai/dogdoctorofficial
NEW DISCORD - Official Server Invite Link : https://discord.gg/ksjAkA5T74

Likes
12
Share

@Northern_Ent
Follow
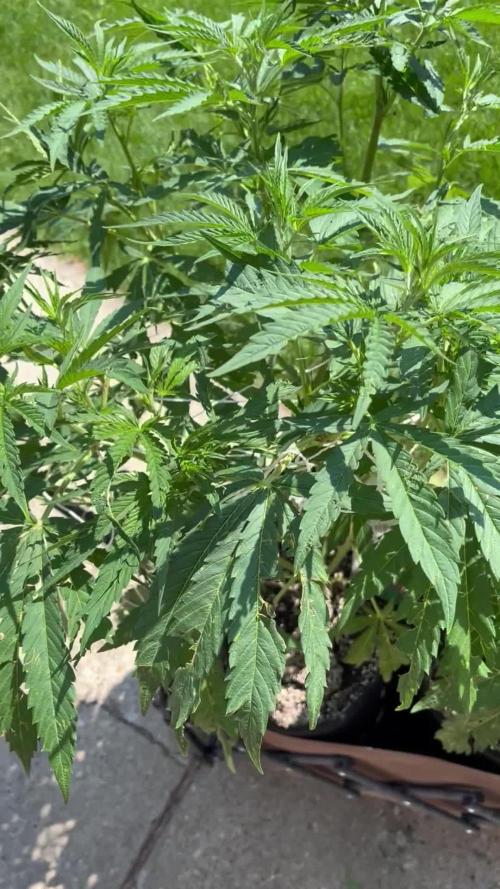
July 18: Plants are recovering from hail damage 7 days ago. Weather is good now but it’s fairly hot reaching 30 C the last couple days and about 21 C overnight which is quite warm for Edmonton.
Starting force flowering tonight. That is 10 h darkness plus 2 h virtual darkness using 730 nm far red light at dusk to initiate dark mode. In garage at 9 pm, few seconds of 730 nm far red and then out of garage at 7 am. 12 h darkness within the ‘26 h day’. Your mileage will vary at different latitudes but that timing works for me here at 53 N.


Likes
16
Share


@Mrg7667
Follow
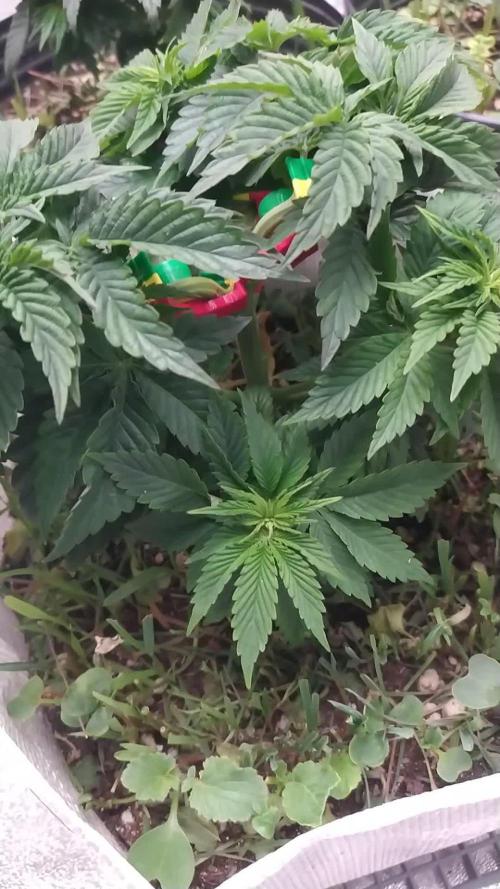
Major defoliation/ lollipoping that happened this week right on day 20 my main concern was looking for more hermies (due to stem cracks from lst) and also cut out any lower branches that where going to make larfy buds.
I only cut up the branches untill the point that the budsites where at least a nice pistil cluster (10and up ) some branches got a good 6-7 inches shaved off some more like 2-3 just depends on the plant with so much variety. Also my plants are like touching the lights it just wont let me mark less then 4inches i have the ability to raise my light another 2inches so i will definitely be doing that. For now i have the taller branches off to the sides so the can outgrow the light without burning.
Smells finally starting to come in with more gassy earth coming from DD and devine chocolate GG4 smell coming from the mellows
Still see some nitrogen toxicity not sure if should cut all nutes in half considerIng week three biogrow increases to 3ml/L

Likes
3
Share

@LAShugars
Follow
I really look forward to popping another seed of her. Most of the pictures Ive seen she has huge baseball size dense nugs
I’m afraid it’s not going to happen with this poor girl


Likes
22
Share


@DeepRootsGrowTrees
Follow
GSC BY KANNABIA
Week #20 MAR 22nd-29th
Week #9 Flower
This week her buds really started to pack on the weight and are super sticky. Her trichomes are mostly still translucent still. She really is a beautiful plant and she smells great👍!! I'm thinking about 2-3 more weeks before harvest!! Thanks for stopping by!! Stay Growing!!

Likes
Comments
Share


@The_Lonely_Farmer
Follow
So I received some fastflowering testers from the amazing fastbuds I cannot wait for these girls too show themselves and start growing 🌱
Thank you so much too the fastbuds team I'm very excited too see what they become 🤞 👀🙏
I have not yet decided which nutrients too use between shogun and aptus but I may use both let's see.
hope you will feel comfortable too advise as I go along any comments are welcome.
Any aptus nutrients users please feel free on giving tips as I think I will be using aptus
Stay blessed growmies 🙏🌱💚
Likes
9
Share


@HUMO_Cultiva
Follow
We start week 3 of bloom!! Goofiez 2 amor compound genetics it’s the champions!!

Likes
Comments
Share

@MrGanjah
Follow
This week I did LST (low stress testing) on the plants, pulling the branches downwards using bud clips. Some petals on the leaves of one of the plants curled slightly upwards. I'm on alert; I believe it's due to the light being too close. I raised their lamp to about 400 ppfd (light pressure per square inch).
Processing
Likes
21
Share


@LittleBigTrees
Follow
Been feeding just water ready for the chop.
Some of them have all brown pistils and have pretty much stopped all together.
The kalimist indica pheno is still flowering so I'll let it go until it looks ripe 👍