
Likes
Comments
Share


@MindFlowers68
Follow
Top dressed with some more soil. The top was looking depleted and just want to keep it from completely taking all the nutrients from the soil. Added a mix of power bloom with azomite and glacial rock dust. I watered in with some pure protein dissolved into hot water then added to the water I was using at diluted levels. The second watering they got this week was with molasses. which also does a good job of dropping the ph of my water to the perfect level and a little bit of Epsom salt because I ran out of my cal mag and also want the plant to have plenty of sulfur.
Last week the stalks were starting to lean but were all getting good light so I did not mess with them but this week they were sagging just a little too much and i oppted for the plant tie to the top of the tent to keep the buds in the sweet zone of the light and to prevent pockets of an unfavorable environment.
Very happy with how the buds are developing. the are not rock hard but dense and the amount of trichomes and weight is surprising when i was lifting the branches. Starting to look like shes slowing down a little but may even go to 9 weeks from the looks of it. i and not going to rush her.

Likes
33
Share


@Darksoul
Follow
Week 6 - Maybe the last vegetative week. Everyone is topped and LST. I think I will let them grow in peace this week (Ill just fix the lst, no more toppings or cutting fan leaves) and install my scrog net

Likes
12
Share


@Flavors
Follow
The budding has begun👀. Flowers are starting to mature pistols are turning to buds. Everything’s looking great! Looking forward to the buds putting on weight. Just continuing to water and added some bud candy for trichome production. The tropical cooler is super fruity dank smell if that is what you are looking for I highly recommend. The next best sent is the Super Lemon Haze x Gary Payton lemon tropical punch smell. The Blueberry Swirl has a zesty lemon smell. Fat Banana has a buttery lemon smell. Probably gonna pheno hunt Tropical Cooler later.


Likes
190
Share


@Herbalize
Follow
Hello folks
For this second week of flowering the girls are doing well and they are healthy 😊
I removed the 400MH and put the 400W HPS
Watering every 4/5 days PH 6.2, without nuts this week, because the ppm runoff was still a bit high and I wanted to make a little "flush" before using flowering nuts
Runoff : Ph 6 / 1650 Ppm
Did a defoliation at the end of the week,so the light could cross the canopy, even though I usually dont like to remove leaves, I have to try👌
Follow, like and comment if you enjoy it
I also have a second diary with 2 Remo Chemo
Peace Love & Weed 😍👊


Likes
45
Share


@Robbaus
Follow
Grandissima settimana! Sono a dir poco raddoppiate, non avevo mai visto una crescita così veloce! Ho cambiato le ore di luce 12/12 una settimana in anticipo rispetto ai programmi. Va tutto a meraviglia, l'unico problema che potrei incontrare è il riscaldamento dell'acqua dei vasi, devo essere bravo a stare sotto ai 28 g nel box, non sarà facile ora che arriva l'estate, terrò l'umidificatore fino a fine fioritura perché mi abbassa la temperatura di quei gradi che mi servono! Al momento ho tenuto lo stesso piano nutritivo della fase vegetativa, appena finiscono di allungarsi cambierò la soluzione di ogni vaso e iniziamo coi fertilizzanti per i fiori non vedo veramente l'ora, al momento scelta vincente l'idroponica! 👍🏼💪🏼🍀🤣🤣😎😎
Processing
Likes
54
Share


@rhodes68
Follow
1/29 Week 5
Nothing but the kind of problems I asked for, some white tips that mean an increase of runoff is needed.
Half expected to see this as I have been varying the amount as a learning experiment. Will up to 20% for a few days
In addition will be reducing nuets slightly keeping cal-mag as is until reason to change presents itself.
Will be kind of boring the next couple of weeks at least till they get into the big tent.
1/30 Aeryn now at 15 inches
Runoff at 40% and nuets reduced to lower pot EC
Ive tossed out my old bottle of Cal-Mag I think its turned on me as these white tips did not appear until it was folded into the feed.
Just no way this dose of nuets is causing the tips to show burning.
2/1 Major defoliation last night at lights out.
Removed perhaps 25-40% or leaf mass on all plants to allow them to stay in the tent another two weeks.
It was time to learn the process anyway, took a compromise path to doing it, some recommended taking more some less, hey sounded good to me.
Plants doing very well after defoliation except for those aggravating white tips, going to be reducing Cal-Mag again to 1ml/gal and keep CT at 5ml/gal taking C-M to zero based on what I see.
2/2 Dropped Cal-Mag from feed, want to see if that has anything to do with those white tips.
Runoff is at 40-50% ppm out under 900 so dam if I know. Will continue to defoliate as we go when something pokes its head where it does not belong.
Otherwise they are beautiful, good job so far Fast Buds. 👍
2/3 man they recover fast, removed a few fan leaves that poked their heads where they shouldnt.
Add Si to feed tomorrow for stem strength
Not comfortable leaving these in veg for two more weeks, just asking for problems. So...
Plan for flowering:
Flipping this weekend so new week will still be veg.
Removing one plant from the Moya tent to the Flowering tent to relieve space pressure as both tents will be set to 12/12 and just flower them all.
Should have space in Moya to cover the few days they are in there with just three plants, have a bout 18" of light hang to work with.
Thinking of moving Aeryn as she is largest and most likely to cause issues.
Just not sure what the stretch is going to be 😳
2/4
The white tips were absolutely caused by the Cal-Mag, considering the doses and PPM that is puzzling to say the least.
Adding Si for a few feeds to get em ready for flowering as I have no idea how these are going to grow so heading off some potentials.
Plants hit 20" over night still flipping in a few days

Likes
Comments
Share

@PicoDeGallo
Follow
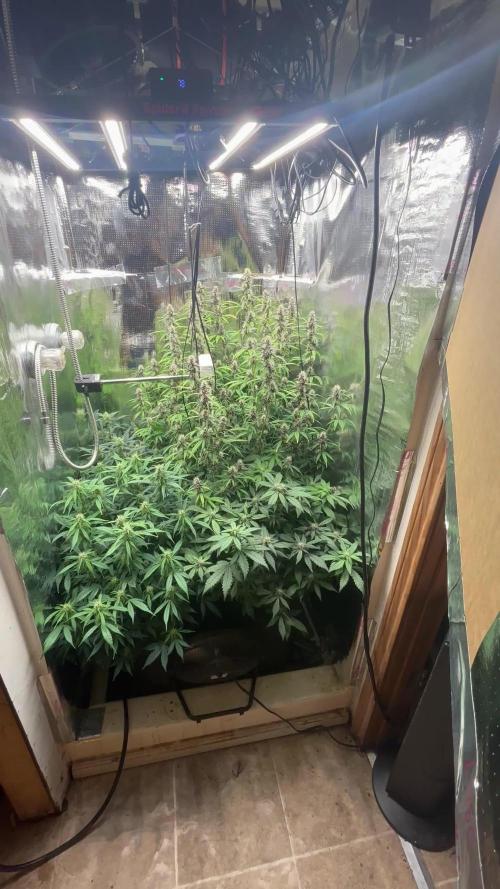
Fast Buds LSD-25 Auto
Right Rear
All I can say is WOW!
This was the smartest and slowest to start but has taken over the shower. It is full of buds that are filling in nicely.
It has been the heaviest drinker. I have been having to give it extra water after each cycle of the drip watering system.
The purple is almost black and I am looking forward to see what it turns out like, probably about 3 more weeks.

Likes
97
Share


@CANNASIM
Follow
GENERAL COMMENT
The SKR is dry and starting the cure in jars, and the NL is done.
RQS NORTHERN LIGHTS AUTO COMMENT.
This is the final week, next time will be the harvest, this girl just got mature from a day to the other, lost 70% of the top bud due to rot i haven t seen. So i could get virtually 30-40% yield from this girl
Without the locks or rot, anyhow still looking ok as far as harvest, quality will be a bit compromise, not the end of times though lol! 🙃👊🏻👍🏻
Likes
11
Share


@VagueReaper
Follow
I'm very happy with how my plants turned out and can't wait to get going again. They're now hanging in my tent so hopefully dried and ready to trim by Christmas day at the latest.
I will update on weight when dried and on the smoke when cured.
Likes
21
Share


@cal917
Follow
Plants are ready for its 48 hours of darkness . Than will harvest . Harvesting with mostly cloudy trichomes with a little amber. plants took aboit 15 weeks from seed to finish.


Likes
11
Share


@NoTraceJamaica
Follow
These photos/video documents week 6 day 3 of growth, %70-80 of all major fan leaves was removed as well as a little more LST, the girls are responding well to the increase levels of phosphorus and potassium.👽


Likes
8
Share


@Edeplant
Follow
LED dimmed down to 40%, i.e. 48 Watt.
Tatanka Pure CBD Seed died on 2nd day (watch Video).
Replacing it with Painkiller XL and Northern Light auto - hopefully they spout fast and healthy this time.
Likes
14
Share


@BLAZED
Follow
Week 11 (10-4 to 16-4)
10-4
Temperature: 24.4 degrees (lights on) 21.1 degrees (lights off)
Humidity: 60% (highest) 52% (lowest)
No pictures.
Added 10L to the reservoir, and turned it on for a couple of minutes.
11-4
Temperature: 24.4 degrees (lights on) 21 degrees (lights off)
Humidity: 61% (highest) 52% (lowest)
12-4
Temperature: 25.5 degrees (lights on) 22 degrees (lights off)
Humidity: 65% (highest) 57% (lowest)
Turned the reservoir on for a couple of minutes.
13-4
Temperature: 26.5 degrees (lights on) 23 degrees (lights off)
Humidity: 65% (highest) 56% (lowest)
14-4
Temperature: 26.4 degrees (lights on) 22.1 degrees (lights off)
Humidity: 64% (highest) 45% (lowest)
Turned the reservoir on for a couple of minutes.
The reservoir is almost empty, there is 850 ml left.
15-4
Temperature: 24.4 degrees (lights on) 20 degrees (lights off)
Humidity: 59% (highest) 49% (lowest)
No pictures.
16-4
Temperature: 23.5 degrees (lights on) 19.5 degrees (lights off)
Humidity: 60% (highest) 53% (lowest)
Today i defoliated both plants heavily for the last time, you can say i did a method called: schwazzing.
Turned on the reservoir for a couple of minutes. (Till the AutoPots are full and the valve closes)
Rised the pots aswell, so the canopy is very even.
I let them recover from the heavy defoliation i did, and next week i will slowly increase the light's strength. (Now still at 50% 50cm)

Likes
Comments
Share


Likes
15
Share


@Chubbs
Follow
420Fastbuds-Week9
Strain:FBT2313
What up grow fam. Weekly update for these gorgeous girls. They're definitely getting close to being done and getting the chop. I did a defoliation this week to allow the light down to the lower bud sites. All in all Happy Growing.
Likes
10
Share


@DeepRootsGrowTrees
Follow
ROYAL QUEEN CBG AUTO
ROYAL QUEEN SEEDS
Week #9 Veg
Week #4 Flower
This week she's looking good buds are getting big she's a plant that looks wild her white hairs in every direction with her lime green leaves!! Stay Growing!!
ROYAL QUEEN CBG AUTO
Likes
10
Share


@Mrs_Larimar
Follow
2022-12-18
Harvestday for the Mimosa Cherry Kush.
That was an easy Job.
Great ratio from leaves to buds
biiig sticky smelly Buds, an explosion of orange, lemon and other Terpenes
very pleasing
as you can see on the pictures , they gave me agood harvest.
they love the Spectrum of HYPHOTONFLUX, HPF-4000
website for for my Fertilisers:
https://greenbuzzliquids.com/en/shop/
Code: GD42025
gives you discount of 25 Percent
Inbetween my Grows, i clean the Room and all Stuff with Purolyt (Hypochlorus Acid HOCl )
But its not only for Desinfection,
iam spraying my Plants twice a Week,( iam Priming them) to make them strong.in pushing their Immunesystem
so i can run the optimal VPD- without stressing the Plant
and protect them of Mmildew, Mold etc.
here is more to read about
👉https://purolyt.de/vpd-kalkulator
👉https://purolyt.com/hygiene-management-in-horticulture.pdf
BREEDER INFO
The recognizable fruity Mimosa scent is amplified because of the sweet Cherry Kush influences that give this indica dominant hybrid an extremely sweet flavour.
It’s not just the extremely sweet flavour that makes Mimosa Cherry Kush exceptional, the relaxing euphoric happy high makes this strain a true recommendation for experienced growers and kush smokers. With a THC count of around 19 to 20%, this indica dominant hybrid is on the strong side and guarantees a long lasting effect. This strain is also very popular amongst medicinal marijuana users due to the strong, relaxing and cheery effect.
The ancestors of this extraordinary strain ar Purple Afghani x OG Kush x Mimosa and therefore has gotten a very colourful mix of genetics.
The plants of this feminized Mimosa Cherry Kush seeds are perfect eye candy with deep blue, purple and red tones. They don’t grow too much; about 100cm on a 10-liter pot. On open ground they grow to be around 150cm and 200cm depending on the climate and the amount of hours it gets in the sun. This Feminized Kush is therefore perfectly suited for growing both indoors and outdoors. In colder climates the plants grow very well too and guarantees a great yield. The many colours remain even after drying which makes them look even better. If you’re looking for an eye catching strain with a very nice flavor and strong effect, then Mimosa Cherry Kush won’t disappoint


Likes
169
Share


@CRiSPrGrow
Follow
Gorilla came down three days and ten hours ago, had the whole grow room to spare so she was hung whole upside down after just a bit of trimming for the main fan leaves that sort of thing. First day 24°C 60% humidity, second day 26-28°C 50% humidity, third day 25.5 °C 35% humidity. I had the exhaust and the fan going which gave this very nice light indirect breeze on these ladies. Really amazing smell that i had not really noticed until D-day, pistachios and christmas pine. Thought i was golden until i realised they were drying faster than i wanted. Ended up with 65/70% humidity which made these buds kinda airy in a way. Also the way the gorilla grows there were loads of tiny stems everywhere was a killer trying to get them out, ended up mincen some of the buds somewhat. Gorilla glue is absolutely a great auto to run. In ten gal it was tripple the size of my stunted one. 370 wet, hopefully something close to 100 dry - let's see I'll update in a couple of weeks.
The gorilla grows bushy quickly, by week 3 it was noticeably more bushy than the rest. Kinda took an extra week to really start flowering then it stretched 20-50 cm a week for four weeks. In all it's close to 1.5 meters in height, loads of colas, maybe twice or three times as many as the GSC. Next time i'm gonna prune the flower nodes further down the cola.
The buds themselves are quite thin, but rock solid much harder than any other strain i've grown so far - but this is my first time growen so take that with a grain of salt. The buds are covered in frost, trykes all over, oily oily oily, if you touch the buds your hands smells great for a few hours. Fun ! The trykes started appearing quite early and took a while's longer than the rest to get ripe - like truly ripe. So there were absolutely no ambers, maybe i saw one or two, but basically no ambers - this lady got cut down at the height of potency
The grow tent. Once you dial it in it becomes your best friend, but if you're having trouble getting it stable it can become your worst nightmare. I made every mistake in the book. First off i set it up without really testing it with the lights on when using it as a germination room. Worked like a charmed until i turned it on. Took me weeks to figure it out. In the end running the AC the whole time through all of summer until it's very last day. 600W HPS through summer is not something i'm gonna be doing again. With my wing reflector there was nothing i could do except keep the lamps high, led to a lot of stretching. Cool tube is the only way to go. The HPS started flickering half way through veg and it died while I was away. I ended up going through 5 of those small fans until i realized & got a box fan. Once I accidently had it pointing straight at them for 8 hours or more a couple of times on max.… So i got a white 150W fan from china i also got Silent TT 123 W fan and hooked it onto the cool tube. Great fan, huge, black, strong, and with temperature control. I call him big dick cop killer because he's black and beats the heat. get it? Had two 90° bends outflowing for the exhaust and the heat just wasn't getting dissipated quick enough. Both of them together I could rest my hand on the cool tube with ease.
i was able to test out temps and lux at various points in the grow room and figured i could have up to 4 degrees difference between the base and the top of the plant, still got it pretty stable. I had differences in lux from several 100 to several 1000 different places in the tent, probably because I was hanging the filter, the fan and the cooltube all crooked by then, but at that point my grow was a slow moving trainwreck. I had everything I needed to dial in my lamp to plant distance too, but couldn’t.
I went bio which was nice, but i think I should try synthtetics or a mix next time. The soil spawned some flies which were easy to get rid of. Then when i tried measuring the EC of the soil, i'm afraisd that the soil particulates kind of skew results. Thought the soil could buff out anything really but rhizotonic had the better of me before i could get my PH strips in.... not that it matters but I broke my PH meter pretty quickly anyway. Live and learn !
Watering itself I think is something you should pay attention to, you don’t want to be pouring it out and getting your soil compacted from the water. Seedlings are a different thing, not too much water, don’t keep the medium too wet, maybe watering with precision is something that could be done. Using the liquid ferts was quite tedious, and I have doubts about using all bio in general, using liquid fertilisers regularly in soil, and following the labels. Thing is you shouldn’t really need much of these ferts in soil anyway, yet still got cal mag deficiencies so you tell me!
Well there's a fair few things i wouldn't do again, like grow in the heat of summer with a 600W HPS and the AC on. I fumbled around before I had my dimmable ballast, and stressed out the seedlings which is a no no. Once I got the ballast I lowered then raised the intensity from 250 to 600 in three weeks light stressing my poor babies even more. It never occurred to me to plan out a grow, next time i'll definitely plan it out and make sure I'm kitted out a bit better going in. Same for the grow room, avoid bends in the piping, set the thing up a run it before i throw the plants in there, wont hang my filter above that high, and keep the fan on the ground maybe. Grow room wise I’m kitted out, got everything I need, but next time will install some 70 micron mesh in all my intakes just in case. Also never growing without cal mag again even in soil ! I'll probably do straight drops into forever homes directly too, no sense faffing about like the @silverback_guerilla 😂.
It's not all bad news though, loads of things i would do again. I would even grow in soil again, especially now i have a bunch of soil ferts from america (thanks @mrs_larimar !!!). I wouldn't mind using the 600W HPS again, worked well enough ! most importantly i will be using TNB CO2 again because it makes a clear difference even if i don't have any of my own grows to compare it to. Another critical thing i did which i'll be using again is the chelation agents, i'm going to want to stay more on top of those and might even use as foliar spray on XXLs between weeks 3 and 4 veg. I ended up spraying rhiz second to third week, will definitely add some cal mag in the foliar spray. Mag sulfur supplement is going in next time too, if you put a lot of light, you need a lot of magnesium, so that's happening again for sure. I’ve been looking at predator insects pretty seriously, ladybugs are a must clearly, but I might throw in some other ones too just to be sure.
It's a lot about what you do when you're not growing , learning about it, meeting great folks (see the comments for all my thanks), and enjoying watching a plant grow slowly. I learned so much about a plant that’s been a part of my life since I was eleven, I think I was 15 when I first thought it was silly not to grow, fifteen years later I can’t believe how long it took me to try it out ! Getting a crash course in horticulture, using a tent, and generally learning about the bio-dynamic world that surrounds us was really rewarding.
Just got some cool ferts in the mail all the way from America, so thanks to growgreentrees.com and growcaps might try them side by side. Expecting some cool testers soon too so thanks to @pharmaz my boy past the bridge ! I’ll pop those right in FTB5, Auto Zkits, and something else I don’t know yet cream cookies or lsd35? I really wanted to get out of the dirt with some coco or DWCs but oh well another soil grow can’t hurt ! A big thank you to @mrs_Larimar GD and the folks at trim bag for the gear ! I’ve already got a spinning blade thing, so let’s see how this compares , but at least now I’ve got cool scissors to do all that trimming – bless ! Just wanted to say thanks for holding my hand to a few folks @mrs_larimar of course, thank you so much and looking forward to some fun times on gd; my main man @mudbug great hanging out with you growmie ; @pharmaz and @silverback_guerilla; new friends like @bigdaddyk @valhallasgarden and @slimsativa; My ghost brother @beans, check out his one leaf GONNA MAKE IT GONNA BEAST IT ; Everyone who stopped by to help me @B4RNS of course, @farmerbrett too, @hawkbo, @tryhard, @tonino, @tazard @mad_scientist @spinnergrow, @poleeg1986 – he’s an amazing European canna porno director check out his gorillas my good lord save me; special thanks to all the Growvengers, and the @dudegrowsweed ; @wheetobeme, @experimentgreen, @weedeep, @chi_town_white_boy @chillum_mafia and even @mulch – play your part man bless ! Thanks to Nico @fast_buds for some cool testers, my favorite hat and some fun times on GD !
A final recap of everything I learned (see for yourself in the diary) : never buy a kit, buy local, buy direct, less is more, go big on fans, keep refills around, always add CalMag CO2 and chelation agents, no bends in the pipes, cover your intakes with micro mesh, nail the first couple weeks of flower and it’s smooth sailing, always protect your eyes ! Just one last thing though: have to say it’s pretty great having access to all the best horticuralists from around the world. Shout outs to all my North American and South American grower friends, @russiangrower and all the east European growers, my Scandinavian friends, Spanish and German growers, and African and Japanese growers, I don’t understand everything you’re saying all the time but I like your style ! You won’t know until you grow ! Dassit 🚀000000