The Grow Awards 2026 🏆 


Likes
Comments
Share
@gr3g4l
Follow
Esta semana mostraron sus primeros pistilos.
Aprovecho que subió la humedad en el exterior y que mostraron los pistilos para quitar el humidificador , ahora me molesta dentro del armario xd
seguimos doblando alguna rama

Likes
26
Share
@Joni2017
Follow
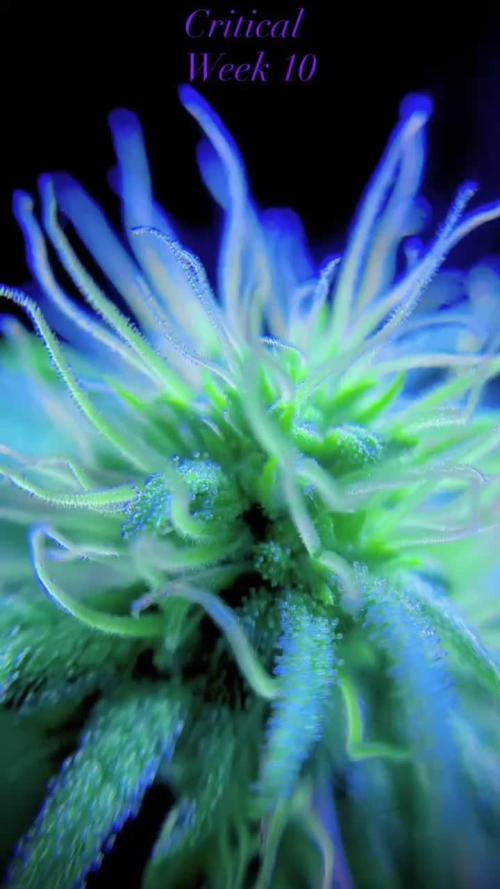
Hello again, GrowDiaries family! 😎
We’ve officially entered Week 10 (4th week of flowering) and the Critical is truly showing her full potential. This week has been all about environmental management and keeping the plant’s metabolism at its peak despite the winter chill.
📏 Precision Measurements & Training
-Height: Steady at 37 cm. Vertical growth has stopped as she focuses all her energy on flower production.
-Canopy Management: The LST has done a great job. The canopy is perfectly flat, ensuring that every "pompom" gets the same light intensity.
-Visual Check: I’ve taken the plant out of the tent for some photos under white light to show the real progress of the trichomes without the LED distortion.
🌡️ Environment & Climate Challenges
-Temperature: We’ve faced some tricky nights at 12°C, reaching 27°C during the day.
-The Strategy: To prevent the plant from stalling due to the cold nights, I’ve started watering with lukewarm water. This keeps the root zone active and ensures nutrients are still being absorbed effectively.
-Humidity (RH): Stable at 40-45%, ideal for keeping the developing buds safe and dry.
💧 Watering & Organic Pest Control
-Nutrient Strategy: Still going strong with the full Biobizz schedule (Bio-Grow 1ml, Bio-Bloom 2ml, and Top-Max 1ml) in 1L of water. She is responding beautifully with no signs of overfeeding.
-The Cinnamon Trick: 🛡️ I noticed some fungus gnats last week, so I applied a generous layer of ground cinnamon on the soil surface. It’s an old-school, 100% organic remedy that acts as a natural fungicide. Result: The gnats are completely gone!
🌿 Flower & Resin Evolution
-The sugar has arrived! ❄️ Resin is now heavily coating the sugar leaves and the buds are thickening up fast. The white pistils are abundant and healthy. The aroma is becoming much more complex and penetrating!
Thanks for the comments and for following this grow! Happy growing to all.😉👍
Processing
Likes
6
Share
@Jack_Greenstalk
Follow
topped previous weeks, this week was spent training plants out to get ready to flip to flowering light cycle next week. left platinum yeti number 4 alone it is smallest weakest growth so i'm doing less to it than the training wise.
Processing
Likes
154
Share
@CBD_Sweden
Follow
@FAST_BUDS,
Hi all the happy people here in GrowDiaries.
This is my second cultivation ever and it will be fun to try a bigger space than my closet grow.
First, I'm just going to say I'm done with the construction of my new growroom.
I put some pictures on the construction here in week one.
The room is 2.14 meters by 1.7 meters and has a ceiling height of 2 meters.
It provides a floor area of 3.6 square meters.
I use a 54 Watt Lightwawe T5 for germination and 2 Pcs 400 Watt HPS lamps.
I have a channel fan that replaces the room air about 40 times an hour to get a comfortable environment in the room, the air enters a fresh air intake from the outside.
The air is purified through a carbon filter to then leave the room to the rest of the basement.
Then I use that heat to heat the rest of the basement.
I will use 8 pcs 15 liter Autopots to grow with and a 100 liter water tank that supplies the pots of water and nutrition.
I will grow completely organically in soil and will watercure my buds to get the best possible medicine for me.
But there are no cultivation rooms to be displayed here, so I continue with what is most important.
Today I have put my seeds in my moisture dome and hope the seeds have germinated within a few days.
I am very excited to see how the new growroom will work and how this new secret CBD plant from @FAST_BUDS, will turn out.
..............................................................................................................................................................................................................................................................................................................................................
Update 2017-08-15. Both seeds have germinated and planted in small pots inside the humidity dome.
I'm so glad it worked so well and now it's just hoping they'll start growing and become 2 big healthy girls :)
...............................................................................................................................................................................................................................................................................................................................................
Update 2017-08-16. I have mixed my own soil today. Its 40% sieved peat harrow H2-H4 0-30 mm, 45% sieved peat harrow H4-H6 0-30 mm. 5% sand and 10% of compost soil. And i use 15% of perlite and mix it all together.
....................................................................................................................................................................................................................................................................................................................................................
2017-08-21 The 2 sisters are doing great, Nr2 is a bit after Nr1 . Some new pics.
............................................................................................................................................................................................................................................................................................................................................................................
2017-08-23. Transplanted from humidity dome and the small germinating pots to 15 liter autopots.
................................................................................................................................................................................................................................................................................................................................................................................
2017-08-27. The girls have settled in to there new home of the 15 liters autopot after a little transplant chock. Now the real week 1 starts for me and the girls. 4 new pics.
---------------------------------------------------------------------------------------------------------------------------------------------------------------------------------------------------------
2017-08-29. New movie of the girls. Its no water for 3 days now so the roots develop more and match the plant above the soil. The temp controlled fan is awesome, its easy to set what temp you like to have in the room. Right now its 28 celcius. And humidity is 56%.
--------------------------------------------------------------------------------------------------------------------------------------------------------------------------------------------------------------------------------------------------
2017-08-29.
Hello to you who read my diary, I just want to say that I am pleased that you have chosen to check in with me and in my diary.
I just want to say that I do this for myself and for a steady flow of my medicine.
Everything you read and see in my diary is 100% honest and I will never distort or beautify anything here.
I document my crops so that I can learn from my mistakes and also to look back at those different crops.
I try to update with pictures every day and with text if something special has happened in the garden.
This is my strainhunt for the best medicine and the beginning of my journey with cannabis and the cultivation of it.
-----------------------------------------------------------------------------------------------------------------------------------------------------------------------
2017-08-30. Cleaned the room this morning, just vacuuming and cleaning with chlorine solution. Im testing the fan to control temp and humidity, it works great.
Added some pics with measurements and a movie. Everything is looking great right now.
-----------------------------------------------------------------------------------------------------------------------------------------------------------------------------
2017-08-31. New video of the girls.
-------------------------------------------------------------------------------------------------------------------------------------------------------------------------------
2017-09-01. New pics and videos. Gave each of the girls with 2 ml Alg-A-Mic, 4ml Bio-Grow, 4ml Bio-Heaven and 10 ml Formulex mixed in 2 liters of water.
I hope they like it :)
-------------------------------------------------------------------------------------------------------------------------------------------------------------------------------------------------------------------------------------------
2017-09-02. New pics and the girls liked the water and nutrients yesterday.
-----------------------------------------------------------------------------------------
2017-09-03. Video of the girls this morning.
Kl 16.00. Did some defoliation on the girls. Videos added.
KL. 23.00. New video.
----------------------------------------------------------------------------------
2017-09-04. The start of week 3. New pics. Im trying to LST the girls.
KL 23.00. Added new video.
--------------------------------------------------------------------------------------------
2017-09-05. KL 08.00. Cleaned the room this morning, just vacuuming and cleaning with chlorine solution.
KL 12.00. The girls got 2 liters of water each with nutes in it, added a video.
-----------------------------------------------------------------------------------------------------------------------------------
2017-09-06. KL 08.00. The girls woke up after their beauty sleep, the leaves are always a bit down after 6 h of darkness, but they will stretch now when the HPS lamp starts.
Everything looks good and I keep trying to tuck the leaves so they get the maximum amount of light where needed. Added pics and video.
KL 23.30. Did some LST and leaftucking.
--------------------------------------------------------------------------------------------------------------------------------------------
2017-09-07. This is day 21 from sprouting. I have never tested PH in my grows, when growing organic in soil iv learned that it adapt PH by it self. But im curious by nature so i had to test.
Kl 10.00 Tested PH in the soil, it was 6.9 and tested my tap water and it was 6.8. Added video/pics of the girls, its 10 H after defoliation, LST and leaftucking. I think its looking good.
Kl 22.30. New pics
-------------------------------------------------------------------------------------------------------------------------------------------------------------------------
2017-09-08 KL 08.00. Good morning, added new video.
2017-09-08. Kl 23.50. Gave every girl 3 liters of water and nutes, added new video.
-----------------------------------------------------------------------------------------
2017-09-09. Kl 21.00. Defoliated a lot today, new pics.
---------------------------------------------------------------------------------
2017-09-10. Kl 08.00. Last day of week 3. New video.
2017-09-10. Kl 23.00. 3 New videos.
---------------------------------------------------------------------------------------------

Likes
60
Share
@Clutch
Follow
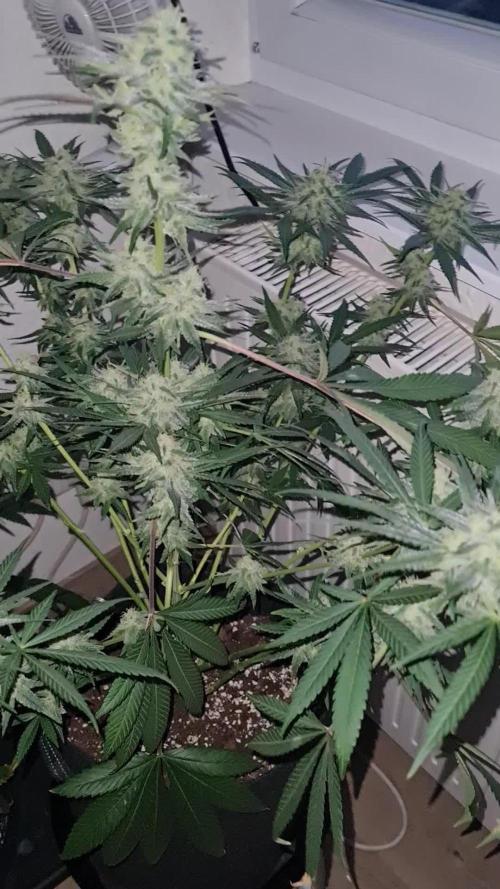
Welcome to final week for this very fun grow 😊
We are 4 weeks later and I'm happy to say the buds have improved very well.
They all look fantastic and very frosty. I did a 10 day dry in a growing tent with a fan on and a much needed carbon filter 😂
The buds went in the curing jar a bit moisty but very close to perfect. I opened the jars 3 or 4 times daily the first week and it was okay. After that some moisture fighters and I cut the last sugarleaves to perfection.
After 3 weeks they are cured fantastic.
I have around 80 grams from 2 plants but one gave 75g and the other 5g 😂 Jack 1 was a very small plant and her sister Jack 2 is the biggest girl I ever grew with 1m 10.
The taste is spicy and herbal and the smoke is very smooth. Leaves a nice aftertaste on the tongue. A spicy hint, bit woody and skunky too
Effects are great. More focus and motivation an very uplifting. Puts a big smile on your face... but if I smoke a big one or 2 I'm also very relaxed and pretty hungry. This strain is made for chilling out, gaming, watch movies/Shows whitout a too hard couchlock. I never was about to fall asleep or too stoned.
Think its also perfect for when u smoke on a festival.
I'm happy with the outcome. It's my best grow so far and for my first autoflowers I'm convinced on this kind of plants. Will defenitly grow this one again .
The Northern Lights suffered from budrot and was thrown away. Not gonna review it and give bad ratings. Was my fault and I already have a new free seed from RQS when I ordered something. It was an NL 😁 that's a sign for a revenge round haha
Thanks a lot for following
See u next year for my next outdoor grow. I'm already having some nice ideas for that 😉
Happy growing friends.


Likes
58
Share
@MadeInGermany
Follow
Flowering day 3 since time change to 12 / 12 h
Hey guys .
My cutting heating broke 3-4 weeks ago, which was fixed immediately and everything went wonderfully.
Now, 3 days ago, the central heating broke down in the entire room, so that at night I only have temperatures of around 13 degrees :-( .
One or the other lady is slowly starting to see a phosphorus blockage, as this can no longer be absorbed at temperatures below 15 degrees, like many other nutrients :-( .
A friend looked at the heating yesterday and came to the conclusion that a real company had to do it, which is by no means possible for a stranger to enter my room.
I quickly ordered heating mats for all the boxes so that the ladies could at least get warm feet.
That's all I have this winter full can do .
Let's hope everything will be fine 🙏🏻.
As soon as the heating mats are attached in the coming days, I will post them in the pictures.
Now for the update.
Despite the severe cold, the ladies are still doing well and have made good progres .
The ladies only had to be watered once this week, each time with 1 l, because it absorbs the water very slowly because of the cold and I don't want to overwater it.
I took every single plant in the pot to take a close look at their roots.
These are snow white and look very healthy 🙏🏻.
It was also the last time neem oil sprayed so that the last trips are finally gone.
Otherwise everything was checked and a lot of planning was done, like I do with the heating mats.
Since a friend had the same problem in one winter and the heating mats got 10 degrees plus on the pots, I am very confident that it will at least bring something for the last cold month 😃
🙏🏻.
I've started flowering even if some are still a bit small, but otherwise they'll get too wide from training and end up taking up space :-)
until then have fun and stay healthy 🙏🏻
👇🏼👇🏼👇🏼👇🏼👇🏼👇🏼👇🏼👇🏼👇🏼👇🏼👇🏼👇🏼
You can buy this Nutrients at :
https://greenbuzzliquids.com/en/shop/
With the discount code: Made_in_Germany you get a discount of 15% on all products from an order value of 100 euros.
👇🏼👇🏼👇🏼👇🏼👇🏼👇🏼👇🏼👇🏼👇🏼👇🏼👇🏼👇🏼
You can buy this strain at :
https://www.thegratefulseeds.com/shop/feminized-seeds/limited-edition/blue-javaz/
Water 💧 💧💧
Osmosis water mixed with normal water (24 hours stale that the chlorine evaporates) to 0.2 EC. Add Cal / Mag to 0.4 Ec Ph with Organic Ph - to 5.8 - 6.4
MadeInGermany

Likes
22
Share


Likes
18
Share
@HippyHydro
Follow
This week unfortunately I am taking the not so good frosty gelato out of environment... Been 0% progress and not enough bud sites to keep her.
One of each left -
Vanilla Frosting & frosty gelato
Both still looking fabulous the flower nutrients have now been removed leaving the ripen at full strength but cal mag is now half the amount
Next week is start of flush week.


Likes
5
Share
@Brendanfromtherose
Follow
Plant is looking good and healthy, starting to develop good roots rapidly and is now fully in the veg stage,
Rhizotonic is working great as far as I can see and Canna start looks the job, I have Canna A&B for later but after studying reviews etc Ice gone for Canna start for the first 3 weeks and then on to the A&B later as it comes into flower,
Plant has grown 4 inches or more the last few days and is now 8-9 inch tall with nice lush green leaves, I'm increasing nutes and supplements and have introduced calmag at a 1/7 recommended dosage I don't want to stress the plant at this early stage,
I've decreased the reservoir level since last week to about 1.5 inches under the net cup as the roots and hairs are developing well and want to give them some air as they grow further into the reservoir
Pump on 24/7
Ph in reservoir is slightly decreased to 6.0-6.1
PPM around 250-300 will increase next week

Likes
6
Share
@BesosConSaboraMarihuana
Follow
DrUnderground UPink Kush es una indica de potencia muy elevada, no necesita demasiada comida, es bastante agradecida,tiene la particularidad de sacar estigmas de color rosa, e inclusofucsia, el envés de las hojas adquiere tonalidades entre rojizas ypúrpuras, estos caracteres son mas visibles en cultivos al exterior.La cantidad de resina es brutal, típico en las mejores Kush
El aroma es una combinación entre kush original y diesel muy característico en estas lineas con un trasfondo a sal de frutas, pero lo mejor de U-Pink Kush es su efecto, con poco puede ser una delas mejores fumadas jamás conocidas, con mucho... puede arruinarte el día.La densidad de los cogollos es alta, las hojas mas cercanas a estosquedan bañadas en resina.Esta preciosidad termina su periodo de floración entre 8 y 9semanas.
El hachís que se hace de su extracción es una exquisitez dealtísima calidad de fama mundial, con ciertos tonos rojizos y ocresproduce un burbujeo de otra galaxia

Likes
66
Share


Processing
Likes
32
Share
@Hawkbo
Follow
Pics taken on day 36. Some, if not most of these are lightly seeded, I've checked for herms but cant find no nuts. Sucks but from what I've read and people I've talked to seems like it wont be too big of a deal in the end, some old school growers even prefer lightly seeded nugget, I've never tried it intentionally. The green buzz nutes are working well. I'm almost out of the more PK so I had to add herculean harvest liquid bonemeal to get the ppm where i want it while trying to conserve the Gbl to last the rest of the run. Didnt have the lady to take my pics today so I was limited and had to take them lefty one handed and was shakey af.
#1 is a little weird and compact but looks like it has potential to fill in pretty good.
#2 is exactly what I was looking for. Showing some purple tint and the nugs are perfect nice and chunky. I like they way shes put together.


Likes
28
Share
@TheHighentist
Follow
Start of week 4 of flower!
Off to a troubling start, as the light switched on over 1 hour ealiere than scheduled.
I took a spare timer, and set it up to continue it's 12/12 schedule, but now moved one hour back.
I cross my fingers they forgive me for this error.🙏
👽👉31/10 The day after watering and the day my timer messed up my 12/12 schedule. But hope it brings no problems.
I defoliated lightly and only removed most under the SCROG line.
Even a couple of underdevoloped branches that stretched below SCROG-net got cut.
👽👉 1/11 Been having a battle with humidity after watering, but upped my air circulation to help.
👽👉 2/11 Waterday*
Upped my nutes on BioHeaven, BioGrow and BioBloom.
👽👉 3/11 They seem to be responding good to the upped nutrients.
👽👉 4/11 Humidity under control.
👽👉 5/11 The VPD on point, has really speed up the trichome production.
👽👉 6/11 Waterday*
Stayed on the same schedule, as last watering. They seem very satisfied and no signs of mistreatment.
Likes
50
Share
@Reyden
Follow
Ho già cambiato le ore e ho messo 15 accese e 9 spente, tempo qualche giorno è imposto il timer 12/12 😃

Likes
18
Share
@BlueSmokeFarms
Follow
Bud sites are producing black/purple spot in leaves. Bud growth is producing as the days go by. Really excited with this being my first grow
Nitrogen boost really helped with the deficiencies. Plants are starting to look really heathy... Prunes lower colas that weren't stretching past the canopy and receiving energy so more energy can be used towards the top buds

Likes
22
Share
@burnout
Follow
Day 21, doing some thinning. The little runt pheno in the front looks like it was barely touched from the top. I'm going to have to wait a couple days for the weekend so I can get the rest.

Likes
3
Share
@GrowPassionItalyChris
Follow
Nate in inizio aprile le prime gorilla glue xl sono da subito partite alla grande, una fase vegetativa molto notevole, ad inizi agosto già sfiorava i due metri di altezza la gorilla xl! Hanno resistito bene al caldo afoso del sud Italia estivo, hanno resistito ai forti temporali di fine settembre, la temperatura diurna e notturna è calata drasticamente causando colorazioni viola in gran parte delle infiorescenze di gorilla glue xl, gelato Olandese e Critical XL, a parte una gorilla gigante, le altre e 5 sono rimaste di statura media ma molto piene di infiorescenze sempre più resinose e profumate e colorate.. Da subito a metà agosto hanno iniziato a fiorire e attualmente manca qualche giorno alla fine di questo magico outdoor, grazie alle varietà di dutchfem Seeds siamo sempre più soddisfatti, cosa pretendere di più?? Anche le autofiorenti sono state magnifiche.. Piante di grande quantità e grande qualità.. Forza dutchfem seeds!

Likes
7
Share


Likes
1
Share
@Billy_Piff
Follow
Fed GH 3 part with Terpinator in flower and some recharge occasionally.
