The Grow Awards 2026 🏆 


Likes
Comments
Share
@LAShugars
Follow
She’s a stretcher!! Fat Buds, like really big!! Reminds me of cherry cola as far as looks.

Likes
2
Share
@Solocultivo
Follow
29 macetas de 20-18 litros aproximadamente
Dia 32 de Floracion Super Suelo
Sin fertilizantes
Apoyado con biortilizantes @bioinsumoschakrana
Melaza
Te de Bokashi
Humato Postasico
Potenciado
@Knactive
Knactive el mejor bioestimulante 100% orgánico para todo tipo de plantas , el cual activa la autodefensa contra el estrés oxidativo y potencia la síntesis interna de todas las fitohormonas.
https://instagram.com/knactive_?igshid=MzRlODBiNWFlZA==
Vital Juice
Es un producto Chileno hecho en base a algas: durvillaea antarctica y ascophyllum nodosum.
Likes
4
Share
@Wescoas
Follow
Quick germination. Put seeds into a cup of purified water, let soak for about 12 hours (until they sank) before placing directly into medium. Used smaller containers in the beginning, with zero amendments added to the mixture. Transplanted into permanent home before roots reached the edge, so there was no delay/shock involved.

Likes
30
Share
@Ganjagrandaddy
Follow
Hi Growbuddies.
We are now into week 7 of this flowering period and all going well so far besides this diary app keeps resetting my update !!!. 3rd attempt here to upload

Likes
16
Share
@Ganjagrandaddy
Follow
Day 35 flowering: besides the obvious calmag need this little lady is waking up now. Her buds are looking very nice. Feels solid with a little squeeze and boy is she fruity smelling now. With still so long to go , she should give a very nice tield if i can sort the cal mag issue quickly.


Likes
7
Share
@AestheticGenetics
Follow
3/27/25
bottom watering has roots shooting out the bottom of the pots.

Likes
16
Share
@GoodTimesOrganics
Follow
Welcome Back!💚
Nach der siebten Woche des Wachstums und dem zweiten Topping, war es Zeit die Pflanze am 07.02.2026 in die Blüte über zu leiten.
Sie hat inzwischen eine richtig buschige und breitgefächerte Struktur.
Durch das anwenden der LST Technik wird das Höhenwachstum gut im Zaun gehalten.
Die Umgebungsgegebenheiten sind OK:
—————
🌞 Temp: 21°C
🌚 Temp: 18°C bis 19°C
💨 RH: 54%
VPD: 0,85 kPa
—————
Viele Grüße 👋

Likes
10
Share
@Canadian_Steelheader
Follow
All is going well, the girls are looking good. Only providing Calmag and powder KoolBloom now. Buds are starting to thicken up and overall nice and healthy. Raised up PK2 slightly, PK1 is much taller.

Processing
Likes
15
Share
@ThePotFactory
Follow
The buds have gotten a bit fatter since last week 😼Im very happy so far. I did over feed them a bit a couple of days ago, probably for the excess PK13/14. You can see some of the leaves have burnt tips. Well now ive ran out of CANNABOOST and decided to replice it with Canadian Xpress Headmasta, ive read great things about this booster and its also much cheaper :))
Peace
Likes
9
Share
@DE_BW
Follow
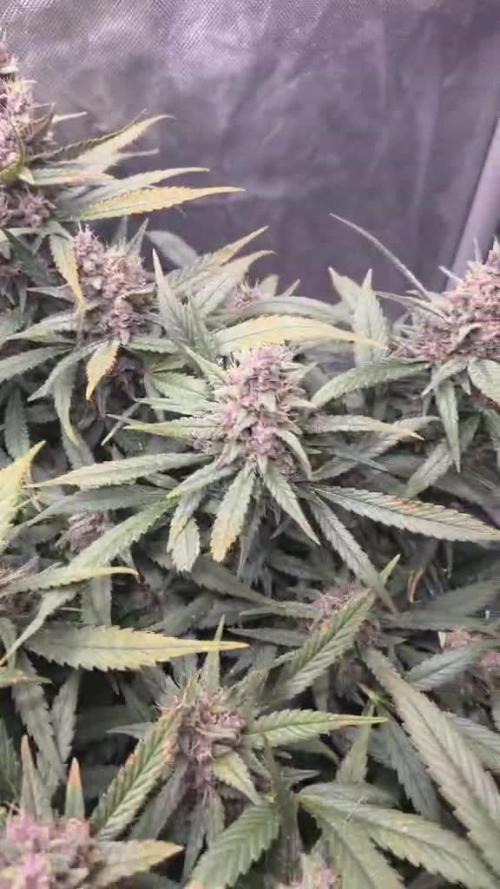
The plant has clearly reached its final stage of flowering. Bud development is complete and the structure looks fully finished. Trichome coverage is extremely dense across buds and sugar leaves, giving the flowers a heavy, frosty appearance.
The pink and purple coloration has continued to spread further down the plant, creating a very appealing contrast and confirming full genetic expression. Aroma has intensified significantly and is now strongly dominated by a sweet, ripe apricot / marmalade note with no harsh or green undertones.
Flushing has been initiated this week, with harvest planned in approximately four days. Overall plant health remains solid, and no further swelling is expected. Focus is now on preserving terpene profile and optimal ripeness.
Likes
14
Share
@Smokwiri
Follow
This week we the weather will be a bit cold, so I put her a bit close to the house.
Weather was a bit windy, so pictures are not the best, but hey... it's an outdoor thing isn't it?
Last week we had wonderfull weather, but this week weather will go under 15C, hope everything will go well.
No additional nutrients yet, there's enough in the soil for 1 full round, but i iwll start adding mineral nutrients soon, just to get better taste and to be sure that no shortages of minerals will be visible on leaf (or better said... let's feed enough, so the insects can have some too (outdoor).

Likes
6
Share
@DTHEREID
Follow
She’s just a beauty and beyond smelly!
This one is going to be getting A 9th week with nutrients as she’s probably going to run 11 week. Flush for 10-11


Likes
40
Share
@Hempface86
Follow
Another week has stared and thease girls are monsters! The Gummiebears is in a 4 gal pot and is 41 inches tall ( 52 from the floor ) and is outgrowing the tent ( who says you shouldn't too autos? Lmao ) and as you can see the other 3 are in 1.5 gallon pots and are monsters as well .. if I don't pull 20-24 ounces this run I will be surprised honestly..
side note.. I cut the 2 lines branches early on from the Cream auto and put them in a vase for 2 weeks and they rooted so I stuck them both in the same little container and they have settled in nicely as I see new growth daily.. it's gonna yeild me an additional half ounce possibly? Idk 🤷♂️ fun experiment tho .. hope everyone is doing well! Happy growing! Likes and comments are appreciated! ✌️


Likes
35
Share
@bypado_farm
Follow
They look good, they are drinking good aswell, every 2 days 1 L each plant
Likes
14
Share
@CANNASIM
Follow
I’m looking forward for this CBD pure strain, Dutch Passion was kind to send me three for their strains.
------VEG SETUP------
-HOMEBOX TRIANGLE+ .4sqm
-1X CREE CXB3590 100w cob
-INTAKE FAN HIGH PRO - 107 m³/h
-EXHAUST FAN PROFAN - 220 m³/h
-TWO SMALL VENT FANS
-HUMIDIFYER WHEN NEEDED
-50%PERLITE 50%SPHAGNUM PEAT MOSS with organic correction, so is a very light soil.
———NUTRIENTS———
This will be an organic grow. Will use a super soil Subcool recipe as base, water will not be ph, and Biobizz to suprement at low doses. Mykos, Azos and Recharge for the roots and a compost tea every now and then.
It has been cooking for 4weeks.
Pots will get 1/3 filled with the super soildiluted 1 part super soil to 1 parts my base soil, and this will gradually increase 1/3 1 part super soil to 2 parts base, and the top 1/2 with only the base soil.
———CBD CHARLOTTE’S ANGEL - DUTCH PASSION———
GENETICS Dutch Charlotte x Red Angel
VARIETY Mostly Sativa
THC CONTENT
<1%
CBD CONTENT
10 - 16%
FLOWERING TIME. 63 - 84 days
TASTE / FLAVOUR Diesel, Pine, Spicy / Herbal
EFFECT Calming, Relaxing
-
1st prize "Medical", Highlife Cup, Netherlands 2018
Charlotte’s Angel is a sativa dominant variety with high CBD levels, 10 to 16% and low THC levels, always below 1%. It’s a non-psychoactive variety offering medical benefits without the high, delivering a strong body effect and a calming, anti-anxiety experience. She takes 9-12 weeks to flower and comes with a herbal aroma with piney diesel undertones. Genetics come from Dutch Charlotte (CBD rich clone) crossed with Red Angel (clone-only Amsterdam CBD variety).
Charlotte’s Angel is popular with cannabis lovers that want to enjoy a joint without getting stoned and is suitable for making concentrates. You get a satisfying experience with the same taste and aroma as a high-THC variety. You feel medicated, yet you are not high, it gives the user a positive feeling of well-being, it is almost impossible to explain unless you’ve tried it! Dutch Passion’s first low THC variety, CBD Charlotte’s Angel®️
Likes
2
Share
@Dameon0803
Follow
Love the stack!!! Sssooooo frosty! Couldn't imagine if I didn't have deficiencies.


Likes
17
Share
@balansa
Follow
no words just look at her )) just loook at heeeeeer )))))) oh i almost forgot i have a newfriend as a magnifier for my ohone and i took a woderfull video ♡♡♡♡♡♡♡
