The Grow Awards 2026 🏆 


Likes
Comments
Share


Processing
Likes
39
Share
@Vincenzo
Follow
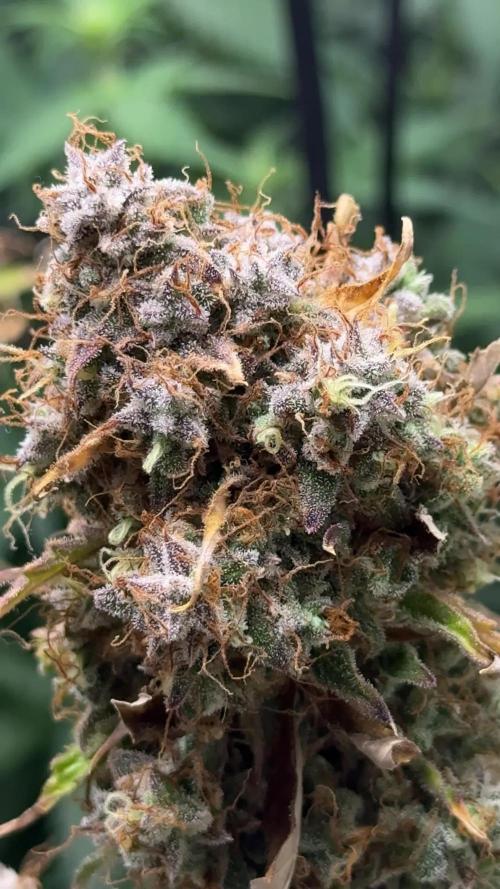
Il profumo è inebriante e forte, la resina aumenta di gg in gg. Il raccolto lo farò Venerdì o Sabato✌️🏻😉🌞✌️🏻


Likes
25
Share
@Grower_Of_Persia
Follow
week intel:
its time to harvest top buds!
because my base nutrients and one of boosters was salt based, i'll do flushing this week to get some relieve to plants in the last days
stresses :
flushing
Drought stress via watering only one time with flushing this week
feeding:
day 1 : i flushed them with Advanced Nutrients Flawless finish and adjusted ph
day 3 : no more feeding from now on
day 5 : no more feeding from now on
guide of the week :
i harvest in 2 parts : first i harvest top of the branches and will let the lower buds to ripe another week then ill harvest the second wave.
its crucial to get uniformed buds in terms of quality that you let the lower buds to get some extra air and especially light! then the pop corn buds quality will reach the top buds.
my dry and cure style is this:
3 days of hanging upside down to get water activity lower to around 0.6 in 50% humidity and 26 C temp (i know its a little high but we are in a hot summer right now and i cant get it lower even with air conditioner) and then after 3 days of drying i remove leaves and stalks, trim buds and move them to jar for the rest of their life :D . and in the first 4 days of curing i open the jar door and let hem get some fresh air in the jar for about 5 minutes and close the jar door again, after 4 days of curing like that buds are smokable but they will get better as they getting cured about 1 month.
im happy as hell with this harvest :D.

Likes
Comments
Share
@Ctrellis90
Follow
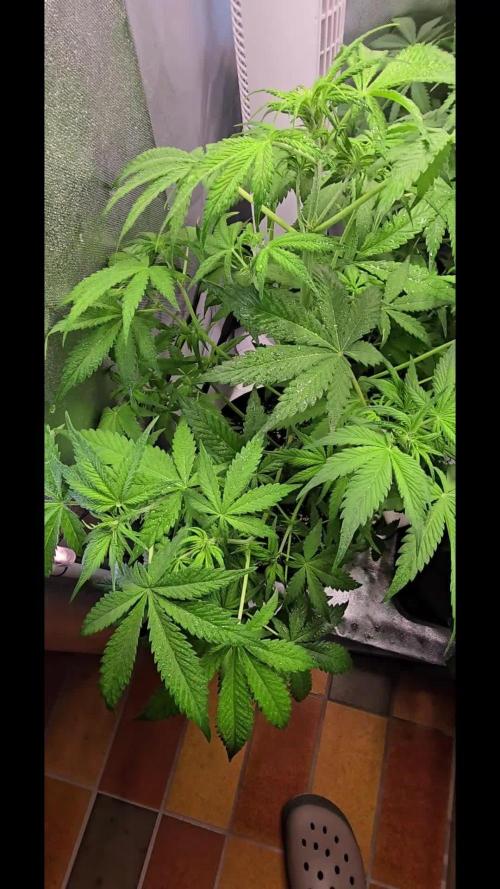
End of another week and dang are these girls going!
The alfalfa Ferment is definitely doing work down in that rhizosphere. It's pretty amazing how well this Ferment does for veging cannabis. I seriously cut my veg time down by almost half when I use it! That's the main objective right there, to be able to continuously flip into flower right after harvesting, and we're basically their now that we have everything dialed in.
These girls will be getting synthetics next week. We're going to start them on a light feed of Athena blended then go from there.
Thanks for stopping by and we'll see ya next week.

Likes
36
Share
@TheCannaProphet
Follow
~ Auto Skywalker Haze®️ by Dutch Passion ~
Skywalker Haze x Auto Amsterdam Amnesia
Well friends, here we go on another 'canna-venture' together cultivating Dutch Passion's Autoflowering version of their outstanding Skywalker Haze along with three other incredible autoflowers from Dutch Passion that I'm running separately, so buckle up and hold on! This will be a wild ride for sure!
I've wanted to grow this strain for some time now and finally have an opportunity to see what I can do with it, and I've germinated two so double the fun!
"Auto Skywalker Haze has a very pungent and fruity aroma! The incredibly firm and frosty buds give off a strong lemony, yet sweet, haze-like scent. The citrus and haze notes are clearly dominant.
The combination of the fruity, sour, pungent citrus-dominant terpene profile with the more pungent, spicy haze character makes this a strain for real enthusiasts.
The buds are completely covered in trichomes and in addition to providing a high cannabinoid profile. It also gives a true taste explosion. The terpenes are in abundance and they provide an exceptionally strong fruity haze taste. " **
"Auto Skywalker Haze is currently Dutch Passion's most potent autoflower with THC levels over 25%! 26.2% to be exact! This makes this strain even stronger than most of the photoperiod seed strains currently available worldwide.**
"The feminized Skywalker Haze is a cross of our original and classic Skywalker variety, which consists of a cross of Mazar x Blueberry which in turn is crossed with an Amsterdam Amnesia from the Amsterdam underground scene.
By crossing this photoperiod Skywalker Haze genetics with Auto Amsterdam Amnesia, Auto Skywalker Haze was created." **
"Auto Skywalker Haze produces robust and stable autoflower plants. This Sativa dominant cannabis strain is known for strong and sturdy plants that can take a beating. Most ladies grow into large plants with a real Sativa appearance.
These phenotypes can grow quite tall with wide and long branching, thin leaves and elongated Sativa buds. These phenotypes usually take a little longer to mature. The flowers, which are completely covered in crystals, may have a tendency to foxtail slightly, but that doesn't take away from its true beauty. These buds also become a lot more compact than you might expect from the Sativa appearance.
There are also phenotypes that remain just a little more compact and tend more towards the hybrid side. These mostly Skywalker-dominant phenotypes grow very hard and compact buds, sometimes reaching as thick as a Coke bottle.
All plants have a good flower-to-leaf ratio and trimming the plants is relatively quick. Some plants can even be picked completely by hand and are ready really quickly. The small sugar leaves are also completely full of resin and trichomes, so you don't necessarily have to be very precise. If you want use it, then you have excellent trim to make your own hash, oil or other cannabis concentrate.
Auto Skywalker Haze generally has a short internode distance. The flowers can grow nicely together and completely fill the branches from top to bottom with sticky buds.
Most Sativa-dominant plants usually have a little more space between the buds. This lady can also stretch a lot. Outside we have seen occasional plants that have reached a height of more than two meters in the open ground. That is very exceptional for an autoflower."**
"Auto Skywalker Haze generally takes about 12 weeks from seed to produce fully mature plants ready for harvest. There are two phenotypes of Auto Skywalker Haze that take a little longer, around 13 to 14 weeks.
These are really worth the wait! During the last few weeks the buds get a lot thicker and heavier and the potency continues to increase. Outdoors, Auto Skywalker Haze takes an average of between 12-15 weeks to fully mature." **
**Credit- Dutch Passion.com
______________________________________________________________________________________________________________________________________________________________________________________________________________________________________________________________________________________________________________________________________________________________________________________________________________________
~THE SETUP~
~ Grown in 15L Gronest geotextile pots filled with Mother Earth Grow 70/30 Coco/Perlite with Xtreme Gardening Mykos added.
~ Seeds were germinated directly in the medium without any 'pre-soak'
~ Seeds were planted three days before the Full Moon (Waning Gibbons) and sprouted within 72hrs, on the Full Moon.
~ Feeding will be by Lotus Nutrients (first time using)
~ 24hr light cycle while germinating
~ 20/4 light cycle after first leaves appear.
~ 4x8 Gorilla Tent
~ HLG 650R w/ 30w Supplemental UVA Bar controlled by a Trolmaster Hydro X controller set for a 15min Sunrise/Sunset simulation. (also a HLG Blackbird for additional side lighting if necessary)
~ Supplemental co2 controlled by an AutoPilot APC 8200 co2 controller
~ AC Infinity Cloudline T6 with Controller 67 using a Terrabloom 6x24" carbon filter
~ De-Humidifier and Humidifier when needed.
~ 14k BTU IdealAir portable A/C unit plumbed into tent for temperature control.
~ BlueLab testing instruments
~ Two Hurricane 18" oscillating fans
~ Two 6" Clip-on fans
~ Two 10" floor mounted fans
______________________________________________________________________________________________________________________________________________________________________________________________________________________________________________________________________________________________________________________________________________________________________________________________________________________
As a cannabis grower, I recently had the pleasure of growing two Dutch Passion Auto Skywalker Haze plants indoors. This hybrid strain is a cross between Skywalker Haze and Dutch Passion Auto Ultimate and is known for its strong cerebral effects and uplifting high. In this report, I will share my experience growing Dutch Passion Auto Skywalker Haze and provide some 'High Humor'.
~Growing conditions~
I grew my Dutch Passion Auto Skywalker Haze plants indoors in a 4x8 Gorilla tent. I germinated both seeds directly in the Coco/Perlite medium and both sprouted within 72 hours!
The growing environment was kept on point with the help of an AC Infinity Cloudline T6 exhaust fan coupled with their Series 67 Bluetooth Controller along with two 18" Hurricane fans, two floor mounted 8" fans and a 6" clip on fan providing ample air movement.
Also crucial to this grow was the supplemental Co2 via a 50# tank regulated by an Autopilot APC 8200 Co2 Controller that I set to keep the tent at 700-1200ppm's throughout the run.
Tent temperature's ran between 68-78℉, humidity was kept between 40-60%. I used a lighting schedule of 20/4 for the entire grow with a pair of HLG 650R's that also have supplemental UV bars attached. The exception being the last three weeks, where I added 4 hours a day of UV, and cut the cycle back to 19/5 for a week, and then finally to 18/6 for the last two weeks.
I used Lotus Nutrients for the first part of this grow but became concerned when I noticed that I was getting yellowing I used starting on the #1 plant going from the bottom up indicating to me that their was a problem with the nutrients. Let me say that I'm VERY OCD when it comes to the PH/EC of what I feed my babies, following all of the recommendations from Lotus, but continued to see the yellowing progress. I then switched to Dutch Pro liquid nutrients and within two feeds I could begin to see a noticeable difference in the #1 plants color and overall health! As I continued using the DutchPro nutrients the #1 plants health, vigor and color continued to dramatically improve all the way up until harvest. I can honestly say the I believe switching to DutchPro nutrients saved this grow from a possible dramatic failure!
~Flowering time~
My Dutch Passion Auto Skywalker Haze plants had a flowering time of 93 days from seed to harvest for the #2 plant and the #1 in an unbelievable 113 days! The #2 reached a height of 23" and produced yield of 116g, while the giant #1 plant came in with a whopping 279g total yield and grew to just shy of 40" tall! In addition to all the tasty flowers that these two plants provided, I took the 'sugar trim' from them and ran it through my sift screens resulting in a 24 gram mound of sift on the first sift!
And now for some 'High Humor':
~Growing Dutch Passion Auto Skywalker Haze was a bit like being a Jedi, except instead of using the Force, I used Coco/Perlite and DutchPro nutrients.
~ My Dutch Passion Auto Skywalker Haze plant was so big and beautiful, it could have been featured in the Millennium Falcon's garden.
~When it comes to smoking Dutch Passion Auto Skywalker Haze, it's like taking a ride on the fastest ship in the galaxy - it's a real trip.
In conclusion, the Dutch Passion Auto Skywalker Haze was one of my all time highest yielding and longest growing autoflowers to date. It was a very easy strain to grow, and it only required minimal care and attention to ensure that it grew to its full potential. Cultivating these two Dutch Passion Auto Skywalker Haze plants indoors was a great experience that resulted in two beautiful and high-yielding plants. Smoking the buds provided a strong cerebral high that was uplifting and energizing. I would highly recommend this strain to other growers looking for a relatively easy to grow variety with strong effects. May the Force be with you as you embark on your growing journey... May all your days and grows be Blessed! 😎🙏❤️
References:
Dutch Passion. (n.d.). Auto Skywalker Haze. Retrieved from https://dutch-passion.com/en/cannabis-seeds/auto-skywalker-haze
Leafly. (n.d.). Skywalker Haze Strain. Retrieved from https://www.leafly.com/hybrid/skywalker-haze

Likes
9
Share
@Headies
Follow
So I have spider mites. I screwed up so much i think this is going 15 weeks. Lost coast to the rescue! time to finish these buggers off


Likes
1
Share
@Anthonythegrower
Follow
It’s another week of flowering for my plant, and it’s turning out beautifully. You can slowly see purple colors appearing on almost all the buds. All the buds are covered with tons of trichomes — I can hardly believe it, such a beautiful plant.

Likes
96
Share
@DogDoctorOfficial
Follow
Week 5 Report: Big Cheese Auto Blossoms into Flower Power!
Hi Guys! Buckle up for another thrilling chapter in the saga of our green queen, the Big Cheese Auto. Week 5 marks her grand entrance into the world of flowering, and oh, the excitement is palpable!
Big shoutout to Seeds Mafia for the genetics that keep surprising and delighting us. As we transition into this flowering phase, it's like witnessing a well-choreographed dance, and our Big Cheese Auto is stealing the spotlight.
🌸✨ The Autopot system is proving to be a game-changer. She's sipping on her own schedule, and the results are nothing short of spectacular. It's like having a master chef in the kitchen, deciding when and how much to feast on those nutrients.
Now, let's dive into the nutrient symphony:
Regulator (0.15ml/L): Our humidity maestro is still grooving. The dance with Mono-silicic acid (Si) continues, ensuring a stress-free environment as our star transitions into flowering.
P-Boost: A round of applause for the latest addition to our nutrient crew. P-Boost Provides a large amount of organic phosphorus (P)and brings a powerhouse of organic nitrogen (N) and highly concentrated L-amino acids. It's like giving our plant a secret weapon for flowering.
Calmag (0.25ml/L): Calmag, our guardian of structural integrity, remains vigilant. Strong stems, sturdy leaves – the foundation for the floral fireworks that lie ahead.
All-in-One Liquid (1ml/L): The NPK trio continues to be the backbonebut (just for this week), but here's a twist - the soil pellets are now in play. It's like the stage is set, and our Big Cheese Auto is the leading lady in this nutrient-filled drama.
Start Boost (0.25ml/L): The roots are thriving, thanks to Start Boost. It's like a construction crew working tirelessly to ensure a solid foundation for the upcoming bloom spectacle.(i will stop this )
Topbooster: Introducing the bloom and maturation stimulator that's about to revolutionize our green symphony. Topbooster is the 100% organic maestro with a concoction of active ingredients that scream "flower power." L-amino acids, polysaccharides, trace elements (B, Fe, Mo), bloom-promoting natural plant stimulants, and vitamin complexes from natural fermentation — it's a holistic approach to enhancing the flowering response.
How Topbooster Works: It's a botanical ballet!
L-amino acids: Leading the floral development and maturation charge.
Trace elements (B, Fe, Mo): Assisting in the intricate dance of floral development.
Polysaccharides (sugars): Stimulating nutrient uptake and microlife populations, like a sweet rhythm for our plant.
Vitamins: The conductors of hormone production. Gibberellins for shooting, cytokinins for cellular division — it's like the choreography that transforms a bud into a floral masterpiece.
Together, P-Boost and Topbooster form the dynamic duo, ensuring our Big Cheese Auto doesn't just flower but does so with a grandeur that elevates the end product's quality. Larger fruit, more fibers, resins, and sugars — it's like a recipe for cannabis opulence.
Aptus Mycor Mix: The underground alliance with mycorrhizal fungi is strengthening. Picture it like a secret society beneath the soil, enhancing nutrient uptake, and fortifying our plant's foundation.
NutriSpray by Aptus Holland: The foliar spa treatment continues. The microelement cocktail is like a VIP party for our leaves, creating a protective shield against nutrient deficiencies.
🚿🍃 Training Update: The leaf-bending symphony continues. It's like sculpting a masterpiece, preparing the canvas for the grand artwork that lies ahead. And the best is yet to come - defoliation is on the horizon. Clearing out the clutter, allowing her to shine from the inside out.
TDS and pH: Our numbers are looking sweet with a TDS of 390 and a pH of 6.0. It's like hitting the perfect notes in a musical composition, creating an environment where our Big Cheese Auto can thrive.
As we transition into the next chapter, the anticipation is building, armed with the botanical brilliance of P-Boost and Topbooster. It's not just cultivation; it's an artistic expression of nature's bounty. Flowering is like the crescendo in a symphony, and our green maestro is ready to lead the orchestra.
Once again, a massive thanks to Seeds Mafia, Aptus Holland, Grow Diaries, and our incredible community. Your support is the backbone of this green tale.
Let's continue to cultivate greatness together!
Genetics -Seeds Mafia Big Cheese Automatic
Light - LUMATEK ZEUS 465 COMPACT PRO
Food - APTUS HOLLAND
All info and full product details can be find in can find @
https://seedsmafia.com
https://aptus-holland.com/
https://lumatek-lighting.com/
As always, thank you all for joining me on this journey, for your love, and for it all. My horticultural odyssey would never be the same without you. Your love and support are cherished, and I feel both honored and blessed to have you in my life <3 <3 <3
With true love comes happiness. Always believe in yourself and always do things expecting nothing in return, with an open heart. Be a giver, and the universe will respond in ways you can't even dream off.
Friendly reminder: all you see here is pure research and for educational purposes only
<3 <3 <3 Growers love to you all <3 <3 <3
P.S- I must extend my sincerest apologies for the missing video reports. Regrettably, Grow Diaries is still facing some technical issues that are preventing me from uploading them. Rest assured, as soon as the situation is resolved, I'll share those videos to give you an even closer look at this fascinating journey.( i can only upload 100 Mb files with is not enough for the most type of videos i do, and even the photos is hard sometimes )


Likes
15
Share
@JeyGanesha
Follow
Iniziò seconda settimana ,sé tutto procede più che bene...da questa settimana inizierò a darGli anche un pochino di Ph perfecto 😉💪👍..........
Oggi all'11 °giorno ho tagliato via 2 foglie perché ho trovato delle macchie di ruggine su 2 foglie......
Likes
25
Share
@Silverback_Guerilla
Follow
10/31:
I fed today with one, signal, sweet & sticky, beastie bloomz, and silica.
Another batch of top-shelf genetics from Spliff Seeds. They are super frosty, fattening nicely, and smell delicious. One of the MWK's has a lot of purples in her lower flowers...sexy.👍
11/4:
Fed with one, signal, sweet & sticky, beastie bloomz, silica, and humic acid.
Really in love with the big Moonwalker Kush...such a pretty plant....and her sister ain't too shabby either.
Neither Strawberry put on much height, but every branch on them will produce some fatass buds with absolutely zero training...excellent candidate for a single-strain SOG.
Amnesiacs protest with too much PAR or UVB...same with the LCK..their foliage is suffering a bit...

Likes
8
Share
@Herbangardener671
Follow
Put a lot of love into this grow. She grew for 4 months from seeds to harvest. About 5 weeks and 56 days of flower. Overall great strain to grow and great site @growdiaries for giving the platform and help from other growers. I’ve learned so much about growing and especially about this strain.

Likes
21
Share
@Highgrade_Harvests
Follow
Week 10 is all done. This plant is by far the most beautiful cannabis plant I've ever grown. The genetics are amazing. Everything from the bud structure to the fading patterns is what you want to see in a plant. The smell is amazing and it is completely covered in trichomes. More
than last week which I didn't think was possible. They just look completely frosted over now. Can't wait to smoke test! I will do a video of the harvest and maybe some timelapse videos to close this grow out! Thanks for following along!

Processing
Likes
3
Share
@cmstacker01
Follow
Week 3 flowering.
Buds are
slowly forming, plants still going good, cold weather is hitting my area now, hope it won't last long, might extend flowering period by a couple days if it stays this cold.


Likes
4
Share
@fungiiiiiii
Follow
07/04/2023 Last week on her, trichomes are looking cloudy. She got neglected a bit during veg and a bunch of stress from electricity outages, where I had to move the plant outside resulting in heat burn (it was around 38 celsius outside) thrips and ruining my scrog, thrips are kinda controlled, and lost a bit of leaves from heatburn, but no biggie. Moreover I diverted my attention to the clones and the other seed that is now a mother plant (see Perpetual KeroseneKrash diary).
14/04/2023 No more light for the next 48 hs and then I'll chopp her
Processing
Likes
22
Share
@WolverineGreens
Follow
🔥🔥🔥I think the stretch is over. Did some slight defol nothin major. Widow and dream have grown most in this last week but are still smaller then the rest. Smell picked up too. Can't wait to seed how the buds develope. Wish I had the 2nd trellis up and trimmed em all harder to prepare for the reduced mobility of the trellis...only my 2nd indoor grow so I'm still learning any advice is greatly appreciated😀
I'm bored so I'm a day early with the update.
2nd grow with the mango 1st indoor with the headband and 1st experience either way with the rest.
Plant Count
Mango- 8
Blueberry Headband- 7
skywalker- 1
Bruce - 1
Widow- 1
critical purp- 1
enemy dream- 1


Likes
28
Share
@Sators
Follow
Hi good fellows!💚
🌱Day 50. Watering with 3L 6.8ph 150ppm clear tap water. Run off water get 115ml and measures is 6.7ph 650ppm.
MP4 included.💚
🌱Day 52. Watering with 2.7L 7ph 150ppm clear tap water. Run off water get 115ml and measures is 6.7ph 550ppm.
Worry about ppm level. Keep watering with clear tap water!💚
🌱Day 54. Watering with 2.5L 7ph 150ppm clear tap water. Run off water get 35ml and measures is 6.7ph 400ppm.💚
🌱Day 56. Watering with 2.7L 6.8ph 150ppm clear tap water. Run off water get 55ml and measures is 6.7ph 400ppm.
Amazing!💚

