
Likes
Comments
Share


@Tropicannibis_Todd
Follow
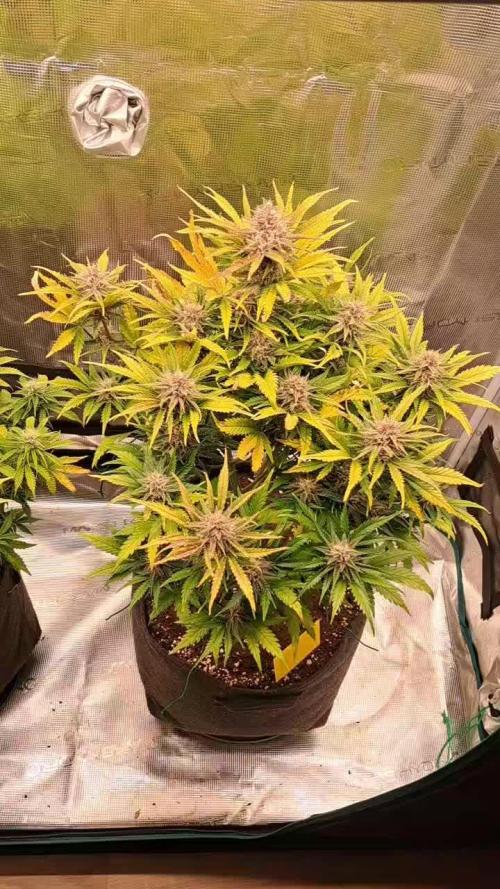
👉Well my friends , as I've said this is the third time e I've grown this beautiful plant , she's a keeper for sure 👈
The smoke is kinda dank, but then sweet and earthy , and maybe a little dirty 😜 Shes Extremely potent facts , super strong 💪
Would definitely recommend 👌
Soil by Promix
Nutrients by Cronks
Lights by MarsHydro & Vivosun
🙃
Thanks to all my growmies out there for stopping by its much appreciated 👈
👉Happy Growing👈

Processing
Likes
7
Share


@Kushizlez
Follow
Day 70-77
(Day 71) Not exactly sure why but node spacing on bbb 6&7 is super tight still. Their stems are also harder and less bendy, almost like they’re root bound.
Bbb #5 in my veg tent is looking bizarre and I’m at a loss for what to do. I’ve been looking up and asking around about the leaf crinkle and no one seems to know what’s wrong. Trashing a pheno of this would hurt. It could be a keeper too as I don’t think the problem is genetic. It’s definitely root bound but that doesn’t cause contorted new growth like that. I’ve concluded that it’s my dense soil coupled with root bound issues, overwatering and high RH.
(Day 72) Later tonight I’m going to give bbb 5 a bath tub flush until it’s reading 200ppms, drain it well and then transplant into a 3g pot with lightly amended soil. I’m also going to give it a light defoliation. I don’t mind stressing the shit out of this plant right now because I won’t be flipping for another week at least. With the small container it will run out of amended nutes mid flower so I will hit it with a few synthetic feedings around then to test out the smokabilty and taste compared to organic nutrients.
I might as well give the rest a good defoliation on the rest of the plants too. I will try to get most of what is under the trellis.
(Day 73) I definitely defoliated #7 waaay too much. Since it’s tucked away in the corner and a really bushy plant I can’t train it as well as the others. I cut most of the sucker branches and the majority of the lower fans. This should prevent the need to defoliate at all until week 3 of flower.
(Day 74) I’ve been reading that higher temperatures with a high RH can affect growth big time. It could be what’s causing all the crinkling and twisting. And now that the plants are in very late veg they could probably benefit from a lower RH. When I was running my temps around 74-78F and 70% RH I was in the perfect range. Now that I’m around 82-86F with the same 70% RH that could be what’s causing it. Hotter air holds more moisture than cooler air and proper vpd at 84F is around 75-80%. I’m going to turn up the speed on my carbon filter and set my controller to 75%. If I don’t see a difference or it gets worse I will drop to 65 and go from there.
(Day 76) I finally got the lights raised up another 4 inches or so. It’s not much but it should help reduce the intensity and stretch the nodes more.
I’m starting to think the super tight node spacing and droopy/contorted growth has more to do with something I’ve been reading about called ‘soil compaction’. Apparently farmers often deal with compacted soil in fields from running tractors over it all day. When I potted the plants I gave them a good little jiggle to compact the soil down further so I could fit a bit more in the container. I think this could be the culprit as they don’t seem to be drying out evenly. Even the plants in my other room are not drying out like they should and it’s probably from compacting too. With the addition of rock dust and dry amendments the soil can become sandy/clay like and retain a lot more moisture. Wish I would have added a few more liters of perlite and packed the soil a bit looser. Either way I need to get this problem sorted ASAP before I get root rot.
Earlier in the season when I overwatered, I stuck a fish tank air pump into the soil and it aerated the soil enough to prevent overwatering. The only reason I discontinued it is because it didn’t have much effect in the 1.7g pots. I just ordered a 36w 6 way fish tank pump that is way more powerful. It was 50 bucks and I’m willing to take a gamble on it. It seems to be my only option at the moment because I can’t just repot. Worst case scenario I can use it for brewing compost teas if it doesn’t work. I’m not sure how well this will work in a giant fabric pot but it’s worth a shot. I’ve heard of people supplementing additional air into raised garden beds with great results.
I’m picking off some of the new auxiliary branches to try and widen the node spacing. Growth is definitely slow and stunted but no signs of deficiencies.
I just thought of another theory on the node spacing... and the more I think about it, the more I think it’s the mystery problem. I’ve been foliar spraying with 1-1-1 VeloKelp at pretty high concentrations 2-3 times per week. I have heard in passing that kelp and seaweed can somehow reduce stretch. A quick google search reveals that Ascophyllum Nodosum Seaweed and other marine algae extracts contain large amounts of hormones and auxins that reduce plant height and stretch. *facepalm*
Guess I’ll stop that for the rest of the cycle. As far as I know there is nothing I can really do but wait for the plant to use up all those excess hormones and nutes. The recent 0-0-15 seaweed extract and 1-0-3 kelp meal I bought is derived from the same kind as the velokelp. I guess I won’t use it again until week 3 or 4 in flower. Tight nodes are very useful in flower but aren’t desirable at all in when trying to scrog in veg. Especially when they’re like a half inch apart. It slows the shit out of a grow. Vietnamese and biker gangs in my area used to grow SOG style and use a synthetic PGR hormone (meant for bonsai trees) called ‘paclobutrazol’ that would make the weed rock hard dense so they wouldn’t have to pay people as much to trim it. I’ve heard that in recent years they have made the switch to using kelp extracts because paclo is getting harder find and is not meant for food crops let alone smokeable crops. I’m ashamed of it but I have smoked pounds of PGR weed long before I knew what a PGR was. 🤷♂️
(Day 77) One more theory. Ever since raising up the plants up onto that shelf the root zone is probably significantly warmer and the bottom of the pot (where most of the roots are) drys out way quicker. It’s possible that the warmer root zone could not be holding dissolved oxygen at the proper rate resulting in that over/underwatered look. Or it could be that I’m not watering enough at once to reach the bottom of the pot where the roots are and it’s indeed under watered. I’m going to water in a gallon when I get my new air pump and see if that makes any positive change. If I see the new air pump making a difference, I will flip on the 21st of April. If I don’t see a difference, I will carefully untangle the plants from the scrog net and remove the shelf. That extra foot should make a massive difference with ppfd and will cool down the roots significantly too. I’m thinking about grabbing a simple soil/compost thermometer to check the temp of the medium. Better safe than sorry.
Rough week. Hopefully everything get smoothed out in the next little while before I flip.
Processing
Likes
6
Share


@xAK47FULLx
Follow
Stressing over this calmag deficiency that I can't fix 😞
Tried adding more calmag
Switched to marshydro
Change nutes and adjusted ph
I transplanted to soil f#ck it

Likes
31
Share


@Mrs_Larimar
Follow
2024-04-25
the ove to the other Roo with stronger Light, pushed her massive,
so i have to transplant them into bigger Pots.
they have alittle N defiency, but soon its history, because they get 10l ore Soil now.
BREEDER INFO
Tangerine Snow F1 Fast Feminised is a 75% sativa, four-way cross of (Boost x Tangelo) with (Lavender x Power Plant).
This Fast F1 hybrid is bred from Cali genetics and boasts great citrus terps, high resin production for extracts,
high levels of THC, very good yields and excellent mould resistance.
Tangerine Snow F1 Fast can be grown indoors as well as outdoors. Indoor flowering times are between 8 - 10 weeks
while harvest time in northern latitudes is during September while in the southern hemisphere growers will be harvesting during March.
Recommended climate regions are hot, dry, humid and warm. These are tall, semi-branched plants that grow in excess of 200cm
and display a high degree of vigour with very good uniformity.
In common with many other heavily sativa-dominant strains, Tangerine Snow F1 Fast offers excellent resistance to mould
as well as to plant pests and diseases. The combination of citrus terps and plenty of resin makes thi
a very good extract strain with the 'washing' method delivering very good yields of hash.
The citrus terpene profile is reminiscent of mandarins and tangerines and also has sweet candy notes.
THC production has been lab-verified at a strong 24% while CBD is low. The effect is uplifting and energising,
perfect for use during the day and early evening.

Likes
5
Share


@Sur_cannabico
Follow
7semanas desde la apertura de cotiledones, vamos super. El spectrumboard de heavengrowligths y abono orgánico de wonderlandAgronutrients.
Que mejor combinación 🔥

Likes
12
Share


@PizzaBoy
Follow
Lollipoping/defoliation completed at the very beginning of the week. Some will argue that’s too late. But I find I get better yields if I wait till the last minute. They will be left alone for the rest of the grow.
Started mid week bumping up to 1250ppm as the stretch has stopped.
That caused a little nuit burn, so dialled back to 1150ppm.

Likes
35
Share


@IndicaVibeMe
Follow
I'm going to need to transplant this gal! Already roots poking out the bottom so I'm prepared to get her in a bigger pot soon! Probably this week.-- update, she's loving Life in a larger pot!
Smells incredible already 👍
Likes
19
Share


@adam_pawloski87
Follow
Let’s Go Day 67 from seed !! So this week went real great! 2 Ogreberrys an Bruce Banner started getting flushed! The rest will follow up and start flush next week ! Today the 3 will continue getting flushed while the 3 others get there dose of nutrients, PHd at 6.5! Let’s grow lil ladies let’s grow!!! You all have an amazing productive day as well as a a great safe week !! Peace love and positive vibes to y’all Cheers 😶🌫️💨💨💨💨🤙🏻If there’s any questions please ask, I’ll be opened up to answer at best of my knowledge! Thank you all have a dank day !!


Likes
13
Share


@Mr_Fuki
Follow
Sweet bush of luxury taste... that is what I can say about that :D
Sweet Citrus, dirt and wood aroma is in room where is that box. I love that.
So back to this bonsai :D
Sometimes I eliminates big leaves but no more training.
We are neer to finish 😍
15.4. 7:48 - Resin on leaves is here, aroma shot me through doors of box.
2 maximaly 4 weeks to harwest 😻


Likes
Comments
Share


@ykscotttyk25
Follow
A new version of the classic. The old classic strain now improved and in auto version!
Just like the name suggests. Expect up to 500gr/m2 of super big buds.
Ideal for beginners. Top-quality buds without much maintenance or extra effort.
Indica-dominant hybrid. A relaxing high that comes hand-in-hand with a pleasant head buzz.
Likes
146
Share


@Natrona
Follow
Apollo is coming along nicely and enjoying new friends, zkittles, gorilla cookies and granddaddy purple. All autos. Godzilla cookies is the runt.
Apollos schedule : Water & feed Tues, Thurs, and Sunday.
Increased TPS to early bloom at 9ml/g and Signal to 3ml/g. I think she could use more fertilizer but I'm gun shy on feeding too much.
I noticed the new leafs are thinner than veg leaves indicating early flower.
No pics on 10/12. My special day.
10/13 pics and video outside before first defoliation. And after defoliation.
Note to reduce impact of stress, I ground up 1 of my B vitamins and dispersed in water after feeding on Friday 13th.
Apollo is strong. Once I did definition you can really see her.
1)Very thick strong stem.
2) Very tight node structure. There was no space between the first and 2nd leaf group.
3) Side shoots almost as thick as the mail stem
4) roots at the soil top. I used MycoBliss in the soil and planting hole.
Friends, Royal Queen Seeds Is offering a discount on purchases
👉**GROWERS20** for 20% 👈
Https://www.royalqueenseeds.com
Link to Apollo
https://www.royalqueenseeds.com/us/56-f1-hybrid-cannabis-seeds
Variety: F1 Hybrid auto
Genetic Background: Lemon x Black Domina x Sugar Mangolia
THC: Very high
Yield: XXL
Height: 55 - 75 cm
Flowering time: 45 - 50 days
Harvest: 75 - 80 days after sprouting
Effect: Calming, Creative, Motivating , Physically Relaxing
Flavor: Citrus, Herbal, Lavender, Pine, Vanilla
Major terpenes: Caryophyllene, Farnesene, Myrcene, Terpinolene
Climate: Short Summers
====================================
Equipment: AC Infinity
CLOUDLAB 844 – Advance Grow Tent 48”x48”x80”
CONTROLLER 69 PRO – Grow Tent Controller
CLOUDLINE LITE 6 - Inline Fan 6"
IONBOARD S44 – LED Grow Light Board 400W
CLOUDRAY S6 – Oscillating Circulation Clip Fan
Carbon Filter 6”
Pots: 5 gallon Air pots
Soil Fox Farm Happy Frog amended with worm castings, dolomite lime and mycorrhiza.
Seeds provided by Royal Queen Seeds Check them out 😎
Https://www.royalqueenseeds.com
Link to the seeds
https://www.royalqueenseeds.com/us/56-f1-hybrid-cannabis-seeds
use Discount Code
👉 **GROWERS20** for 20% discount 👈
Nutrients: Total Plant Solution
>TPS1
>Canopy
>Signal
Amended soil recipe #2 used for soil prep.
https://www.paramountseedfarms.com/super-soil-recipes/


Likes
11
Share


@Ecogeek
Follow
Was facing some difficulty when it came to lighting (what brand, wattage, output range, full spectrum etc.) Did a watering today with a mix of Epsom salt & purified water which was the 1st nutrient mixture since my ladies been in the soil. A couple of changes made since I've joined GD is I changed the distance of lights to plant (was @ 14-18 now 20-24 inches away thanks for that folks) lighting schedule is still on a 18/6hr. Another trick I choose was the water used...it's either rain water or artesian water both help eliminate unwanted pH unbalance. This is my 1st grow and Im going to post more photos of the entire setup. If you guys&gala have any other helpful tips for a better grow lmk. I also wanted to do a LST on my autos but not quite sure when to do, they're currently coming out of week 2 into week 3 vegg mode. Every tip and hint helps so let em fly.

Likes
Comments
Share

@Grow4ever
Follow
Die PH Probleme machten sich bei allen Pflanzen deutlich bemerkbar. Trotzdem war Sie wirklich vom Geruch ein wahrer Traum. Süßliche, fruchtige Note mit einem gassigen Aromer.


Likes
7
Share


@Damonkey
Follow
Transplant tomorrow and new home then after. Flowering will begin in a week or so. She’s responded well to all training and is ready to open up into a nice wide canopy. She’ll be tied down to her new pot a little to encourage a bit more spread and open her up a bit so light can get in.
Likes
11
Share


@Heregrowsnothing
Follow
Popped them straight into rockwool, 9 days later they all emerged just adding a few drops of water every couple of days


Likes
Comments
Share


@Lynx_361
Follow
16.06.2025
The Plant's had a ruff time with me recently! I lost one branch from Number 1 (the short one in the middle). And I had no Time to give them the needet attention. And I did my last Topping. So from now on it's just waiting till flower.
