Likes
Comments
Share


Likes
4
Share

@carlitoshaze44
Follow
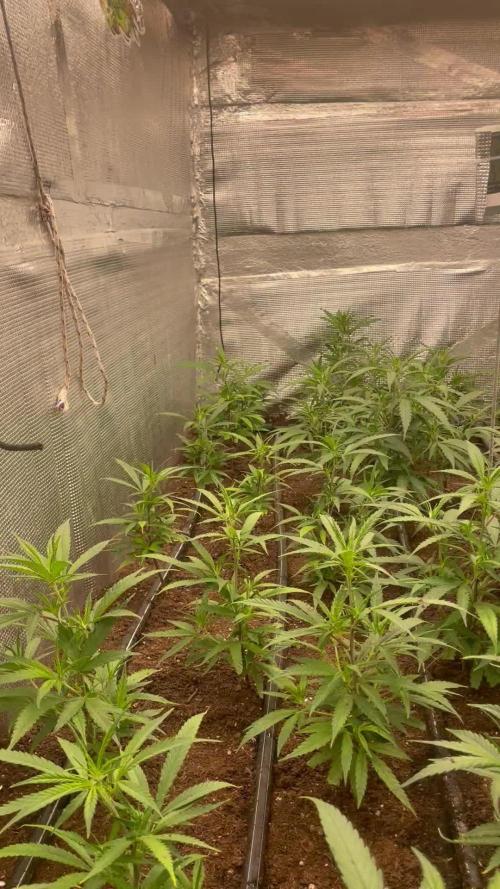
Vamos terminando la tercera semana de crecimiento en el día siguiente a este post.
Se realizará una poda dejando las plantas como chupa-chups.
Se bajará el horario de iluminación para inducir al cambio de floración .
Esta semana sufrimos un ataque de araña roja.
Que se a podido eliminar sin muchas complicaciones.
Las plantas al reaccionar rápido ,no sufrieron daños visibles.

Likes
103
Share


@PEAKYPLANTERS
Follow
Happy evening to all of you .... Brothers of the world's most coveted company!
Peaky gardens burst of thousand-color flowers in an immense enchanted and fragrant valley ...
This week we dedicate ourselves to the rinsing of the soil to start cleaning the roots and eliminate excess nutrients
I hope the contents like you .... if so it was ... leave your opinion
Kiss Kiss

Likes
99
Share


@Natrona
Follow
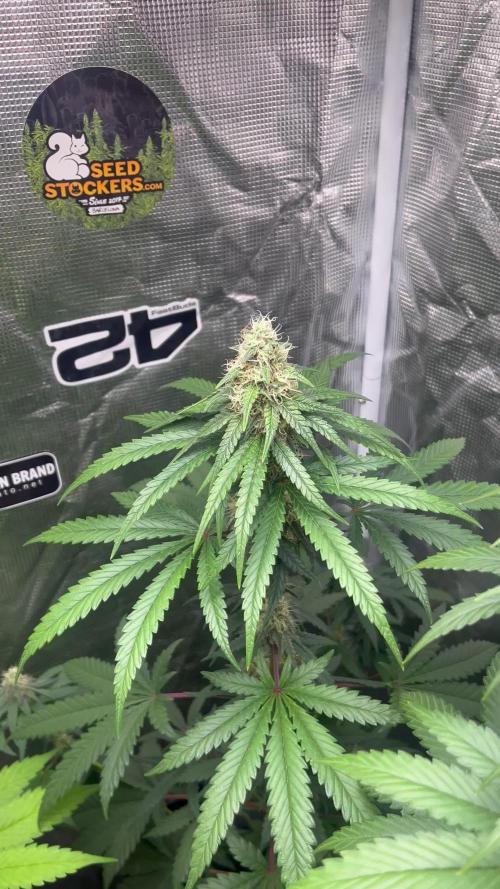
Week Harvest
My journey of Runtz Automatic and her entrance in the Eternity Grow Cup 2025 began on January 7 when she popped her head above the soil. Runtz was an easy carefree plant to grow with no incidents of pests or disease. A few defoliations were all that was necessary to keep her in check. I kept her under a light schedule of 18/6 to maximize her light exposure. After topping her she grew only 24 inches tall. This small plant structure is suitable for growers with limited space.
She was harvested on March 20, day 74 from germination. As part of the flushing process, I topped the pot with ice, then watered with ph 6.5-6.7 water for 3 days. Then I put Runtz Auto in the dark for 2 days still in her pot. March 20, she got the chop, Wet weight 314g and is hanging dry in a darkened room. As she dries, candy, sweet, fruity smells escape the room.
Temps are 71-72and 43-48% humidity. I am sure she is as tasty as she smells and will not disappoint in effects.
My sincere thanks to Patricia @Zamnesia for her support and encouragement throughout this grow. Big thanks and sincere appreciation to Plagron and Zamnesia for hosting this fun and exciting contest.
Everyone entering the contest started with the same strain in either a feminized auto or photoperiod seed. Zamnesia generously provided 5 seeds to everyone and Plagron provided the Green Sensation flowering additive. During this contest I enjoyed visiting many contestants’ diaries and seeing beautiful gardens. Many, like me, are limited in space or number of plants they can grow but all are displaying fine specimens. Some Runtz phenotypes are very sativa dominant, with long thin leaf fingers, while others lean more indica. What will be most interesting will be the smoke reports on effects. My theory is that the more sativa leaning in structure, the more active, energetic and euphoric that plant will be and the indica leaning specimens will be more relaxing and uplifting.
Your likes and comments are appreciated. Thanks for stopping by.
Growers love 💚🌿
💫Natrona💫


Likes
25
Share


@BudHaks
Follow
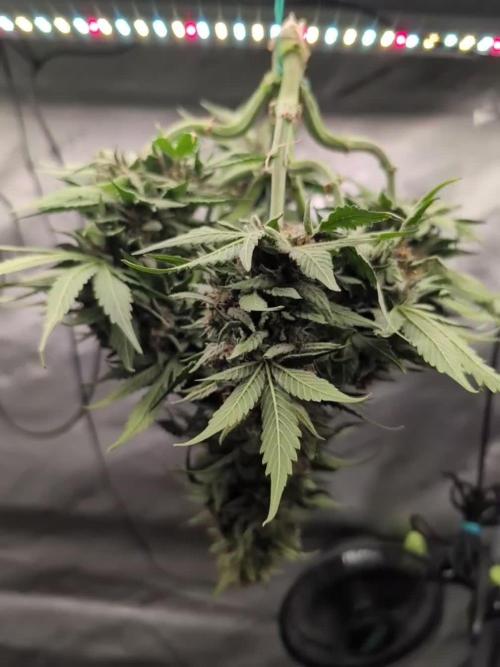
Week 13!
I have decided to stagnant harverst her in two parts as there is fresh growth in her lower half that the light cannot reach and the top buds are mature now and at the optimal cloudy trichomes I'm looking for are present.
Look at all those trichomes heavy leaf and buds!
She is heavy and smelling amazing with hints of fruit and cookies.
I will also be flushing her next week!
What an amazing journey, coming to an end!

Likes
15
Share


@DaddyPrime2
Follow
6/24/24 the videos of trichomes is from both purple octane and rs 11
Also based on trichomes. I should've counted the last week of veg as a flower week. So she's closer than we
6/25 we have clear cloudy and purple. Leaning towards her going till the end of this week.
6/28 we have about 70-80% cloudy and 20-25% amber. she's ready to go.
she will be chopped tomorrow morning. 6/29 unless stated otherwise.
happy growing yall, this plant is a fucking badge of honor with how beautiful she
6/28 I lied and chopped her probably 30 mins after I posted that lmao.

Likes
6
Share


@ProfDoty
Follow
Half of the first harvest done still have k lots to learn but off to a good start still got the Green Poison Auto goin
Likes
8
Share


@Fa5Venom
Follow
Good growth on them little bit of nutrients burn on the northern lights. Won’t get much out that small one but I just couldn’t let it go

Likes
2
Share


@GhostBlvckPhant0m
Follow
“The Wock” 7 Weeks🤙🏾 Ladies are crushing its! I’ve for sure found 2 phenols I want to keep going based on structure and growth. The first was actually going to be a throw away. I didn’t like how lanky she was in her solocup stage. I instead topped her to slow down lateral grown and threw her in a 2 gallon bag to do her thing. She is now in a 7 gallon bag and has the best structure of them alll IMO. My 2nd pheno is a Tri-leaf mutation and it throws tops like no other! The perfect mother plant and is why I chose her as pheno #2. The 2 plants that were topped at the 5th node are bushing out more and more, just like it like it. There are 2 natural growing plants are doing great as well. They have nice bushing with one main cola. All plants will be defoliated 5 days before flip. The nose coming from these ladies is LOUD and I mean LOUD! Sour Candy and Burt Fuel! I’ll be taking cuts and flipping these ladies soon! Happy Growing PSGX Family! 🚀PSGX to the 🌕 #Phant0m
Likes
Comments
Share


@Frostynuggzzzz
Follow
Stopped feeding WW#2 (pH water only)+(still outdoors when sunny)
WW#3 stacking good nuggzzzz, very happy😎💨
WW#2 90% clear 10% milky
Likes
3
Share


@KushKingOrganics
Follow
Here you see the wild Berry cake show that it’s male. Bagged and chopped sprayed down every thing to make sure there was no pollen floating around. No sacks seemed to be open yet. Also added a trellis net for the wedding cake x banana buttercups. Week 2 is over.
Processing
Likes
15
Share


@Tito_Yayo
Follow
D9 Height is steady 7cm, leafs grow.👍
D11 start with 15min/h Ventilator
D12 7.5 cm nice grow
Processing
Likes
12
Share


@MisFit219
Follow
Week 7 going great. Liz is stretching a lot. She is more on the on the sativa side with her fan leaves. Both stacking well. Cut nutrients in half on the Canna A and B.

Likes
26
Share


@Melloganja
Follow
Everything is going well, due to running out of time, I didn’t post the last week, the girls are getting fat and with a lot of resin. I think another 2 to 3 weeks would be ready or some plans will be ready.
Likes
2
Share

@eldruida_lamota
Follow
Vamos familia, actualizamos la quinta semana de floración de estas Runtr de MSNL.
La temperatura que estuvo entre los 24-26 grados y humedad dentro de los rangos correctos.
En cuanto a las plantas las veo verde sano, estiraron bien y ensancharon bastante también.
Se nota que los nutrientes de la marca Agrobeta, añadí Thor y Mega Pk, hacen sus funciones.
Las flores empezaron a engordar y a llenarse de tricomas, por el momento todo correcto, os dejé también alguna novedad y un cambio en la sala, agradecer al equipo de Mars hydro por el nuevo TSW2000. (los últimos 5 años cultive solo con los leds de esta marca).
- os dejo por aquí un CÓDIGO: Eldruida
Descuento para la tienda de MARS HYDRO.
https://www.mars-hydro.com
Hasta aquí todo, Buenos humos 💨💨💨

Likes
10
Share


@RookieGrower65
Follow
Harvested BB2 and GG2 on day 84 with mostly cloudy/milky trichomes and scattered amber because I prefer the Sativa daytime buzz. I think these two are further along because they showed the deficiencies. Both were flushed twice within a week and chopped with a dry pot. Last nutrients were day 73. Nothing but PH 6.4 water since day 76. I expect to harvest BB1 and GG1 at around day 92, checking trichomes everyday. I'm guessing the yield will be greater for the second two. Will post harvest pics and videos for each set of two plants after drying and getting dry weights for each plant.

Likes
37
Share

@DaddyPrime2
Follow
5/27 curious to see where this week ends up at
5/29 the one plant indoors is packing on weight. The one I put outside to finish (possibly stupid) seems to be maturing faster but bulking slower. She's seemed healthy this whole time. Not even a burnt leaf tip
5/31 attempting to take pictures in different lighting to get a better idea for yall viewers
Likes
14
Share

@Vince_Van_Grogh
Follow
Traveling mid next week for an extended period so I decided to harvest early. Did not have the best grow season but will bounce back on the next one.
Gonna try and grow giants next time because this harvest is not going to be enough to sustain me medically for more than two to three months.
Will add a smoke report once cured! 🌿😎