The Grow Awards 2026 🏆 


Likes
Comments
Share
@Creme_De_La_Creme
Follow
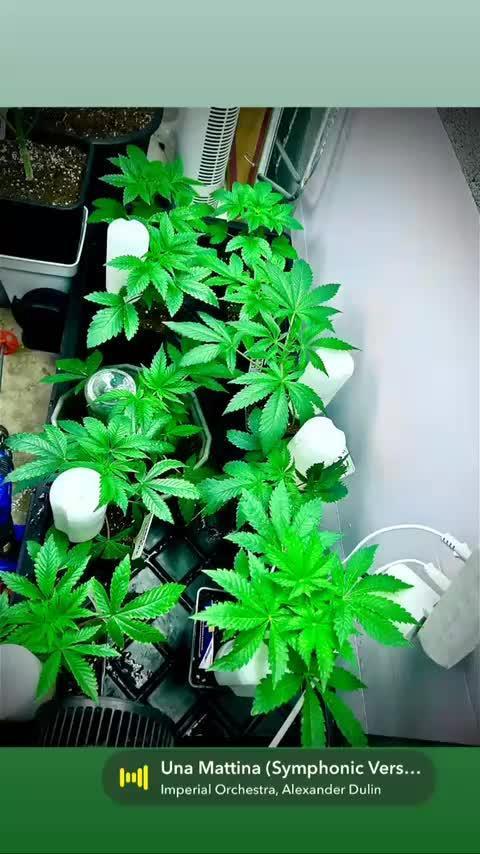
So this lady giant just started the pre flowering strech, but she forgot she is already 6ft tall, WTF ! HAHAHA
I went for a heavy lollipopping and defoliation on day 40 in hopes that she would stress and stop stretching since i do not have any more space for her, but as you can see next week, it did not work as planned....
haha stay tuned

Likes
7
Share
@JayBane
Follow
Day 58 - Started on making a natural intake box
Day 59 - Isolated and sealed the natural intake box + added beter sealing on grow cabin doors & cabin
Day 60 - Semi-automated intake.


Likes
31
Share
@Mr_ZAF_Budz
Follow
Hello Canna Fam,
So week 11 has come to end and the ladies are smelling great! I did a partial harvest to the Gorilla Cookies, LSD-25 and the Girl Scout Cookies as the trichomes were ready to the top half of the buds.
I raised the pots slightly and will leave the rest of the buds to mature a bit more before I do the final harvest.
I must say the trichome product on these FastBuds is just amazing! Great genetics 🔥
I hope you enjoy the diary entry and happy growing to you all✌️🏼
Likes
56
Share
@Master_weeda
Follow
Bonjour à tous les padawans et les maîtres jedis
Pour cette semaine 3 au jour 19 ma plante fais 21 centimètres et son septième noeud apparaît je décide donc de pratiquer un LST sur ma plante.
Pour ce j'utilise du fil de fer galvanisé que je plante directement dans le substrat en faisant attention de ne pas endommagé les racines car n'oublions pas que ce qui pousse dessus pousse aussi dessous.
Jour 17 je pulvérise du une solution composé d'une cuillère à café de savon noir mou (marque briochin) dilué dans un demi litre d'eau en prévention d'éventuels nuisibles.
Pourquoi le savon noir mou ?
Savon noir : quelle utilisation pour le jardin ?
Le savon noir est un produit naturel dont les propriétés nettoyantes sont connues depuis l'Antiquité. Utilisé pour l'entretien de la maison et pour les soins corporels, ses vertus antibactériennes et insecticides en font un allié précieux pour le jardinier bio.
Le savon noir est fabriqué à partir de potasse et d'un corps gras de type huils végétale comme l'huile d'olive, de lin ou de maïs.
Produit naturel et biodégradable (s'il ne contient pas d'additifs, comme cela peut-être parfois le cas), c'est un très bon produit nettoyant, pour les sols, la cuisine, la vaisselle, le linge, etc... Très polyvalent, il est également économique, comparé aux multiples détergents classiques du commerce.
Le savon noir se trouve sous forme de pâte molle et brune ou sous forme liquide, dilué avec de l'eau. C'est du savon noir liquide dont on se sert généralement au jardin, car son utilisation est plus simple. Il s'achète dans les magasins bio ainsi qu'en grandes surfaces ou jardineries.
Attention : la recette du savon noir de ménage et celle du savon noir utilisé en cosmétique ne sont pas forcément les mêmes ; les savons noir de ménage (multi-usages) peuvent contenir davantage de potasse afin d'améliorer le pouvoir dégraissant (irritant ou desséchant pour la peau), voire même certains additifs chimiques.
Au jardin, ce sont en priorité les propriétés antiseptiques et insecticides du savon noir qui sont utilisées.
Le savon noir liquide est utilisé pour lutter contre les pucerons, les cochenilles, les araignées rouges, les aleurodes, les psylles et autres thrips. C'est un insecticide de contact ; il tue les larves et nettoie le miellat qui englue les feuilles.
La recette de l'insecticide à base de savon noir (mou pour ma par marque briochin) est simple à réaliser : une ou deux cuillères à café de savon noir mou (briochin) diluées dans 1 demi litre d'eau tiède (dilution à 5 %) ; une fois la préparation refroidie, pulvérisez-la sur les plantes atteintes, en prenant soin de ne pas oublier l'envers des feuilles. À renouveler 1 à 2 fois si nécessaire, pour être totalement débarrassé des indésirables.
Comme il est de mise pour la plupart des traitements, ne pulvérisez pas la solution à base de savon noir en pleine journée, sous le soleil (ni sous la pluie !) ; procédez le matin de bonne heure ou patientez jusqu'à la fin de journée, lorsque les températures sont en dessous de 20°C.
Jour 18 Je corrige mon LST suivant la pousse de ma plante ...
Pour ma par c'est la manière dont je procède mais petit rappel de la technique du LST
Quand commencer à appliquer la technique LST ?
De nombreux cultivateurs commencent la manipulation dés que les plantes possèdent entre 3 et 6 nœuds ou une paire de feuilles. Durant cette première étape de la croissance, le tronc encore flexible est pliable sans risque qu’il ne se casse, même si au fur et à mesure du développement de la plante il sera de plus en plus difficile de le plier. Nous pouvons continuer à guider la croissance des branches durant toute la culture, même durant la floraison, ce qui pour cette étape représente un grand avantage face à la taille, qui n’est pas du tout recommandé une fois que la formation des têtes commence, cela stressera en effet la plante, ce qui aura pour effet de retarder la récolte.
Comment appliquer la technique de guidage LST
Si nous sommes prudents, la flexibilité naturelle des fibres du cannabis permet de plier leur tronc et branches avec une relative facilitée, même durant la floraison des plantes.
En utilisant une corde fine, nous pouvons accrocher la pointe de la plante à la base du pot par exemple ou à un tuteur que nous aurons planté dans le substrat. Nous plierons le tronc avec précaution et nous le fixerons avec la corde, à partir de là, nous pouvons augmenter progressivement la tension de la corde, chaque jour un peu plus, jusqu’à obtenir la position souhaitée. Soyez attentif à la réaction de la plante, essayez de ne pas appliquer trop de pression sur la corde et rappelez-vous que la flexibilité des branches peut varier d’une plante à l’autre.
Pour obtenir de meilleurs résultats, il suffit de suivre quelques règles simples. Pour commencer, nous devons choisir une corde fine mais pas trop pour ne pas blesser les troncs au fur et à mesure qu’ils grandissent et qu’ils deviennent plus gros.
Nous pouvons utiliser des crochets en plastique souple ou de n’importe quelle autre matière flexible pour éviter d’endommager les plantes. Spécialement en intérieur, utiliser des cordons en plastique de couleur (voir les diaries de @Silky) est très pratique pour voir facilement les accroches et faciliter le travail au milieu du réseau formés par les cordes, les tuteurs, les mailles ou les supports que nous aurons dans la culture. Bien entendu, en culture extérieure et surtout en guerilla nous ferons juste le contraire et nous utiliserons des matériaux de couleur qui n’attirent pas l’attention pour que notre jardin reste discret.
Pour stresser les plantes au minimum, la mieux est de réaliser ces manipulations le soir ou juste après que les lampes en intérieur s’éteignent, ce qui leur permettra de se remettre durant la nuit. Normalement, le jour suivant nous pourrons observer comme les pointes des branches que nous avons pliées se dressent de nouveau vers le haut à la recherche d’une source de lumière.
Que la force soit avec vous💪

Likes
38
Share
@Snakeking
Follow
I changed pots from 50 to 100 liter because i had to water every day also it was about root ban,now they look happier and they jumped again .my last plant in video is different genetic and it supposed to be auto flower by mamamari dispensary in italy. At first I thought they scammed me but now i think this plant goes to flowering stage.help me if you can tell is it flowering sign or just showing her sex.thanks guys🙏🏽

Likes
13
Share
@YOUNGSTERBR
Follow
Estava sem celular, perdi várias mídias da semana passada e dessa semana
Likes
33
Share
@BudXs
Follow
A good week, plants look healthy, environment is top notch, reaping the benefits of dialled in VPD
Likes
27
Share
@Sativa_Juice_Grows
Follow
11/29
Shes growing ok. Green and healthy branches and leaves.
She growing more like a sativa, sativa hybrid
tall and branchy, manageable fan leaves
but because of that she started to get some light burn.
Dont have my tent yet so i cant adjust my light any higher so i tried
to lower the plant down a little
So hoping she can do without super direct light for another day or so.
Other than that shes looking healthy.
11/30
It wouldnt let me do veg and flower in the same week
on the diary so i just split it up in here.
Two busy days.
Tent came i!! which im super excited about
because now i flip the girls to flower.
It wouldnt let me do veg and flower in the same week
on the diary so i just split it up in here.
I spent tuesday putting the tent together
and dropped a video of the new setup because
im REALLY excited about.
got the ladies nice and cozy. Started them on 12/12.
Its my first time on an indoor grow so i hope it works out well
She still has a little of light burn
but shes still green everywhere else
was able to get the light another foot higher
after i moved everything.
12/1
topped dressed with some happy frog soil
Worm casting amount is the only thing i couldnt find a good ratio for
So ill say i mixed about a quarter of the amount of soil
into about 1 to 2 gallons of top soil
i had some down to earth
dry amendments i mixed in with that soil as well.
i couldnt tell how much soil exactly.
I only put in 5 tsp of great white instead of the recommended 7
because i switched the bloom nutes and i didnt wanna over do it
i couldnt tell how much soil exactly.
Fed them some flowering nutes, but cut back
on the amount of nutes by a lot.
Decided im going to just follow what biobizz instructions
say from now on so apparently less is better.
started the bloom and the top max kept everything else the same
and cut out the fish mix for flower, added great white at the end.
Defoliated the bottom few branches and cleaned them up. Nothing to major.
12/2
Temp of tent is steady at 70, 71 degrees.
thats a little bit lower than id like but ill
figure out something in the next few days.
Took the bottom branches and leaves the night before and
Wanted to give it a night of rest before i defoliated the big leaves.
Took most of them off but left the few at the top of the plant.
Looking extremely green. Hoping i get to see some pistils soon.

Processing
Likes
14
Share
@Shellshocked
Follow
1st week of veg not much to say no feeding. no watering other than when it was first sprouted leaves standing strong nice colour. Gonna be a short veg. Of 3 weeks before I flip the beauty just need her big enough to take a couple clones . Only second grow ever gonna try organic for the whole grow as I already am organic in flowering stage
Likes
36
Share
@Ganjagrandaddy
Follow
Day 14 flowering: The little ladies have had a good weeknof stretching this week with the Herz O.g showing the way to the other 2.
Herz.og has now been in flower for 14 days and is well into her stretch period. She has quite wide node lengths so no donkey dicks for her I think. seeing other grows , they donproduce very nice buds somlets see how she progresses with her bud building. looks healthy and happy enough and feeding with no issues so far.
Strawberry Cola is now in flower proper and can say 7 days flowering for her now. she is stretching nicely with some good looking nodes around her frame. I will make sure I don't let her get too bushy to keep all her tips and budlets getting light. i took a good amount of small and pointless lower growth out to open her up more now. She looks the better for it now.
Monster Mash has also had a good stretch the last few days but not as much as her rivals. she has enough nice budlets to work with on her limbs and should start stacking them up soon. All three are looking very healthy and a good size now. soon they can go into a better position under the light as I harvest the other strains in the run.
Until next week growmies , be safe and well.

Likes
18
Share
@Grower_Of_Persia
Follow
my dry and cure style is this:
4 days of hanging upside down to get water activity lower to around 0.6 in 50% humidity and 26 C temp (i know its a little high but we are in a hot summer right now and i cant get it lower even with air conditioner) and then after 4 days of drying i remove leaves and stalks, trim buds and move them to jar for the rest of their life :D . and in the first 4 days of curing i open the jar door and let hem get some fresh air in the jar for about 5 minutes and close the jar door again, after 4 days of curing like that buds are smokable but they will get better as they getting cured about 1 month.
buds are one of the hardest as fucking rocks type of buds! very dense , compact , sticky , smelly , amazing at every aspect
growing stage was 56 days and flowering stage was 75 days total (harvested tops at day 64th)
the total weight of dry buds was : (plant #1 & #3 top buds 56 G + lower buds 22 G ) 78 G + (plant #2 top buds 47 G + lower buds 18 G ) 55 G + (plant #4 top buds 120 G + lower buds 67 G ) 187 G = 367 G


Likes
13
Share
@HeavyHead
Follow
So this is a combination of weeks 11-12 as they all went into 48 hours of darkness and cut down on different days. My got cut down on different days. Will post dry harvest pics next ;p
Processing
Likes
55
Share
@GardenOfHerbs
Follow
- i'm super happy that Dinafem send me this auto to test grow. Looks like i'm the first one to grow this strain so i'm very honored. she will be my second CBD auto and i'm really excited about this one
- Bought the full line of biobizz nutrients again! The Advanced Nutrients was just not working for me. she will be the first to get the full biobizz line!
-she was transplanted into her 10 liter pot on day 4. i made a little video of my transpanting technique, check it out!
- added the calmag powder from big plant sience and there root exploision powder that i won with the grow diaries prize.
so the setup will be:
– 120x120x200cm garden hypro tent
– 1x Grow Northern Telos 0008 Led 240w
– 1 x Phresh Hyper Fan Silent 150mm with controler
– 1x Bull filter 150mm
– 4x garden hypro clip fans ( silent as hell)
– 1x 10 liter Air-Pot
– Biobizz Light mix soil
– biobizz: root juice, bio grow, bio bloom, acti-vera, bio heaven, alga mic, topmax


Likes
6
Share
@GrowDoc
Follow
Everything is going well. I slightly overfilled the fertilizers, I'm already correcting this point. The smell is very strong.🌱🍀🍀🍀🌱🌱🌱
Likes
18
Share
@UKauto
Follow
shes getting there now, considering shes under a 100w light shes doing well.
stinking now too, smells like a bag of haribo tangfastics, really sour with a mixed fruit hint, stem rub smells exactly like fresh cut grapefruit honestly haha hard to pick out a specific fruit smell from the bud though its just fruity, yous know what i mean anyway ha.
really sensetive to nutes, getting burn even after low dose and feed, water, water, feed schedule.


