


Likes
6
Share


@420medic
Follow
The structure on these 2 girls are beautiful, I believe they are starting to pre-flower so this is the last technical week of veg. I hope they stretch a little so they get taller and not so squatty.

Processing
Likes
10
Share


@LittleManGrow
Follow
Plants are doing well, The 84" inch tent is a must if your not training or topping. I removed all the sacks that appeared last week and I haven't seen anymore show up so fingers cross, I check daily. Bigger tent also helps with heat control as the air has more room to rise. Hope you all like the pictures, I started to take videos as they provide more detail with less work.


Likes
74
Share


@Secretflower
Follow
Hi all,
📰 ... April 8, 2021... 📰
🌿 ... Day N°68... 🌿
End of the 10th week of growth for my two Feminized Shogun from Royal Queen Seeds.. 👑
The plants are beautiful, I still let them vegetate until their height suits me. Ten weeks of growth is not normal, but I'm not letting go.
🍼... Nutrients...🍼
When repotting my plants, I put 40 grams of Easy Boost Organic Nutrients from RQS Organic Nutrients.
At each watering I give them Calgreen from Metrop..
🔦...Light...🔦
#MarsHydro Tsw 2000 at 50% power and 70 cm from the canopy.
🐜...Pest...🐜
Tech Fort treatment looks good walking.. 👍
That's all for now my friends.
Thank you very much for going through that.
Take care of yourself and your loved ones.
I wish you only happiness with your plantations.. 😘
📭 ... See you soon.. 💨 💨

Likes
12
Share


@BeHappyNtoke
Follow
Week four after flipping to 12/12 still no signs of anything maybe it’s liking the cycle as a way of managing roots in the small pot still not using a crazy amount of nutes only Time will tell
Likes
23
Share


Likes
6
Share

@MindFlowers68
Follow
My gorilla melons transitioning into flower this week. Not much change in height yet but I will get a good measurement next week. I haven't had to water this plant much at all this whole summer but now that I have the canopy up top I'm gonna have to start watering more. Last day of this week got a mix of compost tea with some liquid fish. It got around 8 gallons.


Likes
12
Share


@Radagast_
Follow
11.07.
Wedding Cake 1# Day 77#
Wedding Cake 2# Day 71#
Today is the end of the eleventh week for the plants.
There were storms all week and with the fact that they spent almost the whole week under stress (they were also under heat stress a couple of days before), I am certainly satisfied with the progress.
On Tuesday, they were watered for the last time, with clean water, then it rained, and the next day it rained all day, since then they have not been watered, as soon as the soil dries I will feed them.
Below in the table is the food that they received last time, but it is included in this week, and I introduced that as well.
Stay High and Keep Growing!!!

Likes
16
Share


@TAXFR33
Follow
All the late nights and hard work are starting to show signs of paying off. Got high hopes for this grow


Likes
5
Share

@UnitedStrainsGermany
Follow
Sie wächst so buschig heute musste ich mindestens 6/7 Stängel mit budansatzen und defolieren das in COCO wäre Jackpot


Likes
11
Share


@Jays_Not_Here_Man
Follow
Put this girl into flower this week! She was getting beastly and my Autoflowers wrapped up so it was time ❤️ I decided to put her into my big tent along with my other grow and continue to flower there. I was going to scrog her in my 2x4 but decided I will need the space to get the summer beans started 🤤
Upped her Bloom nutrients and dialed back the Grow, also increased the Micro’s . Temps have been a little higher than normal, running around 81 degrees of freedom units, and keeping around 55% RH. I did a light defoliation going into flower, and decided to do some LST by tying back a few branches to allow for better light penetration. 🇨🇦👊❤️

Likes
2
Share


@DaddyPrime2
Follow
This clone was neglected so badly. The dispensary got them from had no idea on how to take care of plants. I wanted to take them all to give them better homes. The leaves were so thin that they felt like paper. I've never felt a plant like this one felt. I will make her beautiful. She's exploding with new root
Likes
226
Share


@Kitties_and_Colas
Follow
~_~_~_~_~_~_~_~_~_~_~_~_~_~_~_~_~_~_~_~_~_~_~_~_~_~_~_~_~_~_~_~_~_~_~_~_~_~_~_~_~_~_~_~_~_~_~_~_~_~_~_~_~_~_~_~_~_~_~_~_~_~_~_~_~_~_~_~_~_~_~_~_~_~_~_~_~_~_~_~_~_~_~
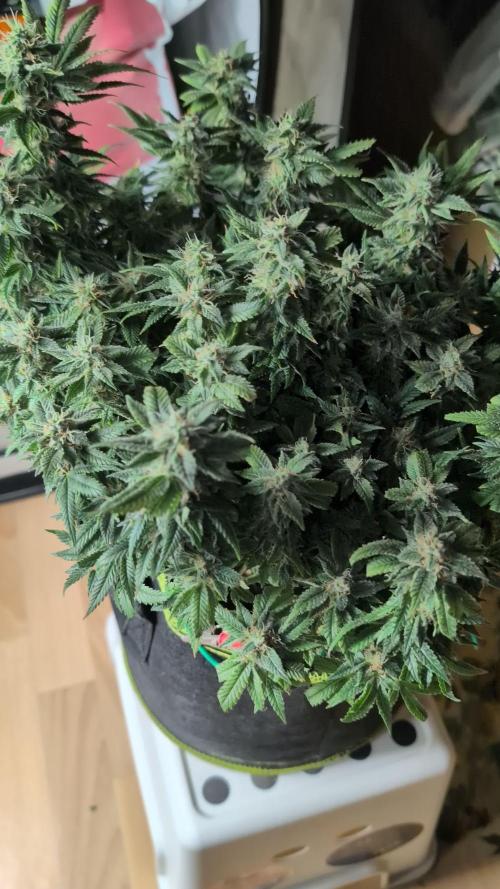
9/18/21
😺 Week 4 of flower!! Everyone is looking pretty good but the mainlined plant seems to be locking out calcium again (and they're clawing slightly, this is on me, I was pushing it lol)..its early but we've increased calcium supplements by 3ml, cut all grow solutions and PK feeds consistent ..we'll update on this again midweek.. thanks for reading grow family and happy harvests!💡🌱 😽💨
Week 4 on YouTube:
https://m.youtube.com/watch?v=EL-n5MUawFY
~_~_~_~_~_~_~_~_~_~_~_~_~_~_~_~_~_~_~_~_~_~_~_~_~_~_~_~_~_~_~_~_~_~_~_~_~_~_~_~_~_~_~_~_~_~_~_~_~_~_~_~_~_~_~_~_~_~_~_~_~_~_~_~_~_~_~_~_~_~_~_~_~_~_~_~_~_~_~_~_~_~_~

Likes
17
Share


@DudeGrowsWeed
Follow
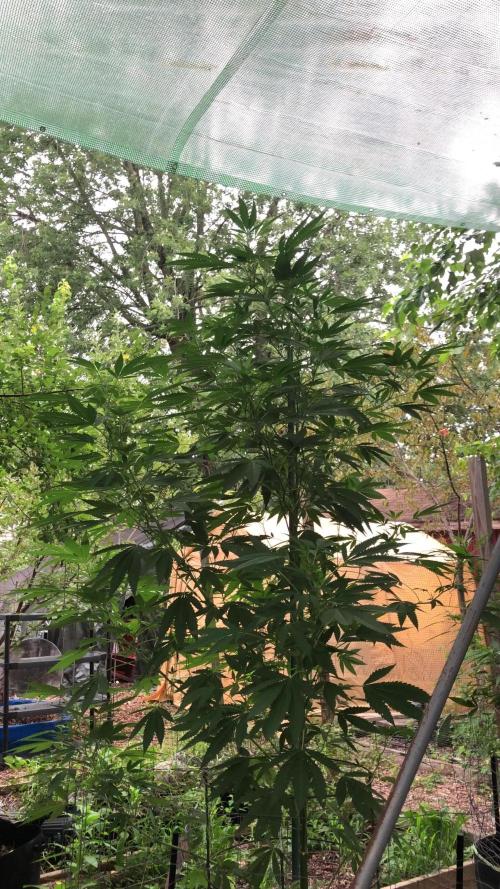
6’-4” & 5’-8” as of today, 6’-0” average height.
These ladies are beautiful! Everyone who comes by the house just stops and stares when they get near my garden. So do I 👍🤣
I had to move some plants outdoors from my indoor grow due to losing the battle to high heat and humidity. Two are super close to harvest, one might get cut over the weekend. Feel free to comment and let me know what you would do. Thanks!


Likes
2
Share


@TheWeedPimp
Follow
Has been working in the other end of the country for the last 2 weeks
Then I come home to the girl! Really booming! Flower everywhere 😍
Just support her today with some bamboo sticks
Really shitty weather windy as F
Likes
3
Share


@LittleBigTrees
Follow
Still only giving her water, still in the solo cup for now.
She's growing really nice with minimal effort 😎

Likes
3
Share


@Comfrey
Follow
This week I continued with LST and while I bend down my Kush on day 39, the stem bent over. I could fix it and within some days the plant repaired the injury quite well. At the end of the week I was surprised how good she handled this big stress. This is not the most beautiful of my plants but I love her like the other ones. 😍

Likes
5
Share


@Deltatigrou0169
Follow
Bonjour à tous,
Très jolie départ sur (21g) (21 de sortie 👍👍👍).
Mise en pots définitive aujourd'hui 😊 c'est parti, maintenant je vais encore plus les bichonner 😊😊😊 j'ai hâte qu'elles grandissent.
Je vous ferai une photo tout les jour pour voir leurs évolution.
Bonne journée à tous 😉
