
Likes
Comments
Share


@NoProbation4Weed
Follow
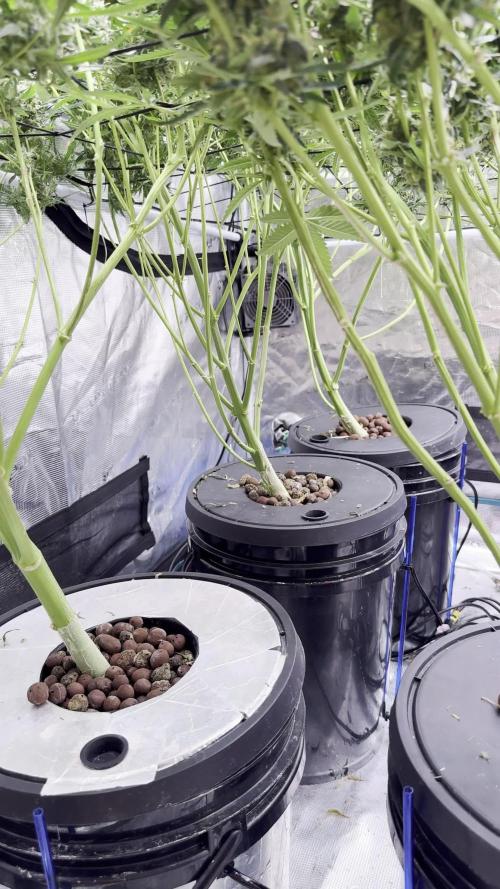
Prepared the soil 12 days ago and prepared the pots at the day i put the seeds into glass of water.
I used 50% Dope Light and 50% Coco as light mix for the top layer
I used 50% Dope Soil and 50% Reused Soild + Additives to reactivate my old soil.

Likes
Comments
Share


@SolitudeCorners
Follow
🌿Week 4: Defoliation & SCROG Setup
Week 4 was all about structure and airflow.
The canopy was getting bushy fast, with a ton of inner growth, so we went in for a solid defoliation session across the board. Lower fans, overlapping leaves, and shaded internodes were cleaned up to let light penetrate deeper into the canopy and reduce potential humidity traps.
Right after that, we finally dropped the SCROG net, stretched out gently across the canopy to guide the branches horizontally and prep for flower stacking. Some of these phenos are already reaching for the sky, so the timing felt just right.
Captured a full-time-lapse clip of the defoliation + netting process. It’s super satisfying watching the chaos turn into clean lines. Nature meets intention.
Feed Bloom since 20/6
22/6 Defoliation
🌱 Plant Response:
After defol, they bounced back fast. Tops are perky, leaves are praying, and stretch is continuing in a controlled way. The structure’s more open now — better airflow, better light distribution, better everything.
Likes
84
Share


@bioaccessory
Follow
Хотелось побыстрее, а получилось как всегда 😄 К 38 дню от каски растишка только показала пол, и вошла в стадию предцвета, поэтому начало цветения ожидаю на следующей неделе. В остальном же всё прекрасно, кушает хорошо, я постепенно повышаю дозу базовых удобрений, и видимо дойду до табличных значений AN.
upd. Конец недели, убрал все растяжки - к началу цветения готовы. 😎
Спасибо, что заглянули, и будьте здоровы! 🙏
Продолжение следует ...😶

Likes
17
Share


@GreenHouseLab
Follow
Day 10 Of 12-12, defoliated 75% of canopy will leave untouched until day 21 Flower. Running 1250 ppms of cropsalts, light dimmed to 75% @15-18” of canopy


Likes
17
Share


@ButterfliesLittleFarm
Follow
Hello Diary.
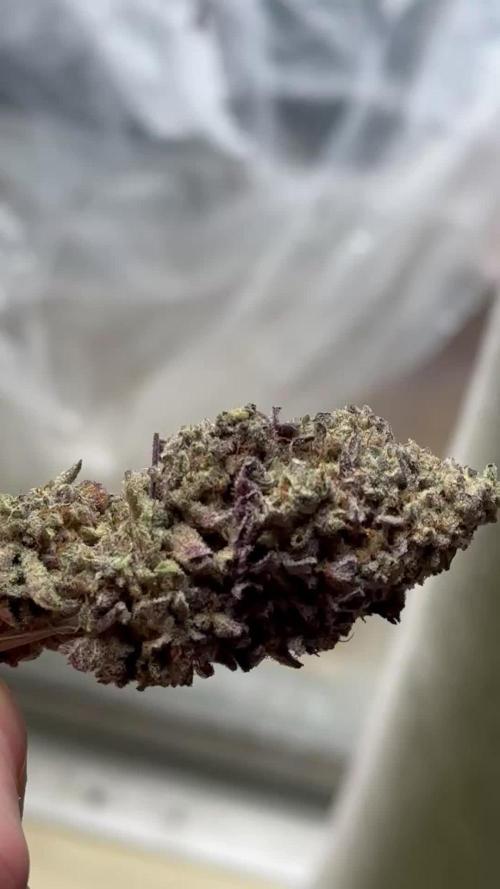
In the end, I have my own praise for this strain. Although they did not both emerge at the same time, they eventually had a harvest together.
The outcome is in the end almost 140 g which is a great average.
The dried flowers are hard and compact, reminiscent of velvet to the touch, really beautiful.
They dried in a growbox for a total of 14 days along with their roommate Watermelon.
My wife, although not a consumer, enjoys trimming which suits me great because I can take photos during that time.
After trimming, we put the dry tops in jars where they matured for another 20 days.
And now as I write this report, I’m enjoying the smoke of Purple Punch, drinking coffee, and trying to remember if I left something out in the report. If so, feel free to write and ask.
I apologize for the delay with the reports, but a lot of photos and videos and other commitments have slowed me down in that.
And hope those who visited the diary got useful information, thank you to everyone who supported this trip, thank you for all the compliments and comments.
See you soon with new diaries.

Likes
241
Share


@Tropicannibis_Todd
Follow
Well growmies ive been looking forward to the Banana Purple Punch 👊 for sometime now , and there both keeper that's for sure 👈 couldn't of asked for better Genetics 😉
The smell coming from both plants during the entire grow was just dreamy 👈.... It's very sweet with that Banana Peel smell 😍
Amazing Plants
👉 Big thanks to all my Growmies out there in GD land 👈 Much appreciated 🙏
Thanks To MarsHydro for the TS1000
👉I used NutriNPK for nutrients for my grows and welcome anyone to give them a try .👈
👉 www.nutrinpk.com 👈
NutriNPK Cal MAG 14-0-14👉 All Weeks
NutriNPK Grow 28-14-14👉 Weeks 2 & 3
NutriNPK Bloom 8-20-30👉 Weeks 4 to 8
NutriNPK Bloom Booster 0-52-34👉 Weeks 4 & 9 & 10


Likes
125
Share


@Regenwurm
Follow
Die 12 Blütewoche ist erfolgreich abgeschlossen!
Tage der Wachstumsphase = 32 Tage.
Tage der Blütephase = 84 Tage
Wachstum h in Blütewoche 9= 0 cm
Blütenbildung: sehr Hoch
Die Blütenkelche sind Mitten in der Produktion und verfärben sich.
Die Trichome sind bei beiden ladies im gesamten trüb. Heißt, der Harvest Day nähert sich. Ich denke 14-18 Tage 👌
In dieser Woche den Ladies einige Blätter abgenommen das in der Endphase das Licht die buds erreicht.
Der Wasserbedarf der Pflanze ist gleichbleibend moderat.
Diese Woche 4 Tage von 7 gegossen
Mutation 1= strähnige Blüten (wie bei der Dr. Greenspoon öfter mal vorkommt)
Mutation 2 = Gigantismus (doppelt so viele DNA Ketten wie regulär)
Mutation 3 = Sekundäre Blüten an Blättern
2 mal in dieser Woche mit Purolyt Mischung 1:25 besprüht
Lichtstärke: 87 %
Lichtabstand: 36 cm
Std Tag/Nacht: 12/12
Temperatur Tag: ca. 24-25 Grad
RLF Tag: 50-55%
Temperatur Nacht: 20-21 grad
RLF Nacht: ca. 50 %
VPD Wert: ca. 1.2
PH Wert Wasser/Düngelösung: 6,4
EC Wert: 1,0
Ventilator Oszillation: Stufe 2
Befeuchter: aus
Entfeuchter: mit Steuerung an
Zusätzlicher Entfeuchter: 1 Stk außerhalb vom Zelt im Raum
Bewässerung: 1* Wasser PH 6,6 EC 0,1/ 3 * bewässert mit Dünger mit den o.g. Mengen
Purolyt Besprühung: 2 mal
Controlling: Grow Control
Dünger: Greenbuzz Nutrients
Licht: Pro Emit Vollspektrum
Abluft: EC Carbon Active 750 m3 gesteuert/PrimaKlima 480m3
https://greenbuzznutrients.com/de/
Danke an Greenbuzz
Ihr bekommt 25 % Rabatt bei der Nutzung des Codes auf der GB Homepage
https://greenbuzzliquids.com/de/shop/
Code: GD42025
(Mindestbestellwert 75€)


Likes
30
Share


@Green_Dream
Follow
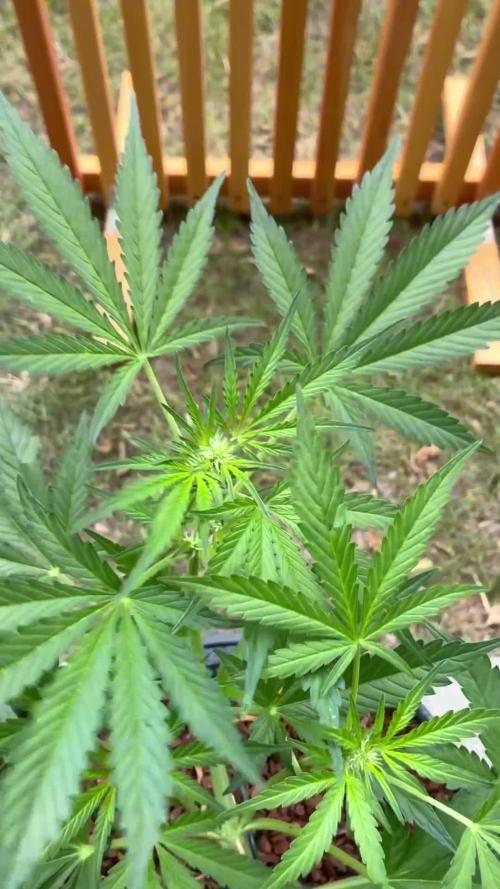
Bananas are doing great, very nice, big, fast-growing ladies. Especially one of them has a very peculiar smell, I definitely get it why they are called Bananas :D
I flipped them to 12/12 after 47 days of veg. I was a bit afraid that they were getting too large, I hope they will fill up the remaining space nicely.
Likes
15
Share


@Kurow
Follow
This week is dedicated to finalizing the pot and nutrients for the rest of the lifecycle, looks like it took to the nutrients very well not much new upwards growth but new leaf sites appeared!

Likes
11
Share


@kauilmayel1996
Follow
Me siento muy contento con estás auto...
Fast buds sorprendiendo con unos cogollos hermosos y un olor increíble...
No hice el mejor trabajo pero estoy feliz de haber hecho esto...
estoy enamorado con las ruderalis!
Auto de Fast buds un súper 10!
Likes
7
Share


@Bingbings_garden
Follow
Hello growers,
Another week down. Nothing major happening so keeping it short and simple.
After stretching she is 83cm from base to highest cola thanks to the training. I measured the main stem and it comes out around 1.4m in length. Flower development has gone into full effect. Decrease in temperature outside so hoping to get tight and dense nugs. Water 1.5L per day.
Processing
Likes
4
Share


Likes
2
Share

@Mars8_8
Follow
So first run back and we finished. Happy with the results but know I could have done a lot better. But overall like this strain. It puts out about .9 grams of rosin for every 7g smashed. Taste good and smooth. Burns white. Lower thc effects but I think having my lights to strong late harvest was more the issue.

Likes
4
Share


@Zugzug
Follow
No food just Water (Grow Dots)
Day 22 Transplant to 3gal pots
Day 23 start of LS
Likes
7
Share

@Bunterbiber
Follow
Welcome to Week 5! The weather took a bit of a turn this week. The sun decided to hide behind the clouds a lot more, we had our fair share of rain, and the nights got noticeably chillier, dropping down to a minimum of around 10°C. Despite the less-than-ideal outdoor conditions, the ladies pushed through and continued to develop remarkably well.
I’ve kept up with the LST (Low Stress Training), specifically focusing on keeping all the main tops at an even height so we get a nice, uniform canopy. Watering has stayed consistent and easy—just giving her a drink of tap water + CalMag about twice a week.
Appearance & Flowering:
She has really stretched out horizontally and become quite wide! She is more bushy right now, and those signature dark leaves are just a treat to look at. But the most exciting news of the week: she is officially starting to transition into the flowering stage! The first pre-flowers are showing, and she seems totally unfazed by the colder nights.
Don't forget to check out how the Purple Haze Auto is handling the chill and her own transition to bloom over on my profile!

Likes
15
Share


@DeepRootsGrowTrees
Follow
SHERBERT QUEEN AUTO / RQS
HARVEST WEEK
I didn't have any issues from seed to harvest this lady stayed short in stature however she did produce some frosty buds and they looked and smelled amazing!! Stay Growing!!
Thank you for stopping by and taking a look during this grow it's much appreciated!!!
Thank you to ROYAL QUEEN SEEDS!!!
RQS / SHERBERT QUEEN AUTO