The Grow Awards 2026 🏆 


Likes
Comments
Share
@RGGROW
Follow
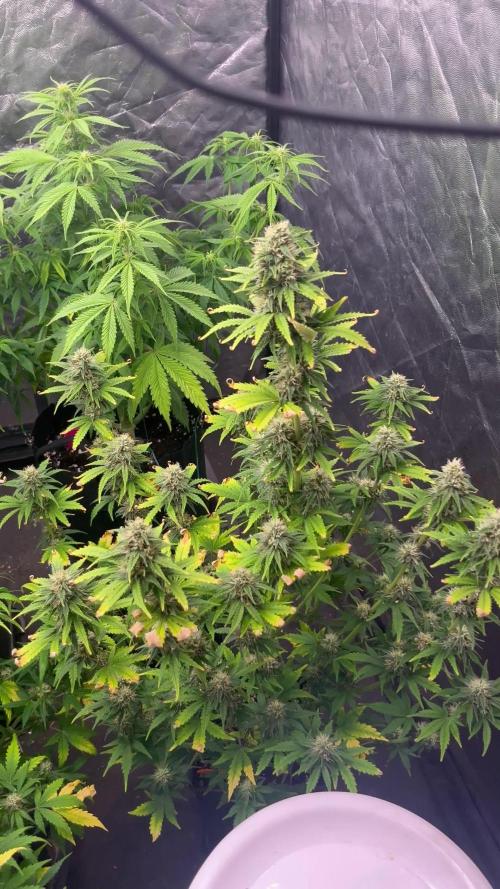
Heavy defoliation day 15 of flower. Netting was causing more trouble than help so I removed it. Adding power bloom every other watering. Had to defoliate again on the 21st day of flour.

Likes
13
Share
@Growyourownathome2x2
Follow
Day 24 since sprout 3rd of April was delayed transplanting these as I was waiting on my pots to arrive, all done now there looking happy in the new pots 😁🍁


Likes
4
Share
@Ziocannabis
Follow
Sono mancato 15 giorni e purtroppo se lasci un compito a chi non sa recepire i segnali di Aiuto guardando le foglie….
Credo sua un over fertilizzanti perciò ho fatto immediatamente un risciacquo ad entrambe le due davanti
Le altre 4 sono delle Gorilla Glue e sono state messe a dimora il giorno 18/10 inizio fase germinazione
Le altre 2 hanno 10 giorni di più e speriamo si riprendano
Che dire… buona fortuna a me che ne ho bisogno 😆😄

Likes
Comments
Share
@hfwbr420
Follow
First week after light switch is done. Plants are growing very nice.
Tips for improvement are allways welcome! :)
Processing
Likes
5
Share
@PETEROG
Follow
Hey guys everything is going great with these ladies all 6 germinated and popped up in 3 days after planting 1 of the six shooters is a lot smaller than its sisters so I've order LEMON PIE from FASTBUDS should be here tomorrow to take its place and I'm going to move the six shooter outside so if you would like to see its journey comment and like bellow ⤵️
The only thing I wish I did differently would of been starting these girls under a cfl or a cheap led to stop stretching but lesson learned if anyone has any question's please comment and thank-you all for your support ✌️
Likes
43
Share
@Ju_Bps
Follow
Hello friends
Still good with this plant,
For the moment no problem with her, easy grow, she like be touched, and fertilizer.
This week I've start pk 13-14.
She have a really nice smeel and lot of pollen, I think bud will be not really big, because short vege, next time I'll put more plant.
All continue to be good, I hope harvest for end of this month or start December.
Next week I'll start to publish pic of trychromes.
I'm in late in my diaries, my phone was broke and needing to got my pics in my old phone.
Have a good week, grow and smoke.
See you next week 😊😊


Likes
31
Share
@420DeepGrow
Follow
Gracias al equipo de AnesiaSeeds, Marshydro, XpertNutrients y Trolmaster sin ellos esto no sería posible.
💐🤯 39%Thc Wham Boom:
Sube al ring con WHAM BOOM de Anesia Seeds, donde la energía electrizante de Wham choca con las vibraciones frías de RS54, creando una variedad que es todo equilibrio, potencia y sabor. Este peso pesado feminizado ofrece una mezcla perfecta de 50% Sativa y 50% Indica, proporcionando una experiencia que te hará flotar de euforia mientras tu cuerpo se sumerge en una serena relajación.
WHAM BOOM es una productora prolífica, con rendimientos en interior de 600g/m² y en exterior que alcanzan la asombrosa cifra de 900 - 1200g por planta. Con una floración de entre 65 y 70 días, esta variedad está lista a principios de octubre, lo que la convierte en una competidora ideal para los cultivadores que aspiran a una cosecha de campeonato. Con una imponente presencia de 100-140 cm en interior y 160-220 cm en exterior, WHAM BOOM se alza como testimonio de su destreza genética.
🏠 : Marshydro 1.50 x 1.50 x 1.80, carpa 100% estanca con ventanas laterales para llegar a todos los lugares durante el grow
https://marshydro.eu/products/diy-150x150x200cm-grow-tent-kit
🌬️💨 Marshydro 6inch + filtro carbon para evitar olores indeseables.
https://marshydro.eu/products/ifresh-smart-6inch-filter-kits/
💻 Trolmaster Tent-X TCS-1 como controlador de luz, optimiza tu cultivo con la última tecnología del mercado, desde donde puedes controlar todos los parametros.
https://www.trolmaster.com/Products/Details/TCS-1
🍣🍦🌴 Xpert Nutrients es una empresa especializada en la producción y comercialización de fertilizantes líquidos y tierras, que garantizan excelentes cosechas y un crecimiento activo para sus plantas durante todas las fases de cultivo.
Consigue aqui tus Nutrientes:
https://xpertnutrients.com/es/shop/
📆 Semana 1:
Gran comienzo primaveral después de una germinación excelente. La etapa de plantula se desarrolla con normalidad.
Esta semana aplico tierra de diatomeas espolvoreada en el sustrato para proteger las plantas y las rocio con una solución de cola de caballo para prevenir futuros hongos.
Potencia de la lámpara: 40%

Likes
65
Share
@TheBudWhisperer
Follow
Week 5 of flower and seed production for all these plants has started in earnest. We cleaned up the tent somewhat and took down all the males after having done their job. Alls left is to wait for finish now.
The nute deficiency appears to have corrected itself now that we’ve balanced out the ratios a little more. The WPM is no match for the sodium bicarbonate but still gonna have to keep on top of that to the end of the grow. Full fumigation of the grow spaces will be required - multi-day process I am not looking forward to. Time cleaning is time not growing, sadly.
We’re coasting to the finish now but should still have some decent updates on our super secret seed harvesting method once they’ve fully matured😉👍. Hope everyone’s well and grow’n that straight 🔥.
Background
Fingers crossed that these Spicy Bitch regs provide at least one male so that we can back build some stock of it. In the event that does take place we’ve got a single clone of each strain from the previous pollen chuck to sit in the tent with them so they can make babies for the next few months. The whole point of the last year was to start making some foundational genetics for a third generational cross we could call our own. If you’ve been following along than you’ll know that it’s been anything but easy. Our previous pollen picks didn’t pan out at all so we’re back to the drawing board with a new option from ExoticSeeds.
This’ll be a 10 plant run with 5 regs and 6 strains for pollination including the strain itself.
We’re running in a 2x4 MarsHydro grow tent all powered by a Mars Sp6500. That’s a little more than 600w packed into half the recommended footprint😳. Why? you ask - because we like our buds big and overcompensatory😂. Really, I’m just of the mind that we can pack more light into this space than recommended and get much better results. The math doesn’t lie. At least not as long as I wasn’t high when using the calculator again…..
Many thanks to @MarsHydroLED for the opportunity to test run the equipment👊.
In addition, we’ve also moved to a new nutrient system - Druid Nutrients out of the Netherlands. They don’t really have a presence on GD yet but you’ll be hearing about them very soon I’m sure. The beauty of this system is that it’s literally a 1 (one) component system for the entirety of the plants grow cycle. It really has changed the game in terms of ease of feeding and maintenance. It’s also very versatile and seems to provide everything needed across multiple different strains in the same ratios. Keep your eyes peeled for these folks. Pretty much a guarantee that they absolutely blow up once more people know about them👍👌😎.
Strain Background
Spicy Bitch: predominantly sativa, heavy yielder with a daytime kinda trip profile. It’s a cross of Queen Mother and a Pre-2000 AK47. We’ll pull what pollen we can and hope to have a female run out a larger supply of seed for the future.
Many thanks to @Exoticseeds for the chance to give these beans a go👍👊.
Pollination Strains:
Holy Surfer S1 - this is one of the focal points for this cycle. A fellow growmie was kind enough to ship over some S1 genetics I took an interest in. The only ask back was that if I did cross it to send a few his way for testing👍. Shoutout and cheers to @blendmedmedman. Hoping to have something back to ya in short order. For full details on this alluring hybrid option check my buddies link at seedfinder -
https://en.seedfinder.eu/strain-info/Holy_Surfer/Smiling_Tiger/
Northern Lights - this came from a particularly interesting batch of seeds that have shown a very dependable variegation trait. It’s a compact and squat plant requiring very little maintenance. Typical for the strain really. It’s been chosen as an option to potentially mellow out the high , shorten the stature of the resulting hybrid and inject it with some of that mellow indica effect.
Boogie Nights - total shot in the dark. Still haven’t even tried the strain myself yet but it was available at the right time and interesting enough to make a salad with. Big thanks to AMS who’ve been nothing short of an excellent seedbank to collaborate with. Expect similar growth characteristics to that of the Northern Lights. Better resilience however.
Blueberry - this particular clone is from extremely strong stock. Spliff seeds broke the mold with this strain. She’s lower maintenance than the NL, more resilient than anything else we’ve got on the menu and the terp. Profile on this girl is out of this world. If we can bring any of these qualities to the cross, then it could be magic👌.
White Widow - garrghh, I just can’t get away from this particular plant. Again, still haven’t even tested the buds yet and all I can say is that the growth characteristics are extremely vigorous and desirable. This plant is one of 3 unicorns that I have yet to tame due to a combo of extremely bad luck and circumstance.
All told, it’s still the same story: a VERY experimental breeding project designed to shotgun a broad swath of genetics against a reliable and dependable Breeder who’s put out proven fire 🔥🤟😎👍.


Likes
18
Share
@TheGreenLeopard
Follow
this week was great, the V1 arrived through a lot of logistical nightmares. its the final test before mass production- i will post another dairy for it but please have a look at the pics above. ive created a stylish subtle, modern way to grow 4 plants. this will be great for all levels and will save big on energy and nutrition. you just have to prune, it can even draw water into itself. anbd its 4 plants!!! stick here and youll see it in action.
ive decided to change the order in tents. now we have super strong Purple berry Kush with the returned and super strong sweet seeds Sweet cherry pie. so one tent is the strong, and the other tent is now perma auto flower, which serves for additional veg for girls who fall behind their grow peers. hope that makes sense. i think my net is pretty useless other than a visual to plan nodes. i guess the real support will come from placing more plastic rods around the colas and fastening them. hope Christmas was kind to everyone. this oncoming week will be the last week of veg i think for tent two and we flip to flower. thanks for looking.


Likes
26
Share
@LongJohn420
Follow
29.6
I think I have missed a week but girls are growing like crazy now. I topped that topped one again and pinched also couple new shoots. Let's see how that turns out never done that before. Gonna switch to flower once these get recovered from that pinch. That topped one is also super cropped. I bend it to half from main stalk and tied to a stake for support. But yes very healthy nice growing plant no problems all good.
3.7 Flipped to flowering today. Next update is flowering week 1 seven days from today. (10.7.)
Both doing very good. Topped girl has got good even bushy shape, like it. Other one has not gotten too tall. They actually are the same height.
Happy growing!

Likes
16
Share
@Albeginner420
Follow
I give her only pH water as She has already the nutrient in the soil and she's thriving. The buds are really starting to fatten up. The flower stretch Is over.
Likes
48
Share
@DreamIT
Follow
🧙♂️🍁BUBBA HAZE BY REGULAR SEEDS 🍁🧙♂️
🧙♂️ 19.2 ...
🧙♂️ 20.2 ...
🧙♂️ 21.2 ...
🧙♂️ 22.2 ...
🧙♂️ 23.2 ...
🧙♂️ 24.2 after a week of vacation, here we are again with the updates. everything is going well, at the weekend I provide for the transfer and between 2 to send them into bloom
🧙♂️ 25.2
___________________________________________________________
😮 What ???? New to Regular Seeds?
Take a look at their site, you won't regret it !!
http://bit.ly/REGULARSEEDS
________________________________________________________________
📜 A look at the details of what I'm growing 📜
🧙♂️🍁Bubba Haze 🍁🧙♂️
⚧ Gender
▪️ Regular
➰ Genes
▪️ 75% Indica / 25% Sativa
🎄 Genetics
▪️ Bubba Kush x Jack Herer x Cannalope Haze
🚜Harvest
▪️ 550 g/m²
🌷Flowering
▪️ 8 weeks
✨THC
▪️ Very High
✅CBD
▪️ 1.0%
🏡Room Type
▪️ Indoor
🌄Room Type
▪️ Outdoor
🕋Room Type
▪️ Greenhouse
__________________________________________________________________________
📷🥇 Follow the best photos on Instagram 🥇📷
https://www.instagram.com/dreamit420/
🔻🔻Leave a comment with your opinions if you pass by here🔻🔻
🤟🤗💚Thanks and Enjoy growth 💚🤗🤟
Likes
18
Share
@Diips
Follow
d.57 - looks alright, had to do some lst and adjustments to level out the height
gave an additional biotab.
move my big fan, below the plant, in an effort to push the moisture upwards and out, which resulted in me being able to raise the lights further up.. my plant is way over the average height of is genetics, thanks to biotabs 🌞.
fastbuds said it would have an average height of 70-100 cm, and ny plant is closing in on the 80 cm and she keeps going ^^. and people say that autoflowers cant be main lined, well i believe this grow proves it.
achieved darker folliage in the bottom, so i believe that we are on the right track. hopefully the deficiency levels out.
day 62/63 gave an additional biotab so we are at 6 total. day 63 i gave 10 ml bio pk with the watering.
Likes
13
Share
@Alpha_Green
Follow
Some of you may have wondered:
Why do I use CO2 at average 950 ppfd μmol/m2/s (moral flow)?
The answer is quite simple. Because of lack of space in some regions of my cultivation area, I simply cannot keep the ideal distance to my Sanlight high-performance lamp, due to some height growth of various strains. And so some of the main colas have ppfd values of 1250 μmol/m2/s and even more...
So this is how I manage to achieve and compensate for such high radiation levels even with a CO 2 balance. And I have to say, my strategy to avoid various light stress symptoms works just fabulously. In combination with CO 2 implementation, my babies are simply unbeatably insensitive to light. Thats it!
Beginning of 3rd week flowering:
Again feeding my babies by 36 hours fermented potions of Bio Tabs Kompost Tea PK-Booster (15 g pro Liter) and added:
5ml Orgatrex/Liter
1 Spoon of Bactrex
1 Spoon of Mycotrex
1 Spoon of Mycco-Vital
1 Spoon of Dynomyco
A little tip for those who are interested in small modifications that have a big difference or influence - on the result - effect - beauty - health - taste! Before adding microorganisms or beneficial bacteria or Mycorrizae and Trichodermas, please use oxygen-saturated water. On the one hand, unwanted chlorine gases evaporate and the small world of the microbiome becomes even faster and more rewarding in compost tea to sprout.
Last but not least for this week, I would like to introduce my reasons, why I prefer growing biologically and sustainably.
First of all, it’s something which suits very well in these times/days we are living now. Sustainability is a big need and task for our planet. 🌎 Nature means life. Our home, the air we breathe and everything that surrounds us. Not just today. Hopefully tomorrow as well.
Maybe I'm starting to protect our environment on a small scale, but maybe I can also make a big difference at all.
If you change the way you look at things, the things you look at change...
I thought about what’s the difference, between Mineral Feeding and Super Soil Feeding.
It’s very easy. Biologically Growing is a similar process than the natural soil activities out there in the lap of nature’s. So plants has to work and interact with the microorganisms and microbiomic communities in the soil. So the plants will never get lazy like the lazy ones of mineral feeding growers.
If you grow biologically, you will feed the soil first and the microorganisms will support every parameter next to your plant conditions. And that will generate an unbelievable spectrum of Terpenes and Trichomes you will never forget.
It’s the same comparison, when you daily visit McDonalds and you eat only fast food. How does your body and mind react on this shit for money?!?!
May I invite you to think about it…
See you next week dear Growmies! Have a nice Weekend and take care…
Peace out!
Addendum for Day 53:
At the moment we unfortunately have another winter onset here in Germany. This means that I am forced to take additional heating measures due to structural facts in order to be able to keep the temperatures constant. After all, just tonight the thermometer climbs again to -1 degree Celsius.
In addition, my exhaust air system runs out of my bedroom terrace and I therefore grow winter and summer with the patio door open. Well, sometimes I experience real weather-related challenges. But all in all, no problem...
"Where there's a will, there's a way."
Addendum to pouring out the fermented PK tea: I always administer half a liter of lukewarm aerated water with 3.5 ml of cannazyme per liter to each plant. This means that the "root machine" is not supplied with supplies unprepared and the nutrient solution can thus also be better distributed in the soil. Since I also work with cloth shoes, I spray them evenly moistened everywhere with water that is also warm before pouring them out from the outside. This has the advantage that the moisture stays where it should: in the pot!
... I did the math today ;-) We are still in week 7 until this Friday. And week 8 starts on Friday! OMG... still so much time yeahh!
Today my Fast Buds Sour Jealousy and Sweet Seeds Big Devil and Dark Devil Automatics arrived. I'm looking forward to it.
This time Fast Buds next Time Sweet Seeds. Love them too. Very beautiful genetics.
Today a review video of the beginning of week 3.
At the time of the pictures, I had minor signs of nitrogen excess. (Light peaks first at the crown of the roof and then slightly continuing to the middle section.) I then painstakingly racked my brains as to why this could be. I found that very slight dry spots had formed and therefore the root found small accumulations of nitrogen that caused its problems. But then, when I carefully homogeneously checked the moisture content in the substrate, the problem evaporated again. However, they had not shown any loss of growth rate during this time. Nevertheless, they developed as expected.
They Strawnanas had no problem with that.
In the end, I always have a hard time killing them. But I guess that's the way things go.
We live and die.
We come and go.
But it's not there yet. ;-)
Tomorrow is day 56.
Tomorrow’s updating day!
Can't wait to see their progress.
Have a good time and see you tomorrow… 🏽🕊️
🏽 ☮️🕊️

Likes
8
Share
@Bryankush
Follow
Giorno 1 bene le ragazze si sono riprese bene dal trapianto e stanno sviluppando bene le radici e iniziano a bere più acqua.
Giorno 2 LST e verrà già pulita con una leggera defogliazione e più che altro lollipopping( solamente 1 nodo in meno per ogni ramo e 2 nei più sviluppati) perché è già più grande della compagna e ha i rami troppo cespugliosi che rovinano il flusso di aria e il loro corretto sviluppo.
Giorno 3 annaffiata con 1L di acqua
Giorno 7 defogliazione e lollipopping


Likes
91
Share
@CANNASIM
Follow
Expecting a awesome top shelf smoke from this girl, smell is mid way, a lot less than other strains, so it make a good option to stealth, but not the best. Superb strain, will update on the effects after dry and fully cured, high is supposed to be mild and functional, this is my first medical strain with high CBD, super curious.
---WET WEIGHT---
421G
---DRY WEIGHT---
95G just flowers000
---UPDATE 2 . After harvest---
-A -Jaring
After drying till the stems almost snap, in a rack, I separed the flowers, weighted and jared for cure.
-B-Vape report.
Vaped with a Davinci IQ, about .5 from the uncurred buds, from 350f to 430f max temp.
Since the begging of the session you feel this is a special strain, taste is 5/5 vapor production is insane 5/5, and the effect as discribed by RQS, a stress killer that allows you to funcione normally, think it as a mild relaxant, is what i was looking for so super satisfyed!
As you increase the vaping temps you feel the effects stronger, basically is a good body sensation and head tranquility, no paranoia, no confusion, no psychoactive stone. The side effects i feel is the classic dry mouth, not too strong though.
-C-Joint smoke.
Nice and smooth it hits with a mild sensation, very relaxing, no couch lock, mental trip or anything, i’m certain is similar to canna-tonic some how, very enjoyable, sweet taste tones of citrus earthy and woody.
-D-Bong hit.
Not a fan of bongs, i feel vaping gives a better overall experience, though for the sake of the diary, i did a bong hit to check, filled a full bowl and hitted mutiple times, the smoke is smooth, no harshness, though is a bit more intense than smoking a joint.
---UPDATE 3 . Final—
Well guys, this concludes my diary, with this final update.
After two weeks cure, i feel is already cured for the most part, one more week and all the cruise part will be done, after that it continues but slowly. It was fun to grow, and top shelf smoke. Note that is not a recreative smoke, is functional and enjoyable, i feel that if you have a super strong strain you can dilute in to this one and have a more controlled high. Smoking, vaping in multiple temperatures and i could still function, work, speak on the phone and think clear.
Looking for a Stress Killer, high in CBD, that will melt your stress and concerns so you can go on with your duties and enjoy a nice smoke, give this strain a go, and let me know so i can follow your diary and know your opinion.
Cheers everyone and thanks for those who contributed to the diary in any manner, or passed by. Happy growing always. 00