
Likes
Comments
Share


@420DeepGrow
Follow
Gracias al equipo de Anesia Seeds, Marshydro y XpertNutrients sin ellos esto no seria posible.
💐🍁 Captain Future:
Nuestros criadores en Anesia Seeds están siempre en busca de nuevas dimensiones en la genética del cannabis y están comprometidos a ayudar a dar forma al futuro de la cría de cannabis. Después de que nuestra Future # 1 fuera probada varias veces por encima del 37% de THC y se convirtiera en un éxito entre los dispensarios, teníamos claro que el viaje no podía terminar aquí. Después de numerosos intentos, encontramos el socio ideal para mantener o aumentar la potencia y llevar la experiencia de sabor al extremo.
Esta variedad Premium puede cultivarse tanto en interior como en exterior. En el interior, las plantas tienen un tiempo de floración de 10 a 11 semanas y deliever rendimientos de 500-600g por metro cuadrado, al aire libre una planta puede producir hasta 800g
🚀 Consigue aqui tus semillas:
https://anesiaseeds.com/es/product/captain-future/
💡FC6500: Eficiencia líder en el mercado: la lámpara de cultivo LED FC-E6500, que ostenta un estatus líder en el mercado, es una solución rentable con un PPE de 2,8 µmol/J y un rendimiento máximo de 2,5 g/vatio. Ofrece un PPF alto de 2026 umol/S y es adecuada para una cobertura de vegetación de 1,50 m x 1,50 m y una cobertura de flores de 1,20 m x 1,20 m.
Iluminación versátil y uniforme.
https://marshydro.eu/products/mars-hydro-fc-e-6500-730w-commercial-led-grow-light/?gad_source=1&gclid=Cj0KCQjw1qO0BhDwARIsANfnkv9IIrYSbmJqz8PqpJOIyWwJfp5bc3SGJgUV68USLQ4tjmXDYwoBuAsaAue3EALw_wcB
🚥 MarsHydro ADLITE UV/IR/RED:
Para lograr un crecimiento óptimo de las plantas y maximizar los rendimientos es un arte simple que depende en gran medida de las condiciones ambientales adecuadas. Reconociendo las limitaciones de la iluminación natural y las soluciones de iluminación tradicionales para satisfacer estas necesidades únicas, lanzamos ADLITE. Estas luces especiales UV, IR y roja están diseñadas para llenar áreas del espectro, proporcionando las altas longitudes de onda que las plantas necesitan para un crecimiento y desarrollo óptimos.
🚀 Consigue aqui tu Adlite:
https://marshydro.eu/collections/adlite-supplemental-lights/
🏠 : Marshydro 1.50 x 1.50 x 1.80, carpa 100% estanca con ventanas laterales para llegar a todos los lugares durante el grow
https://marshydro.eu/products/diy-150x150x200cm-grow-tent-kit
🌬️💨 Marshydro 6inch + filtro carbon para evitar olores indeseables.
https://marshydro.eu/products/ifresh-smart-6inch-filter-kits/
🍣🍦🌴 Xpert Nutrients es una empresa especializada en la producción y comercialización de fertilizantes líquidos y tierras, que garantizan excelentes cosechas y un crecimiento activo para sus plantas durante todas las fases de cultivo.
Consigue aqui tus Nutrientes:
https://xpertnutrients.com/es/shop/
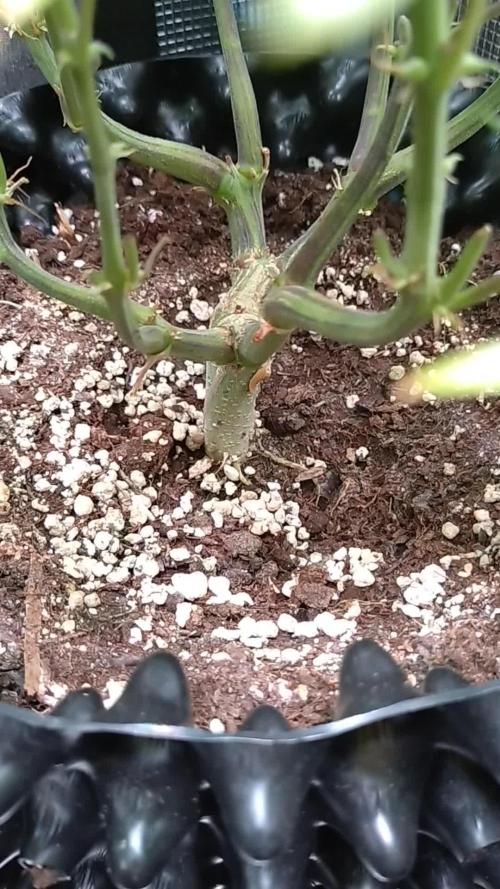
📆 Semana 12:
Última semana de engorde de este precioso micrófono antes de lavar raices, el aroma es increíble y la cantidad de resina se acumula por momentos.

Likes
30
Share


@Green_Dream
Follow
It's exciting to start a new journey! I started by trying to germinate 2xF.Bs. Unfortunately only one made it, so I started one more and this third one made it at well 👌
This time I washed and buffered the coco with CalMag and mixed it with a good amount of Perlite for better drainage and aeration.
This time around I’m challenging myself to get up to 200 likes, quite a high aim I know, let’s see if me and Fat Banana can make it.
If you have something in mind you would 👉 Like 👈 to see or learn, be so kind and let me know ;)
Big Plant Science
Power House Part A 200ppm/ml/l
Calcium Plus Part B 150ppm/ml/l
Stimulus 30ppm/ml/l
Aroma Boost 80ppm/ml/l

Likes
4
Share

@PhinolaGreen
Follow
9. Woche
Sie sieht wirklich gut aus, hatte während dem Switch auf Bloom harte Mg Probleme, wie bei allen anderen auch und habe sie aber gut stabilisieren können. Tatsächlich wird sie nur gefeeded hihi und das zeigt sie auch, bin sehr zufrieden 😀 😉

Likes
21
Share


@w33dhawk
Follow
Moin moin liebe growmies!
Diese Woche war anstrengend (nicht mit den Ladys) im allgemeinen ich hab für den Sommer ein paar zu viele Pflanzen angesetzt (Tomaten,paprikas und Zitronen) jetzt bin ich nur noch am pflegen und das ganze im Blick haben, das ich kaum noch Zeit für andere Dinge habe 😰 aber naja das Leben ist kein Kinder Spielplatz.....
So zur Woche am 07.05 und 08.05 stand nicht viel an nur zu gucken (ach ja die garten Lady ist in den garten gezogen, und bekommt einen Extra Bericht da sie länger laufen wird als die Ladys hier).
09.05.22 heute war lst angesagt um die Pflanzen in Form zu halten.
10.05.22 heute stand Gießen an es gab für alle 4 Ladys 2L Wasser mit nährlösung zusätzlich zu den microben von Bio bizz habe ich jetzt auch great white hinzu gefügt( 1tsp/8L wasser)
11.05 bis 13.05.22 beobachten und hier und da ein wenig lst um die Form zu behalten.
Das war es wieder für die Woche cu growmies und viel Erfolg bei euren Damen.

Likes
21
Share


@DogterB
Follow
Week 9
Day 57 (9/11)
Things are going well, or so it seems. She looks like she is starting to bulk up at her bud sites. Her pistils are everywhere and I'm hoping to see the buds forming soon. Being a first timer, I have no idea what I'm looking for, but it's still exciting! Temps and humidity have been holding fairly steady. I think I'm to to point of bumping the humidity back some, keeping it below the 60% range. I have a couple VPD charts I'm trying to go by and they give me a range I am trying to keep the temp/humidity in. I fed her last night and she seems happy. Haven't noticed any of the discoloring or anything continuing, so that's good. I added some Alaska Fish Fertilizer to the mix just because I got it for free and wanted to give her a little nitrogen boost because her youngest leaves are kind of pale. I've heard that it's hard to overdo it with it, so figured it was safe enough. It has an NPK of 5-1-1, so I thought the P & K boost might be good too.
Day 58 (9/12)
Humidity keeps getting a little high, so I busted out a dehumidifier. There is some yellowing on some newer leave serrations, but idk if it is new or I'm just thinking it's new.
Day 59 (9/13)
Yesterday got a little rough for her! I kicked on the dehumidifier I have before I left for the day, and good thing the wifey was home to check in! Apparently that dehumidifier pumps out some heat! Within a few hours, the tent temp was almost 93F and humidity was nearly below 40%. She was quick to turn it off, crank the exhaust fan, and get the window opened to cool it off. When I turn it on in the future, I'll have to be sure to keep an eye on the room temp. I feel like she is a long way off from being ready, really doubt she will be anywhere near the 70-77 day grow time. That's fine with me, as long as she's happy and filling out, she'll get there eventually. Most other journals I've seen, they don't chop until week 12 or so. I also felt up one of the forming buds a bit, and the smell she left on my fingers is maddeningly delicious, about knocked my socks off.
Day 60 (9/14)
Pulled her out last night and tried tucking in a bunch of leaves to get more light to some of the lower bud sites. It's wild how many she has. She probably could have used some defoliation, but being an auto (and my first time growing) I held off. Maybe in future grows I'll give it a shot. Doing a better job at LST would probably have helped as well. She's still trucking, starting to see some start of frostiness.
Day 61 (9/15)
She seems fairly light in the pot, I'll probably try to feed her tonight or tomorrow morning, it just depends on when I get outta school today. I have surgery today, so I'll be here until late so will more than likely just get it mixed up tonight for in the morning.
Day 62 (9/16)
I mixed her up some feed last night. She's been having some yellowing on her tips and serrations, likely from phosphorus deficiency. Hoping what I mixed up is plenty to stave that off. I mixed it last night and gave it to her this morning after lights on. Her smell has really kicked in, I'm glad I got a filter and exhaust fan or the house would smell amazingly illegal. I was running late this morning and didn't even remember to get a pic of her this morning. I'll try to get one tonight before she goes to bed.
Day 63 (9/17)
Some of her lower leaves are starting to yellow between veins, showing magnesium deficiency. I almost put some cal-mag in yesterday with her feeding, now I wish I did. I'll wait it out and get her some next time she gets watered, or sooner if she's gotten worse since last night. I feel like she is just gobbling through her food, but honestly idk. I may be just keeping her right at the edge of deficiencies.

Likes
37
Share

@GERGrowDesigns
Follow
Dear Growers ,
Welcome to Flower Week 8-9 Day 56-63 from Flowering , we’re excited to share a very special project with you:
NARCOS SEEDS Kingping Kush .
With dedication, knowledge, and hands-on practice, we’ll guide you step by step through the journey—watch with us as growth, development, and small wonders unfold before your eyes.
Whether you're a beginner or an expert, you are warmly invited to join, ask questions, and share your own experiences along the way!
Project Setup & Conditions:
• Brand/Manufacturer: Narcos Seeds
• Tent: 222cmx150cmx150cm
• Light: 2x 720 Watt Full Spectrum
• Humidity: 40%
• Soil: Narcos Organix Mix
• Nutrients: Narcos Products
• pH Value: 5.6
A Special Thanks To
Narcos Seeds
for the amazing collaboration, trust, and generous support in making this project possible. Your contribution is truly appreciated!
Congratulations on Your Own Projects!
We celebrate your growth, your creativity, and the passion you bring to the table. It’s truly inspiring to witness at Each visit .
Stay curious and keep up Growing —we look forward to welcoming you back for the next chapter soon!
Likes
102
Share


@Aleks555
Follow
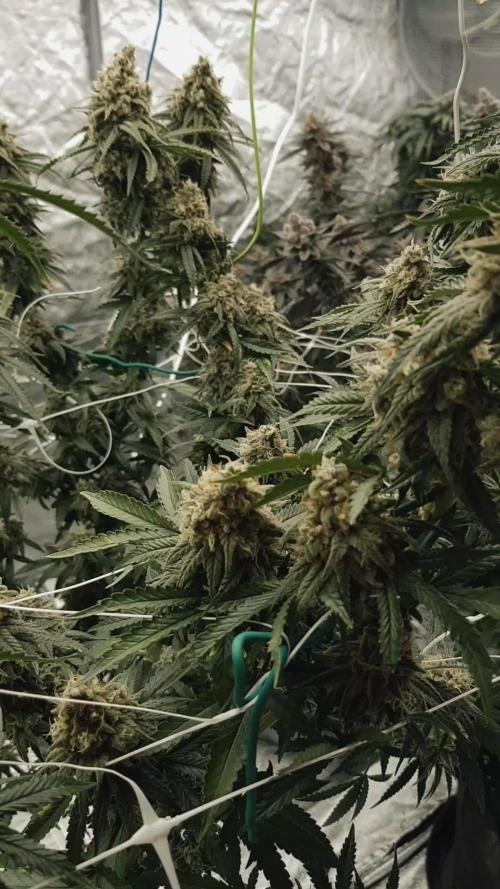
Riding the Green Wave with Jealousy from Zamnesia! 🌿🌈
Hey fellow growers! Just wanted to share the exciting journey of my Jealousy strain from Zamnesia. It's been a thrilling 12 weeks from seed to this point, and the plant is truly living up to its name.
Growth Milestones:
At 140 cm tall, she's a stunner! Week 6 of flowering, and every inch is a testament to the care and attention she's been given. The lush canopy is bursting with life, and the trichomes covering the colas make it look like a winter wonderland.
Nutrients for the Win:
Feeding her with love, care, and the amazing nutrients from Plagron. The results speak for themselves – vibrant green leaves, robust branches, and the buds are forming beautifully.
Adventures in Trichome Wonderland:
The magic is happening in the trichome department! Each bud is adorned with these tiny crystals, and I can't wait for the harvest day to see them glisten under the lights.
A Shoutout to Zamnesia and Plagron:
Jealousy is a Zamnesia beauty, and Plagron nutrients are like the secret sauce that makes her thrive. Massive shoutout to both for making my growing experience nothing short of amazing.
She's Loving It:
Most importantly, she's happy, and that's what matters the most. The Jealousy strain is not just a plant; it's a companion on this green adventure.
Stay tuned for harvest updates! 🌿✂️
#Zamnesia #Plagron #Jealousy


Likes
45
Share


@yan420
Follow
FERMAKOR BARREL MIX – BASE IN USE
(Testing on the Fantasy Feast girl we pulled out of another diary
https://growdiaries.com/diaries/274722-grow-journal-by-yan402 )
(FERMAKOR BASE SYSTEM KOH VERSION diary
https://growdiaries.com/diaries/278391-grow-journal-by-yan402)
(Urea & Micros on the way — first week running without them)
🍶💧🍶💧🍶💧🍶💧🍶
💧 30 L Barrel – Current Working Mix
🍶💧🍶💧🍶💧🍶💧🍶
Step 1 – Calcium Nitrate (Part A)
7 L warm water (~35–40 °C) → added 45 g Calcinit, stirred until fully clear.
That’s the calcium + nitrogen backbone for the feed.
Step 2 – FERMAKOR PK Base (Part B)
15 L water in the main barrel → added 30 ml FERMAKOR PK Concentrate, mixed well.
This forms the main P + K part of the formula.
Step 3 – Combine Solutions
Slowly poured the Calcinit mix into the barrel while stirring — no reaction, still crystal clear.
That confirms the mix is stable and precipitation-free.
🌿 Step 4 – FPJ / FFJ Batch
Added 30 ml homemade FPJ (fish + veg batch) ≈ 1 ml/L.
Color shifted to a light-amber tone — looks alive and active.
🍋 Step 5 – Citric Acid Balance
Added 1 tsp citric acid after everything was blended to fine-tune pH and help chelate micros later on.
📦 Step 6 – Top Up & Check
Filled to the 30 L mark with plain water → pH tested with drops, showing yellow-green — roughly 5.8 – 6.0 range.
Nice clean look, stable smell, no residue.
💧 Current Base Ingredients (Active Mix)
Warm Water ≈ 22 L total
Calcinit 45 g → N + Ca foundation
FERMAKOR PK Base 30 ml → P + K support
Citric Acid 1 tsp → Chelation + pH balance
FPJ / Fish Emulsion 30 ml → Organic enzyme booster
Result: clean amber mix, mild and balanced.
I’ll let this version run for a week before adding anything.
👀👀👀👀👀👀
Observations and changes
👀👀👀👀👀👀
27.10.25 VW27 noticed some min burnt tips so I decreased Calcium Nitrate 45 to → 40g, decided to add two more elements micros and Epsom salts just to make sure they got everything, Fetrilon Combi 1 (Micros): 0.5 g, Epsom salts: 8 g
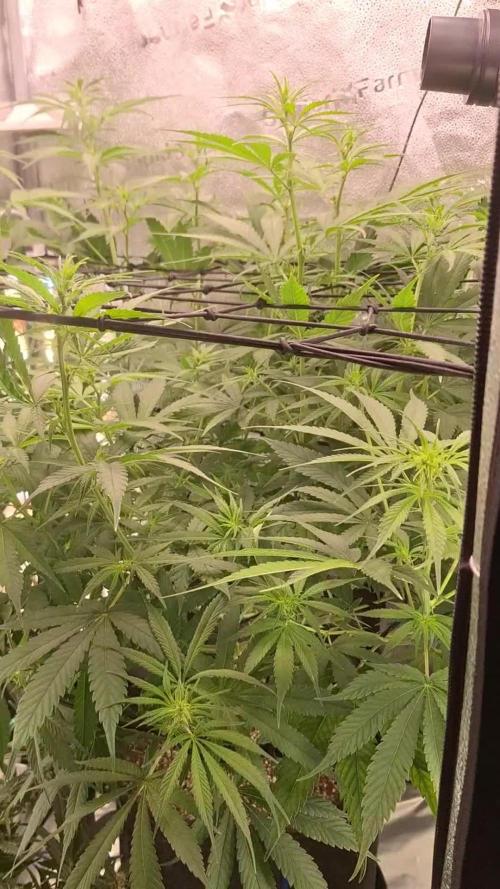
28.10.25 VW27 she seems devoid of any deficiencies, seems ready for the flip to 12/12
02.11.25 VW27 girl is looking good so I decided to stop making daily videos and do a standard once a week update.
09.11.25 aVW28 7 days since flip,stretch in full swing, first pistils showing, leaf color deep and healthy. Slight tip burn early week → gone after pH stabilized.
Feed stayed clear, no residue, roots clean and sweet-smelling, did what I hope is a last cleanup and pruning🎥
10.11.25 VW29 added Phosphoric acid pH down to the schedule for flowering stage.
14.11.25 FW1 FERMAKOR PK Micros 40 → 50 ml
23.11.25 FW2 got some burnt tips, observe and act accordingly in case it worsens, diluted by 25% for this week.
🌱💦🌱💦🌱💦🌱💦🌱💦🌱
🌿Day to day tasks & actions 🌿
🌱💦🌱💦🌱💦🌱💦🌱💦🌱
23.11.25 FW1 – Fed 3l of #1 → 1l runoff
24.11.25 FW2 – Fed 5l of #1 → 2l runoff
25.11.25 FW2 – Fed 5l of #1 → 2l runoff
26.11.25 FW2 – Fed 5l of #1 → 2l runoff
27.11.25 FW2 – Fed 5l of #1 → 2l runoff
28.11.25 FW2 – Fed 5l of #1 → 2l runoff
29.11.25 FW2 – Fed 5l of #1 → 2l runoff
30.11.25 FW2 – Fed 5l of #1 → 2l runoff
🍶💧🍶💧🍶💧🍶💧🍶
💧 Nutrients in 30 L #1 Veg — FERMAKOR
🍶💧🍶💧🍶💧🍶💧🍶
💧 Calcium Nitrate (Calcinit / Nitcal):
45 g → 40 g → 35 g
= 1.33 g/L → 207 ppm N + 253 ppm Ca
= 1.17 g/L → 183 ppm N + 224 ppm Ca (current)
💧 PK Concentrate (FERMAKOR Base):
30 ml → 40 ml → 50 ml
= 1.00 → 1.33 → 1.66 ml/L
→ balanced 1:1 P:K + light micros (from extract)
💧 Home-made FFJ/FPJ (Fish + Veg):
30 ml
= 1.00 ml/L
Epsom Salt (MgSO₄·7H₂O):
8 g
= 0.27 g/L → 26 ppm Mg + 35 ppm S
💧 Fetrilon Combi 1 (Micros):
0.5 g
= 0.017 g/L
→ Fe 0.7 ppm • Mn 0.7 ppm • Zn 0.3 ppm • Cu 0.3 ppm • B 0.1 ppm • Mo 0.02 ppm
Phosphoric Acid (pH down) + Citric Acid (chelation):
→ First set pH with phosphoric acid
→ Add a little citric only if extra chelation is needed
💧 Target pH: 5.8 – 6.0 (drop test yellow-green)
📦 TOTAL Inputs:
60 ml → 70 ml → 80 ml / 48.5 g per 30 L
= 2.00 → 2.33 → 2.66 ml/L + 1.62 g/L (current)
YouTube Link: https://youtube.com/-m8h?si=A7x4Zlr2kj-_ga31
Likes
21
Share


@NorthernMonkeyzInc
Follow
Im just lovin this girl so much, the colours are fantastic and range between greys, greens, pinks and purple. Shes super frosty and smells great too

Likes
50
Share


@Rwein93
Follow
Ciao ragazzi e bentoranti per i nuovi aggiornamenti!!!😉
Purtroppo ragazzi questa settimana non è stata delle migliori per i parametri. In Italia il caldo inizia a farsi sentire e nel box si sono raggiunte temperature di 30°C e l umidità è salita al 70% anche bagnando al minimo loro.
Però nel complesso tutto bene, le ragazze al limone crescono imperterrite e la numero 2 adesso misura 35 cm. La numero 1 se non l avessi piegata sarebbe stata almeno 45 cm. Una bomba!💣
Anche la numero 3 sembra che si stia riprendendo bene.👍
Avendo cambiato zona di crescita non avevo calcolato il cambio di ph dell acqua del rubinetto e il fatto che non usi prodotti con un regolatore di ph incorporato mi ha tratto in inganno.🤦♂️
Ho misurato il Ph dell acqua dopo averla fertilizzata ed era di 7.7 così ho introdotto 0.25 ml di Ph Down e l ho portato a 6.27. Ora dovrebbe assorbire i Super nutrienti che gli stando alla grandissima!!!💪
Eh niente ragazzi! Speriamo che le temperature si abbassino di un paio di gradi anche per noi perché si muore e sembra solo l inizio.
Grazie a tutti per aver guardato e restate collegati per nuovi aggiornamenti.🙏
Buona settima e felice crescita🌱🌱🌱
P.S.
Il video riprende 3 talee varie all inizio, le Lemon Tree, le MimOrange e 1 altra talea


Likes
31
Share


@Pedrojuan
Follow
Bueno, en el inicio de la fase de floración, hemos cambiado la solución nutritiva con ml x ltr , metí la red scrog y he notado que esta cepa se estresa con facilidad, tras el cambio de agua y nutrientes y la red quedaron full stress, poverine... Empiezan el fotoperiodo con mucho olor a vegetal y esto me hace temer que tendrán mucho olor los futuros cogollos... esperemos tener suerte también en este cultivo. Estoy muy contento, no pensé que gracias a ZOE SPACECAKE me iba a apasionar tanto cultivar el cannabis.

Likes
26
Share


@Stash074
Follow
Best week of the entire grow..Harvest day‼️ i definitely underestimated my workload. Did some minor wet trimming..most of my workload will come during dry trimming...I can confidently say that I will definitely be pulling much more than my 1st grow. Im hoping for at least a pound. Will keep yall updated in my last upload for this grow with the final weight..Happy growing 😎🍃


Likes
14
Share


@Quintall
Follow
Heute mit LST angefangen ist mein erstes mal gerne Tipps geben .
Ausserdem gabs am Tag 14 BioGrow von Green house feeding
6g BioGrow pro Pflanze
Ich schau mal wie es die Tage weiter geht.
LST ab Tag 15
Day 18 Entlaubung
Day 19 600 ml per plant
Likes
6
Share


@Krissci
Follow
Kosher seems to be ahead of the other strains.
Will begin flushing today and final defoliation and LST
Likes
Comments
Share

@Wenz004
Follow
Jetzt ist mir klar warum Sativa so lange brauchen - nach 2 Wochen und 2 Tagen Stretch kaum noch richtige Blüten sichtbar - heute 4.1 Liter Getränk eher inhaliert als getrunken. Weiter gehts.

Likes
7
Share


@CanadianFillmore
Follow
Thanks for stopping by growfessors, week 4 begins. Not much to report other than I'm happy with the bud development.

Processing
Likes
5
Share


@PETEROG
Follow
Hey guys everything is going great with these ladies all 6 germinated and popped up in 3 days after planting 1 of the six shooters is a lot smaller than its sisters so I've order LEMON PIE from FASTBUDS should be here tomorrow to take its place and I'm going to move the six shooter outside so if you would like to see its journey comment and like bellow ⤵️
The only thing I wish I did differently would of been starting these girls under a cfl or a cheap led to stop stretching but lesson learned if anyone has any question's please comment and thank-you all for your support ✌️
Likes
36
Share


@MrJoint
Follow
✌️🎃 Thank you for checking my cultivation.
🍇 I think that I found the purple.
😬 I can’t wait the time for my first harvest of life. I’m pretty happy with my achievements.