Recommended
Likes
Comments
Share
@AustinRon
Follow
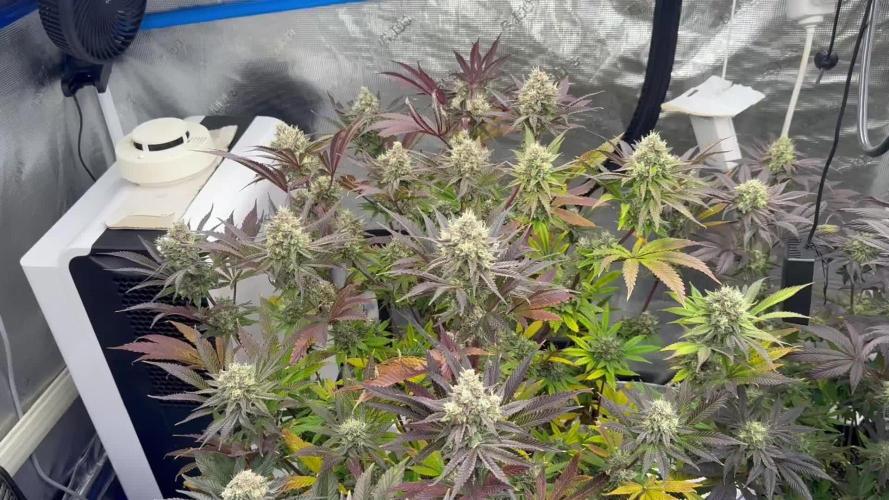
OG 4Q24 Flower Week 10 Orangegasm (Fem) [ IRIE Genetics ] 12/12 @ Bolt (Day 21) Germination: 20 November 2024 #3A Earliest Harvest Date: 9 February 2025 #3B Latest Harvest Date: 19 February 2025 _________________________________________ Start of Week: [Wed Feb 12, 2024 CR2 4Q24 64:F:9:1] End of Week: [Tue Feb 18, 2024 CR2 4Q24 70:F:9:7] OrangeGasm Fertigation: - MAX: EC: [ 1.6, mS] - LightIntensity MAX: [ 850, µMol/m2/s] ______________________________________ __ Wed Feb 12, 2025 OG 4Q24 64:F:9:1 Refresh Reservoir - Amount: [ 5, gal] - EC: [ 1.6, mS] - Primer A&B: [ 48, ml] - SLF-100: [ 15, ml] Reclaim Dehu - Amount: [ 4, gal] EC: 1.6 Runoff - Amount: [ 1.25, gal ] - EC: [4.3 , mS/cm2] - EC∆: [ 1.6 , mS/cm2] # Danger!!! (I don’t think so - Happy Plants) __ Thu Feb 13, 2025 OG 4Q24 65:F:9:2 Runoff - Amount: [ 2, gal ] - EC: [ 4.6, mS/cm2] EC: 1.5 Refresh Reservoir - Amount: [ 2, gal] - EC: [ 1.5, mS] - Primer A&B: [ 32, ml] - SLF-100: [ 10, ml] Reclaim Dehu - Amount: [ 2, gal] If we see the pistils of the last two plants shrink/collapse in the next 3 days, we may be ready Tuesday/Wednesday . . . I also note we’re about 2 days after from OPTIMAL BUD Structure, Foxtailing is becoming less well formed at largest top and some of the sooner ready buds … __ Fri Feb 14, 2025 OG 4Q24 66:F:9:3 EC: 1.4 1.5 gal dehu 3 gals+ refresh Reduced Fertigation Time 50% as Tank is at refill after 4+ gal yesterday, again. :-{ __ Sat Feb 15, 2025 OG 4Q24 67:F:9:4 Reclaim Dehu - Amount: [ 2.5, gal] Refresh Reservoir - 2 Gal - Primer A&B: [ 17.9, ml] - Resin Bloom: [ 9, ml] EC: 1.3 Runoff - Amount: [ 0.5, gal] - EC: [ 3.0, mS/cm2] - EC∆: [ 1.7, mS/cm2] __ Sun Feb 16, 2025 OG 4Q24 68:F:9:5 Refresh Reservoir - 2 Gal - Primer A&B: [ 16.5, ml] - Resin Bloom: [ 8.3, ml] Runoff - Amount: [ , gal] - EC: [ , mS/cm2] - EC∆: [ , mS/cm2] EC: 1.2 __ Mon Feb 17, 2025 OG 4Q24 69:F:9:6 EC: 1.1 __ Tue Feb 18, 2025 OG 4Q24 70:H:9:7 1000 - Remove Plants from Tent - Remove Drip Tray - Remove Light - found water unseen in bottom tray - the reason for unreasonable humidity - Removed Drip Rings - Dried bottom drip tray - Resealed Tent - Low RH _______________________ Harvest Log Max Min Average Height (in) 40 21.5 29.875 Weight (g) 700 157 385.5 Secondary Stem Count 30 17 21.125 Est Dried Trimmed Wt 140 31.4 616.8
Likes
100
Share
Giorno 56 Zombie Kush #1 è pronta. 20% di tricomi ambrati e quindi si taglia. L'avrei lasciata volentieri un'altra settimana ma ho i barattoli vuoti 😀 Zombie Kush #2 ha ancora tutti i tricomi latte e rimarrà almeno un'altra settimana. Cmq bellissime cime. Tutte di uguale consistenza e colori stupendi Le due Rainbow sono praticamente identiche e tra qualche giorno verranno tagliate visto che hanno già un buon 10% di tricomi ambrat La Milk Monkey ne ha ancora per due settimane e mi sta colpendo particolarmente. Penso sia la pianta più collosa mai coltivata. A settimana prossima e grazie dei like e dei commenti ❤️
Processing
Likes
63
Share
@AsNoriu
Follow
Day 92. In video you can see how brown is Gorilla Max pistils and how sad looking is pale Bunny Gorilla, both girls are drinking fast, so maybe they will finish with decent result, that was two strongest plants, sad ... All other girls are ok, Control garden is huge, side colas , which gets more light caught up tops standing in dark, funny to observe. So many plants bring humidity up, will do defoliation in 4 days on my new days off. Silica and CalMag out. Day 94. Girls are okish, Bunny Gorilla refused to drink pure water, pot was still heavy, i will check in the morning, but she went into some stress or lockdown a bit, but maybe its just my paranoia , morning weighting will show. Defoliation is a must, but i know now, that this time its overcrowded, cant access pots for lifting, max 10 plants and i think for 2 month veging those airpots are too small, i think they have even only like 15 liters of actual soil in them despite 20 liters on price tag, next round i am back to fabric pots , have new 30 liters waiting in dark room for theirs turn. Day 94 Evening. Morning for me, but girls where going to sleep, some pots already ultra light, same mistake in one grow ??? Never !!! ;)))))) All girls got heavy feed, managed to mix up 1000 ppm from 4 components only, huge amounts involved, very hard without BioGrow, think it was too early for sure to take N out. With Bunny was real headache, but at the end she was light as most others... Overthinking not good, better to flow with them. Honestly think such version of grow would be better with single plant or higher electric capacity ... Don't want to move place, so next grow again change of tactics..... ;))))) Toping on 5 nod with mini LST and veg max 5 weeks. Loads of bottom buds are smaller than seed from which they grow. Think to lolitop all that crap. Two days till next watering to make decision ... Day 95. Girls are happier than ever, they needed more food, thats all. Now i think i will do feed/feed/water regime till end of week 8, then heavy flush, its summer at mines and i can do it properly outside. Girls bulk up every day. Thinking to lift Gorillas tonight and all lights as well, Incredible Bulks and Strawberry Cough doing magic in shadow , what will they do with a bit of more light then ??? ;) Day 96. Socialism in my garden ;)))) Cookies are crap, Gorillas are The Joy, all Control Garden makes me wanna sing as well... No more defoliation or lolitoping, they are fattening up and i want to see final weight and nice colours .... Heavy feed at the end of this day or next morning . Happy growing !
Likes
152
Share
Week 8 - Oct 26 to Nov 2nd Smooth week! A bit of a late November heat wave brought my room up to near summer temperatures 😵 Crisped the tips a bit with the heat and upping the nutes. This advanced nutes stuff is very salty for a soil grow and even the small amounts reported above, split between the 4 plants, still end up getting to the fan leaves. Using Molasses and plain water feeds between nute feeds this stuff is still very touchy. The more I type about it, the more I realize it wasn't that smooth 😂 Still the best base/biggest four plants I've had and the Chem-Bomb Autos are way fatter bud wise compared to the Chocolate Mint Og Autos but they were a little ahead in development even though they all germinated in the same week. More in Week 9! Thanks for checking in! Drop a like and/or follow so I can return the favour 🙌 -- IG: @GlazedGrow
Likes
78
Share
This girl is definitely budding- but not in a structure I’m used too. I’ve done a few rounds of defoliation on her, but she’s just very leafy and will definitely be the lowest yielder in the tent.
Likes
36
Share
@UncleErrl
Follow
Topped the plant on Sunday and she is doing awesome by Wednesday. Let me know what you think about the video! I may do more once I’m feeling better and have this go pro a little more figured out. Maybe some timelapse. And excuse the voice in the video, I’m currently sick.
Likes
Comments
Share
@Dabking
Follow
I was told to never judge a strain purely off it's THC percentage. To smell a plant, and what your nose picks out is generally the strain that will jive the best with the endocannabinoid system in your body. This strain exemplifies that. It's only around 17% but the high is amazing. An under-rated strain for sure. Very easy strain to grow. Although the same strain, one looked pretty different and was much frostier despite getting the exact same treatment from seed to chop.
Likes
6
Share
Yellow Zushi is growing very well and uniform, looks like she is training herself to stretch lower branches up. Looking healthy and growing fast. Thinking of topping main branch but not sure yet since I also want to start taking clones soon!
Likes
14
Share
First glimpse it’s perfect. Now I will cure the buds in a jar
Processing
Likes
8
Share
unstoppable :p Day 29: on the video, the 2 on the right side are the Ayahuasca Purps, the other ones are Peyote critical. getting real bushy, need to defoliate soon day 32: they got their first feeding, I only use a minimal amount of blooming nutrients. day 33: plucked some leaves , cuz there was no airflow at all, also installed a new ventilator. day 36: had to pluck some leaves again
Likes
18
Share
@Canna96
Follow
Hey now, hope everyone is haing a great weekend. The Sundae Driver is doing pretty well, she is 2 weeks from getting wet under the Spectrum X which is only cranked up to 30% so she is putting out close to 230 Watts for the 7 seedlings. I will only keep 5 of them and give a couple away as I think even 5 mainlines will be tight in my 5X5 tent. My plan is to transplant them in a couple days, and then top them for the first time at the third node around day 20, and then hopefully top her again around day 27, then again hopefully around day 30, and then flip her to flower by then end of week 6 or 7 at the latest. If i go much past there I think I will run out of room but we will see how it goes. First time ever running a Royal Queen Seeds Strain, but I have smoked this Sundae Driver before and she was one of the tastiest strains I have ever tried, so very excited for this run. I hope everyone has a great weekend, thanks for stopping by, Stay Safe and Blaze On!!! 💪 Website: https://medicgrow.com/ https://growdiaries.com/grower/medicgrowled
Likes
16
Share
hello friends 🍰🍰🍰🍰 frequent watering of flowers. sprays. 💧💦💦 I try to tie a flower for the good LsT. Please leave me here like if you read these words. I wonder if anyone reads it at all.😅 Have nice day friends 💚
Likes
10
Share
@GIJOSE
Follow
Well there's been so much growth in this week compared to last week! I am struggling with the little bit of nitrogen toxicity on one of my plants. I was going to send these plants to flower at the end of next week but I have to go out of town for two weeks. When I get back I will send the girls the flower. I did not want to leave the babysitter with plants that are just starting to flower. Hope everyone is doing well and a safe. Cheers! -G.I.JOSE
Likes
16
Share
@Ensign420
Follow
Introduction - Week 14|07 Summary - Ensign's log, stardate 9437.65, Great week of growing! Wow what a good week! Growth in the main tent has all around been incredible! Submitted my first submission to the Global Grow Cup! Filmed a video of the solo cup container (marked with the ticket/order number) that will be used for the competition. Also had to fill and prove the solo cup holds 2 cups of soil. Now I need to root a clone (for the first time), transplant her into this cup, and submit my 2nd entry before the 30th of this month. As far as my first attempt at cloning, have already begun the rooting process! Managed to take cuttings from 3 out of the 6 phenos in the main tent (the first cutting was also my first time topping). Soaked the cuttings for two days before planting them into Coco Coins. So far everything has gone surprisingly well! The clones are now rooting under the propagation dome with the vents fully closed. Will check for roots soon! At the end of the week, growth was just raging! Was planning on flipping to flower in a week, but decided to begin the first week of flower next week! Thus this is the last week of veg. Plan to flip to 12/12 next Monday! Onwards to next week! [START OF WEEK 14|07] ========================================================== Garlic Budder #1 - WEEK 14|07 - Full Veg Wk5 Garlic Budder #2 - WEEK 14|07 - Full Veg Wk2 Garlic Budder #3 - WEEK 07 - Full Veg Wk5 Garlic Budder #4 - WEEK 06 - Full Veg Wk4 06/03/24 → 06/09/24 This Week's Estimated Goals ---------------------------------------------------------------------------------------------- DLI: ~26 mol/m²/d PPFD: ~400 μmol/m²/s VPD: ~1.0 kPa This Week's Meter Readings & Averages [Lights On: 16:00 - 10:00] ---------------------------------------------------------------------------------------------- DLI: 24.56 mol/m²/d PPFD: 379 μmol/m²/s VPD: 0.91 kPa Soil %: [32.7, 37.6, 37.9, 34.1] ========================================================== Day 01 - Monday - 06/03/24 - Total Days: 098 ----------------------------------- Daily Averages [~23:00] - Temps: 80.7°F [27.1°C] - Humidity: 74.4% - VPD: 0.90 kPa - Soil %: [31, 34, 39, 35] ----------------------------------- - [09:57]: Quick morning check! --- #1 is looking a bit droopy, but almost lights off (at 10:00) so not concerned. --- Nice! Mainly wanted to check on #4 and she is looking great! She’s perked back up and looking good! - [23:08]: Evening check. --- Wow! It’s a jungle in here! --- #1 has gotten too big? Nah!? Keep on growing girl! --- #2 is growing and definitely getting bigger! Growth just looking really weird. --- #3 has continued to get larger and is looking quite uniform in growth! --- #4 is growing and looking perky again! --- Even the original #1 and #2 phenos (in the back) are looking good! --- Wow! #4 is really getting close to the light. - [23:14]: Checked down both fill tubes. --- Both reservoirs were completely dry! - [23:27]: Checked the Ecowitt soil moisture sensor data: --- 30% - [CH01 EB1 - Garlic Budder #1] --- 34% - [CH02 EB2 - Garlic Budder #2] --- 39% - [CH03 GFP - Garlic Budder #3] --- 32% - [CH04 FPT - Garlic Budder #4] - [23:32]: Poured 4 cups of distilled water down EB1’s fill tube. --- Poured 2 cups of distilled water down EB2’s fill tube. - [23:38]: Checked the humidifiers. --- Refilled the 4X4’s humidifier with distilled water. --- Tomorrow, plan to defoliate and start cloning for the first time! --- Going to take multiple cuttings from both #1 and #4 for sure, but still deciding on the rest. --- Getting hyped! Day 02 - Tuesday - 06/04/24 - Total Days: 099 ----------------------------------- Daily Averages [~23:00] - Temps: 81.4°F [27.4°C] - Humidity: 74.3% - VPD: 0.93 kPa - Soil %: [29, 35, 38, 32] ----------------------------------- - [11:59]: Time to film the first entry for the Global Grow Cup! --- Going to be using BuildASoil 3.0 potting soil. --- Filming the video using a stand and my phone. --- This video is mainly to establish the container that the plant will be grown in. Also to prove that the container is a 16oz container and that it can hold 2 cups of soil. --- The ticket (order) number also had to be written on the cup. - [12:36]: Done! --- The video had to be done in one continuous shot with no edits (my original submission does not have the logo). --- There was also a photo that needed to be shot which shows the cup filled with 2 cups of soil (just like the video, the original image submission did not have the logo). --- I think I did everything correctly, but also sent an email for verification of submission and validation. --- Getting hyped! --- [*smokes a bowl] --- Going to defoliate today along with for the first-time, going to take cuttings for clones! --- After a bit of online research, decided to split the cloning process into two days. --- Today going to take cuttings and will soak them in a solution of aloe for 24hrs. Afterwards will change the water out and use straight distilled water. --- Then in a couple days, plan to transplant into coco plugs (Coco Coins) for rooting. --- For optimal results, also be using a rooting hormone (Clonex). --- Well.. Here goes nothing! - [17:01]: Evening check. --- Wow! #1 is looking huge! Her main top is stretching above the lower canopy which is continuing to bush out. --- #2 is growing along. Growth is gnarly and a bit droopy, but she’s getting taller! --- #3 is looking great! Still a bit small, but she is continuing to get larger. --- #4 looks like she needs a watering. --- Both plants in the back are also looking surprisingly great as well! - [17:05]: Checked down both fill tubes. --- Both reservoirs were completely dry! --- As far as today's defoliation, going to leave #2 and #3 alone and will focus my defoliation and cloning on the rest of the plants. --- This will be my first attempt at cloning, also going to try topping for the first time today. --- No pressure Ensign. What can possibly go wrong right? - [17:27]: Time to start the cloning and defoliation process! --- Filled a measuring cup with 3 cups of distilled water. ------ Added 3/4tsp of Horticultural Aloe ------ Added 1 more cup of distilled water --- Mixed the solution and poured an even amount into three separate solo cups. --- Made sure to mark two of the cups (#1 and #4). The unmarked one will be for any other clones from amongst the 6 phenos (if any at all). - [17:43]: Time to top and defoliate #1! --- Using a pair of brand new trimmers (AC Infinity), --- Gently cut the main stalk to even out the canopy. --- Then trimmed and cleaned most of the nodes leaving the top node or two. --- Also trimmed the leaf fingers a bit before placing the top cutting into the cup of aloe solution. --- Now for the rest of the cuttings! --- [~45 minutes later] - [18:32]: Managed to finish defoliating and cutting the rest of the clones. --- Took two more lower cuttings from #1 (3 clones total). --- Took 3 lower cuttings from #4 --- While defoliating, decided to try and clone the original #2 pheno as well. Took 4 small cuttings. --- Similar to the top cutting, trimmed and cleaned each lower node for each cutting before placing them into the cups. --- Before finishing up the 2nd cutting, I noticed the first cutting (the top cut that was also trimmed) was drooping. --- So I did not trim and the leaf fingers for the other cuttings. --- In total there were 10 cuttings taken for potential clones. --- My main focus was to take cuttings and to clean up all the lower growth from both #1 and #4. --- Defoliated and cleaned up the back original phenos as well (also trimmed back the cover crop). - [18:35]: Temporarily placed the cuttings onto the floor of the 4x4 tent. --- Took the trimmings (about 3 cups) and spread them onto the top mulch of #1 and #2. --- Time to set the environmental controls for the 3x3 veg tent. - [18:43]: Within the AC Infinity App, --- For the Veg Tent [3x3] controller, --- Adjusted the 'Vegetative [18/6]' Schedule for the grow light. ------ Set the Mode to ‘On Mode’ ------ Set the START/END times to 04:00PM/10:00AM ------ Set the MAX to 1 --- The IonBoard S33 is now utilizing around 60.8W (at intensity 1 out of 10). --- Adjusted the 'Vegetative [18/6]' Schedule for the exhaust fan. ------ Increased the Humidity’s HIGH trigger value from 81% to 87% --- Adjusted the 'Vegetative [18/6]' Schedule for the humidifier. ------ Decreased the VPD target value from 1.5kPa to 0.8kPa - [18:52]: Moved the cuttings into the 3x3 veg tent. --- It begins! I think. --- Going to let these cutting drink some aloe for a day before switching to straight distilled water. --- Hmm. Could be the white floor of the 3x3 veg tent, but have noticed the S33 has a whiter spectrum whereas the FC-6500 seems to be warmer in color. --- Anyways, - [18:58]: Poured 4 cups of distilled water down EB1’s fill tube. --- Poured 2 cups of distilled water down EB2’s fill tube. - [19:06]: Filled a pump sprayer with 5 cups of distilled water. --- Focused mainly on the straw mulch of #4. --- But also misted the straw mulch for the rest of the plants a bit. - [19:12]: Checked the humidifiers. --- Refilled the humidifiers with distilled water. - [19:44]: Going to be using Clonex rooting gel before planting the cuttings into Coco Coins (pre-soaked with microbes and aloe). But before that begins, going to transfer the Clonex gel into a squeeze bottle. --- Gently peeled back the seal on the original Clonex bottle. Just enough make a tiny opening, --- Then slowly and carefully poured the gel into an empty squeeze bottle. --- Also removed the sticker from the original bottle and placed it onto the new one. - [19:54]: Perfect! --- Instead of applying the gel to the cutting, going to be applying the gel to the Coco Coin. --- This squeeze bottle will make applying the gel a lot easier. --- Will take PPFD readings tomorrow. --- Also will change out the aloe solution to distilled water. --- I really hope I didn’t screw things up before they could even begin. --- Don’t die on me ladies! --- Please. Day 03 - Wednesday - 06/05/24 - Total Days: 100 ----------------------------------- Daily Averages [~23:00] - Temps: 81.9°F [27.7°C] - Humidity: 75.5% - VPD: 0.90 kPa - Soil %: [29, 36, 38, 36] ----------------------------------- - [09:40]: Quick morning check! --- #1 is looking a bit droopy, but looking okay. Topping is a high stress technique so going to take some time to recover. Don’t plan on flipping the main 4x4 tent to flower for a good week or so which should be enough time. --- #4 looks great! The defoliation seems to have no effect on growth. Nice! - [09:41]: Also quickly checked on the 3x3 veg tent, --- Nice! The cuttings are looking great! --- No yellowing and they all seemed to have turned up towards the light. --- So far so good! - [22:53]: Evening check. --- #1 is continuing to dominate this grow! She has spread wide and looking incredible! --- #2 is looking gnarly, but getting there. --- #3 is getting larger! But still a runt. By far, her leaves are the darkest of the bunch, but she is still growing! --- #4 looks happy and growing along beautifully! Wow! - [22:55]: Checked down both fill tubes. --- Both reservoirs were completely dry! - [22:59]: Poured 5 cups of distilled water down EB1’s fill tube. --- Poured 2 cups of distilled water down EB2’s fill tube. - [23:05]: Checked on the 3x3 veg tent. --- Ooo yea! The cuttings are still green! Nice! - [23:07]: Took PPFD readings. --- The cuttings were around 121 μmol/m²/s which gives a DLI of 7.84 mol/m²/d --- Nice! These levels are on the lower range for seedlings (~100-300), perfect! I think. - [23:14]: Swapped the aloe water out to straight distilled water. --- Going to let these cuttings soak for one more day before planting. --- Please don’t die girls! - [23:15]: Checked the humidifiers. --- Refilled the humidifiers with distilled water. --- Ooo yea! --- Tomorrow is the big rooting day! Day 04 - Thursday - 06/06/24 - Total Days: 101 ----------------------------------- Daily Averages [~23:00] - Temps: 81.9°F [27.7°C] - Humidity: 75.2% - VPD: 0.91 kPa - Soil %: [32, 38, 38, 34] ----------------------------------- - [16:20]: Evening check. --- #1 is a bit droopy, but growth is looking green and healthy. --- #2 is looking bigger! She’s also looking sort of droopy. --- #3 is growing along nicely! Looking good girl! --- #4 is looking great! A bit droopy but plan to water today. - [16:23]: Checked down both fill tubes. --- EB1's reservoir still has some water. --- EB2's reservoir was completely dry! - [16:23]: Checked the Ecowitt soil moisture sensor data: --- 28% - [CH01 EB1 - Garlic Budder #1] --- 36% - [CH02 EB2 - Garlic Budder #2] --- 37% - [CH03 GFP - Garlic Budder #3] --- 30% - [CH04 FPT - Garlic Budder #4] - [16:30]: Using a pump sprayer, --- Misted the straw mulch of #4 with 6 cups of distilled water. --- Focused mainly on the straw mulch. --- Also misted the straw mulch of #3 (in the grassroots fabric pot) a bit. - [16:43]: Poured 5 cups of distilled water down EB1’s fill tube. --- Poured 3 cups of distilled water down EB2’s fill tube. - [16:52]: Checked the Ecowitt soil moisture sensor data: --- 56% - [CH01 EB1 - Garlic Budder #1] --- 44% - [CH02 EB2 - Garlic Budder #2] --- 40% - [CH03 GFP - Garlic Budder #3] --- 45% - [CH04 FPT - Garlic Budder #4] - [17:01]: Took general PPFD readings. --- #1 was around 379 μmol/m²/s which gives a DLI of 24.56 mol/m²/d --- #2 was around 333 μmol/m²/s which gives a DLI of 21.58 mol/m²/d --- #3 was around 293 μmol/m²/s which gives a DLI of 18.99 mol/m²/d --- #4 was around 378 μmol/m²/s which gives a DLI of 24.49 mol/m²/d - [17:09]: Took the weekly height and light distance measurements. --- #1 was about 21" tall. --- #2 was about 13.5" tall. --- #3 was about 9.5" tall. --- #4 was about 19.25" tall. --- Hmm.. - [17:19]: Adjusted the right oscillating fan a bit. --- Re-angled the CloudRay S6 oscillating fan upwards. Been noticing that the air has been hitting the tops of the plants so easing off a bit (#1 is still getting hit, but she’s huge so not too worried). - [17:23]: Back to the measurements! --- #1 was about 9.5" away from the grow light. --- #2 was about 17" away from the grow light. --- #3 was about 17.5" away from the grow light. --- #4 was about 11.5" away from the grow light. - [17:46]: Checked on the 3x3 veg tent. --- Cuttings are still green! They do look a bit droopy but no signs of yellowing. --- Okay! - [17:55]: Time to begin the rooting process! --- For my first attempt at rooting, going to be using Coco Coins pre-soaked in saponins, microbes and aloe. --- To further help with rooting, going to also be using Clonex rooting gel. --- Filled a measuring cup with 4 cups of distilled water. ------ Added half of 1/64tsp of Quillaja Saponaria Extract [60] ------ Added 1/16tsp of Horticultural Aloe ------ Added 1/8tsp of Mycrobe Complete --- Mixed the solution thoroughly. --- Time for the Coco Coins! --- 10 cuttings means 10 Coco Coins. - [18:09]: Dropped 10 Coco Coins into the measuring cup. --- The coins immediately started to expand. --- A bit too much.. Oops! --- Poured the solution and Coco Coins into a pitcher. --- Added 2 cups of distilled water to the solution (now at 6 cups). --- Great! The coins are pretty much fully expanded, but going to wait a bit longer to fully saturate each coin. --- [~20-30 minutes later] - [18:42]: Great! --- Took the seedling and flood tray from the AC Infinity propagation dome and placed all 10 Coco Coins into the slots. --- Gave each Coco Coin a quick shake to remove excess solution. The coins were not dripping with solution but still pretty saturated. --- Arranged them into 3 groups with the cuttings in mind. --- Also tried to keep the pre-made holes intact. --- Time to inoculate the Coco Coins! - [18:54]: Using a squeeze bottle, --- While keeping the nozzle from making contact with the coco, gently filled each pre-made hole with Clonex rooting gel. Just enough gel to fully cover the hole of each coco coin. - [19:00]: Time to plant the cuttings! --- Gave each cup a misting of distilled water. Focused on wetting the top growth with water. --- Okay! --- To avoid mixing cuttings up. - [19:01]: Starting with the original #2 pheno cup, --- For each cutting, --- Using a pair of clean trimmers, made a final 45° cut about 1/2" from a bottom node. --- Then stripped away and scared the protective membrane below the node before planting. --- Made sure the node was about 1/2" below the surface of the coco. --- To help with planting, while inserting each cutting, gave the Coco Coin a gentle squeeze to loosen the coco. This also helped to ensure the coco and gel was in good contact with the cutting. --- Once the cutting was planted into the Coco Coin, made sure to place back in the same spot (made sure to keep the cuttings in their groupings). --- Once a cup was complete, made sure to keep the label with the group. --- Re-misted the top growth as needed to keep it wet. --- Also wiped the trimmers with isopropyl alcohol in between cuttings (plan to use 10% bleach solution for next time). --- Repeated this process until all 10 cuttings were cut, planted, and in the tray. --- The coco coins fit perfectly into the tray and don’t reach the bottom. Nice! --- The bottom air gap is important. --- Poured a bit of distilled water through one of the empty slots into the bottom of the tray. Just enough to fill the bottom of the tray, but not enough to reach any of the Coco Coins (~1/4cup). - [19:35]: Placed the propagation tray with cuttings into the 3x3 veg tent. --- Placed the first layer of the propagation dome on before giving the sides a misting of distilled water. --- Also sprayed the top of the propagation dome before covering the cuttings. --- Vents are all fully closed. - [19:40]: Placed the bar lights onto the top of the dome before configuring the controller. ------ Set the START/END times to 04:00PM/10:00AM ------ Set the bar light’s intensity to 2 (out of 10). --- Also made sure the propagation light controller’s time was in sync with the Controller 69 Pro. - [19:47]: Took PPFD readings. --- The cuttings were around 136 μmol/m²/s which gives a DLI of 8.81 mol/m²/d --- The PPFD levels are similar to the floor. --- Perfect! --- Going leave the IonBoard S33 on during this rooting process. --- Will check back tomorrow to cycle the air under the dome. - [19:56]: Checked the humidifiers. --- Refilled the humidifiers with distilled water. - [20:17]: Quick night check! --- Ooo yea! Growth is raging and looking perky! --- Mainly checked on #1 and #4 which were looking incredible! --- Keep on growing ladies! Day 05 - Friday - 06/07/24 - Total Days: 102 ----------------------------------- Daily Averages [~23:00] - Temps: 82.7°F [28.2°C] - Humidity: 76.2% - VPD: 0.89 kPa - Soil %: [37, 40, 38, 35] ----------------------------------- - [10:03]: Decided to increase the ambient temp in the 3x3 veg tent. --- Within the AC Infinity App, --- For the Veg Tent [3x3] controller, --- Adjusted the 'Vegetative [18/6]' Schedule for the heater. ------ Increased the Temp target value from 78°F to 82°F --- Hopefully this will help to keep the veg tent at a more consistent temp. - [22:26]: Evening check. --- Ooo yea! The garden is looking incredible! --- #1 is looking perky and just bushing out! Wow! --- #2 is getting big! Growth is weird and leaf fingers are huge! Just going to let her grow. --- #4 is looking happy and growing along like a champ! Nodes are starting branch out and she is turning into a bush! - [10:28]: Checked down both fill tubes. --- Both reservoirs were completely dry! - [22:33]: Poured 5 cups of distilled water down EB1’s fill tube. --- Poured 3 cups of distilled water down EB2’s fill tube. - [22:40]: Checked on the propagation dome (inside the 3x3). --- Ah yea! Looking great ladies! --- Lifted the top of the dome to let some fresh air in for a bit. --- Wow! --- Leaves still look nice and green! --- So far everything looks great! --- Just going to continue on! - [22:53]: Checked the humidifiers. --- Refilled the humidifiers with distilled water. - [11:01]: Decided to adjust the humidifier for the 3x3. --- Within the AC Infinity App, --- For the Veg Tent [3x3] controller, --- Adjusted the 'Vegetative [18/6]' Schedule for the humidifier. ------ Increased the VPD target value from 0.8kPa to 1.5kPa --- The higher VPD level will essentially turn the humidifier off. --- I won’t be needing the humidifier for a good week so might as well save the water. Day 06 - Saturday - 06/08/24 - Total Days: 103 ----------------------------------- Daily Averages [~23:00] - Temps: 81.6°F [27.6°C] - Humidity: 74.9% - VPD: 0.91 kPa - Soil %: [35, 40, 37, 31] ----------------------------------- - [07:40]: Quick morning check! --- #1 and #4 are looking perky and happy! --- Also checked on the propagation dome, --- All cutting still look green! Hyped! - [20:02]: Evening check. --- Wow the garden is raging with growth! --- #1 has blown up! She has clearly recovered and growth is ramping up again! --- #2 is stretching upwards! --- #3 is now the smallest of the 4, but still getting larger! --- #4 is looking incredible! Wow! Growth looks perky and happy! - [20:05]: Checked down both fill tubes. --- Both reservoirs were completely dry! - [20:10]: Poured 6 cups of distilled water down EB1’s fill tube. --- Poured 2 cups of distilled water down EB2’s fill tube. - [20:16]: Checked the Ecowitt soil moisture sensor data: --- 35% - [CH01 EB1 - Garlic Budder #1] --- 40% - [CH02 EB2 - Garlic Budder #2] --- 36% - [CH03 GFP - Garlic Budder #3] --- 27% - [CH04 FPT - Garlic Budder #4] - [20:19]: Using a pump sprayer, --- Misted the straw mulch of #4 with 5 cups of distilled water. --- Focused mainly on the straw mulch. --- Also misted the mulch of #3 a bit (in the fabric pot). - [20:27]: Checked propagation dome (in the 3x3), --- To cycle the air under the dome, lifted the top off for a bit. --- Ooo yea! Everything is still green and looking great! --- Keep on rooting ladies! --- Oops! - [21:45]: Checked the humidifiers. --- Refilled the humidifiers with distilled water. Day 07 - Sunday - 06/09/24 - Total Days: 104 ----------------------------------- Daily Averages [~23:00] - Temps: 81.5°F [27.5°C] - Humidity: 74.8% - VPD: 0.91 kPa - Soil %: [36, 40, 37, 36] ----------------------------------- - [08:18]: Quick morning check! --- Nice! The main tent is looking great! #1 and #4 are both raging with growth! --- Checked on the propagation dome (inside the 3x3) and the clones are still looking green! --- Wow! Everything is going almost too well! Just keep on growing! - [19:08]: Evening check. --- Garden is just exploding with growth! Seems everyone has fully recovered from the defoliation and topping! --- Wow #1 is bushed out and looking incredible! --- #2 is growing really starting to get large! Growth still is funky, but stoked none-the-less. --- #3 is starting to fill in the pot! Getting larger! --- Wow! #4 is getting taller and looks healthy and green! - [19:12]: Checked down both fill tubes. --- Both reservoirs were completely dry! --- Wow the canopy is really starting to get taller and closer to the light. May need to raise it up soon. --- Absolutely surprised how low the light levels have been throughout this entire cycle. Barely moved the light and have not increased the intensity past 2 (out of 10). Less is really more. --- Anyways! - [19:18]: Checked the Ecowitt soil moisture sensor data: --- 36% - [CH01 EB1 - Garlic Budder #1] --- 41% - [CH02 EB2 - Garlic Budder #2] --- 37% - [CH03 GFP - Garlic Budder #3] --- 34% - [CH04 FPT - Garlic Budder #4] - [19:19]: Poured 6 cups of distilled water down EB1’s fill tube. --- Poured 3 cups of distilled water down EB2’s fill tube. - [19:24]: Checked propagation dome (in the 3x3), --- To refresh the air, lifted the top off for a bit. --- Sweet! Still green! Wow! --- Using a spray bottle, misted the top growth with distilled water. - [20:35]: Checked the humidifiers. --- Refilled the humidifiers with distilled water. --- Wow what a week! --- Growth has been just insane in the 4x4 tent! All plants have fully recovered and have just exploded with growth. --- I think it’s time to flip to flower! --- Also, I’m absolutely baffled about how well the cloning process has been going. --- So far no issues! --- Not complaining, but just surprised. Keep on growing ladies! --- If all goes well, should have fully rooted clones soon ready for transplanting (into solo cups of course). --- Absolutely hyped for next week! --- Maximum warp Ensign, Engage! [END OF WEEK 14|07]
Likes
15
Share
@Wenz004
Follow
So finally the wonder of stretch started,) During my last living soil experiment exactly that did not work. This time with help of topbooster and P-booster it works good.
Likes
16
Share
@THC123
Follow
Day 43 (August 9th): This weather is all over the place. Super cold nights, then super hot days. We’ll see how it holds up! Day 46: A male popped up beside her, doesn’t look like she’s in flower yet and I caught the male pretty quickly. Should be alright. Still just watering when dry. Going to add some top dressing once I see signs of flower
Likes
39
Share
Schnipp schnapp. Weitere Updates nach der Trocknung und zur Vorbereitung für das Fermentieren. 29. März Ein Teil der Orions wurde bereits zum fermentieren gelegt. In kürze gibts ein Update zum finalen Endprodukt.