
Likes
Comments
Share


Likes
12
Share


@Kirsten
Follow
31.12.24:
I have been readjusting the LST pegs and wire daily. Sometimes, twice a day! (I know, too much time on my hands)! 😆
The plants have responded fantastically! I'm so glad I gave it a go. Some plants have been a bit too tall, and I snapped Do-sì-dos P3, pulling the stem down. Audibly snapped 😬I let it be, though. It seems to have healed mostly, in only 2 days.
I have increased the lighting to 70%. They're getting watered a few times a week, with 1 litre of Dechlorinated water, containing the following nutrients and additives;
1ml of Biobizz Bio-Grow,
1ml Biobizz Top Max,
1ml of Biobizz Bloom,
2ml of cal-mag,
1g of Ecothrive Biosys.
The plants are responding well to this concoction, so it's all good so far. The leaves are looking greener and are getting darker.
Will be monitoring to continue readjusting the LST ties. Also, to monitor the increased lighting level, to make sure they can handle that yet.
1.1.25:
Happy New Year!
I have continued to readjust the LST wire and plant pegs. Several times a day.
Coincidence would have it, I have a 6ft tropical aquarium which was time for cleaning! I always water my Acer tree in the front yard with this water, with beautiful results 😍 👌 🍁 I decided to try it out in my indoor garden. I'll post photos of before and after to see the difference, good or bad 😅
3.1.25:
Plants are doing very well, except for PPP3 I'm quite disappointed in that one, as I feel like it's wasting a space. I guess I'll have to keep it, along with the Do-sì-dos that I snapped twice, which refuses to die 😅
I started to lightly defoliate, which is difficult because I always get carried away with it.
I'm going to water again with the nutrients in description of this week.
Overall Pink Mist P3 is looking a little sparse, and training is difficult as the stem is harder and thicker than the other plants in the tent. Hoping to see some more growth this week!
4.1.25:
Continuing to defoliate and adjust the LST pegs and wire.
Watered today with 1ltr of dechlorinated water PH'd to 6.0. With the following nutrients;-
2ml Biobizz Bloom,
4ml Biobizz Bio-Grow,
2ml Cal-Mag,
2ml Ecothrive Flourish,
0.2 g/ltr of Ecothrive Biosys.
I've increased the Nitrogen by adding double the amount of Biobizz Bio-Grow. I'm trying to keep them growing for as long as possible! I really want to keep the strength up and keep the leaves nice and lush green! 💚
Will update here with more photos and videos.
Thanks for checking out my diary 🍃 ✌️

Likes
14
Share


@CURATI_DA_SOLO
Follow
Questa settimana stanno gonfiando moto sono resinosissime e inizia veramente a sentirsi la puzza anche fuori la tenda....ora inizierò a cercare di dare le ultime botte e poi inizierò a risaquare un po'! Le cime sembrano durissime!

Likes
15
Share


@leitogrowARG
Follow
1 DE AGOSTO - DIA 8 ✅💨
- Hoy puse en funcionamiento el ventilador para remover el calor concentrado de la lámpara por sobre las plantas y distribuir aire fresco en todo el indoor. Beneficiando también a el tronco y las ramas, generando una resistencia al viento. El crecimiento se ve uniforme en todas las plantas.
2 DE AGOSTO - DIA 9 🌱💪🏼
- Hoy es un gran día!!
Apliqué la técnica de LST a todas mis nenas. Mi deseo es obtener buenos resultados al final de la cosecha, pero ya me siento muy feliz porque al final del cultivo lograré ganar experiencia!!
3 DE AGOSTO - DIA 10 💦👨🌾🏻
- Hoy es día de riego.
1 litro de agua para cada una de las niñas (600 cc desclorada y 400 cc destilada)
- PH 5.9 📊
- LSD-25 #2 y SIX SHOOTER #1 parecen ser las más vigorosas del cultivo.
- Relleno las macetas con tierra debido al crecimiento del tallo de las plantas. Todo marcha muy bien!!!
- LSD-25 #3 aparentemente esta pasando por un leve estrés, ha dejado de crecer a la par de las demás. ¿Que puedo hacer al respecto? ¿Perjudicará el ciclo de vida de la planta?
4 DE AGOSTO - DIA 11 💡📏
- Subo la lámpara a 40 cm de distancia.
- Por lo visto las niñas respondieron bien a la técnica de LST.
5 DE AGOSTO - DIA 12
- Reviso la humedad del sustrato y aparentemente se encuentra en buenas condiciones, por lo tanto mañana voy regar las niñas.
- Como todos los días controlo los ganchos y la soga colocadas, parece que las plantas se adaptaron al entrenamiento sin ningun problema.
LSD-25 #2 y SIX SHOOTER #1 tienen un crecimiento mas rápido por sobre las demás.
- LSD-25 #3 que habia pasado por leve estrés (dentro de mi punto de vista) parece comenzar a desarrollarse de manera normal.
6 DE AGOSTO - DIA 13 💦👨🌾🏻
- Hoy es día de riego.
LSD-25 #2 y SIX SHOOTER #1.
En primera instancia regaré solo a ellas dos, ya que el sustrato se encuentra bastante seco.
1 litro de agua a cada una (500 cc destilada y 500 cc desclorada) con una dosis de 2 ml VOODO JUICE 💀 y 2 ml PIRANAHA 🐟
- PH 5.9 📊
- Antes de finalizar el día repetí el riego con todas las demás nenas (LSD-25 #1, #2, SIX SHOOTER #2 y GORILLA GLUE)
7 DE AGOSTO - DIA 14 🌱💪🏼
- Hoy cumplen dos semanas en tierra. Estoy muy contento por que se nota el progreso de todas!!
Cargue las fotos del día para culminar esta semana, se puede observar como el tallo y las ramas se van adaptando a los alambres que les fui colocando. Una BELLEZA 😍


Likes
64
Share


@Cheeba_Inu
Follow
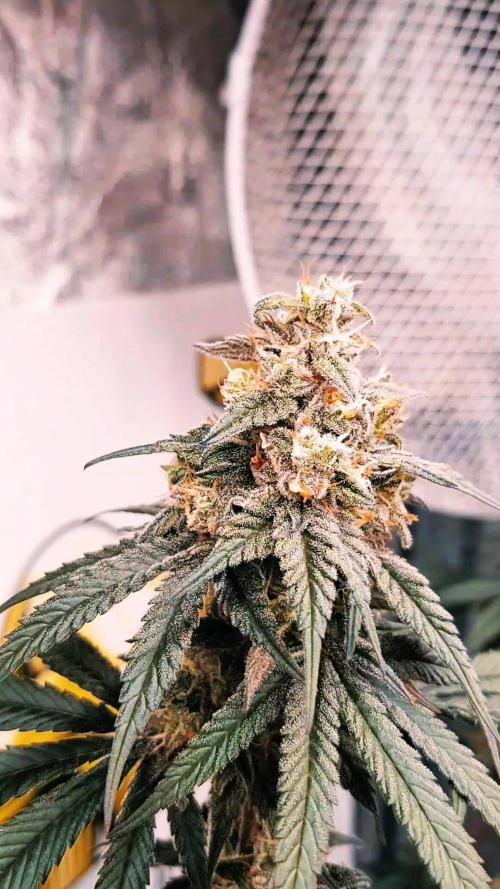
June 19, day 91, the grow has gotten close to harvest time, so I am begining to reduce the nutrient EC for this upcoming week. I will then give the plant 24-48 hours of darkness, along with very low EC water before harvest.
I continue to take leaves off as needed for canopy exposure, but I think the buds have pretty much reached the size they are going to get. While the density of the canopy has limited lower development, there are about 50-100 top bud sites which will each be a minimum of a couple grams dried (and some much more), so I am pretty excited to see the final wet a d dry harvest weights. The buds themselves are hard and resinous, glittering nicely when not under the strong LEDs. The smell is sweet, fruity, and floral, mild but pleasant.
I have noticed more clear trichomes than I would be used to for the stage in the grow (although plenty of cloudy and amber as well). I have a suspect this might be due to genetics, and contributes to the euphoric high this strain in known for.
June 21, day 93, worked to expose more underdeveloped bud during this final ripening period. It's coming along!
June 23, day 95, the Euforia is ripening. A lower bud became light bleached when they were suddenly exposed to light, and I am interested to see what happens to it after harvest. Overall the buds are a lovely light purple/pink and are hard with trichomes.

Likes
10
Share


@HideAndFly420
Follow
Day 64 my baby is going really well by now, she s been running fast until now and I think that’s enough with fertiliser. From today o start my flush, I will give today my last dose of regulator and from next irrigation just on controlled water until the end of maturation, I want this baby to eat everything .
day 65 started flushing. ph controlled water at 6.0 i think 20 more days at max before m
Day 68 First check with micro today. The baby looks already milky and amber on the top buds but the rest of the plant is still transparent. I’ll wait at least until this weekend for a re check maybe I’ll cut her in two rounds. As I be been watching a lot with micro I noticed so many dust and other stuff on the buds so I think I’ll wash her in water.
Today watered ph 6.
Let’s see!
🌱🔥🌱🔥🌱🔥🔥
Processing
Likes
10
Share


@TheOtherSide
Follow
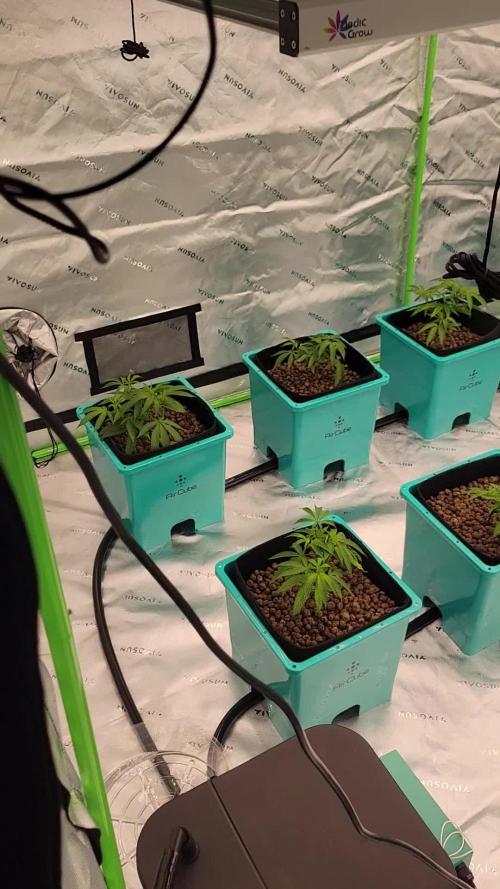
09/29 - 10/15 D50-D56
10/02 D18 - Folded the top of the fabric pot down and opened the bottom for air. Redid all the LST. About 7-8 buds at top of canopy. 5-10 under buds. She is beautiful! I am sooo excited! If all continues well, I am going to be super happy with my first lady.
10/01 D52 - 1.75 Gal Ph 6.3 water, 3 mg Cal-Mag +
10/03 AM D54 - 1 Gal Ph 6.3, 3 cal-mag+, 2.5 micro, .5 gro, 3 bloom, 1/8 easy weed
10/05 AM D56 - 1 Gal Ph. 6.2 3 cal-mag+, 2 micro, .5 grow, 3 bloom
24x36x60 tent
Optic 1 54w cob (Seed, Early Veg)
Optic 1 XL 100w cob (Later Veg, Flower)
2x 28" tower fans
1x 6" clip on fan
3 Gal Fabric pots
Carbon filter & Exhaust Fan
Coco-Coir & Perlite - 70/30 soil


Likes
8
Share


@Sandpepper
Follow
Sarah Lee is gliding along and budding up. I can't stop checking on her. Lol. I'm in love! 😍
The leaves are getting that beautiful dusting of goodness. I can't believe I've got this far!
I'm always battling humidity. Ugh. It's when the light goes out it rises to 55%-60%. I'll start applying Lost Coast tonight (the entire plant) to help avoid PM and bugs. I have only been treating the top soil and bottom 6".
FF Tiger Bloom every other water. About 2 tsp. Just over a gal of water. pH 6.58.
I've noticed all her branches are really trying to catch up to the main cola. I can't wait to try LST on my next grow. This light is fantastic!
I've heard if the tips of your leaves are slightly brown, you are good with the Nutes. What do you think?
I hope she looks good to y'all.
Happy growing! 🌱☀️


Processing
Likes
5
Share


@Secaplanta
Follow
Semana 7 siguen creciendo. Complete con linea top. Hay una que no floro que puede ser?

Likes
36
Share


@TaterheadJohnson
Follow
7/7: Transplanted plant to final pot! Roots showed out of tray. Accidentally pulled a root off during transplant 😢.
After transplant I top feed/watered medium with a half gallon of treated water. I mixed 2ml of Rapid Start in 1 gallon water hub. Poured half in half gallon jug then poured half gallon over medium. Added 2 gallons of water into reservoir (1st white line) to promote root growth to bottom and to begin capillary reaction.
7/8: Bumped light intensity dimmer to 30%.
7/9: Left for Vacation.... Praying for my baby!🙏🏿 Going to be gone for 4 days. 😅
***** For this Grow******
“Day Air Temperature” will be the max temp of tent for the week.
“Substrate Temperature” will be the average temp of tent for the week.
“Night Air Temperature” will be the lowest temp of the tent for the week.
Likes
50
Share


@DogDoctorOfficial
Follow
Week 6 Veg Report – Runtz We Meet Again!
Another week, another step forward in our Eternity Grow Cup 2025 journey, and oh boy, do we have a lot to unpack! These Runtz girls are showing their potential, and we’re dialing in every little detail to ensure they thrive. Let’s dive deep into everything that happened this week!
Cal-Mag Deficiency Adjustment – Pheno #5’s Special Needs
This week started with a close inspection of our phenos, and we noticed that Pheno #5 was showing early signs of a calcium/magnesium deficiency. Whether it was slightly off VPD levels or this particular plant being more demanding, we decided to correct it by increasing the dose of RO Water Conditioner. Now, while this isn’t a direct substitute for Cal-Mag, it does contain trace amounts that can help stabilize the situation.
🔬 Understanding Cal-Mag Deficiency:
Calcium and magnesium are essential secondary nutrients. Calcium strengthens cell walls, preventing issues like tip burn and weak stems, while magnesium plays a critical role in chlorophyll production, allowing plants to efficiently absorb light energy.
💡 Signs of Deficiency:
• Yellowing between veins (Magnesium)
• Rust spots on leaves (Calcium)
• Slow growth and weak stems
⚡ How We Address It:
• Slightly increasing RO Water Conditioner to see if trace minerals help
• Keeping an eye on overall nutrient uptake to ensure no lockout
• Monitoring VPD (Vapor Pressure Deficit) closely to optimize nutrient absorption
Let’s see how she reacts next week!
Branching Development – Pheno #2 Leading the Race
All five phenos are thriving, but Pheno #2 is showing the most aggressive branching, pushing outward faster than her sisters. However, overall, we’re seeing very uniform growth, which speaks volumes about the stability of these genetics.
🌱 What is Branching & Why It Matters?
Branching is the plant’s way of expanding its canopy, increasing surface area for photosynthesis, and maximizing potential bud sites. Well-structured branches allow better airflow, light penetration, and more even growth—key for a successful high-yield harvest.
⚖️ Topping vs. Leaf Bending – The Training Choice
Instead of topping, I’ve decided to go with leaf bending for now. This method allows for gentle manipulation of the plant’s growth without causing major stress. Once we introduce the SCROG (Screen of Green) net, this training will help maximize the canopy spread.
Moving to the TrolMaster Ecosystem – A Game Changer
Big move this week—our Runtz girls officially transitioned into the TrolMaster Ecosystem, and let me tell you, they are absolutely loving it! Under the ThinkGrow Model 1 LEDs, they’re thriving, leaves praying upward, soaking in that optimized spectrum.
💡 ThinkGrow Model 1 LEDs – Why They Work
• PPFD of ~400 µmol/m²/s at their level, running only on Channel One
• Full-spectrum lighting tailored for optimal vegetative growth
• Passive cooling design, keeping temps stable while saving energy
Environmental Conditions (Measured on the TrolMaster Tent-X and the AMP-3)
• Temp Max: 26.6°C | Min: 16.2°C
• RH Max: 77% | Min: 52%
• VPD Max: 1.65 kPa | Min: 0.43 kPa
• Solution pH: 5.8
• EC: 0.96
• Water Temp: 16.3°C
Why These Numbers Matter:
• Keeping VPD in check ensures efficient nutrient uptake
• pH and EC levels fine-tuned for maximum root absorption
• Water temp stable to avoid root shock and slow growth
Autopot System Prep – Getting Ready for the Next Phase
The week wraps up with us cleaning and preparing the Autopots for their next phase. These self-watering systems will allow the Runtz girls to access water and nutrients at their own pace, optimizing growth as we head into pre-flower soon!
A huge THANK YOU to Zamnesia, Plagron, and GrowDiaries for making this incredible Eternity Grow Cup 2025 possible! Also, a big shoutout to my main sponsors, thank you for keeping this journey running:
🔥 Aptus Holland – Precision nutrients for peak plant health
⚡ TrolMaster – Bringing automation and accuracy to the grow
🌱 Pro-Mix – The foundation of strong roots and healthy plants
💨 The CannaKan – Premium solutions for top-tier results
Grove Bags – Revolutionizing post-harvest storage & terpene preservation
📜 Ziggi Papers – The ultimate rolling experience
And of course, a massive thank you to the community—followers, supporters, lovers, and even the haters. You ALL fuel this journey, and I appreciate every single one of you!
🚀 Good luck to all fellow competitors—watching everyone’s grows is inspiring, and the competition is fierce!
📢 Join the journey on YouTube & Instagram for exclusive content, behind-the-scenes action, and more insights into this epic run!
👊 Let’s keep pushing, learning, and making history—see you all next week for another deep dive into the Runtz We Meet Again grow! 🌿🔥
💚 growers love to all 💚
Genetics - Runtz https://www.zamnesia.com/6000-zamnesia-seeds-runtz-feminized.html
Nutrients - Plagron https://plagron.com/en/hobby
- Aptus Holland https://aptus-holland.com/
Controls - Trol MAster https://www.trolmaster.eu/
LED - https://www.futureofgrow.com/en
LED - https://www.thinkgrowled.com
Soil - https://www.promixgardening.com/en
Germination - Cannakan https://cannakan.com/?srsltid=AfmBOopXr-inLXajXu3QFgKXCXXos4F1oEvScjMKIB5MR5dk8-GJ-F49
DOGDOCTOR 15% off
Smoking Papers - https://ziggioriginal.com/
Terpene saver - https://grovebags.com/
As always thank you all for stopping by, for the love and for it all , this journey of mine wold just not be the same without you guys, the love and support is very much appreciloved and i fell honored with you all in my life
With true love comes happiness Always believe in your self and always do things expecting nothing and with an open heart , be a giver and the universe will give back to you in ways you could not even imagine so
As always, this is shared for educational purposes, aiming to spread understanding and appreciation for this plant. The journey with nature is one of discovery, creativity, and respect. Let’s celebrate it responsibly and continue to learn and grow together!
Growers Love To you All 💚
#EternityGrowCup #RuntzHunt #GrowersLove #CannabisCommunity #AptusHolland #ProMixSoil #TrolMaster #Zamnesia #Plagron #ZiggiPapers #Grovebags

Likes
14
Share

@GERGrowDesigns
Follow
Welcome to Flower Week 7 and harvest of Sensi Seeds Purple Berry Muffinz
I'm excited to share my grow journey with you from my
Sensi Seeds Project . It's going to be an incredible ride, full of learning, growing, and connecting with fellow growers from all around the world!
For this Project , I’ve chosen the Feminized Photo Strain Purple Berry Muffinz:
Here’s what I’m working with:
• 🌱 Tent: 120x60x80
• 🧑🌾 Breeder Company: Sensi Seeds
• 💧Strain Info : 26%
• ⏳ Flowering Time: 6-7weeks

Likes
105
Share


@PEAKYPLANTERS
Follow
Respect for all of you, brother farmers! masters and beginners! thank you again for gathering on the pages of my diaries! we carry out our work with dedication and live on ambition!
This will be the last week of feeding before moving on to rinsing the roots in the soil
One of the girls is developing artichokes on the tops... nothing but gems😉😄😋💕

Processing
Likes
4
Share


@Therbalist
Follow
Went from 450w to 150w blue for a week due to heat and too much height gain. Weather got cold so I put the 450w red back in as they seem to be thickening up. Feminising was very easy on the ones I chose, I chose only three that had thicker faster flowering and more THC but will cross with the more sativa dominant ones.
Likes
27
Share


@Jbjibman
Follow
The plants are still alive but due to temperatures below 5 °C there is almost no growth. Hope weather next week will be more sunny and warmer.