
Likes
Comments
Share


@OS_Farmz
Follow
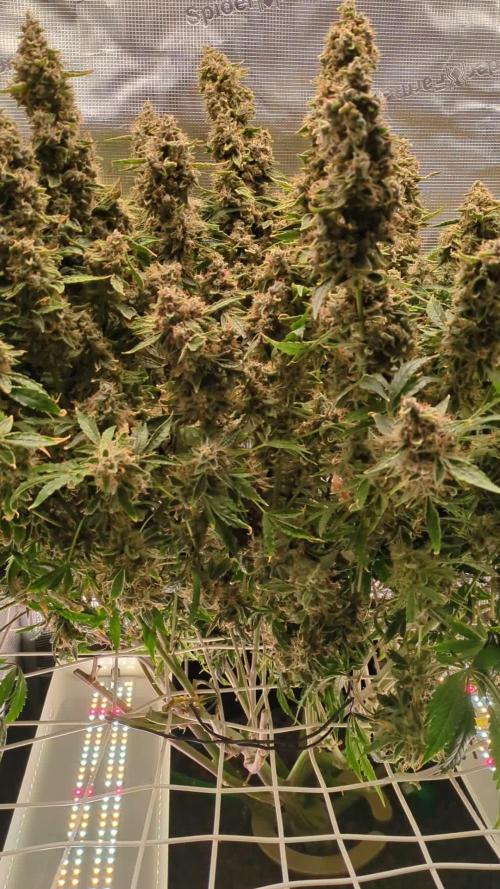
3 week of flowering finished, all good. Getting up to concrete jungle 😵


Likes
1
Share


@420Cannaking
Follow
Germination great success with 100% rate.
Paper towel moistened with bottled water PH6 in combination with heat mat at 33'C.
Produced all very long healthy tap roots Within 24HOURS.
Blackberry Moonrock Auto by Weedseedsexpress.
Proudly supported by Weedseedsexpress.com

Likes
3
Share


@Joaka
Follow
como preventivo aplique tierra de diatomea via foliar. solo realice un apical por variedad de semilla ya que las otras aun según mi criterio les faltaba. se espera realizar la otra semana apical en las otras dos para dejar 2 sin manejo para comparar.

Processing
Likes
15
Share


@Dico29
Follow
Seems to be going good, idk if I should ad more bloom booster or just use molasses. Also the broken cola I replanted, seems to still be alive but don’t really know what else to do. Just hope I can get these out of some random guys back yard soon.


Likes
40
Share


@valiotoro
Follow
The trim was easy and the buds are super fat full of resin✂️🤩
The smell is delicious🤤


Likes
134
Share


@DogDoctorOfficial
Follow
This Girl is on fire, i am completely in love with everything about her, she is frosty, she is fast growing , she is the most pest resistant plant i ever grew, could not find yet a single what ever pest on her, she smells retarded crazy for the stage shes in , i mean, dont even know how to describe what i am felling growing this Mama and the memories that she is bringing me from the 90s , i mean this is a very peculiar and familiar smell that i didnt see around for over a decade minimum, big but big shout out to Dutch Passion, much respect guys you did a great job on this creation of yours , loving every single aspect of this journey so far !!!
This week started my K supplement and increased my doses on it all bringing my TDS up to 550, increased my PPFD up to 900/100 Umol/m2/s, its time to make this beautiful fruits fat , heavy and , i know it looks impossible but, with more and more trichomes with is something i already can tell that is going to be something out of this galaxy, not this world , out of this galaxy <3 <3 <3
As always thank you all for stoping by, for your time, your love and for it all, i am truly blessed with you all.
All info and full product details can be find in can find @
https://dutch-passion.com/
https://aptus-holland.com/
#aptus #aptusplanttech #aptusgang #aptusfamily #aptustrueplantscience #inbalancewithnature #trueplantscience #dutchpassion #dogdoctorofficial #growerslove
With true love comes happiness , Always believe in your self and always do things expecting
nothing and with an open heart , be a giver and the universe will give back to you in ways you could not even imagine so
More info and full updates @
https://growdiaries.com/grower/dogdoctor
Growers love to you all

Likes
5
Share


@Matou
Follow
Ernte.
3 Wochen Fermentation/Curing.
62% RH mit Regulierung über Boveda Hygro-Pack 62%
Likes
8
Share


@Kingseeds
Follow
Another powerful strain form in-house genetics (OGKB V 2.1 x Platinum )
pure gassy flavour and aroma which will have all the Kush lovers out there going crazy
Absolutely frozen cola

Likes
317
Share

@MonyetDiablero
Follow
I want to thank my buddy @FatnastyzBudz for keeping me company on the phone during my 13 hours trimming, without him i would be lost as it started feel like a punishment task.
I also want to thank you my followers for your kind words and encouragement to make her a monster.
Without your messages a grow is just a grow, but through growdiaries and each other's diaries we want to challenge ourselves every grow
Lots of love to you my new friends.
Who am i ? until last november i have always grown hydro for a little over 11 years. But growing started to look more and more like work because i was more busy with programming my controllers for the ph / humidity / lights / soil moisture / temperature. Also the realization that i have 2 children and my own house made me nervous for the authorities because where i live growing is not allowed. So i decided to grow smaller where i previously had 200x180x200 space i opted for 70x70x160 with the result that i can only grow 1 strain at a time. The intention is to remain self-sufficient in this way and still be able to exchange or give away something here and there at a party. Although I am sponsored I will not be able to grow every strain because not every strain can deliver the result I need to remain self-sufficient. If you know of an auto strain or photo strain that takes at least 11 to 15 weeks I would like to know so that I can grow it in the future and of course I will try to set a record for that grown strain. Because during the 4 grows that I can do per year I can only try to achieve a record since I cannot show you multiple strains at once. I am happy that after 11 years I have found growdiaries and that I have met you my friends.Greetings MonyetDiablero.

Likes
152
Share


@SlowpokeFuegobud
Follow
🍪 🍒 🍰🍩 🎀🍪 🍒 🍰🍩 🎀🍪 🍒 🍰🍩 🎀🍪 🍒 🍰🍩 🎀🍪 🍒 🍰🍩 🎀
Welcome to week 8, dear growmies!! 😘
DAY 51
Watered with 2ml bloom+ pk + 4ml humics, growzyme + 3ml bigfruits + 2ml calmag+ 2g/L LO 💧
DAY 54
Watered with 2ml bloom+ pk + 4ml humics, growzyme + 3ml bigfruits+ 2ml calmag 💧
Thanks for showing up and supporting me and the girls, bless you, growmies!! 😘 ❤️
Shouts go out to my sponsors @GreenBuzzNutrients, thanks so much for your support!! 💚 💚 💚
If anyone would like to try their amazing organic products, you can find a generous discount code of 25% in my weekly comments! 😜 🙏
If you want a recommendation which product to get first.. BIGFRUITS!! 😍 I love the tasty terps with this one!!
https://greenbuzznutrients.com/
Thanks also of course @Kannabia, for the beautiful genetics!! 🧡🧡🧡
Pouring all my love into this grow, thank you for joining in, growmies!! 💚 💚 💚 😘 ❤️ ❤️ ❤️
Wishing you all the best for your beautiful gardens!🌱 🙏 Grower love!! 💚
_________________________________________________________
Strain Info:
https://www.kannabia.com/en/feminized-cannabis-seeds/break-up-cake
We need to talk
You’ve got to celebrate everything in this life, and that includes love and heartbreak. Since you’re all familiar with Wedding Cake feminised marijuana seeds, we’ve put a Break-up Cake in the oven at the Kannabia Seed Company – because things don’t always go well, and we sometimes need a friendly seed to lean on.
Break-Up Cake has a base of Girl Scout Cookies, one of North America’s best-known strains, which is earthy with a very potent indica effect. And we top it off with a delicious Cherry Pie which, in addition to giving it an elegant dark attire, adds a silky, deeply sweet flavour of cherries and berries. Look no further – it’s the perfect cake.
This seed will be celebrated for its ease of cultivation and abundant production. It’s one of the best investments you’ll make this year. But if it’s going to be memorable for one thing, it’s for its sweet complex flavour that’s full of contrasts. If we have to break up, let’s do it sweetly and amicably, right?
How to: Break-Up Cake
Break-Up Cake is an “all-terrain” marijuana seed, which will adapt to the place you allocate to it. An ode to independence, it’s a plant with only the most basic needs that knows how to grow by itself.
It’s a pale branching plant with tremendous dark green leaves, purple tips, and an icing sugar coating of trichomes. Its immense buds are some of the stickiest ones we’ve found in our seed bank recently.
Indoors, it needs 60 days of flowering to give no less than 600 grams per square metre. Use a Screen of Green method without hesitation, or plant it using hydroponics if you want to obtain the full benefit of its potency.
Outdoors, it reaches two metres in height with a harvest of 800 grams per plant, which is reason enough to give it a go. Like a good break-up cake, this plant doesn’t need to live with a partner, and knows how to live well in a Guerrilla plot. Between 25th and 10th October is its moment.
Taste and effect of Break-up Cake
Very relaxing but not causing lethargy, it’s a good indica-dominant plant. Its effect is mellow (we’re too old for childish games). It calms the consumer but it also gives rise to creative moments. Head on up to the top floor, later to make your way, little by little, down to the kitchen later (where you might want to give in to temptation if you need to stimulate your hunger).
The flavour is full of nuances. It will remind you of a vanilla sponge or cheese cake: you’ll notice a cherry topping, something sweet that you can’t quite distinguish, and an earthy undertone on a biscuit base… You’ve got to sample it to know it.
_____________________________________________________________________
SETUP:
80x80x180 cm Zelsius
240W Full Spectrum LED IR UV dimmable
DW240H-A6-HS
Heatsink color red
LED Chips:
512pcs SAMSUNG LM301H + 24pcs Osram 660nm + 8pcs Osram IR 730nm + 8pcs UV 385nm
Color mix: 2700K + 4000K
2,8umol/J
Driver HLG-240H-C2100B
Coverage: veg 5x3ft / flower 4x2ft
Product size: 628x205x68mm
Green Buzz Nutrients
Shouts go out to my sponsors @GreenBuzzNutrients, thanks so much for your support! 💚 💚 💚
If anyone would like to try their amazing organic products, use code GD42025 for generous 25% discount (for orders of minimum 75€) ✨
https://greenbuzznutrients.com/
Biobizz Lightmix
custom exhaust fan 320/270cm³/h
Carbon Active Granulate 240cm³/h
tab water pH 8 - EC 0,25 with Calmag to 0,5
Advanced Hydroponics pH minus Grow + Bloom to pH 6.2
🍪 🍒 🍰🍩 🎀🍪 🍒 🍰🍩 🎀🍪 🍒 🍰🍩 🎀🍪 🍒 🍰🍩 🎀🍪 🍒 🍰🍩 🎀

Likes
100
Share


@Njanne
Follow
Here is a video tour of my back yard jungle. I am in the process of a huge clean-up now that the plants are ripening up and the buds are getting heavy. I'll post some photos tomorrow once the work is done. Some of the fan leaves are coming down now to promote light penetration and air circulation... don't want mildew.

Likes
66
Share


@Neo09
Follow
This week we solved a problem with high temperature and we had instaled a clima. IT Works perfect! Ladys are Just happy as you can see on videos😎happy growing to all of us😎🙋♂️🙌


Likes
29
Share


@Belverde
Follow
Welcome growers
This is the last day of the firsmonth in blooming for the PINK KUSH 🌳
She dosen't suffered to much after the defoliation
But i think isn't a good technique using with her
I mean...maybe a light defoliation can be great, but not too much 🙌
Anyway.
The flowers are forming well and she already has rich of sticky trichomes 💯
Also a very particular aroma is coming...i have never smells some similar
I cant wait the end for enjoy it 😍
This will be my 2022 first flowers 🎉🎉
About nutrients 👇
I still using organic/veganic nutrients at any watering 💧
A little bit of silicium (Bionova) / Crescita (Biomagno) / Activera (Biobizz) / Grow vegan (Bionova) / The Missing Link (Bionova) / X-Cell (Bionova) / Bioheaven (Biobizz) , a little bit of P-K 3-5 (Bionova) /Fioritura (Biomagno) / Bloom vegan (Bionova) / Biomassa (Biomagno) / Florastimo (Biomagno) and i started to use some enzymes present in the Sensizym (Advanced Nutrients)
That's it dor the week..
And that's all...
See you next..
Thanks for tge support 😎👍👍
FC ✌️
🇮🇹
Likes
16
Share


@Northern_Ent
Follow
July 5: starting fourth week and she is finally getting some traction. The conditions are good for some fast vegetative growth. I need to remember to not over-fertilize this auto.
July 8: faster growth starting. She’s bigger than the Chemdawg auto.
July 10: topped this auto early in the morning. Likely needs some N.
July 11: fan leaves are getting bigger after being topped. She’s about 50% bigger than the Chemdawg auto which was started at the same time. Other diaries have the auto overdose not autoflowering and we’ll have to see what happens.
My autos were started about 3 weeks later than I wanted this year but it turned out to be a very cool spring. These autos are catching summer heat and hopefully it’s not too much for them at this early stage.
July 12: she’s noticeably bigger this morning. Done with heat wave now and back to ideal cannabis growing temperatures.
Likes
15
Share


@RussianGrower
Follow
Приветствую всех, кто следить за мной. Ваша поддержка очень важна для меня.
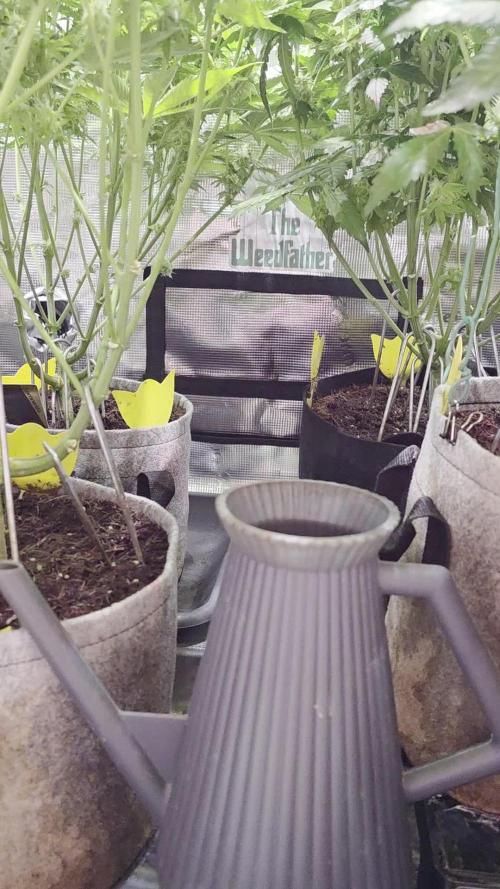
На следующий день после того как я обновил прошлую неделю дневника наступило время пересадить растения в более крупное ведро. Я покажу вам как использовать дешовые пивные стаканы для пересадки ваших растений. Вы можете посмотреть это на первом видео.
Когда я пересаживал растения я дополнительно добавил микоризу в большое ведро. Одно из растений "ЛСД -феминизированное" всё ещё показывает замедленный рост, несмотря на то, что я решил подсветить его LED полный спектр. Так же я внёс базовое питание, корневые стимуляторы и стимуляторы роста, в добавок с гуминовыми кислотами. Я планирую сделать из эти растений много клонов и запустить новый дневник в другой палатке, а эти растения потом переставить в маленькую палатку. Если вам интересно следить за приключениями травки в России, подписывайтесь на мой дневник
--------------------------------------------------------------------------------------------------------------------------------------------------------------------------------------------------
Greetings to all who follow me. Your support is very important to me.
The day after I updated the last week of the diary, it was time to transplant the plants into a larger bucket. I will show you how to use cheap beer glasses to transplant your plants. You can watch it on the first video.
When I transplanted plants, I additionally added mycorrhiza to a large bucket. One of the "LSD-feminized" plants still shows slow growth, despite the fact that I decided to highlight its full spectrum LED. I also added basic nutrition, root stimulators and growth stimulators, in addition to humic acids. I plan to make many clones of these plants and start a new diary in another tent, and then move these plants to a small tent. If you are interested in following the adventures of weed in Russia, subscribe to my diary.
Likes
7
Share


@SzkolaZiola
Follow
Ice Ice Baby from Frosty Hash Genetics
Bred by: Powerzzzup (Cookies breeder)
Mother: Gary Payton
Father: Strawberry Surprise
She is supposed to be a great washer for live rosin - we'll see how she does.
Likes
5
Share


@JamaweedOPO
Follow
The plant can finally enter the ideal environment, it has adapted very well. It remains strong and vigorous.
Likes
79
Share

@McBubatz
Follow
13. Woche, BW 7. Straw Limez is gut dabei, Blüten werden größer, hoffentlich noch en gutes Stück 😅. Ansonsten sieht sie gesund aus, Trichome produziert sie wie keine andren sonst, die sieht aus als wäre sie mit Trichome berieseln worden 🤣. Geruch is hier das 2. Highlight, immer noch sehr Erdbeerig, so extrem ausgeprägt 🤤 das hätt ich echt nicht erwartet 👌.


