


Likes
Comments
Share


Likes
35
Share


@bmvape
Follow
The Northern Light produced almost twice as much as White Widow. As they were in the same basin, I attribute the better performance to three factors. 1. Roots made it to basin faster. The WW's pellet dried out before her roots were in the water as the airstone shifted right under the NL.
2. The second and more powerful light was placed directly over the NL, however, the space is so small that they both should have benfited.
3. I did a better LST job on the NL.
Overall, happy with the harvest. The buds are airy, my fault. The smell is very lemony with a bit of an earthy smell during the cure. Currently, the taste is minty and refreshing, but still a bit heavy. Effects are nice. Noticeable but not overwhelming or tiring. I think potency will come with age,
But both plants tolerated my inexperience and have produced enough fruit to get me by. What else could you ask for out of a first grow?!
Thanks to everyone that helped! Wish I found this community from the start.

Likes
28
Share


@Ferenc
Follow
Day 58, 7th of November 2020:
The 6th day since the lamp switched to be 12/12...
I raised up the nutrition intake as it can be seen above only the BioBizz family 2ml/l and removed some LST because the plant remains in shape or just set a bit but nothing significant....
Amazing really really beautiful lady this one....strech is on the way..... 😅
Nice smell Inreally like this strong stable genetics.
Nothing really to report there is crazy 2-3 weeks from now ;)
;)


Likes
2
Share


@Glen1818
Follow
The first is already peeking out of the ground, the other should follow.
I used Plagron Lightmix.
LED @ 24W

Processing
Likes
5
Share


@Ensign420
Follow
Week 02 Introduction
This week has been a bit of a struggle. Had my first experience dealing with slime and brown algae. But I think adding enzymes and increasing the beneficial bacteria helped to fix the issue. Also experienced nutrient burn for the first time. My nutrient solution strength got as high as 671 PPMs. So backed it down to about 430 PPMs during the end-of-week reservoir change. Also cut Hydroguard (expired?), CaliMagic, and Superthrive from this grow. Now she's still stunted, but is starting to recover. Hopefully...
[START OF WEEK 02]
Day 01 - Monday - 08/10/20 - Total Days: 008
-----------------------------------
- [0830]: Still looks a bit yellow. But getting larger!
--- Solution strength was at 248 PPMs.
--- Just topped off with a bit of distilled water
--- PH went up to 6.1 so PH'd down to 5.8
--- Ran the top feed for a bit to wet the hydroton.
- [2130]: She's looking even more yellow now.
--- Even the new leaves are really yellow.
--- Decided to add more base nutes.
--- Added 4ml of Sensi A
--- Added 4ml of Sensi B
--- Now at about
--- Solution Strength went up to 304 PPM.
--- PH was at 6,
--- Also raised the water level a bit more.
--- I really hope it's a nutrient deficiency and not an over-watering issue.
--- Please live!
Day 02 - Tuesday - 08/11/20 - Total Days: 009
-----------------------------------
- [0830]: Looking less droopy. But still yellow.
--- Decided to do a reservoir change.
--- 4.5gal of distilled water
--- 8ml of Sensi Grow A
--- 8ml of Sensi Grow B
--- 8ml of Voodoo Juice
--- 4ml of B-52
--- 4ml of CaliMagic
--- 4ml of Hydroguard
--- 4 drops of Superthrive
--- PH'd down to 5.8
--- Solution strength: 302 PPM
--- Since I didn't want to risk over-watering the rockwool, I did not to do a top feed, may do one tonight after the sleep cycle (lights are still set to go off at 10am and back on at 4pm).
--- As I was doing a reservoir change, I noticed that the tubes and bucket were a bit slimy. Didn't really stink or anything. Is this normal? Maybe due to the Hydroguard and Voodoo Juice?
--- I hope she gets better soon!
- [2215]: Getting larger! But still yellow.
--- Also can see a root growing through the net pot! Tiny little thing but it's there! Will have to start dropping water once more appear.
--- After looking over a few DWC diaries using AN nutes, seems like my solution strength is still too low. Most around this stage average around 500 PPMs with about 4ml per gallon.
--- Top fed for a minute to wet the top of the hydroton.
--- Solution strength went down to 263 PPM.
--- Added 8ml more of Sensi A
--- Added 8ml more of Sensi B
--- Now base nutes are at 16ml for 4.5 gal of water.
--- PPMs went up to 411.
--- Still lower than 500 PPMs, but that's okay.
--- PH was at 6. Not sure if I should adjust PH using AN nutes. So going to not ajdust unless PH goes above 6.1.
Day 03 - Wednesday - 08/12/20 - Total Days: 010
-----------------------------------
- [0830]: Looks like more root growth!
--- She still looks yellow. But leaves are perky.
--- PH was at 6.2 so lowered down to 5.8.
--- Solution strength was at 394 PPMs
--- Since roots are still growing, I decide to lower the water level a bit. Now water level is a bit below the net pot.
- [2200]: Root is getting longer!
--- Slime is returning. Not sure why.
--- Solution strength: 357 PPMs
--- PH: 6.1
--- Decided to add an enzyme along with more beneficial bacteria to hopefully cure the slime.
--- Added 16ml of Sensizym
--- Added 5ml of Hydroguard
--- Added 8ml of Voodoo Juice
--- New solution strength: 430 PPMs
--- New PH: 6.1
--- Top fed for a minute.
--- This slimy residue is really freaking me out! I hope the added enzymes will help eliminate the slime.
--- Going to do a full reservoir sterilization/nutrient change over the weekend. Please survive until then girl!
Day 04 - Thursday - 08/13/20 - Total Days: 011
-----------------------------------
- [0930]: I think the enzymes worked! There is little to no slime now!
--- Although I think the root was also dissolved in the process. It's now just a little stub sticking just below the net pot. The enzyme is also suppose to dissolved dead roots too but guess that root was too weak? Not sure what happened there. But I think the slime is cured!
--- Solution strength went down to 395 PPMs. Decided to add more base nutrients.
--- Added 8ml of Sensi A
--- Added 8ml of Sensi B
--- Added 4ml of B-52
--- Solution strength went up to 598 PPMs.
--- PH was at 6.1
--- As long as the PH is between 5.5 and 6.3, I'm not going to use PH Up or Down. But still will monitor PH levels.
- [1715]: Checked up on her after her nap and shes looking alive but stunted. But no slime!
--- Decided to add some sugars to help maintain the enzymes and beneficial bacteria.
--- Solution strength was at 587 PPMs.
--- PH was at 6.2
--- Added 8ml of Bud Candy
--- Solution strength went up to 671 PPMs.
--- PH also went up to 6.3
--- Lowered water level a bit to hopefully promote more root growth.
--- Top fed for a minute.
--- She is getting bigger, but still looks yellow.
Day 05 - Friday - 08/14/20 - Total Days: 012
-----------------------------------
- [0915]: Leaves look a little burnt on the tips. Still no slime.
--- Going to back off on the PPMs to hopefully fix the nutrient toxicity.
--- Solution strength was at 632 PPMs
--- PH was at 6.3
--- Added/Removed water until PPMs were at 536.
--- PH was still at 6.3
--- Raised water up a bit, then top fed for a minute.
- [2200]: Looking better. Still yellow though.
--- Solution strength: 514 PPMs
--- PH: 6.5
--- Added PH down.
--- New solution strength: 518 PPMs
--- New PH: 5.2
--- PH was kind of high. So decided to PH down. Had to use quite a bit to bring it down. But eventually got it to drop down to 5.3. A little low, but so far, the PH has always gone up so wanted to start it really low.
--- Ran the top feed for a minute to re-saturate the top of the hydroton.
Day 06 - Saturday - 08/15/20 - Total Days: 013
-----------------------------------
- [0830]: She looks stunted. leaves are still yellow.
--- Solution strength: 514 PPMs
--- PH: 5.6
--- Top fed for a minute.
--- Not sure what to do at this point. Going to do another reservoir change soon. Hoping she lives until then.
- [2145]: Looking pretty much the same.
--- A bit of slime has returned. Since I've been diluting the nutrient solution, the enzyme ratio has dropped. So I guess this is expected.
--- Also noticed that slime build up was on the air-stones. Never really checked the stones so not sure how long that has been there. Looks brown too, which can't be good.
--- Going to do an H202 sterilization of the system (minus the net pot) tomorrow so did not add anything.
--- Lowered the water level to below the net pot.
--- Then top fed for a minute.
Day 07 - Sunday - 08/16/20 - Total Days: 014
-----------------------------------
- [0900]: STERILIZATION DAY!
--- Decided to skip today's night cycle for a deep clean.
--- I'm hoping that skipping a night cycle won't be too stressful.
--- Temporarily moved her to a new bucket.
--- Used about a half of gallon of straight distilled water to flush out the net pot.
--- Drained the system and wiped up all the brown sludge. Also removed the air stones and cleaned up all the goo.
--- Filled the system with 2 gallons of distilled water and at least 30ml of food grade hydrogen peroxide (35% strength).
--- Yea its a lot, but since I'm not going to sterilize the system overnight, I went with a really high doseage. Basically I kept adding until I started to see little bubbles start to form.
--- Then I ran the water pump.
- [0915]: Boiled the air stones in tap water for about 10 min. Then reconnected them to the airlines.
--- I let the air stones and hose soak in the sterilization solution for about 5 minutes so the peroxide can absorb into the stones. Then ran the air stone to help mix and agitate the solution.
--- Occasionally, I'd repeat the process of turning the air pump off for a few minutes to let the stones soak.
- [1000]: Covered the top two row of holes of the net pot with some aluminum tape. Hopefully this solves the light leaking in through the hydroton.
- [1200]: Used an old toothbrush and scrubbed the pump clean. Then drained the system.
--- Refilled with more distilled water and peroxide. Again added a lot.
--- Ran system again to sterilize even more.
- [1530]: Drained the system and refilled with distilled water to rinse.
--- Ran the system for a few minutes, then drained and rinsed again.
--- Did this a few more times over about an hour.
- [1630]: Added 4 gallons of fresh distilled water.
--- Added 15ml Sensi Grow A
--- Added 15ml Sensi Grow B
--- Added 12ml of B-52
--- Added 16ml of Voodoo Juice
--- Added 16ml Sensizym
--- Solution strength was at 430 PPMs
--- PH was at 5.6
--- I was going to add Hydroguard, but I think the bottle is expired. Since 2017 or 2018!? I think Hydroguard is good for up to 2 years from the date on the bottle or 6 months after opening. So not going to use from now on. I wonder if this could have contributed to the slime build up.
--- Also removed the CaliMagic and Superthrive too. Going to only use AN products to eliminate the chance of incompatible nutrients.
--- Placed her back in the bucket and top fed for a minute.
--- Here's hoping for the best. Going to let it ride until morning! Please feel better!
[END OF WEEK 02]

Likes
72
Share


@Stinkfox
Follow
She smells incredible! Same as last time. She’s starting to bulk up. I’m probably going to harvest this one a week earlier than last time, for more of a rush/energetic high. I’ll start flushing after the next ful week of flower.

Processing
Likes
142
Share


@MadeInGermany
Follow
Hi everyone 🤗.
Everything is going great 👍.
There are no defects or anything unusual :-).
Today the Blue Cheese Pheno 1 became the first time rinsed, and now only gets 0.4 Ec water for the next 10 days ca :-).
Everyone else needs a while.
otherwise there is not much to report this week.
I wish you all a nice week, stay healthy 🙏🏻 and let it grow 🌱


Likes
28
Share

@GreenHobbit
Follow
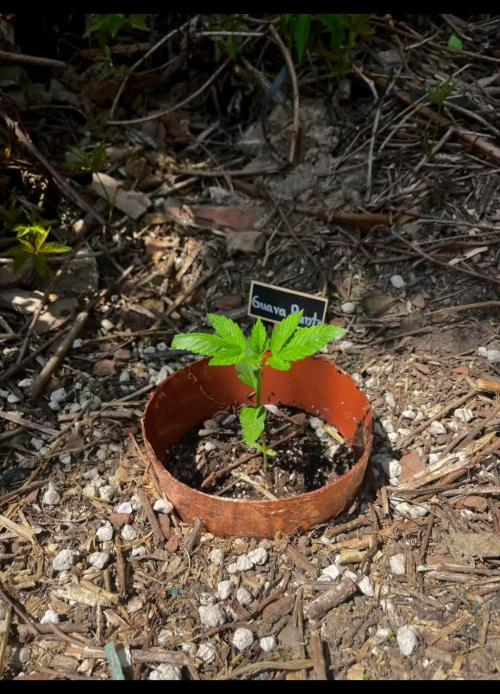
The Hobbit Hole Outdoor Grow 2026
Woche 3 – Die Sonne kehrt zurück
Nach zwei Wochen voller Regen, Wind und kleiner Rückschläge hat sich das Wetter endlich auf die Seite des Hobbit Hole geschlagen.
Die vergangenen Tage brachten genau das, worauf die vier kleinen Damen gewartet hatten: Sonne, Wärme und deutlich bessere Bedingungen für Wachstum. Und auch wenn die Pflanzen noch weit von ihrer späteren Größe entfernt sind, war der Unterschied innerhalb weniger Tage deutlich sichtbar.
Zum ersten Mal seit dem Einsetzen ins Freiland konnte man morgens tatsächlich erkennen, dass sie über Nacht gewachsen waren.
Die schwierige Anfangsphase scheint damit überstanden zu sein. Die Wurzeln haben inzwischen genug Zeit gehabt, sich im Boden des ehemaligen Fichtenhangs auszubreiten, und nun beginnt das Wachstum oberhalb der Erde spürbar anzuziehen.
Besonders die Cinderella hat in dieser Woche einen kleinen Zwischensprint eingelegt. Das erste dreifingrige Blattpaar ist inzwischen deutlich stärker ausgeprägt als bei den anderen Pflanzen und sie übernimmt aktuell die Führung im Hobbit Hole.
Direkt dahinter folgt die Guava Runtz, die weiterhin sehr vital wirkt und sich zu einer ernsthaften Konkurrentin entwickelt.
Gelato zeigt sich wie gewohnt ausgeglichen und gesund. Kein hektisches Wachstum, aber eine sehr saubere und stabile Entwicklung.
Die Purple Punch bildet momentan zwar noch das Schlusslicht, macht aber ebenfalls sichtbare Fortschritte. Nach ihrem ungewollten Bodenkontakt in der vergangenen Woche wirkt sie inzwischen deutlich erholt und schiebt neues Wachstum nach.
Auch die Schutzmaßnahmen scheinen ihren Zweck zu erfüllen. Die Kupferringe halten weiterhin stand und bisher konnten weder Schnecken noch andere Gartenbewohner ernsthaften Schaden anrichten.
Was mich in dieser Woche besonders gefreut hat, war die Entwicklung des gesamten Platzes. Vor wenigen Tagen standen hier noch vier kleine Sämlinge, die gegen Regen und Wind kämpfen mussten. Inzwischen beginnt das Hobbit Hole langsam genau das zu werden, was ich mir vorgestellt habe: ein kleiner versteckter Outdoor-Grow mitten zwischen Brombeeren, Holunder und jeder Menge Natur.
Noch ist es nur der Anfang.
Aber zum ersten Mal habe ich das Gefühl, dass die Pflanzen nicht mehr einfach nur überleben, sondern anfangen zu wachsen.
Und genau darauf habe ich gewartet.
Aktuelle Reihenfolge:
🥇 Cinderella
🥈 Guava Runtz
🥉 Gelato
🏅 Purple Punch
Der Sommer hat das Hobbit Hole endlich erreicht. ☀️🌱🏡

Processing
Likes
22
Share


@Silverback_Guerilla
Follow
2/10:
I watered today with about 3/4 gallon each, plus cal-mag, signal, bembe, armor si, a little open sesame, and their final dose of endoboost.
I took photos today, but forgot to snap a shot of the Soooperrunt. She's as tall as the short one now, just not as bushy. I think she'll make a fair amount of bud despite her sloooow start, smaller stature, and smaller pot. The tall one is keeping pace with the biggest plants in the garden.
2/11:
Wife home sick today....postponing construction project to raise the lights....kinda scary....about 10"-12" from the tops now..
2/12:
I woke up to find the tallest of these bitches stretched another few inches and within 9 inches of the lights!!!
I quickly drug everybody out of the closet and undertook the project. In addition to that project, I installed and hooked up my new AC Infinity 6" intake fan. It's pulling in fresh air from the soffit vent on the eave of the attic, and currently feeding the garden with 46f fresh air. I'm able to easily maintain daytime temps in the lower 70f's now. I am able to drive the nighttime temps as low as I want. The only issue is that the outdoor RH varies quite a bit, so I ordered a 30-pint dehumidifier to put in the top of the closet. It will battle with the evaporative cooler while the lights are on to keep it at 45% RH, but after the lights go off, it will lower the RH to 35% unti morning. After another couple of weeks, I'll kill the evap cooler altogether and try to maintain 35% RH 24/7. I'm optimistic that it will be the difference-maker in maintaining lower RH while I'm flushing all the plants during the last couple of weeks. That's usually such a challenge...especially with a bunch of 5 gallon pots.
I also sprayed everybody with boomboom spray to try and mitigate the light burn damage that is likely to ensue.
2/13:
Still stretching... about 12" from the lights again. I will wait to raise the lights until tomorrow when I feed them. I'm seeing calcium deficiency on a few plants, including a #9. Will up the dose tomorrow when I feed.
2/14:
I fed them today with about 3/4 gallon each including grow big, big bloom, tiger bloom, cal-mag, signal, bembe, humic acid, and I switched over from Open Sesame to Beastie Bloomz. Raised the lights another couple of inches. I did some training on them and defo'd a little bit.
2/15:
Installed the new dehumidifier and rigged the continuous drain on it...works great.
2/16:
I rotated the edge plants and removed some old leaves. I added another 22w 3000k 4' bar light under the canopy.
2/17:
I rearranged the garden and defoliated a little bit. That's it for week 8-

Likes
16
Share


@BLAZED
Follow
Week 11 (2-9 t/m 8-9) Week 1 bloei
2-9
Temperatuur: 29.8 graden (licht aan) 21.5 graden (licht uit)
Luchtvochtigheid: 80% (hoogste) 50% (laagste)
Week 1 van de bloei is begonnen!
Watergift: 1250 ml, met 0.2 ml Silica per liter, 1 gr Calcium PowderFeeding per liter. EC: 0.4 PH: 6.4
3-9
Temperatuur: 29 graden (licht aan) 21.5 graden (licht uit)
Luchtvochtigheid: 69% (hoogste) 50% (laagste)
Watergift: 500 ml, met 0.2 ml Silica per liter, 1 gr Calcium PowderFeeding per liter. EC: 0.4 PH: 6.4
4-9
Temperatuur: 28.5 graden (licht aan) 21.5 graden (licht uit)
Luchtvochtigheid: 71% (hoogste) 51% (laagste)
Watergift: 1200 ml, met 0.2 ml Silica per liter, 1 gr Calcium en 0.4 gr Hybrids Powderfeeding per liter. EC: 0.9 PH: 6.5
5-9
Temperatuur: 29.6 graden (licht aan) 20.8 graden (licht uit)
Luchtvochtigheid: 72% (hoogste) 51% (laagste)
Wat blaadjes weggehaald.
Watergift: Geen.
6-9
Temperatuur: 33 graden (licht aan) 22.3 graden (licht uit)
Luchtvochtigheid: 70% (hoogste) 42% (laagste)
Watergift: 850 ml, met 0.2 ml Silica per liter, 1 gr Calcium PowderFeeding per liter. EC: 0.4 PH: 6.4
7-9
Temperatuur: 32.2 graden (licht aan) 22.6 graden (licht uit)
Luchtvochtigheid: 66% (hoogste) 45% (laagste)
De kartelpuntjes van het blad zijn lichtelijk geel, na het water geven heb ik de runoff gemeten en dat geeft een EC 2.4 en PH 6.8 aan.
Ik ga nu een weekje geen Hybrids voeding geven en daarna ga ik de runoff weer meten.
Watergift: 1500 ml, met 0.2 ml Silica per liter, 1 gr Calcium PowderFeeding per liter. EC: 0.4 PH: 6.4
8-9
Temperatuur: 30.4 graden (licht aan) 22.8 graden (licht uit)
Luchtvochtigheid: 75% (hoogste) 46% (laagste)
Watergift: Geen.

Likes
20
Share


@Skunklerman
Follow
Week was great as I saw the end to my fungus gnats and the plants really began to develop their own signature smells.
The monster plant has more myrcene funky smell to it and the smaller bushy plants are hitting hard with fruity earth tones.
This week looked like this:
2/7: nothing
2/8: 1 gal water/pot with 1 tbsp coconut water powder/pot and 1 drop of microbe lite bmc
2/9: nothing
2/10: nothing
2/11: 1 gal water/pot with 1 tbsp aloe flakes/pot. and 1 drop microbe lite bmc. Top dressed with gnarley barley which is sprouted hemp seed, Barley seed and corn seed which i pulverized
2/12: nothing
2/13: .5 gal water/pot and light defoliation

Likes
4
Share


@theplantdaddy
Follow
Both germinated within 48 hours. Both were extremely vigorously growing from day 1. Temps were 80-82f and humidity 70-80%.
Looking forward to trying the orange sherbet. Dubbed the sour terp monster, lets see if it lives up to the hype. My third time growing gelat.og auto from seedsman. Consistently a dense dank plant! Stay tuned.

Likes
27
Share


@RDWCGrowing
Follow
1/20/2023- So much to do pre grow and over the next 16 days, absolute first order of business is that I have to take down my current Grow---TIMBER-- Then I have a list of things I have to get done in order to be ready to start this grow 1 Feb.
With that said
T - 2 days until start 48 hour Flush
T - 2 days until Start 48 hours of Light
T - 4 days until TIMBER!!!
Items that need to be done before 1 Feb 2023
1. I need to clean the tent out
2. I need to clean the equipment- Proper Sanitization between grows in Hydro is a must!!!
3. I need to get the hole in the ceiling above my tent repaired- For my last grow I had a deep sink installed in my grow room, to make Hydroponics a little bit easier and have a water source in the same room. The seals on the pipes they were installing broke and leaked through the ceiling causing some damage all the way across my grow room, I was already weeks into my grow and couldn't risk them working above my tent and it would have been very awkward positon for them to be working in as well, so have to get this done quickly between chop and germination.
4. I have to install my new light- I was using a Vivosun 4000 and for this grow I am switching up to a Spider-farmer SF 7000.
1/20/23- For this upcoming grow I am working with M/F photo seeds so I ordered 4 Sex determination kits. I recieved my my 4 Sex determination testing kits from Rimrock Analytics today. I will be using these to test my plants at week 2 of Veg so that when/if I take clones I know I am taking them off females. As well as I don't want to accidently pollinate my tent during this grow I am looking for big beautiful buds not seeded buds. :-)
1/24/2023- Harvest of current grow- Started at 2:00pm and finshed wet trim and firt batch into the freeze dryer.
1/25/2023- Next batch into the freeze dryer and cleaning all my equipment for this Grow.
T-1 Day until the workers are supposed to be here to fix the hole in the Grow Room.
T-3 days until I instll my new Gorilla Grow Tent and my New Light Spider Farmer SE-7000 for this grow.
T-7 Days until Start of Germination
1/26/2023- Harvest is done ran through the Freeze dryer and dry tim completed.
1/27/2023- Grow Room repairs completed. Hole is gone Letting the paint dry before I install the new tent.
T-2 days until Install the New Gorilla Grow tent and the new Light
T-3 days until I put the hydro equipment in the new tent
T-5 days until Germination
1/29/2023- Day 0- Final Pre Germination activities
Germination Start T-3 days
The paint on the ceiling was dry and it was time to finish prepping for Germination. I got the following items knocked off my list.
New 4X4 Gorilla Grow Tent is up and ready
New Spider Farmer SE-7000 Light is installed- Thanks Moony Grows for the suggestion and for the Code that got me some money off and free shipping (Moonygrows)!! I turned the lights all the way up to max and set the timer to 18/6 0600-0000. I will keep an eye on the temperature and humidity without my plants and see how hot it gets with the new light.
I put my Hydro system back together and put in 40 gallons of water into it, time to monitor for leaks the next few days.
I Setup my cloning machine for Germination Days 3-11
1/30/2023
let me break down the situation, ROOM in the TENT.. Enough said.. No really I tried putting my exhaust system up in the new tent with my new light, The light is so big corner to corner that it really didn't give me enough room for the lights be be raised, with the exahust hanging the buckets my plants are Starting in are 2 and 1/2 feet off the ground, great for plenty of room for roots but not so great for upwards space for the plant to grow. In a 6' 11 tent with the exauhst in side and hanging that only gave me a little over 4 feet of grow room to play with. My last grow if you saw my diary, anyone could tell I was struggling to keep the buds off the lights. No good, Since space was such an issue I was running my carbon filter inside on the ground but It really needed to be up sucking the heat out not shooting the cool out. With that setup I was sucking air through the filter and pushing it out the tent at a bottom exhaust hole cold out. Wasn't doing me any good for my heat. I was hitting temps of up to 85 degrees. I bought a portable AC unit and have been running it in the grow room to try and keep temps below 85 and I have had to lower the power on my lights during grow also not ideal.. With that said a friend of mine MoonyGrows (Check out his diary) took the time to look at my issue send me a picture of my grow tent setup with detailed instructions on how to suck the air out from the top but putting my filter and fan on top of my tent so no room issue and I am sucking the air out from the top where the heat is instead of pushing the air out from the bottom where the cool is... THANK YOU MoonyGrows For taking the time to help me get this straightened out.. Now I have room and I have the exhausts working right and now my temps with everything at 100% are topping out at 80 this dropped the temp by 5 + degrees at 100% max.
T-2 days until Start of Germination
Prepped my seed tray with humidity dome
Prepped my Rapid Rooter plugs. I Used RO water, and I added a few drops of Hydrogen peroxide to Oxygenate the water. I then PH balanced between 5.7-6.0 the same that they will be getting in the Cloning Machine and when they get to thier final grow pod. I perfere the 5.8x range and I hit 5.84 for these rapid rooters. If you want to see a complete video on the process HowWeedGrow has an amzing video that shows step by step how to do it and explains it better than I ever could including how to plant the seeds. Which I will cover when I get to that step on Wed. https://www.howweedgrow.com/how-germinate-weed-seeds-cannabis-rapid-rooters/
1/31/2023
T-1 day until Germination Start
All set and ready have my Rapid Rooter plugs ready to go have my seeds out.. Have my seed tray warming up tonight. Tomorrow morning right into the Rapid Rooter then strait into the tray. I will spray the dome to start the humidity in there.
2/1/2023
Germination Day!!
Let the games begin!
0600am Put the seeds into the Root Riots. And then put the seeded Root Riots into their first home the Seed tray. I have them under the light 24/7. Sprayed the dome
7:30pm Sprayed the Dome to keep humidity going on the dome.
2/2/2023
Day 1 of Germination
Sprayed the Dome in the morning
Sprayed the Dome in the evening
2/3/2023
Day 2 of Germination
Roots are starting to come out the bottom of the root riot plugs and the heads are slowly popping out of Number 4 just below the surface.
Afternoon- Number 4 has popped up
Evening- Number 3 has popped up as well. Happy Dance!!
2/4/2023
Day 3 - Germination
Surprise Surprise Surprise- all 4 have now poked their heads up.. Happy day!! 100% Germination succeeded.
Now major milestone to track is how many are female and how many are male.
I will take look at the roots this afternoon/evening and see if they have enough root to go into the cloning machine for the next 7 days before they go into their Hydro Pods.
Day 3 - Germination - Evening..
Roots looked good and they were tall enough to make it into the cloning machine.
Now that they are all in the cloning machine I have switched the lighting to veg state 18 on 6 off.
2/5/2023
Day 4 - Germination - Morning
All the Ladies (fingers crossed) looking great stretching nicely and look nice and green, Photo synthesis underway....
UPDATE!! After a very interesting POD cast on FSTS by Dr. Bruce Bugsbee from Utah University, I have shifted my lighting to 24 hours on through seedling and then I am going to shift to 20 hours on the rest of Veg.
2/6/2023
Day 5 - Germination
While Checking on my conditions inside the new tent last night, I found that the Humidity was down to 39 Percent. I added an AquaOasis Cool Mist Humidifier, the reason I selected this humidifier is that I needed one that could be turned on and off utilizing my Inkbird Humidity Controller IHC200 that I have my Pro Breeze Dehumidifier currently running with.
Root structures are starting to get there about 1/4 of an inch.
2/7/2023
Day 6 - Germination
Everything seems on track more roots poking out of each today. They are each getting a little taller as well.
Checked in the evening and number 3 was drooping the Root riot plug on the bottome was dry and the roots were not in the water yet. I raised the water just enough that the longest root that was sticking out is now hitting the water.
2/8/2023
Day 7 - Germination
Everything looked good while checking in on them this morning number 3 is now full up and no droop again.
2/9/2023
Day 8 - Germination
T-2 days until Plant into Forever Pods and we start week 1 of Veg .. :-)
Surprising thing to me is that number 1 and 2 were later in popping then 3 and 4 but the roots are growing longer in 1 and 2.
2/10/2023
Day 9 - Germination
Number 1 and Number 2 are definitely ready for transplant today.. Based on how they were yesterday and where they are today I am hoping by tomorrow 3 and 4 are ready. Today they look to me where 1 and 2 did yesterday.. I really hope 3 and 4 catch up by tomorrow since..
T-1 day until transplant to new/ final home for grow.
Need the roots long enough to have some clay down in the basket to keep the root riot out of the water and only roots in the water..
2/11/2023
Day 10 - Germination
Today they got placed in thier forever Home, 7 days from Sprout and 7 days until Week 1 Start.
PPM- 180 this is water out of the Tap
Temp Water: 70.7
Temp Tent: 77
Humidity: 40% I have a humidifier going 24/7 to try and bring this up.. I also have Humidity Domes on each plant.
2/12/2023
Day 11 - Germination
Sprayed the domes, all are looking good.. Nothing much to do at this phase but Keep monitoring the PH level in the system and making sure they have a comfortable home.
T-6 days until Week 1 start
2/13/2023
Day 12 - Germination
Sprayed the domes, They were looking a little yellow today so I moved the light down to assist. Nothing much to do at this phase but Keep monitoring the PH level in the system and making sure they have a comfortable home.
T-5 days until Week 1 start
2/14/2023
Day 13 - Germination
Sprayed the domes, They were looking a little Florissant yellow today, with what looks like slight burn on the tips, I talked with a fellow grower and we agreed that It was probably that I was drowning them, Yes you can drown you plants even in Hydro, but only early on.. :-) It usually happens with the water being too high, which soaks not only the roots but the medium (root Riot plug in this case). I lowered the water from touching the bottom of the pot to about 1" away. This will probably take 3-4 days to resolve. I will continue my daily monitoring.
T-4 days until Week 1 start
2/15/2023
Day 14 - Germination
Sprayed the domes, continue my daily monitoring they look a little darker green instead of lime green now that I lowered the water levels in the system, so I think that I might have resolved the issue but it will take a few days for recovery to happen.
T-3 days until Week 1 start
2/16/2023
Day 15 - Germination
I looked in on them this morning, 3 and 4 look like they are doing well and recovering nicely. Number 1 not so much it has brown spots on the leaves, this very well can still be a side effect of the overwatering but I decide to go ahead and add Nutes earlier than I was planning just incase. I was going to wait until Saturday but I think intervention is necessary now especially after drowning them early on.
I added 1/2 what I am planning on adding for week 1 start. I also think I am going to adjust my chart to add 1/2 2 days after plant from now on. I don't think it would hurt it to have some Nutes to pull from.
.25ml/Gal Calmag = 12.5ml
1ml/gal GH FloraMicro= 50ml
1ml/gal GH FloraGro = 50ml
1ml/gal GH FloraBloom = 50ml
T-2 days until Week 1 start = I will drain the system and start it over on Saturday with Week 1 Nutes.
2/17/2023
Day 16- Germination
I didn't even want to post today after looking in on them this morning, 3 of the 4 are now showing signs of dronwing.. Brown spots on the leaves, the water levels were still too high.. I drained about another inch out of the tanks.. Will see how quick they recover.. I start week 1 tomorrow and will have to ensure my water levels are at least 1" away from the basket on this round.

Likes
13
Share


@NoVC01
Follow
Moochie's Garden 7/7/2025 (Learning curve producing videos.)
Big bluster - "Miracle-Gro/10 gallon, no ph, right out of the well" Wife said phuck Fox farm we are using NPK RAW, using ph watering cans to feed @ 4 gallons each and 5-gallon buckets of ph. watering. Once a week per feed/water. Following NPK feeding schedule.
AzaMax soil drench .4%, 2 gallons each plant. Still spraying neem. Next, mixing Azamax for foliar spray. If I had not taken steps to prevent pests initially, I'd be completely overwhelmed.
Likes
20
Share


@DeepRootsGrowTrees
Follow
KRITIC AUTO by KANNABIA
Week #5 Overall
Week #3 Flower
This week she's is doing great no issues she's getting a nice aroma to her she's getting weight to her and you can see the trichomes on her buds.
Stay Growing!!
Kannabia.com
KRITIC AUTO

Likes
3
Share


@Barcelona_Farmers710
Follow
Buenas Farmers!! Después del problemas de la sobre fertilización... a pesar de eso huelen espectacularmente sin hablar de la explosión de resina de nuestra Gorila Z y la Blue Gelato 41!! Un placer para el Paladar 👌🏻
Likes
22
Share


@Albeginner420
Follow
Those colas are gigantic and so damn dense, this is a very resinous strain with Amazing smell. Im sure she will give me goosebumps. The waiting game is very difficult. She's a 9/10 weeks strain.


Likes
39
Share


@BelgianBudtender
Follow
Heyo growmies, hope y'all had a good week.
Lots of things happened this week, I had to move the entire grow operation in preparation for the summer, so excuse the lack of pictures and time lapse, I did manage to record the plant recovering from another round of defoliation!
After adding organics at the end of this week it became clear I needed Beneficial's, my roots were slimy, I promptly cleaned the plant, put her in fresh clean water and have introduced hydroguard to my system at double dose, I suspect most of them will die to the h2o2 so ill add some more later next week.
I'm considering flipping to flower somewhere during week 7 or at the end, I feel like I've spread her out enough to fill out the tent, according to the breeder she stretches 1.5 to 2 times, we'll see.
Enjoy your week, stay safe and keep growing.
