Likes
Comments
Share
@FunkyNutz
Follow
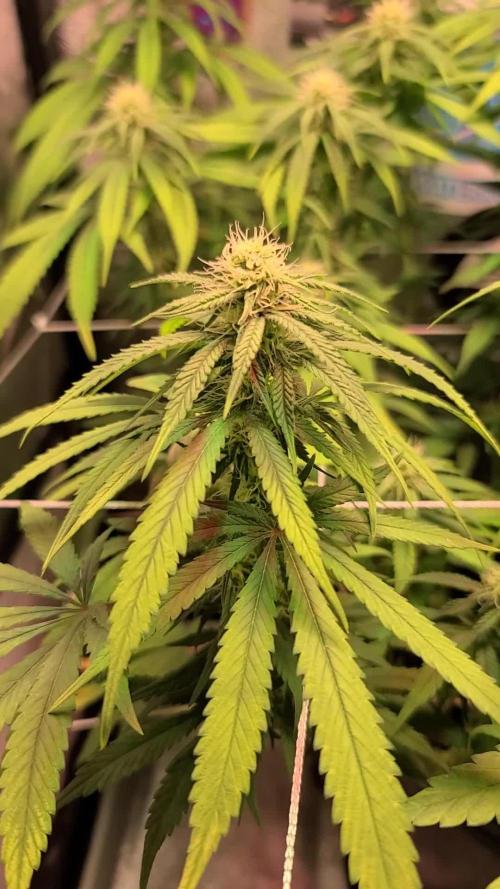
Week 4 seemed a bit slow at first, but i also realised that I wasn't treating coco appropriately, I should feed nutrients every time I water and control the ph and ppm better. By the end of week 4 I got a water quality tester and am now able to properly take my ph down and monitor ppm so my plants don't get nutrient burned, but still gets enough nutrients in time. I also allowed good amount of the top layer of my coco to dry because I mixed up advice that received about soil and coco together. Apparently coco has no issues with overwatering unless your pots have no drainage so in the last 2 days I started treating coco the way it's supposed to be treated, I also finally got calmag and my plants are showing good signs of health past 3 days, they look revitalised and happy again 😊 Unfortunately, apple fritter was way too sick for me to continue with it so I restarted it in a proper coco and perlite mix that's non fertilised, that's a separate diary because its a whole month later. I decided not to train the first 2 plants just to see how the natural process is supposed to go.
Likes
28
Share
@OGgrows
Follow
what a great phenotype. Very easy to grow. bittersweet citrus flavor. very nice and fresh. great strain
Likes
36
Share
@Xpie77
Follow
This week I sprayed the purple haze with silver water and will be mixing this beautiful purple haze with the cheese to get some purple cheese 🧀🤪 The 9 cheese girls are doing greet. Now I'm going to let them restore for a week. Check you next week
Likes
5
Share
4/28 Day 35 I wish this plant was bigger. Could be my fault. Her transition to flower was at such an odd time(3weeks) and that’s when her last feeding was coming to an end but should I give her flower nutes early? Do half an half? Or just wait and then give flower? I waited and I shouldn’t have considering that organic inputs take time to feed your plants. Depending on what you’re using. First time trying Gaia green. I do like the ease of it but it would take some adjustments for me to utilize it best. A month between feeding is too long for my impatient ass and it gives me too long of a commitment to not fuck up. I’m also using roots organics with some other plants and I’m really liking the weekly feedings. It makes more sense than a month. What if I have a strain that’s like 10 week flower? Do I just do another dose at week 7 and 8 and then because it’s “organic you don’t need to flush” thing. Probably over thinking it but yeah here’s my plant yall 😂
Likes
13
Share
Likes
19
Share
@Chubbs
Follow
420FASTBUDS ORT2110 WEEK 6 The both of these have been an interesting grow since the beginning. Both definitely have there own unique qualities. The one is looking more and more mutant like every day and the other is starting to look like a decent plant but staying on the short side. Happy Growing
Likes
68
Share
@Hawkbo
Follow
This is 10 days after the first video in week one, 2 days since running the co2 and they started to take off in the 5x9. BTW the floraflex nute dosages are grams per gallon since its dry. ALSO notice the no calmag, have seen multiple growers using floraflex with zero calmag and ZERO ISSUES they have even told me personally that they seem to have healthier plants without the calmag which is wild to me (another reason to switch to floraflex). The 4x8 were just transplanted within the past 3 days, no co2 yet. Obviously isn't perfect I wish I had everything at the same exact stage but I had an issue with some of the clones and couldn't wait to start them over so I just transplanted some mothers I had hanging around in solo cups from a few runs ago. The small ones are the new clone strains cherry kush mints frosted apricots and Platinum Gushers. Might have some issues feeding everything evenly as the smaller ones won't be eating as much as soon as the rest. Maybe I'll stop the co2 in the 5x9 and only run in 4x8 to get everything to even out as much as possible before the flip. Next run I'll have to be more organized and prepared but I'm hopeful I can pull off some decent results on this one. The co2 in the tents is a little tricky, would like to hear how some other growers run theirs. Constant exhaust on lowest setting? Exhaust on a timer? No exhaust? Today I'm trying no exhaust at all and see what happens like a sealed room essentially but im thinking of having the exhaust on a timer to run every 2 hours for 15 mins just to refresh the air or every hour for about 5 mins. Got alot of cleanup left to do so don't mind the God damn mess mf.
Likes
6
Share
@Ninjabuds
Follow
Permant marker the one seedling I could not be more happy with. It has a distinct different look to it than any other plant in the tent with strong growth going on. I'm sad about the other seedling thou the 1st set of leaves were kinda deformed and it has like a spiral thing going on where new growth comes from. Hopefully it comes back around, I always like seeing atleast 2 phenos of a strain I feel it gives you a better idea of what a strain is. It's looking like a good start to a week the plants are strong they are getting to the point I can let the dried dry out completely. I'm thinking by the end of this week the plants will be starting to be sold. Last week I put all the plants into my bigger 2x4 tent with my medicgrow mini sun 2 the 500w version. Only a few of the plants were ready for that light. Seems like the only plants that really have good resistance and have a strong start are the weedseedsexpress.com seeds. Shout out to weedseedsexpress.com for the strong plants. I ended up putting all the plants back into my 2x2 tent with the 55w amazon light it has alot more blue light in its spectrum. It's kinda weird b4 I switched the plants to the 2x4 tent they were getting 220umol under my amazon 55w led then when I put them under the 500w light 25% strength about 50in from plants and they were getting only about 195umol in that tent but it was stressing most the plants. I assume a larger light has more side lighting hitting the plants. I think when useing larger lights it's good to measure umols from the top but also coming from the sides. I think durring seedling stage they only need about 50% the umols coming from the side the plants as the top is receiving. When I put the plants back in the small tent about the same umols as they were getting b4 the switch and they were still a little stressed. So for a few days I put the small light at the top the tent giving them 100umols for a few hrs then 130umols the rest the day.
Likes
2
Share
Una cepa bastante fácil de cultivar,yo al preparar un súper soil a base de guano,ácidos humicos,bacterias,mi suero de lactobacillus casero,algas marinas y humus,tan solo regue con agua por lo que no tengo mucho trabajo en ese sentido,ademas tampoco le aplique ninguna técnica de entrenamiento cosa que me gustaría hacer si tengo oprtunidad de volver a cultivar esta cepa, sin embargo vi que empezó la floración siendo pequeña de tamaño,término dando una excelente porra central y algunos cogollos bajeros con los que me fui haciendo algunas infusiones con leche entera y también con aceite de oliva para no tener que recurrir al mercado negro y poder asi añadir mis canabinoides a mi sistema para poder mejorar mi lumbalgia y descansar mejor. El aroma es sencillamente exquisito,ha sido todo un placer cultivar esta cepa,lo malo es que es muy poco para mi ya que soy un usuario que necesita una buena reserva de cogollos potentes sobre todo a nivel físico que me ayuden a lo largo del año.muchas gracias y espero que os haya gustado mi trabajo, paz compañeros Canabicos! 💚✌️❤️💛🌱
Likes
37
Share
@MrJones
Follow
OSS Ghost Train Power 🔹⊱╮🔹╰⊰🔹 GROW Started 03.10.24 INFORMATION 🔹╰⊰´🔹⊱╮🔹 🌞Environment - Maintaining 80F and 65%Humidity 🌾Training - The girls are recovering from last week's Pruning and Defoliation, ⚱️2-Gallon 📊6.2 PH 💧 Feeding - Using Horti Bloom and Horti Cal 12-0-0 🌞Medic Grow Smart 8 760 Watts 🕷️ IPM - CannControl from Mammoth and Mosquito Bits as needed 🔹⊱╮🔹╰⊰🔹 PLANT UPDATES 🔹╰⊰´🔹⊱╮🔹 📝 Notes - I am still not getting the vertical growth that I want before I flip, so I changed my light cycle to 18/6 and will be doing another defoliation and pruning of a few side branching - remember I am looking for tall plants with little horizontal growth. 📝Fertigation injects fertilizers into an irrigation system to supply dissolved nutrients to crops. 🗓️04.20.24 Today, I flipped the ladies into flower. I Have let them veg out as much as I feel the grow space can handle. I am sure there will be a bit of pruning and super cropping in the near future. These girls will grow untouched other than the 2x daily fertilization, but I am switching out the Horti-Grow with the Horti-Bloom, feeding at Hort-Bloom @ 2.7 GRMS Per Gal and Horti-Cal @ 2.5 GRMS Per Gal. 🗓️04.21.24 Today fed with Hort-Bloom @ 2.7 GRMS Per Gal, and Horti-Cal @ 2.5 GRMS Per Gal. 🗓️04.22.24 Today fed with Hort-Bloom @ 2.7 GRMS Per Gal, and Horti-Cal @ 2.5 GRMS Per Gal. 🗓️04.23.24 Today fed with Hort-Bloom @ 2.7 GRMS Per Gal, and Horti-Cal @ 2.5 GRMS Per Gal. 🗓️04.24.24 Today fed with Hort-Bloom @ 2.7 GRMS Per Gal, and Horti-Cal @ 2.5 GRMS Per Gal. 🗓️04.25.24 Today fed with Hort-Bloom @ 2.7 GRMS Per Gal, and Horti-Cal @ 2.5 GRMS Per Gal. 🗓️04.26.24 Today fed with Hort-Bloom @ 2.7 GRMS Per Gal, and Horti-Cal @ 2.5 GRMS Per Gal. ╰⊰🔹╰⊰´🔹⊱╮🔹╰⊰🔹╰⊰🔹STRAIN INFORMATION🔹⊱╮🔹╰⊰🔹╰⊰🔹╰⊰🔹⊱╮ Powerful West Coast genetics Ghost Train Haze x Pellezino combine to create this exceptional Cali weed strain Ghost Train Power. This exceptional strain exhibits dominant terpenes like Limonene, Linalool, and Terpinolene that produce a tempting citrus, herbal, floral scent with a fruity taste that is a flavor sensation. Ghost Train Power comes from powerhouse parentage and produces extreme levels of THC up to and in excess of 30% and when you consider her substantial production this strain is unprecedented. The potent effects are surreal and intoxicating and the harvests are a treat. Indoors this beauty will reward you with a generous 650 gr m2 of tantalizing frosted bud and outdoors she can produce more than 1 kilo per plant. Ghost Train Power is USA genetics that will live up to its acclaimed reputation and have you coming back for more over and over again.
Likes
17
Share
This is my first grow, felt like now is the perfect time to start. 😅 Picture 1 - The plants will have a 24h schedule with both sun and LED light. The solution with the cloth in front of the window is only temporary, I need something thats easy to pull up as soon as the sun comes out. My light is about 16in/37cm away from the plants, please let me know if its too close or too far away from the seedlings. Up until this point I germinated both the seedlings using one of those 'Easy Start' Kits with Microorganisms, I then just transplanted both plants with the soil still attached to them in the final pots. I am using Bio Bizz Light Mix for the soil. In about 1 week I will start adding the fertilizers, I will go with about half of what it says on the nutrient schedule because these are autoflowers. Picture 2 - Day 1 - Seedling number 1 is looking healthy. (I think?) As you can see I put a hygrometer next to it so I can monitor the Humidity and Temperature levels. I currently have a humidifier running next to the plants and humidity levels seem to be good so far. I read online between 65-80% are good at this stage. Picture 3 - Day 1 - Seedling number 1 again. At this stage I only water around the plant and dont soak the whole pot, I read that soaking the whole pot while the plant is this tiny can overwhelme the plants. I also noticed that the leaves look kinda yellow-ish? Please let me know if thats normal. Picture 4 - Day 1 - Seedling number 2. I need help with this one I dont know why but he doesnt look good, from the beginning he was much slower than plant 1 and when he finally popped out he looked like he was dying, he is kind of gaining a little bit of color now again but I dont know if he will make it. If you know whats wrong with him please let me know. I hope he opens his two little leafs soon. I still have a third seed laying around so please let me know if it'd be smarter to just abandone number 2 and germinate a new seed. Thanks for reading this far and I'll update as frequent as possible. Day 1 Issues Update - After taking a look at seedling number 2 again and seeing that after all this time it still didnt show any progress, I noticed that one of the two first leaves is actually cut. I mustve damaged it while inspecting earlier because I, (stupid newbie move), touched it too much or whatever. Now germinating my last seed in hopes that all goes well. Since I dont have anymore 'Easy Start' kits im going to try a different germination method, I will put the seed in a cup of water with a piece of cardboard on top of it overnight (12-15h) and then plant it into the moist soil afterwards. 😄 Picture 5 - Day 2 - Seedling 1 is still doing fine. In the morning the temperatures went up a lot (29 Celsius), due to the sun shining a lot through the window, and the seedling was showing slight signs of heat stress (Leafs going up and small yellow-is tint), I then opened the window and the Temperatures quickly dropped back to normal (20-23 Celsius). Moisture levels seem lower than yesterday and Im not sure why (probably because of the heat and opening the window?), still at a solid 62% tho so Im not too bothered. Picture 6 - Day 2 - Since my last Seedling 2 died I germinated another one, I put it in a glass of water over night (~15h) and then planted it into the soil. Hopefully it'll pop out in the next few days... 💪 Picture 7 - Day 3 - Everything looking good with Seedling 1, I kinda felt like it was sort of streching too much instead of growing its leaves, so I put the light closer to it. I will water again tomorrow, the last time I watered was when I put it in the soil 3 Days ago. Picture 8 - Day 3 - The new Seedling 2 is still germinating and will hopefully pop out of the soil in the next few days. Picture 9 - Day 4 - Seedling 1 still going strong, leaves are praying but I read that that is a good sign. I watered both pots again today with just Ph-water, will add fertilizer in about 3 days for seedling 1. Seedling 2 is still germinating, will post a new picture as soon as it pops out of the soil. 😉 Picture 10 - Day 5 - Seedling 1 looks healthy, but is going kinda slow. Turns out I had the light far too high... 😐 Pulled it as much down as I could now and its already growing better! Main indicator for not enough light was the stretching and the thin leaves. I will probably have to invest into a bigger setup as soon as flowering hits. ✊ Picture 11 - Day 6 - Seedling 1 leaves are getting bigger and the next set is already on the way. Picture 12 - Day 6 - After 4 days germination, seedling 2.1 finally popped out the soil! 👏 Picture 13 - Day 7 - Seedling 1 leaves seem a bit curled up, probably because of the hot sun this morning, Im not too worried tho. Will water with nutrients the first time tomorrow. Picture 14 - Day 7 - Seedling 2.1 looking fine, soil was pretty dry so I watered it a bit with ph water.
Likes
11
Share
Flower week 3 successful. Feeding every watering with nutrients and once a week calmag. Next week I start with Aptus K Boost in a lower dose and then let's see how they react. Till now I am super super happy with Aptus 🌱. Big big thanks that I can use the good Stuff💚💛❤️. But we know all the good Stuff comes from Holland 🇳🇱
Processing
Likes
12
Share
hotter this week over here 100 plus sometimes a 97 98 started feeding low nutrient mix cloned last week when you guys said to just tryn to keep them cool......any tips during this stage??
Likes
18
Share
Hey week 7 , and safe to say the star of the show so far is blue gelato 41 . So dense and full of thc. The buds are literally so dense I can't believe it . Inhouse genetics terple smells really dank just hoping the buds get a little more fat Seedsman wedding cake limited edition has actually turned white with the amount of frost, its out of this and the blue gelato with the most thc Watermelon punch growers choice smells really fruity but I already know I won't be growing again
Processing
Likes
1
Share
little clone lollipops still partying. Just hand watering ever couple days, or throwing one of the drip rings into the pot once in a while. I also am rotating the pot a 1/4 turn when I remember. Will probably move this out from under the shade this week cause I think they've gotten used to the flower lights and will bud soon.
Likes
278
Share
A big hello to all the cannabis growing gardeners...and all the other visitors that came across my grow journal. Just on harvest day I was summoned on a long quest...around 700 km. will be away for three days. I will update this diary as fast as i"m back. For now just the photos as no time for anything. ---------------------------------------------------------------------------------- Now cannabis smell is overpowering in my grow room I can finally write something about Spider Farmers 6-Inch Inline Fan with Smart Controller and Carbon Filter :) As my grow room gets really stinky at times i always invest in a top shelf carbon filter almost twice the size of the one provided by Spider Farmer, to my shock Spider Farmer carbon filter absorbs the smells wonderfully well. No smell leaks and that just when the fan is running at 5 out of 10 levels of output. The smart controller is something completely new to me, and had a lot of fun experimenting with it during the veg and early flower, when the smell began i needed it to run full time at level 4 or 5 to rid the fragnance. All in all the whole combo is a great deal. If you are not as keen on technology the set without the controller is awesome on it's own. But to have some extra options open, the controller at the device throws at you a ton of settings you can use to optemiase you grow enviornment. The SE 7000 is hanged at 40 cm. over the canopy and runs at 520W. This whole grow's main sponsor is Spider Farmer. You can easily obtain all the great grow equipment we use at: spider-farmer.com A big thank you to Jessie and the whole Spider Farmer crew for supporting me with the newest technological advancements in horticulture. Thanks to them what i do here is possible. Thank you Mafia Seeds for giving me the opportunity to try out your stock. seedsmafia.com/en/feminized-cannabis-seeds/moby-dick-feminized.html Plagron did send us their Contest package for the Power Buds competition . Thank you for your visit, please leave a like and hope to see you beck here in about a week.
Likes
51
Share
Flowering day 3 since time change to 12 / 12 h Hey guys . My cutting heating broke 3-4 weeks ago, which was fixed immediately and everything went wonderfully. Now, 3 days ago, the central heating broke down in the entire room, so that at night I only have temperatures of around 13 degrees :-( . One or the other lady is slowly starting to see a phosphorus blockage, as this can no longer be absorbed at temperatures below 15 degrees, like many other nutrients :-( . A friend looked at the heating yesterday and came to the conclusion that a real company had to do it, which is by no means possible for a stranger to enter my room. I quickly ordered heating mats for all the boxes so that the ladies could at least get warm feet. That's all I have this winter full can do . Let's hope everything will be fine 🙏🏻. As soon as the heating mats are attached in the coming days, I will post them in the pictures. Now for the update. Despite the severe cold, the ladies are still doing well and have made good progres . The ladies only had to be watered once this week, each time with 1 l, because it absorbs the water very slowly because of the cold and I don't want to overwater it. I took every single plant in the pot to take a close look at their roots. These are snow white and look very healthy 🙏🏻. It was also the last time neem oil sprayed so that the last trips are finally gone. Otherwise everything was checked and a lot of planning was done, like I do with the heating mats. Since a friend had the same problem in one winter and the heating mats got 10 degrees plus on the pots, I am very confident that it will at least bring something for the last cold month 😃 🙏🏻. I've started flowering even if some are still a bit small, but otherwise they'll get too wide from training and end up taking up space :-) until then have fun and stay healthy 🙏🏻 👇🏼👇🏼👇🏼👇🏼👇🏼👇🏼👇🏼👇🏼👇🏼👇🏼👇🏼👇🏼 You can buy this Nutrients at : https://greenbuzzliquids.com/en/shop/ With the discount code: Made_in_Germany you get a discount of 15% on all products from an order value of 100 euros. 👇🏼👇🏼👇🏼👇🏼👇🏼👇🏼👇🏼👇🏼👇🏼👇🏼👇🏼👇🏼 You can buy this strain at : Clearwater Seeds Water 💧 💧💧 Osmosis water mixed with normal water (24 hours stale that the chlorine evaporates) to 0.2 EC. Add Cal / Mag to 0.4 Ec Ph with Organic Ph - to 5.8 - 6.4 MadeInGermany
Likes
48
Share
Day 99 07/10/24 Monday Flushing this week Using de-chlorinated tap water 10L pH 6 with Flawless finish. Seeing her finalise and ripen this week will be satisfying 😍 Watching her colours transform, she's just stunning 👌 Picture and video update 📸 Day 101 09/10/24 Wednesday De-chlorinated tap water pH 6 only today. Day 103 11/10/24 Friday De-chlorinated tap water pH 6 only today again pH 6. Only 1.5L Day 104 12/10/24 Saturday Another Flush today, using 10L de-chlorinated tap water pH 6 with flawless finish. She really has darkened in colour now, fans showing a deep dark Purple / Black, the buds themselves are a deep dark purple, and absolutely laced with trichomes 🤤 Picture update tonight📸💚
Likes
Comments
Share
Big stretch during second week. We'll see when they stop. I will trim the lowest branches one last time before week 3.
Likes
17
Share