
Likes
Comments
Share


@Bread_n_Buds
Follow
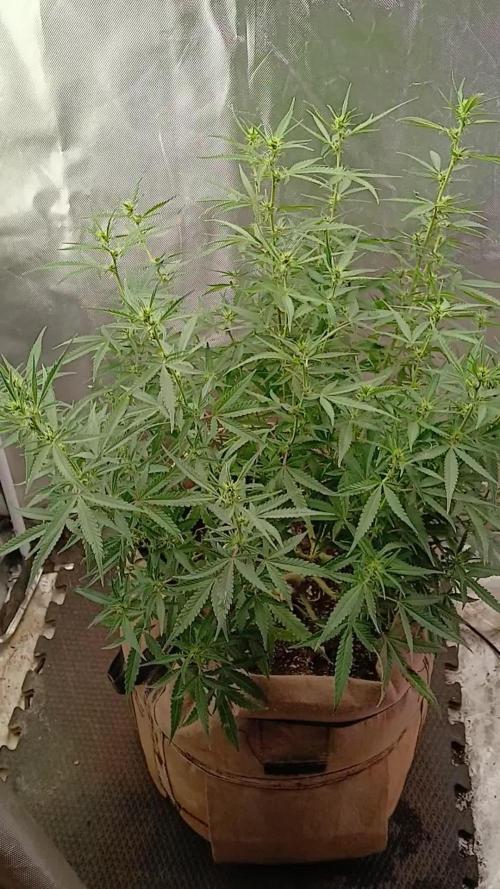
Here our Zookies, as I anticipated, have started off great and are starting to give their best
In this diary you will find the plant worked with the techniques in this case the first topping was done, we cleaned everything else creating the Mainfold and we are going to work everything with the main lining. We are at the first topping and we have two mini branches growing.
The other one you will find in the diary next worked without the application of techniques that involve cuts to preserve its speed.
Comparison is the salt of experience.
We have started the Plagron fertilization program, we are in 100% organic configuration, the soil is recycled Promix + 1/3 fresh soil + 10% Perlite + RQS Mycorrhiza Mix (4gr in the mix, 1 gr under the small fiber pot).
We are administering // 1 ml/l of Power Roots - 1 ml/l of Pure Zym - 1 ml/l of Sugar Royal - 3 ml/l of Alga Grow
I have doubts about the compatibility of Pure Zym with mycorrhizae. If in doubt, ask the experts, do not mix too much at random.
https://plagron.com/en
The doubts about the compatibility Pure Zym / Mycorrhizae have been dispelled, they can go well together according to Plagron experts. If someone tells you that enzymes eat mycorrhizae, which in principle may seem possible, explain to them that it is not true.
https://www.royalqueenseeds.it/growing/452-easy-roots-mix-di-micorrhize.html
Try this variety, it is a top strain of the last few years very high level of thc ---- https://www.zamnesia.io/it/11174-zamnesia-seeds-zookies-auto.html
Brief description of Zamnesia // The result of the cross between Animal Cookies, GG#4 and ruderalis, this compact variety produces top quality buds, maintaining all the charm of a modern US hybrid. Thanks to the hard work of the Zamnesia genetics team, Zookies Automatic is easy to grow, fast flowering and exceptionally vigorous. Regardless of whether you grow indoors, outdoors or in a greenhouse, if you are looking for a stable autoflowering strain that is quick to harvest, Zookies Automatic is definitely the one for you.
Like all Zamnesia autoflowers, Zookies Auto promises rapid harvests of top-quality bud with minimal effort. And she delivers on that promise. After germination, Zookies Automatic plants grow vigorously for around 3–4 weeks. At the end of the pre-flowering phase, plants typically reach a height of between 90–110cm, depending on the size of the pot.
You can find the whole world of growing on Zamnesia and more, just check out the site and you will find "all the best that nature has to offer" in various shapes and colours.
The new strains are fantastic and the old ones are no exception... p.s. no hermaphrodites so far, can you growers say the same?
---- // www.zamnesia.com

Likes
3
Share


@dirty_jay
Follow
I think I'm getting real close to harvest. I'm fairly nervous about the drying and curing. Think I'm mostly going to use brown paper bags as I'm not sure I can control the humidity well enough in my grow space. The last 4 rounds of watering I've given nutes twice. Usually I go 6 cycles of watering fertalizing twice. Maybe this too was a bad idea and I'm going to start flushing soon anyway. Possibly one more round of nutes in a couple days.

Likes
2
Share


Likes
6
Share


@BestBudz131
Follow
Made a few mistakes with this first grow. To much light and under watering but she’s growing nicely today!
Likes
11
Share


@Inceptionist
Follow
I mean actually using this tent for other grow, so might as well rate it.
It's quite durable and like the shape and color of it but I like this tent less with every grow.
Doesn't has the best placement of air vents and therefore steals quite a bit of space which is supposed to be for your plants because it develops too much negative pressure.
The three squared "windows" at the bottem aren't really usable because too much light will come through. It's just gonna make your tent a hermie tent.

Processing
Likes
12
Share


@MUDBUG
Follow
I would recommend more stability in the pack I got all 3 was different phenos but terp wise both was home runs there making moves with flavor the size was always the biggest autos out there it was the terps that was missing but I believe that's changed now both #6 #10 are full of flavor u wont be dissatisfied 100% if u hit that one SHE WILL GET BIG buds were really dence on these but the FRUITYNESS is wat will make this a top strain to come✍️✍️✍️✍️🔥🔥🔥🔥🔥

Likes
24
Share


@Enollam
Follow
Servus zusammen 🏽
Ich bin bisher sehr angetan von den biotabs
Beide Pflanzen machen im Zelt den besten Eindruck.. ich bin gespannt auf das was da noch kommt... Auf jeden Fall bis hier her angenehm und unkompliziert

Likes
1
Share


@DaVinchi720
Follow
Doing a rerun with the keeper pheno due to herming stemming from a power outage.


Likes
51
Share

@Bread_n_Buds
Follow
And we have arrived at the magic moment for our autoflowering plants, the Zamnesia elves are working their magic and the buds are composing and freezing in the night. A scent of paradise invades my house now.
--- Our Black Orchids are beautiful and different from each other. I imagined they were similar until a few days ago but then one started flowering more quickly and kept the main cola quite aligned with the lateral buds; the other instead started a mega central brunch and stands up to 130 cm tall. What we like most is that it seems to be bringing out dark buds. I don't want to bring bad luck but here we are waiting for a Black with fingers crossed, touching wood and everything necessary. Beautiful, tall and powerful, she will still be a champion. The bigger drink 2 litres x day and i found her dry in the morning.
---- Fertilization schedule - As for the fertilization schedule, we have two plants, one further forward and one further back. To the advanced one we are giving the green sensation and all the late flowering program while to this one in the photo that is monstrously big, it seems dark and a little further back we are still giving the early flowering program with a lot of bloom, still power zym and grenn sensation.
---- https://plagron.com/it
- Alga Bloom - 2 ml/l
- Sugar Royal - 1 ml/l
- Power Buds - 1 ml/l
- Green Sensation - 1 ml/l
--- The dehumidifier now works between 50% and 55%
--- The 100% Organic Plagron pack can be found on Zamnesia at the link: https://www.zamnesia.io/it/11457-pla gron-easypack-natural.html
// Strain Description // It is said that the orchid symbolizes love, refinement and beauty. Well, we can confirm that the Black Orchid Automatic contains all these attributes and many more. This autoflowering variety has a lot to offer: a particular but very pleasant aromatic profile, and a relaxing and carefree high. Furthermore, this plant is very productive when grown in optimal conditions.
- Get a seed of this fantastic strain --- https://www.zamnesia.io/it/9493-zamnesia-seeds-black-orchid-automatic.html
- Fully organic soil and fertilizers
--- https://plagron.com
buy on www.zamnesia.io
- Growbox and ventilation system --- https://www.secretjardin.com/
- Light — P2000 - https://www.viparspectra.com
- Music and sound --- I made my girls listen to 432hz frequencies and black music from www.radionula.com
- Z --- You can find these seeds, much more from the world of cannabis, mushrooms and an incredible series of accessories and gadgets on the reference site not only mine but of many growers
---- https://www.zamnesia.com


Likes
18
Share


@BrownsBuds
Follow
The three autos I continued to flush this week and turned off the lights on friday morning for the 48 hour of darkness before the harvesting.
I have cut off all dead leaves and cut the stem of the plant and hanged upside down in the tent at 50% humidity. I have no lift scales to measure the weights of the plant but will update as it cures.
Dr jack auto which is still outside the tent is doing well and now is under the more powerful light.

Likes
7
Share


@Cultivatorcarlos
Follow
everything in the second week of flower went well. she really stretched and the buds quickly started getting fat. also every watering i would notice a very strong odor of weed.
december 22nd 2021: gaver her last half of gallon used in last feeding. also nothing was tested. ph tested at 6.6 last feeding and it usually comes out a little higher after a few days.
january 1st 2022 i noticed the first trichomes.


Likes
57
Share


@MadeInGermany
Follow
Hey everyone :-)
We arrived in the last week before the harvest 😍😍😍.
I can hardly wait because both are beautiful and smell extremely good 👍😃.
Let's start with the weekly overview:
Flowering day 56
Both were poured with 1.2 l each and checked for their health.
Flowering day 57
Today the tent was cleaned and the humidifier refilled.
The trichomes have been checked and are about 80% milky and 20% amber.
Flowering day 58
Both were checked, and the technology was checked for functionality.
Flowering day 59
Today both were checked and fresh osmosis water was left in the tank.
Flowering day 60
Again, both were poured with 1 liter.
Flowering day 61
Today was a pure control day.
The trichomes are now 30% amber and 70% milky (a few days until harvest).
Flowering day 62
Today the whole tent was cleaned.
And got the darkroom ready. In the next few days we will go to the darkroom.
Of course, there will be a harvest update before the last update.
Until then, I wish you all the best, stay healthy 🙏🏻 and let it grow 🍀
You can buy this Strain at :
https://sweetseeds.es/de/red-mandarine-f1-fast-version/
Type:
Red Mandarine F1 Fast Version
☝️🏼
Genetics:
Red Poison Auto®️ (SWS39)
X
Tangie (California Orange x Hybrid Skunk)
👍
Vega lamp:
2 x Todogrow Led
Quantum Board 100 W
💡
Bloom Lamp :
2 x Todogrow Led
Cxb 3590 COB 3500 K 205W
💡💡☝️🏼
Soil :
Canna Coco Professional +
☝️🏼
Fertilizer:
Green House Powder Feeding
☝️🏼🌱
Water:
Osmosis water mixed with normal water (24 hours stale that the chlorine evaporates) to 0.2 EC. Add Cal / Mag to 0.4 Ec Ph with Organic Ph - to 5.5 - 5.8 .

Likes
46
Share


@pifflestikkz
Follow
This plant was an absolute dream to. Grow, no issues at all with health of plant, just struggled to tame her as she was a a thick strong climber 💪💪.
I'm so impressed with how this turned out, I could have flushed for another 3 days to make it 12days but I needed the space.
After The 2 days of dark I was recommended I can definitely say it has vastly boosted her trichomes and the smell when I opened the tent blew my head away 😍😋
Aiming for a 10-14 day hang dry,
The 10-12 weeks curing in jars with humidity packs.
I will update with a dry bud weight and smoke test 👌
Bud wet weight is just 500g+
Final bud dry weight is 298g.
Of juicy resinous purple and orange buds 😍 smells like sherbert and hang dry smoke test revealed a candy sherbert, no banana yet but hoping like the grow it matures with cure process now.
Hits eyes straight away, sandy bottom kids, giggles, munchies, fun time with Mrs, bed. Full cycle with this one very happy over here 😉😁💚
FAT BANANA AUTO FROM ROYAL QUEEN SEEDS, big thank you to the team, and the breaders. What a pheno I received. I appreciate you all


Likes
2
Share

@BasedBuds_89
Follow
Had an awesome week, she finished her final stretch and now ill focus on one final defoliation and lollipop to redirect energy to buds.

Likes
18
Share


@DogDoctorOfficial
Follow
Seedsman Seeds Germination Report - Run 01: The White OG Journey
Kickoff to Germination: The Start of Something Great!
Welcome to the beginning of this adventure with The White OG feminized seeds from Seedsman Seeds. Excitement is in the air as we’re searching for strong, resilient plants, and this journey has all the best tools and tips. Starting with five seeds, we’re aiming for a solid beginning and maximum potential. Let’s explore every step in detail to make this grow as robust as it can be!
Germination Process: Tools of the Trade
TheCannaKan: The Ultimate Germination Gadget
I’m thrilled to share my love for TheCannaKan, a little germination wonder! This tool is essential for any grower who wants to start their seeds with precision and care. I noticed rapid results in just 24 hours, with the seeds showing signs of life. At about 32 hours, I transferred them to the Root Riots, which brings us to the next exciting stage.
Why I Love TheCannaKan:
• Quick Results: Seeds sprouted rapidly, minimizing wait time.
• Consistency: Keeps moisture levels optimal for uniform germination.
• User-Friendly: Simple yet effective for both new and experienced growers.
Root Riots and Their Role in Root Development
After sprouting, I placed the seedlings into Root Riot cubes under a dome. Root Riots are fantastic for stabilizing young plants, providing an airy and nutrient-friendly environment that promotes robust root growth from the start.
Benefits of Root Riots:
• Root Aeration: Soft yet structured, these cubes support root expansion.
• Moisture Retention: Holds just the right amount of water for growing seedlings.
• Enhanced Root Health: The cubes are ideal for preventing damping-off and ensuring healthy, white roots.
Nutrients to Kickstart Growth: Aptus Holland Regulator and Startbooster
To give the seedlings a perfect start, I added Aptus Holland’s Regulator and Startbooster (1ml/L each). This mix promotes early root and stem strength, giving seedlings the ability to absorb light and nutrients more efficiently.
• Aptus Regulator: Enhances plant resilience, aids in nutrient absorption, and promotes early vitality.
• Aptus Startbooster: Adds a balanced mix of growth hormones and nutrients that are ideal for the early stages, encouraging healthy roots and faster seedling growth.
Light and Environment: Future of Grow FOG LED with TrolMaster Tent X Controller
I’m using a Future of Grow (FOG) LED at 600W, but keeping it dimmed down to around 200 PPFD. This setting is controlled by the TrolMaster Tent X Controller to give the plants the perfect start without overwhelming them with intense light. Controlled lighting helps seedlings to develop without stress, encouraging healthy growth and internode spacing.
Shoutouts:
• Future of Grow LED: High-quality, efficient LED light that adapts well to seedling and veg stages.
• TrolMaster Tent X Controller: Reliable and intuitive control over light, humidity, and more. Perfect for a hands-off, efficient environment setup.
Observations: One Seedling Takes the Lead
At the end of this germination stage, it looks like one seedling has emerged as the strongest, while the others may need a few more days. Patience and observation are key; some seeds naturally take a bit more time to sprout. I’ll keep monitoring these with hope, allowing each seedling its own rhythm.
Grower’s Notes and Tips
• Consistency Matters: Germination is all about steady conditions—consistent moisture, gentle nutrients, and stable lighting make all the difference.
• Document Everything: Keeping a log of each step (like this one!) helps track growth patterns and provides valuable insights for future grows.
• Stay Positive and Patient: Not every seed will sprout at the same rate. Trust the process and remember each plant is unique.
Community Shoutouts
Thank you to everyone who makes this process smoother and inspiring—TrolMaster, Aptus Holland, Future of Grow, and Seedsman Seeds for amazing genetics and tools, as well as the growers’ community who share insights, tips, and encouragement along the way.
Next Steps
Now that we’re through germination, we’ll move into the early growth phase. I’ll keep documenting the lighting adjustments, nutrient changes, and growth patterns of each plant, especially that eager seedling leading the way!
Growers Love, and here’s to a strong start for the future of this grow! 🌱
DISCOUNT CODE - SeedsmanSeeds - DOGDOCTOR 10% off
As always thank you all for stopping by, for the love and for it all , this journey of mine wold just not be the same without you guys, the love and support is very much appreciated and i fell honored and so joyful with you all in my life 🙏
With true love comes happiness 💚🙏 Always believe in your self and always do things expecting nothing and with an open heart , be a giver and the universe will give back to you in ways you could not even imagine so 💚
Friendly reminder all you see here is pure research and for educational purposes only
💚Growers Love To you All and remember to keep that smile big and alive 💚
Likes
7
Share


@iHateSativa
Follow
Chopped And Hang drying
I lost count of thow many days in flower But I know its over 100 days
I'll be making canna oil with coconut oil
And canna oil with MCT oil

