
Likes
Comments
Share


@Bread_n_Buds
Follow
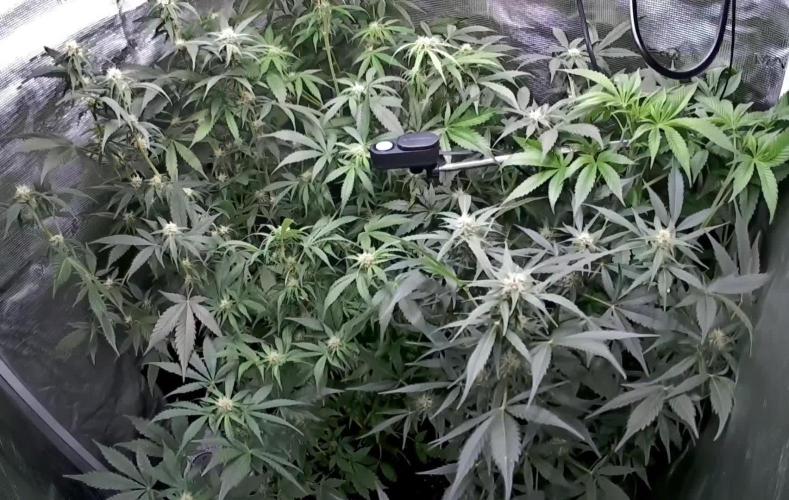
Trainwreck is now an established strain in the history of cannabis, now we can see how it turns out on the automatic one from Zamnesia.
Remember that we are growing a plant worked with the techniques indicated and another left to grow without pruning to preserve its speed; in the previous/next diary you will find the other plant of the same variety.
In this diary we find worked with the Main Lining. Topping at the second internode to create the MainFold, growing shoots worked parallel to the ground for another three internodes and then topped again. We have removed the branches of 1 internode on each side and topped the remaining two branches on each side.
Slow down the use of nitrogen during this technique, you may not need everything recommended by the manufacturers. So, if the leaves become too dark or, worse, the tips of the leaves arch downwards and the leaf becomes "crunchy", it is time to lighten or stop the basic fertilizer. She is a bit dark and I slowed down by giving only additives.
Comparison is the salt of experience, so the plant in the other diary will be treated very differently, go see it to compare.
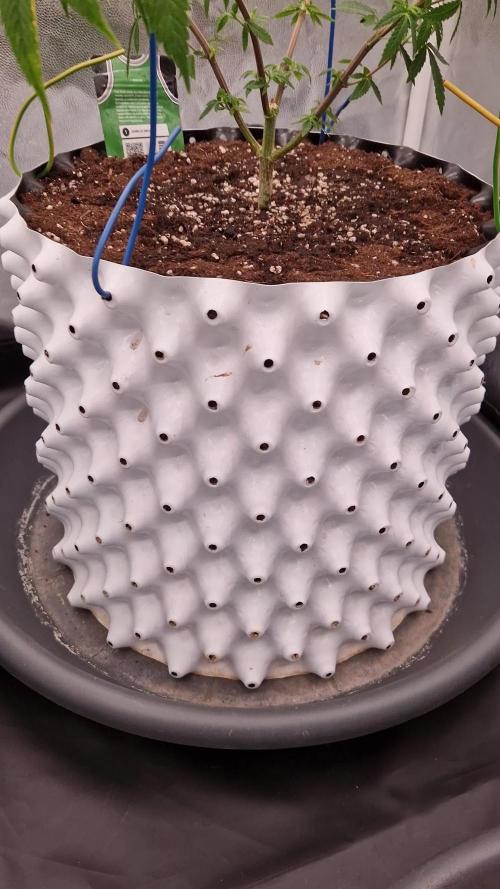
We started the Plagron fertilization program, we are in 100% organic configuration, the soil is recycled Promix + 1/3 fresh soil + 10% Perlite + RQS Mycorrhizae Mix (4 g in the mix, 1 g under the small fiber pot).
We fertilize with: 1 ml/l Power Roots - 1 ml/l Pure Zym - 1 ml/l Sugar Royal - 3 ml/l Alga Grow
We sprayed 3 ml/l Vita Race foliar fertilizer once a week.
https://plagron.com/it
We always have the excellent RQS mycorrhizae flowing in the soil.
https://www.zamnesia.io/it/5778-mix-micorrize-easy-roots.html
Take a taste of this strain, it's a cross of legendary strains
https://www.zamnesia.io/en/11055-zamnesia-seeds-trainwreck-automatic.html
Short Description Zamnesia // Trainwreck Automatic is the autoflowering descendant of the popular cannabis strain Trainwreck (a stunning cross of Thai and Mexican landraces). Much loved for its 70% sativa genetics and sativa-like effects, Trainwreck Automatic is as easy to grow as an indica (even in cold climates).
This autoflowering strain goes from germination to harvest in 11–12 weeks, meaning you'll be harvesting sativa buds in no time. It prefers warmer climates, but thanks to its short life cycle, it can also be grown in more northern areas (provided it is germinated a few weeks early when growing outdoors)
Trainwreck Auto offers delicious lemon and lime flavors that enhance the classic sativa profile of its parents. Furthermore, thanks to the spicy and earthy notes, the overall experience will be even more intense, regardless of whether you smoke or vape it. In terms of its effects, Trainwreck Auto is euphoric, uplifting and energizing. Fueled by a THC content of around 21%, this strain is perfect for socializing and best suited to smokers who prefer to stay active after consuming cannabis, rather than lazing around doing nothing.
The whole world of cultivation and much more is from Zamnesia: just take a look at the site and you will find "all the best that nature has to offer" in various shapes and colors.
-- // www.zamnesia.com

Likes
15
Share


@Medup75
Follow
Learnt some hard lessons this round! Next time I'm adding dolomitic lime to buffer soil aswell as always pHing from now on! Other than the lockout mid flower and slightly smaller buds as a result I'm happy with my first attempt at a actual tent grow. The buds look dense and frosty and under a scope a few are starting to turn cloudy. Next round is gonna be only three as I'm not comfortable with it being so cramped! I reckon I'll let her go another week with feed the I'll do a two week water only flush!
Happy growing to all ✌️

Likes
16
Share


@TooQuiikk
Follow
Let me start by saying, I'M SO GLAD I DIDN'T CHOP! THESE BABIES ARE GAINING SOME SERIOUS BULK!
I can not wait to see them finish out, It's really testing my patience, but I notice more bulk every single day!
It's about time to get the chop, they are maturing really quick and I love it. The smells are absolutely insane!!!


Likes
27
Share

@Webacca
Follow
Tja, eine ereignislose Woche geht vorbei. Wachstum keins zu verzeichnen. Nur die Buds werden dicker und zeigen Trichome.
Der Geruch beim Entlauben ist schon sehr nice. Nicht zuzuordnen, aber sehr nice.
Gegossen, etwas entlaubt und jetzt wieder warten, was geht.
Evtl ziehen sie in den nächsten Tagen um ins Gewächshaus. Die Eisheiligen halten sich ja heuer etwas ruhiger.
Der letzte Zeitraffer ist am Ende dabei. Glaube nicht, dass ich noch einen laufen lasse. Spätestens draußen nicht mehr
Likes
26
Share


@Roberts
Follow
G13 auto has bounced back well after neem oil treatments. All the critters appear to be gone. She is growing good under the Medic Grow Mini Sun-2 in the Athena blended line nutrition. she got some basic training today. She should start making the switch to flowering soon. Thank you Medic Grow, Athena, and Weed Seeds Express. 🌱🌱👍🏻🌱🌱
Thank you grow diaries community for the 👇likes👇, follows, comments, and subscriptions on my YouTube channel👇. ❄️🌱🍻
Happy Growing 🌱🌱🌱
https://youtube.com/channel/UCAhN7yRzWLpcaRHhMIQ7X4g

Likes
24
Share


@JUNGLE_B4RNS
Follow
Growing feminized seeds from White Label Seed Company is an affordable and easy method of obtaining a high quality harvest. White Label was the first company associated with the Sensi gene-bank to make feminized varieties available to the public. As the popularity of growing feminized cannabis has grown, the number of White Label feminized varieties has increased to keep pace with the demand.
Transplanting at beginning of week 4, it’s now end of week 5, using only water. Time to feed and increase Nitrogen, some plants are showing Nitrogen deficiency and got some bottom leaves getting yellow.
Except the lil Nitrogen deficiency, all the plants are doing well. The Kush are compact, White Gorilla Haze got 2 different phenotypes.
(I’m looking for a job in the Cannabis industry as Master Grower, Mineralogist, Quality Control)

Processing
Likes
16
Share


@Andres
Follow
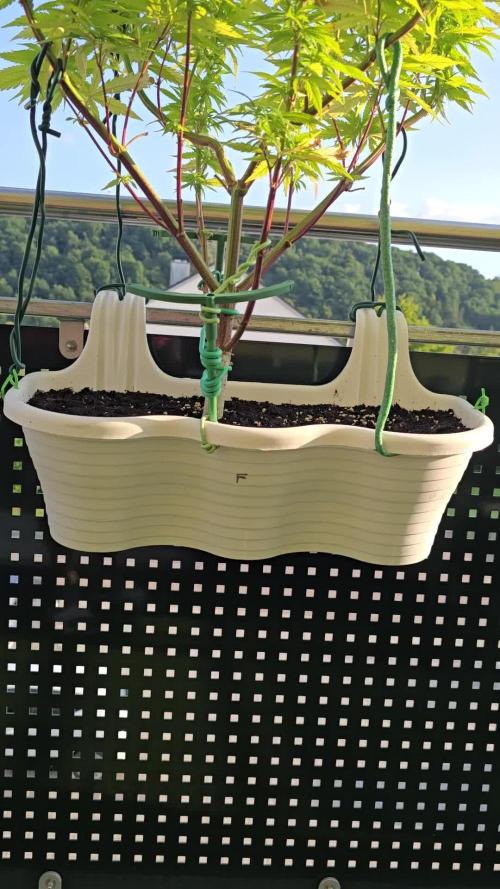
they are taking shape in their flowering but one of them requires urgent nutrients ... tomorrow comprare.biobizz ... although I am finding that I only use organic material ... she needs it .. I hope that my work trips do not affect my babies.... the other pack its height is 160 cm

Likes
6
Share

@TrickzGrowz
Follow
Echt kräftige Triebe bekommen, bin gespannt wie sie sich jetzt im großen Topf ausbreitet.

Likes
9
Share


@JamaweedOPO
Follow
A planta segue bem parou de crescer na última semana e começou a engordar as flores.

Likes
13
Share


@HAN_GROWER17
Follow
Esta semana esta rodeada de una paleta de olores bastante rica, se siente bastante agradezco contar con un buen filtro de olor (artesanal), el que cumple al 100% su trabajo, si se dan cuenta hay flores que se ven bien buenas, plantas que prometen ser bien productoras, esperemos se mantengan asi y las otras plantas que van un poco atrasadas culminen con un buen resultado.
Hemos implementado una poda RIB, para ver si potenciamos aun mas los resultados.
!Saludos!
Te invito a comentar cualquier sugerencia.

Likes
2
Share


@taisoncreamcaramel
Follow
Blüten werden immer dichter ....
Tag 66 : Planung : Wetter mit viel Sonne nächste Woche .... Nochmals knapp 2 Wochen düngen, dann spülen ... wahrscheinliche Ernte Woche 14 !
Likes
6
Share

@Crazy_Doofus
Follow
16/01 Spider mites since 2 days, already start getting black spots on the leaves, she's very close to ready, so cut half way, will keep a close eye on the bottom... For another couple of days...
21/01 not much movement
24/01 cut lower part and cut the clones, BEST CLONES EVER ❤️♥️

Likes
16
Share

@Naujas
Follow
112 days!!!! This week was very difficult for the girl, because it rained a lot, but from today the weather forecast promises only good weather, I hope it will be so, next Saturday, I'm going on a long vacation, the girl will be without me for 3 weeks, so I won't be able to hide her from bad weather, I will leave the automatic watering which I will control via wifi, once a week I will ask a person to come to water with nutrients and take photos, :) so there will be weekly updates, but with fewer photos:) good luck to everyone :)
Likes
44
Share


@Cogollo_eu
Follow
**Encontrarás la traducción a español al final de la descripción**
From/Desde: 12/04/19 || To/Hasta: 18/04/19
From day/Desde día: 50 || To day/Hasta día: 56
You can find the Money Maker Diary here:
** Podéis encontrar el diario de las Money Maker aquí:**
https://growdiaries.com/diaries/25667-gorillamakingmoney-gorilla-vs-money-m
-----IMAGES & VIDEOS-----
I'm sorry for not having a tlapse video this week, i slaved the cam onto my 60x60 tent to record the first growing week of another plants, next week i will return with more tlapse videos.
-----WEEK SUMMARY-----
To have a visual size of the plants take into consideration that the SCROG net it's fixed 24 cm abobe the top part of the soil.
There's something i want to correct and remark this week. About the question i asked some weeks ago on growers help, about the plant with decoloring problems (Photos 7 & 13), where i've choose the defoliation answer as the correct one. Watching the plant today, I would say that it can be an excess of co2 in the roots caused by a co2 tablet that I used during the first days of growth. You can notice how the part of the plant in the back does not present de decoloration it have in the front.
Also remarking what i've told last week, i must say the SCROG is not a true SCROG, as some colas begin below others, and also colas are of different heights among all plants. Anyway i'm very happy on how everything is going. And insisting again, I have very very few experience growing cannabis, this is my 3rd grow, 2nd indoor, and first time with photo-period at indoors, and of course is the first time too i'm trying to apply growing technics on a serious way. I really don't know if i'm doing things right or wrong.
-----WATERING CALENDAR-----
13/04/19 - 1.250 ml with all week nutrients -(Sensizym, bloom stimulator, bloom nutrition & amino complex) @ PH6.4 & 1.3 E.C.
17/04/19 - 1.250 ml with Silica Power, Pro Active, Bloom Stimulator, Bloom Nutrition, Sensizym & 5 drops of Amino Complex @ PH6.5 & 1.3 E.C.
*****ESPAÑOL*****
-----IMÁGENES Y VÍDEOS-----
Siento no tener vídeos timelapse esta semana, he esclavizado la cámara en el armario de 60x60 para grabar la primera semana de crecimiento con otras plantas que tengo en el.
-----SUMARIO SEMANAL-----
Hay una cosa que quiero corregir y remarcar esta semana. En sobre la pregunta que realicé hace unas semanas sobre la planta que tenía una decoloración (Fotos 7 y 13), en la que escogí la respuesta de la variegación. Viendo la planta a día de hoy, yo diría que es un exceso de CO2 en las raíces causado por una pastilla de CO2 que usé durante los primeros días de crecimiento. Al fijarse bien se ve como la parte trasera de la planta no presenta las decoloraciones y sin embargo la frontal si.
Para tener una idea más o menos certera del tamaño de las partes de las plantas, tened en cuenta que la red está fija a 24 cm de la parte superior de la tierra de los tiestos.
También remarcando lo que dije durante la última semana, he de decir que el SCROG no es un SCROG real, ya que las colas no empiezan desde la misma altura ni son de la misma altura, ni las plantas son de la misma altura. Pero yo estoy muy contento con como va la cosa, vuelvo a insistir que es mi primera vez con foto-dependientes indoor, mi segundo armario indoor y el tercer cultivo de mi vida, y por supuesto la primera vez que aplico o intento aplicar las técnicas de cultivo. Lo estoy intentando realizar bien y de manera eficaz, pero realmente no se si lo estoy haciendo bien o mal, yo simplemente me lio y veo como responden las plantas.
-----CALENDARIO DE RIEGO-----
13/04/19 - 1.250 ml con todos los nutrientes semanales -(Sensizym, bloom stimulator, bloom nutrition & amino complex) @ PH6.4 & 1.3 E.C.
17/04/19 - 1.250 ml con Silica Power, Pro Active, Bloom Stimulator, Bloom Nutrition, Sensizym & 5 gotas de Amino Complex @ PH6.5 & 1.3 E.C.
Likes
Comments
Share


@Marbanya
Follow
2025-04-13 to 2025-04-19
I have started the flush and will be harvesting in the next few days. The aroma on this cultivar at time of harvest is a combination of musky earth and citrus. No nutrients are used the last 10 days.
Likes
2
Share


@Kaonoppakorn
Follow
Organic living soil mixed by myself while mixing the local organic matter : )
For example: Earthworm casting / Bat guano / Seaweed power extract / perlite / peat / coco / soil / fungi needed
And water when dry.

Likes
9
Share


@Headies
Follow
This is the beginning of each week. So I flushed them and switched nutrients. They were mag deficient, nitro toxic. Not PH actually. I'm adding co2 next week after I seal the room. I think I need to back the PAR down to 800 but they are still alive and it's over half way done.
How any more weeks? I thought this was a 65 day auto. Hydro in a 5 gallon pot could add up to three weeks I heard with Autos. could these go 12 weeks total?


Likes
10
Share


@Minuteman_Organics
Follow
A few of the zed blacks hermed..spreading pollen into the flower tent. Already seeing some seeds develop. It is what it is. I should have done a better job checking on them. I kept the Zed blacks that only had a couple flowers on the bottom but tossed anything that had flowers growing up the majority of the plant. Some of the most famous strains in the world were self pollinated so I don't have issues with a couple male flowers. They're just trying to improve their fitness as nature intended.
The plants are doing very well. A few of the bottom leaves are dying which is normal...senecense! Sucking up those nutrients. I've been liquid feeding using the fish, seaweed, humate and recharge.
I have saved the males and they are trying to reveg. Still popping out a few flowers which I'm cutting off. 1 rainbow belt. 1 zed black. 3 hash plants
The hash plants are smelling incredible. Definitely a few keepers mixed in here. Maybe 3/7. Hopefully the quality of the flower backs it up.
Zed blacks have 2/3 I'm interested in. One is very very low yield. Unless its a really high quality plant I'm gonna toss it
Rainbow belts are both smelling ridiculous. Super frosty. Good yield. One is slightly more frosted than the other. The zkittles pheno has pure Skittles smell with a little lemon cleaner chem to back it up. Probably my keeper!

Likes
81
Share


@UnorthadoxDude
Follow
Hey! Welcome to week 8! Karen is mid way through her flowering stretch. Please check back to last week as I update daily so the week is now complete. I count about 20 colas now.
Day 51: Have reconfigured the tent, see video. Karen is now 36cm and still stretching. Karen has more light now. Smell is still there hits you when you open the tent. Fertigated 2l.
Day 52: Height: 39cm. Karen's scent is heavenly. I have reconfigured again and installed some upgrades. Better reflector. Much bigger carbon filter. Increased airflow. Better config. More efficient pot layout. Karen is lovely.
I am grateful to her and for her, so I wrote her a little poem, I hope she liked it.
"Karen! Oh Karen! The phoenix of flowers,
Three lowly weeks she struggled in vain,
Shadowed and starved for five hundred hours,
He slowly wept to witness her pain.
Karen! Oh Karen! I P-H'd your showers,
and in the fourth week you started to gain,
Hallowed and hard you survived as you cowered,
I thought you meek, I was wrong once again.
Karen! Oh Karen! Forgave me my howlers.
She set a pace, a pace she maintained,
Now shes a girl at the peak of her powers,
And so I'm a geek, with buds on the brain."
Day 53: Approx 48h into a simulated dry spell.
Alright I think it is time for Karen to get her first MAJOR defoliation. I will update shortly with photos and info. I will also be doing some gentle LST to separate the colas a bit.
Day 53.5: Defoliation and LST. Finally got chance to photograph that bunda. Enjoy!
Day 53.75: Bit of a fail. Messed up the timer and the lights ended up being off for about 3 or 4 hours. Because I was cooling the room (open window) to keep temperature in the tent down, without any light the temperatures absolutely plummeted as it is sub-zero outside. By the time I realised and turned the lights on, the temp in the main tent had dropped to 14 degrees celsius. Whoops! How is that for mistreating your girl? Defoliated about 80% of her leaves, 4 nodes, significant LST, then stuck her in the cold and dark for 1/6 of a day. Not to mention she is now almost 3 days into a "dry spell". There do not seem to be ill effects, and Karen has already begun to respond to the LST; all the colas that had been changed in angle are now upright again.
The dry spell I keep mentioning, there is a method behind my madness, I have spotted one or two small flies and I think they may be fungus gnats. I am starting to suspect that the 2nd seedling in the Purple OG Punch Auto grow was actually beheaded by fungus gnat larvae. So I am drying out the mediums as much as I dare. I am closely monitoring the plants, so far the only one I have had to break the drought for is Enigma; all the girls in big pots haven't even noticed it's dry yet. How far am I going to push it? Well I will judge it on a plant by plant basis, but quite honestly I am hoping to see physical signs of thirst before I breakdrought. Of all the plants the two I think will respond most strongly to this will be Karen and Bertha, because of where they are. Karen here is actually probably 4 weeks into flowering rather than two, so about now is a good time to give her a little hydration stress. I do not think I will push it past 5 days, as RH is 34%. By now all the plants will be compensating for the lack of moisture and the high temperatures and low humidity. They will be taking more and more moisture out of the coco, and as the coco dries further and further down, those plants that have space will start desperately growing roots to find moisture. Mark my words, 24 hours after I end this drought, every plant in the tent will throw out crazy growth.
Day 54: Ended drought and fertigated 6l, no run off, I will re-fertigate tomorrow. Karen is still stretching her height post LST is now 37cm. The two tallest colas seem to have stopped but the other colas are still stretching.
Day 55: Alright so it has been 5 hours since lights on, and Karen is looking in good shape, all her drooping leaves have perked back up and she has added quite a bit of foliar growth. The colas are all still rising, except perhaps the two tallest. This girl is absolutely loaded with pistils, I'm starting to see trichomes on the sugar leaves, but trich production hasn't started in earnest yet. She has a least 20 colas, and 6 of them are thicker/taller than the primary cola at her tip. Every one of her nodes has reinforced itself with a bulbous growth and these cola branches are swelling rapidly. I am increasingly of the opinion that, all being well, this girl is going to surprise us all with her yield. My first grow, which was just mucking about really, I got 60-70g of the two main plants, and they were just bare sticks with 2 colas. Although her height is less than theirs was, 2/3 of their height was bare stick... whereas every mm of her is befoliaged and living. So in terms of the height of the actual cola I think they were about comparable in usable space on a per cola basis. The main difference being that Karen has 20+ colas whereas they had 2 primary and 2 lower. I know that it is probably unrealistic to expect more than 70g from a single auto grown indoors. Nevertheless my gut tells me this baby could achieve at least 100g, perhaps as much as 150g. The next few weeks will determine that, but given where we were in week 3 I will be grateful for any yield of quality bud. I have dropped the lights down to 18/6 from 'tonight' onwards.
I really have no idea how long we have left for Karen. According the the "brochure" she flowers for 7-8 weeks, with a total crop time of 9 weeks. The problem is I don't know what a total crop time is? Does that mean from seed to finish? If so Karen is clearly not going to be anywhere near that timescale.I am going to go ahead an assume that, for my plant anyway, the first 4 weeks were veg weeks. I think it is fair to count week 5 and 6 as flowering because pistils were popping out very early in week 5 if not before. So that makes this week four of flowering. I am going to assume 8 weeks rather than 7, so I think we have another 4 full weeks give or take a week. On that basis I am expect harvest week to be around week 12 or so. I am not fixed on this though, I am determined not to harvest this girl early.
Day 55: Photos taken 00:00 9/3/23 Strong 24h of veg growth as predicted.
Day 56: Existing leaves continue to swell. Stretch appears to be slowing. I've taken so many media this week that I cannot scroll down far enough to select a recent thumbnail. Probably Karen's biggest week in terms of changes. She is looking like she is going to impress. Height 39cm.

Likes
11
Share


@Growformyself
Follow
Alle 3 Samen sind nach 4 Tagen durch die Erde gekommen! Jetzt liegt es an mir, was daraus zu machen!