
Likes
Comments
Share

@Barzenegger
Follow
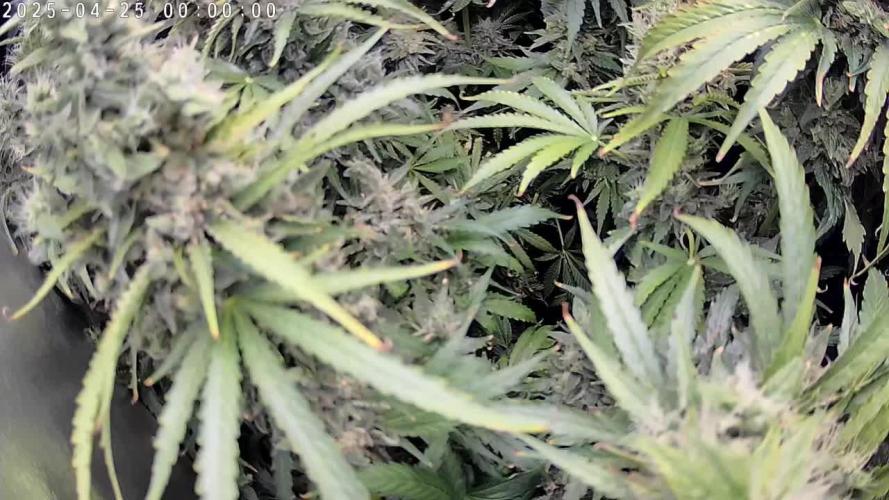
This is the last week, I've given them another tank filling, but the Chem Beyond Diesel CBD was chopped on day 69F, which was the second day of the week, SAD CBD, and NYC Diesel CBD followed on day 73F. I left the for a couple more days, but also chopped it on day 76F, which is already the next week, but I won't be creating another diary entry for that one as it was 3 days long and nothing happened.
The foxtailing makes it look like there are still a lot of white pistils, but most of the inner/lower ones are finished, the trichomes look ok, and I am growing impatient again.

Likes
38
Share


@TheCannaProphet
Follow
*Note: The wattage listed was incorrect. I used a 360w UnitFarm LED for this grow so the gram per watt figure will be inaccurate. Thank you 😎🙏
🏆FastBuds California Snow🏆
My Setup:
Planted into Jiffy Peat Pellet that was hydrated with de-chlorinated water with SuperThrive added then ph'd to 6.0 @ 80℉ where it took 3 days for her to break ground.
Grown 100% organic in 4g fabric pot by Gronest filled with Mother Earth 70/30 Coco/Perlite medium amended with (my 'Secret Recipe): 2tbs/g of Down To Earth 4-4-4 / 2 cups/g of Earthworm Castings / 1tbs/g of Dr. Earth Flower Girl 3-9-4, 1tbs/g of Dr. Earth Bat Guano, 3/4 cup of Down To Earth Azomite and 1 tsp/g Down To Earth Fish Bone Meal.
24hr light cycle during Germination / 19/5 light cycle for the remainder of the run under UnitFarm's UF-4000 and UFS3000 LED's which I have to say just blew me away with the results they gave!!!
If you're on a budget and want a light that is about as low profile and cool running as they get you really need to check out UnitFarms lights. Believe me... I run a pair of HLG 650R's and a HLG 225 in my 4x8 so I'm no stranger to 'high end' lights but lemme tell ya, these two UnitFarm lights absolutely blowup my 4x4 and don't overheat the tent!
She received straight water ph'd @ 6.2-6.8 when needed and weekly Compost Tea's for the entire grow which is one of the beauty's of growing 100% organic, you establish a microbial colony in your medium, then feed the microbes every 3-4 weeks keeping them fat and happy... They, in turn, through their life processes take care of feeding the plant. Pretty freaking cool if I may say so, and there's no simpler way to grow IMHO.
This Cali Snow's structure was perfect didn't require me to top or LST this plant, only tucking shade leaves that were blocking light penetration. She grew tall with wide node spacing allowing for excellent light penetration making her a growers dream, low maintenance, extremely tolerant of temperatures and disease/pests ) and a healthy yield of some FANTASTIC smoke...What more could you ask for? 😍💖
All in all, this strain has made it's way onto my 'list' and you'll be seeing it run again by me for sure as she's a hard one to stay away from! I highly recommend this one... Go grab some and put a huge smile on your face too! 😁


Likes
13
Share


@Eldorado_ed
Follow
Well after splitting the Girls up due to space it’s looking like the HPS Ladies are almost ready looking we’ll ahead of LED ones also buds are fatter with HPS but would say the LED ones look healthier looking if that makes sense


Likes
247
Share


@PremiumBudsEU
Follow
Hello dear growers and growmies 👊💚
my lemonade haze girls turned into little green bushy trees :)
the scent that comes from my closet smells like a candy store 🍬🍭 just delicious 🤤
They get 0.75 l of water 3 times a week
and a light dose of fertilizer.
The microbe soil life seems to be active, they get a small replenishment of microbes and micro nutrients every 2 weeks.
i hope to see first signs of blooms by the end of this week , gotta do a heavy defoliation this or next weekend 🤙😃
thanks to everyone who stopped by I appreciate it very much , stay healthy my friends 🍻💚

Likes
68
Share


@cRypto666
Follow
Freunde der Sonne :) KURZE INFO DER LETZTE EINTRAG HIER IST IMMER DER AKTUELLLSTE NACH DATUM NACH UNTEN SOLLTEN UNTEN SCROLLEN UM ZU VORHIERIGEN EINTR'GE ZU GELANGEN : <3 WEEED
wollte dir ein text drücken :) hab mich vertippt... aö ich bin heute eine Bewustseinsstufe beim Grown aufgestiegen ! Endlich kann man jetzt Täglich meine Real Talk oder Reaktion ViD/PIC anschauen. Absofort werde ich meinen GARTEN anderts wahr nehme wer rein schaut kann Exklusive Tipps für seinen Garten gebrauchen. Gerne bin ich für Fragen offen und ich helfe wenn ich kann fals nicht findet sich in der Gruppe immer jemand.
DER GRUND IST DAMIT ICH NACHVOLLZIEHEN KANN WAS ICH FALSCH GEMACHT HABE BZW UM WISSEN ZU MANIFESTIRE UND GEWISSE GEDANKENVERBINDUNGEN GESACHFFEN SIND. IM GRUNDE MEIN GROWTAGBUCH ICH TEILE MEINE GEDANKEN MIT EUCH GLEICHGESINNTEN UND WÜNSCHE ALLEN EINE ERFOLGREICHEN GROW brO
cRypto666
2 minutes ago
cRypto666
<LIEBE> BRUDER ICH LADE DIE VIDEOS UND BILDER NOCH HOCH UND ICH BIN MIR EIGENTLICH SICHER ES KÖNNTE DIR GEFALLEN VIEL SPAß
AUF QEEN SEED GIBTS WIRKLICH GUTE BLOGS MIT TOURTORIALS FÜR NEULINGE/ANFÄNGER .
Konnte mir so mein Verständnis und Grundlage die fürs grown wichtig ist gut lernen und Aneignen ! WIRKLICH VIELE UND GUTE INFOS !!
https://www.royalqueenseeds.de/blog-cannabis-anbau-c3
https://www.royalqueenseeds.de/blog-die-10-grossten-fehler-von-cannabiszuchtern-n86
es ist soweit heute beginnt Woche 1 ... BEVOR WIR STARTEN, WICHTIG WASCH DIR GRÜNDLICH DIE HÄNDE UND BENUTZE GUMMIHANDSCHUE BEIM ARBEITEN! SEHR WICHTIG!
Ich freue mich das ich heute wieder das Gärtnern begonnen habe und eine Hällfte der Samen in der Erde sind. Kennt ihr das Gefühl der Vollkomenheit wenn man sich im Garten beschäftigt ? Für mich ist das Therapie und für euch?
Ich spiele mit dem Gedanken anstatt Samen zu growen mir einfach eine Mutterpflanze Anschaffe um mir meine Stecklinge zu ziehen ! Dafür brauch ich aber noch ein anderes Zelt und eine Lampe. Die Mütterpflanze kann dann erst mal wachsen und ich kann nebenbei noch mal ein Durchgang mit Autos schaffen bevor die Steckis fertig sind. Wenn es soweit ist gebe ich euch bescheid wenn ich Samen und Setup bei mir stehen.
So jetzt aufs eigentliche zurück. Ich habe heute erst mal mein Setup geprüft und so gut wie möglich desinfiziert. Es ist verdammt wichtig das nach jedem Durchgang sauber gemacht wird also zb Zeltwände, Boden, Topfe, Boxen, Wasserbehälter. Habe ich gemacht und habe meine ersten Samen in Anzucht Erde gesetzt, befeuchtet, markieren und in die Box. Wände und Deckel mit zersteuber befeuchten und ab unter die Lampe. WICHTIG MACH DIE ERDE NICHT SO NASS ! DAS GEFÄLLT IHNEN NICHT SONDERN HALTE SIE AM BESTEN FEUCHT IN DEM DU ABEND / MORGEN EIN BISCHEN WÄSSERST!
ICH STELLE DIE LAMPE AUF CA 40 cm zum Boden ein bzw der Box. Ein gewisser abstand muss sein um die Fläche komplett zu Beleuchten. Da meine Lampe dimmbar ist muss sie nicht ganz oben hängeng sondern Kann näher an die Pflanzen ran und Stelle den Dimmer auf 20 %. Das reicht anfangs in dem Stadium völlig aus, muss aber dann später angepasst bzw hoch geschraubt werden!
Lüfter I läuft 24/7 und sorgt für optimale Bedinungen! WICHTIG
LAMPE 20/4 HELL/DUNKEL (REGLER STEHT AUF 20 % LICHTLEISTUNG)
DANN HABEN WIR ES EIGENTLICH SCHON GESCHAFFT UND ALLES RICHTIG GEMACHT!
Ich versuche schon so viel wie möglich von meiem Wissen an euch weiter zugeben bzw auf Papier zubringen, ist aber NICHT IMMER ZU 100% Möglich, da es einfach zu viele Informationen sind !
Bei fragen einfach fragen und die Comiunity hilft sicher !!!
KOMMT ZEIT KOMMT RAT ... ich hab 2 Monate Infos eingeholt und Produkte verglichen !
Auf Queen Royal Seeds gibt es gute Anfänger Tipps sogar teilweise mit Video. Mir hat das sehr geholfen mein Grundwissen aufzubauen.
BEVOR IHR DAS GÄRTNERN ANFANGEN KÖNNTE MACHT DIR GEDANKEN WO DEINEN GARTEN STEHEN KANN.
#1 AM BESTEN IHR HABT EIN GARTENZIMMER DER NUR ZUM GÄRTNERN BENUTZT WIRD IST DIE BESTE LÖSUNG DA DU DEINE UMGEBUNG VIEL LEICHTER SAUBERHALTEN KANNST
#2 DU KANNST DEIN GARTEN AUCH INS WOHN. BZW SCHLAFZIMMER STELLEN WENN DU KEINE MÖGLICHKEIT HAST EIN GARTENZIMMER ZU MACHEN. DAS IST NICHT DIE PERFEKTE UMGEBUNG ABER WENN DU ABLUFT RAUSLEITEN KANNST DANN MACH ES ! DU KANNST ES AUCH IN DEN RAUM STRÖMEN LASSEN MUSST DIR ABER BEWUST SEIN DAS ES EVTL DAS SCHIMMELN IM RAUM ANFÄNGT! IST MIR SCHON PASSIERT ! LEITE SIE WENN MÖGLICH AM BESTEN RAUS !
ACHTE DAS DARUF DAS DEINE LUFTFEUCHTIGKEIT UND TEMP KONSTANT BLEIBEN UND ES NICHT EINMAL ZU WARM UND EINEMAL ZU KALT... IHR WISST SCHON SORGE FÜR EINEN KONSTANTE UMGEBUNG IN DEINEM GARTEN. DIE WAHL DER SAMEN IST AUCH WICHTIG DA ES SORTEN GIBT DIE EINE WARME UMGEBUNG EINE KONSTANTE ODER EINE EHER KALTE UMGEBUNG. AM BESTEN IHR PASST EURE SAMEN EURER UMGEBUNG AN HEIST DU WOHNST IN EINEN LAND WO ES EHER WARM IST ALSO 25-30 ° C dann WÄHLE AUCH EINE PASSENDE SORTE AUS!
MEHR GIBTS ERST MAL NICHT ! BIS ZUM NÄCHSTEN MAL!
Likes
9
Share

@Salokin
Follow
Week 6 | Jealousy Marker | Vegetation
She's pushing hard. From 35cm last week to 58cm this week — that's serious stretch for a plant in a 5L pot, and the canopy is filling out to match. Foliage looks healthy and dark green, structure is strong with good branching developing on the lower nodes.
Temperatures cooled off compared to last week — 28°C days, 18°C nights, humidity steady at 60%. Watering holding at 1L per plant per 24h, pH 6.2, EC 1.2 mS/cm. Nutrient stack unchanged: CANNA Aqua Vega at 3 ml/l, CalMag Agent at 0.9 ml/l, Aptus Regulator at 0.1 ml/l. Natural light at 17 hours.
No smell yet, which is expected at this stage. She's all business right now — building the framework for what's coming.
Updates every Sunday. Stay tuned.
Likes
6
Share

@Antarctic
Follow
11.02.2026 – 17.02.2026
Canopy Adjustment: To ensure an even light spread, I’ve raised the Wonder Pie by placing it on a container. Now, all tops are leveled for maximum photon absorption.
The "Draft" Hack: To combat the late-flower heat, I’ve implemented a new ventilation strategy. By opening windows in both the grow room and the adjacent room, I’ve created a cross-ventilation effect (draft).
Temperature Drop: Success! I managed to drop the peak temperatures from 30°C down to a perfect 24°C. This drop is crucial for preserving terpenes and increasing resin production as we head toward the finish line.
Current Specs: pH 5.8, PPM 1000. Stability is the name of the game right now.
Likes
32
Share


@MadeInGermany
Follow
Flowering day 19
since the time
change to 12/12.
Hey all together 😀.
This week she has developed beautifully ☺️.
I poured it 3 times with 1.2 l this week.
Tomorrow I will add the 2 g GHSC Powder Feeding Bio Bloom because the first blossoms are coming :-).
I checked all the leaves thoroughly for pests or diseases and everything is fine ☺️.
Next week I'll look at your roots as soon as the coconut is completely rooted.
As every week, the tent was cleaned and the entire technology checked.
The humidifier was also refilled every day 👍.
In the next few days I will remove the bottom shoots so that the energy doesn't end up being wasted in the small popcorn buds.
I wish you a lot of fun with the update.
Stay healthy 🙏🏻 and let it grow 🍀
You can buy this Strain at :
www.Zamnesia.com
Type:
Banana
☝️🏼
Genetics:
OG Kush x unkown
👍
Vega lamp:
2 x Todogrow Led
Quantum Board 100 W
💡
Bloom Lamp :
2 x Todogrow Led
Cxb 3590 COB 3500 K 205W
💡💡☝️🏼
Soil :
Canna Coco Professional +
☝️🏼
Fertilizer:
Green House Powder Feeding
☝️🏼🌱
Water:
Osmosis water mixed with normal water (24 hours stale that the chlorine evaporates) to 0.2 EC. Add Cal / Mag to 0.4 Ec Ph with Organic Ph - to 5.5 - 5.8 .

Processing
Likes
6
Share


@Silverback_Guerilla
Follow
TUESDAY 9/3:
A the trichs on a couple of them are getting pretty cloudy, but they still have at least another week of flushing ahead of them. The rest have a couple weeks left to go I think.
WEDNESDAY:
I was out at the property for awhile today, hosed off the horsies and cleaned their hooves really well. I was there long enough that I was able to move the plants into direct sunshine for an extra couple hours. I fed everybody with a half-gallon of water including bembe, terpinator, tiger bloom, beastie bloomz, armor si, and big bloom...just enough to wet their whistles.
THURSDAY, FRIDAY, SATURDAY, SUNDAY:
I was sick as a dog . 2-day stomach virus, followed by an acute pancreatitis attack...
😷
MONDAY:
I gave them all about a half-gallon of aquarium water with some bembe, beastie bloomz, and tiger bloom.
Likes
34
Share


@gottagrowsometime
Follow
She grew really well and strong, I topped both plants, and maybe I shouldn't be. Cause height, I'm just not getting in my autos and me topping them is leading me to believe that they are flowering earlier than they would if I just left them.
But I'm still happy with how these grew, instead of 1 main cola I got 10 smaller ones, so I'm happy, they grew strong and quick, gave no trouble but a bit of nutrient burn. Very easy to grow and very resistant some of the most I've grown so far, they bounced back very quickly with the very few issues I did have, she was really easy to turn around and if you found this to be your strain, then you'll get some decent harvests back from a few plants, hoping to see 130-160g from both plants.
WOW. 1.5 day on the cure and already I'm getting the bang of ripe bananas. The berries smell has kinda dropped a little. Amazing at how fast this smell took over. Ripe banana + fruity and a deep fuel has taken over my cure press. And the bud is in jars, it still stinks.
Likes
7
Share


@Naujas
Follow
well, it's exactly 12 weeks :) and my house is full of lemon aroma :) the girl endured really difficult growth, but she coped with everything perfectly :) who followed the growth, you saw that she grew on the balcony for 10 weeks, and she spent the last 2 in the grow tent :) 500 gr wet weight !!!!:) , before putting it in the ground I expected less than 10 g dry yield :D then this growth turned out super well, if it wasn't for my vacation I would have let it grow for about 2 weeks I think. but everything is still very good, I'll go home, fix it and do a smoke review :).

Likes
4
Share


@TherealNICOGREEN
Follow
Jeg har IKKE OPLEVET NOGET I ALT DEN TID JEG HAR DYRKET CANNABIS! 💪💚💚👌

Likes
13
Share


@ernest_twwg
Follow
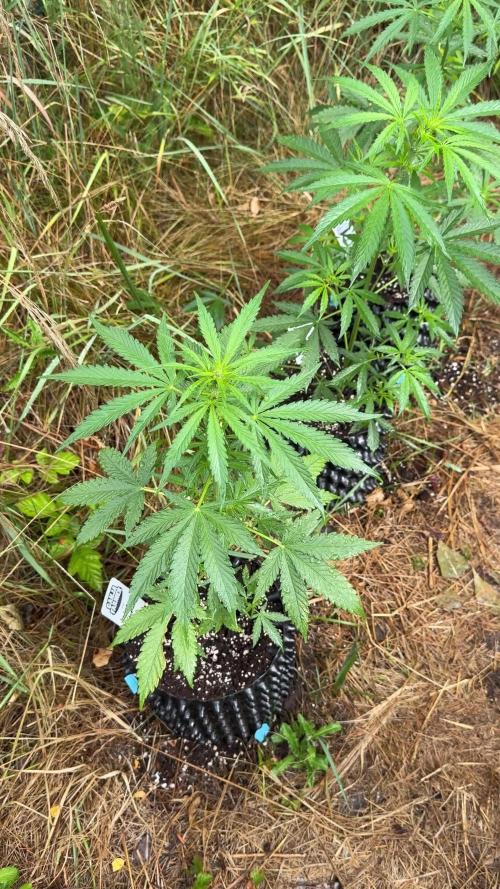
April 25th:
Planted this little gem on sunday, didn't check the room Monday, and Blam! Tuesday brought a surprise. I think it may have popped on Monday, to be honest.
9 Gallon bucket
Light cycle is 16/8 until she gets moved outside in the middle of May. We have a late start where I'm at because the frost likes to stick around for a while.
Light intensity is at 60%.
Likes
11
Share


@Original_Growers
Follow
Day 21 of flowerig going great. Gelato strain was too much bushy, so we had to defoliate it. Now all the works are done, only have to wait buds to get fat 😁.


Likes
9
Share


@Tobecobe
Follow
04/09 - Started minor defoliation. Shes getting too bushy and blocking bud sites and causing moisture spots. Will remove a couple of leaves every other day for the next week.
05/09 - Full res change. Realised I mucked up the ratio. Went 35ml Micro, 25ml grow, (Shouldve been the other way around, so added an extra 10ml grow), 15ml Bloom and 15ml Silica. EC 1.4, PH 5.7. Will keep an eye on her and add some additional grow if she does alright.
06/09 - Minor defoliation. Removed about 12 leaves total so far. LST to spread the canopy a little more. PH stable at 5.8, EC at 1.4, Water level dropping. Seems to be stretching and pistils have begun to form! Responding well to the uptick in nutes from the res change.
07/09 - Leaf tucking, LST and took a leaf or two. Shes getting her stretch on for sure. PH stable at 5.8, EC stable at 1.4. Water level still dropping.
09/09 - After much deliberation, I ended up going for a fairly heavy defoliation session and am now going to leave her the hell alone until at least mid flower. I removed a large chunk of shaded leaves and bud sites and effectively ended up lollipopping her. I also removed all the old LST, and added a couple to pull leaves out of the way. The canopy remains largely unchanged, but shes much more airy now, and Im seeing far fewer damp spots where leaf perspiration has occured. Now to see if I can keep my hands off for a few weeks!
Likes
40
Share


@Totogrowuk
Follow
The weather has been absolutely pants. Cold and wet and windy. Typical UK 😅.
Most the girls are into pre flower now and some are showing colour.
It’s difficult keeping all fed especially with the rain but no major drama so far.
Likes
32
Share


@Arcadium
Follow
Had 1mm of rain in the last month, responding well to very little water, drip irrigated a few hours once a week. I spent so much time hauling water jugs for feeding last year, this is a treat..

Likes
17
Share


@ChitownCannaChica
Follow
Chopped her. Full harvest report once dried! Smells are a beautiful lemon candy! Cannot wait! Resin is there, terps are there, and easy to grow! Loved the sun! Only issue was caterpillars! ✌️🏻💚🌿💨
