
Likes
Comments
Share


Likes
107
Share


@Tropicannibis_Todd
Follow
Alright Then
REMINDER I DO 2 UPDATES PER WEEK 👉WEEKLYROUNDUP👈👉MIDWEEKLY UPDATE👈
We just hit week 3 and all is well , have to admit she's showing great , Growth in just 21 days😃 .......
Middle of this week I have decided to start a little training by pulling her over to the side and have decided to top it 👌 And she's filling out the pot perfectly👌
Very little water given ,so far and rain water to be used entire growth
Lights being readjusted and chart updated .........👍
I GOT MULTIPLE DIARIES ON THE GO 😱 please check them out 😎
👉I WISH GD HAD DISCORD SERVER SO GROWMIES COULD HAVE A PLACE TO HELP AND TALK THINGS RELATED TO GROWING IN REAL TIME .....👈
👉SO I CREATED ONE ALL YOU NEED IS TO JOIN THE GROWDIARIES DISCORD SERVER !!!!!!!!!!!👈
LINK IS 👉 https://discord.gg/zQmTHkbejs
AND SEE HOW IT PLAYS OUT !!!!!!!

Likes
5
Share


@ScouseCityLX
Follow
Exited to try one of fastbuds newer strains! Was hard to decide over this and Banana Purple Punch but I went for Cherry Cola Auto this time!

Likes
11
Share

@BushDoctor740
Follow
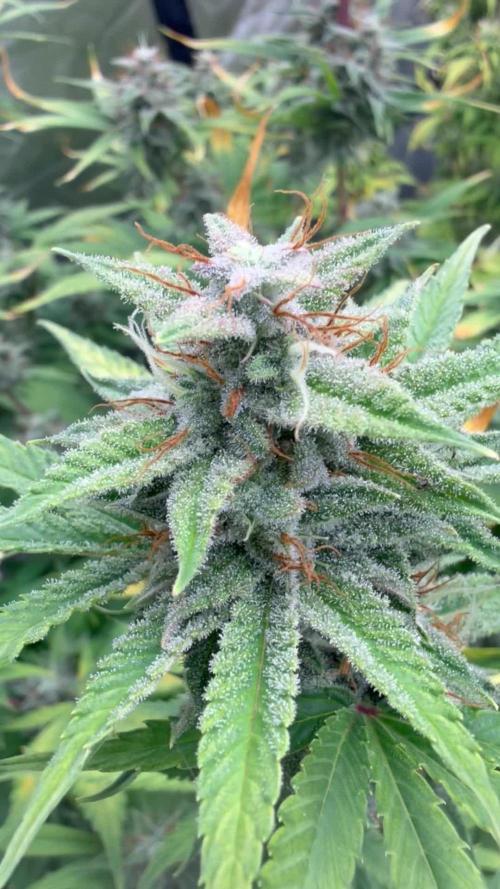
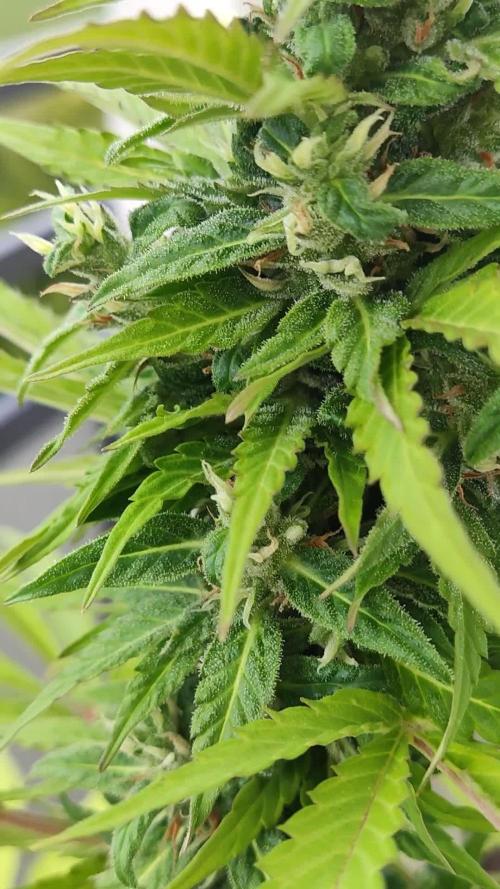
The trichomes are heavy and she is really pretty at this point.She still has some clear trichomes as some are cloudy.Ill let her go a lil longer and keep pounding her with 80 percent light intensity and maybe one more feeding of Plagron and some bud candy.


Likes
23
Share

@Pheno_Minds
Follow
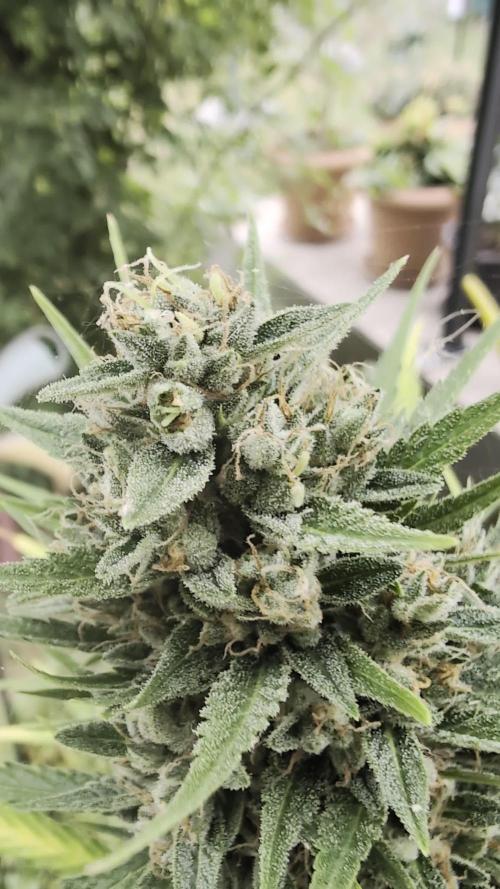
📋 Die Strawberry Banana von Fastbuds befindet sich in Woche 7 der Blüte, was insgesamt Woche 12 entspricht. Die Pflanze zeigt deutliche Anzeichen des herbstlichen Lebenszyklus, bei dem sie ihre Energie nun fast vollständig in die Blütenproduktion steckt.
📏 Die Pflanze hat eine Höhe von 58 cm. Als Substrat dient eine Mischung aus 30 Prozent Kompost und 70 Prozent Plagron Light Mix.
📸 Der optische Zustand zeigt eine Pflanze in der finalen Reifephase. Die Blattfärbung geht stark ins Gelbe und Bräunliche, was in diesem Stadium völlig normal ist, da die Pflanze ihre Nährstoffreserven aus den Blättern in die Blüten zieht. Die Struktur ist kompakt, die Blüten selbst wirken dicht und sind bereits ordentlich mit Trichomen besetzt, die bei genauer Betrachtung glänzen. Die Narben sind bereits überwiegend bräunlich gefärbt.
✂️ Alles in allem ein klassischer Verlauf für das Ende der Blüte. Die Pflanze sieht aus, als würde sie die letzten Reserven mobilisieren. Ich werde jetzt genau auf die Trichomentwicklung achten, um den optimalen Erntezeitpunkt nicht zu verpassen. Das Ziel ist jetzt nur noch das Ausreifen der Blütenstände bei gleichzeitigem Auswaschen der restlichen Nährstoffe.
Processing
Likes
41
Share


@FoxyLoxy
Follow
Ok, as i enter week 4 I'm a little nervous about the growth of these unknown strains. I'm a day away from week 4, one of the plants is very stunted, looks like its having an issue with a nitrogen deficiency? Otherwise I've topped the other two which seem to be doing moderately better, but one of them looks like its about to follow suit of the other plant.
UPDATE; I have replaced the previous pictures posted of the plants with these. As you can tell I have varying deficiency peaking through, especially #2 my wife's plant, if anyone can shed some light, please do so as it is progressing quickly. Right now they're just drinking ph'd water and that is all.

Likes
7
Share


@420keef
Follow
Just cut up the lemon shining silver haze yesterday, first pics are from after i cut the wonder pie (from another diary) and i put one of my plants from outside there instead. Going to post more updates when i can actually smoke it!

Likes
4
Share


@GoodTimesOrganics
Follow
Nach dem letzten entlauben und leichtem Biegen der Äste, entwickelt sich die Pflanze etwas homogener. Allerdings hat sie im Stretch nochmal ordentlich an Höhe dazu gewonnen.
Auch bei ihr ist ein leichter Tripsbefall vorhanden und Raubmilben wurden eingebracht.

Likes
10
Share


@Alpengrower
Follow
showing great colors during the last 3 weeks of flowering, great strain. i absolutelly recommend it!

Likes
7
Share

@SkunkyDog420
Follow
Hallo zusammen 🤙.
Sie wächst sehr schön und macht keine Probleme.
Wer einen Rabatt von 20 % haben möchte muss den Code: ZAMMIGROW2024 eingeben
Likes
63
Share


@Chubbs
Follow
420Fastbuds
StrawberryGorillaAuto
Week 1 of Veg
What up grow fam. These 3 have sprouted amazing with no issues. All 3 had popped after 48hrs of being in the soil. Still misting the top soil with my sprayer to keep the soil moist but will start regular manual watering of 500ml every other day this week.
All in all Happy Growing
Likes
12
Share


@Cannibalgardens
Follow
Well I decided to transplant this one as she was holding to much water in that smaller container and she wasn't liking the soil so much so I put her into a more balanced soil no nutrient additives . She will hopefully be doing better by the end of the week and if not I'll still keep plugging away at her and here's to the best cheers ...

Likes
11
Share


@CannaChris_grows
Follow
This cultivar was an absolute dream to grow it was so easy so beautiful smelt so good. It was definitely the star of the show on this run
Likes
52
Share


@MeaCulpa
Follow
Hello everyone,
unfortunately it remained with the 3 seeds but It does not matter.
3 ladies fit quite well in my 80x80 tent. Then they have space.
I removed one PC fan for supply air. Two were too many.The tent literally inflated.
Otherwise it seems the ladies are doing well. I don't think much can go wrong in 7 days of live but I've seen horses puke.😀
I wish you a nice weekend.
Likes
4
Share


@AmsterdamAutos
Follow
Got a TDS meter at the end of this week. This lady is also in full on flower!!! I just love seeing the pistols, I am also catching a small bit of smell during a small period when the lights come on!
She is starting to spread out and even out well. I dont think she is to great for LST, or at least she should be started a bit towards the end middle of week 3 or the end even. She grows short and bushy.
Likes
4
Share


@DesertBuds420
Follow
honestly, I wasn't even sure if it was time to harvest. I did everything off the naked eye and I definitely wasn't able to look at trichomes to determine so i went based off the ratio of brown to clear/white. i harvested only the top cola and left the bottom bud sights on to see if they would grow anymore lol anyways, time to cure and dry. cant wait to taste my first full grow!

Likes
1
Share

@LokalGrenz
Follow
7/14
Flipped last Monday going to count today as week one of flower started to see white pistils so yea today starts week one of flower everything looking okay she drinks a lot is only complaint
Likes
11
Share


@m0use
Follow
Memes for the fastbuds meme contest
Memes for the fastbuds meme contest
Memes for the fastbuds meme contest
Memes for the fastbuds meme contest
Processing
Likes
27
Share


@Silverback_Guerilla
Follow
2/10:
I watered today with about 3/4 gallon each, plus cal-mag, signal, bembe, armor si, a little open sesame, and their final dose of endoboost.
The short one never did stop making the hook leaves on all her new growth, but she seems happy..budding faster than anybody else..
2/11:
Wife home sick today....postponing construction project to raise the lights.
2/12:
Today, I tackled the project to raise my ceiling another foot. In addition to that project, I installed and hooked up my new AC Infinity 6" intake fan. It's pulling in fresh air from the soffit vent on the eave of the attic, and currently feeding the garden with 46f fresh air. I'm able to easily maintain daytime temps in the lower 70f's now. I am able to drive the nighttime temps as low as I want. The only issue is that the outdoor RH varies quite a bit, so I ordered a 30-pint dehumidifier to put in the top of the closet.
I sprayed everybody with boomboom spray to try and mitigate the light burn damage that is likely to ensue.
2/13:
The taller one is still stretching a little bit, but the 2-footer is just budding up.
2/14:
I fed them today with about 3/4 gallon each including grow big, big bloom, tiger bloom, cal-mag, signal, bembe, humic acid, and I switched over from Open Sesame to Beastie Bloomz. Raised the lights another couple of inches. I did some training on them and defo'd a little bit.
2/15:
Installed the new dehumidifier and rigged the continuous drain on it...works great.
2/16:
I rotated the edge plants and removed some old leaves. I added another 22w 3000k 4' bar light under the canopy.
2/17:
I rearranged the garden and defoliated a little bit. That's it for week 8-

Likes
9
Share


@Vet4weed
Follow
Plants are doing nicely on their own. I have learned to be more hands-off and let them take their own pace. I check soil dryness every few days and add water/nutrients when dry past my first knuckle. Sticking with the same nutrient mix as it seems to be doing the trick. If you watch the timelapse, you'll see a moment of panic when the reflector fell over onto Cheecha. But, in the long run, what doesn't kill them seems to be making them stronger. Cheecha is now almost the same height as her sister Chonga. We're in Fall now, so the room is getting a little cooler, but above 70 degrees F. Humidity is also starting to drop a bit too.
