


Likes
1
Share


@therealgrowmie
Follow
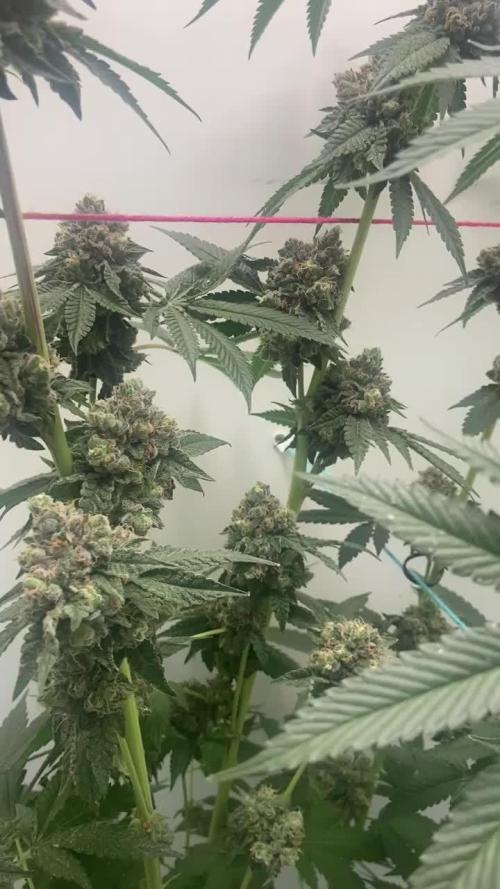
We’re in the midst of the bulking phase now, with a few buds stacking up nicely.
Unfortunately, the plant on the left has sparser bud distribution. Compared to other auto genetics, these three plants also show a broad variety in growth structure and phenological traits.
Also, overall plant health isn’t entirely satisfying, with high temperatures being the Main cause. The leaves are showing several stress-related issues like mild tip burn, nitrogen deficiency, and some cal-mag problems. But hey—we’re here to grow buds, not leaves! 😄
That said, the fade is to be expected as the plants start to cannibalize themselves for nutrients. The stretch is also in its final phase, so we’re likely 3 to 4 weeks away from harvest.
---
Quick rundown on everything else:
Watering: 1500ml every third day
Fertilizer: According to the BioBizz schedule
Light intensity: ~1000 PPFD
VPD: ~1.62 kPa
Temperature: ~28°C
Relative humidity: ~55%


Likes
17
Share


Likes
29
Share


@Smokwiri
Follow
Plant is doing good ;) its getting wide too ;)
Zamnesia 10% discount voucher for seeds: GROWITGD

Likes
10
Share


@HIAZ_urbanbudfarmer
Follow
Finished really fast! Not expecting a very big harvest, they needed a longer veg time, pretty small at start of flowering, didn't use massive bloom this run either
Going of the last run expecting good quality. Small buds.

Likes
10
Share


@TiRobotProds
Follow
Les site d'usine grossissement de jour en jours, bientôt engraissement des colas au Méga pk.

Likes
13
Share


@Robeeriegenetics
Follow
Dropped light hours down to 16 . Topped off nutrient solution with 5.0 ph evened out .removed none chosen phenos to be flowered in separate room no longer tracking those we will only follow the chosen mothers clones i cut clones today as well had the lady friend clean floor with bleach and dawn put clones in ez cloner 32 systems
Likes
23
Share


@StantonGrowsUk
Follow
Was a normal week nothing too special. Plants are looking abit frail so will be giving them some nutes.
Couple abnormalities on a few leaves 🍃 😌 but will put that down to temp and genetics, we will see how they take to the feeding.
Gonna turn up the light to give the plants more FOOD.
Within the next few days I'm hoping to see more strength in the plants

Likes
Comments
Share
@JamesRenato
Follow
Já faz 11 dias desde a ultima atualização, tinha me programado para colher dias atras porem, mudei de ideia ao ver que os buds estão ganhando mais volume. Nos últimos dias falhei na rega e a ela acabou passando sede por um dia, logo senti a diminuição do cheiro, provavelmente esse estresse volatilizou alguns terpenos. Eu já estava regando no modo flush mas, por conta do ocorrido decidi retornar com alguns suplementos (Cal-Mag, Silica e alguns Carboidratos), com a intenção de estimular a produções de novos óleos. Estarei observando os tricomas e quando os primeiros estiverem mudando a coloração, ai sim vou colher.

Likes
14
Share


@GanjaReaper
Follow
Day 49:
Like is told you guys last week, I went on vacation for 3 weeks, so my friend took care of my plants.
Buds are starting to show up.
I do have one plant which is light greenish. Might be from overwatering or shortage of nutrients. I don't know the reasons since I have not been taking care of them.
The weather/climate still sucked. Alot of colds and rains.
Until next week.
Likes
3
Share

@lasonda
Follow
Flowering continues, I've had some magnesium deficiency issues that I'm trying to compensate for with Calmag Xtra, also from Advanced Nutrients. I've also lowered the Grow dosage. The buds are really loaded with trichomes and, if I've done everything correctly, I expect the buds to increase in size. 🌴🤤🤤🤤🤤

Likes
24
Share


@Purrple_Haze
Follow
Still a Mystery… Or Maybe Not? 🤔🌿
Alright, growmies—this “Mystery Autoflower” is keeping me on my toes. The more I observe her, the more convinced I am that she’s no auto at all. At this point, there should be pistils everywhere... but nope, still no sign of preflowers. That’s definitely not typical for an autoflower this far in, and I’m starting to think I might’ve accidentally popped a Red Hot Cookies seed instead. 😅
Well… turns out my so-called "Mistery Autoflower Magic" from Sweet Seeds wasn’t quite what I thought she was.
After week after week of no pistils and a stretch that just wouldn’t stop, I had my suspicions—and now it’s confirmed:
She’s not an auto at all, but a photoperiodic Red Hot Cookies! 😅
Honestly, I’m not even mad. She’s been growing beautifully, showing strong structure and healthy vigor all along.
She did stretch nicely over the past days, which had me thinking bloom was kicking in—but so far, it’s just veg vibes. Still, she’s looking healthy and happy, so I’m not complaining.
💧 Feeding Routine this Week:
🔸 BioBizz Grow, Bloom and Top Max
🔸 CalMag
🔸 Alg-a-Mic
🔸 Silica spray (every 3 days for strong leaves)
🔸 Homebrewed compost tea (2 days after feeding)
🔸 Effective Microorganisms (2 days after that)
🌡️ pH: 6.5
📈 EC: 1200
Let’s see what the next week brings—maybe she’s just fashionably late. Either way, she’s looking bushy, balanced, and ready for whatever’s next. Stay tuned! 🌱💫

Processing
Likes
2
Share


@eldruida_lamota
Follow
Que hay familia, yo aquí entre humos actualizo las misty gorilla auto, seamos sinceros, yo estoy algo decepcionado con el tamaño de la flor, no con el ejemplar ni la calidad solo la cantidad, y es que ahora pienso yo, las autos realmente merece la pena a sabiendo que si ciclo es parecido al de una feminizadas? 4 semanas crecimiento 8/9 floración?
No no merecen la pena seamos realistas si queremos cultivar en interior lo mejor que podemos hacer es comprar semillas feminizadas y asegurar tu cultivo.
Y dejar solo las autos para gente que no se puede permitir un indoor y tenga que cultivarlo en terraza y así cultivar todo el año .
Ph regulado ya quite alimentación y limpie raíces, las e sacado a la terraza, desmontó Indoor me mudo y ampliamos zona de comfort.
Hasta aquí es todo gente un saludo y muy buenos humos 💨💨💨

Likes
65
Share


@Dendegrow
Follow
Week 2 of the flowering phase flew by 🌱💨. Unfortunately, I may have overdone it with potassium or kept the water level too high – the classic signs of clawing leaves were evident. Thankfully, they seem to be recovering now and are back under control 💪🍃.
My IR night experiment is showing clear results 🌌: The plants exposed to infrared radiation at night stretched significantly more. This might be especially beneficial for this indica-dominant strain as it leads to better canopy distribution, improved airflow, and reduced risks of mold and disease. Plus, the light distribution is much more efficient now, which I’m excited to see pay off.
On the downside, my Orange Sherbert turned hermaphroditic 😔. It’s hard to pinpoint the cause – overfertilization seems unlikely since I’m using only organic nutrients. I suspect it might be linked to an E-field experiment I’ve been running. To confirm this theory, I’ll conduct a new grow with a similar strain next year to see if the electric field negatively impacts cannabis development.
Stay tuned for updates! Drop a like and follow along for more grow insights 🌿✨. See you next week!
Woche 2 der Blütephase ist wie im Flug vergangen 🌱💨. Leider habe ich wohl etwas zu viel Kalium gegeben oder den Wasserstand zu hoch gehalten – die typischen Anzeichen von Adlerkrallen waren sichtbar. Zum Glück scheinen sich diese jetzt zurückzubilden und sind wieder unter Kontrolle 💪🍃.
Mein IR-Nachtexperiment zeigt bereits deutliche Ergebnisse 🌌: Die Pflanzen, die nachts mit Infrarotstrahlung bestrahlt wurden, haben deutlich stärker gestretcht. Das ist besonders bei dieser indica-dominanten Sorte wahrscheinlich von Vorteil, da es zu einer besseren Verteilung des Blätterdachs führt. Dadurch verbessert sich die Luftzirkulation, das Risiko von Schimmel und Krankheiten wird minimiert, und die Lichtverteilung wird effizienter. Ich bin gespannt, wie sich das weiter auswirkt!
Leider hat meine Orange Sherbert gezwittert 😔. Woran das genau liegt, kann ich schwer sagen. Eine Überdüngung halte ich für unwahrscheinlich, da ich nur biologischen Dünger verwendet habe. Ich vermute, dass mein E-Feld-Experiment eine Rolle spielt. Um das zu bestätigen, werde ich nächstes Jahr einen neuen Durchlauf mit einer ähnlichen Sorte machen und prüfen, ob das elektrische Feld tatsächlich eine ungünstige Rückentwicklung der Pflanze verursacht.
Bleibt dran, lasst ein Like da und folgt mir für weitere Updates 🌿✨. Bis nächste Woche!

Likes
10
Share


@StickyFingah420
Follow
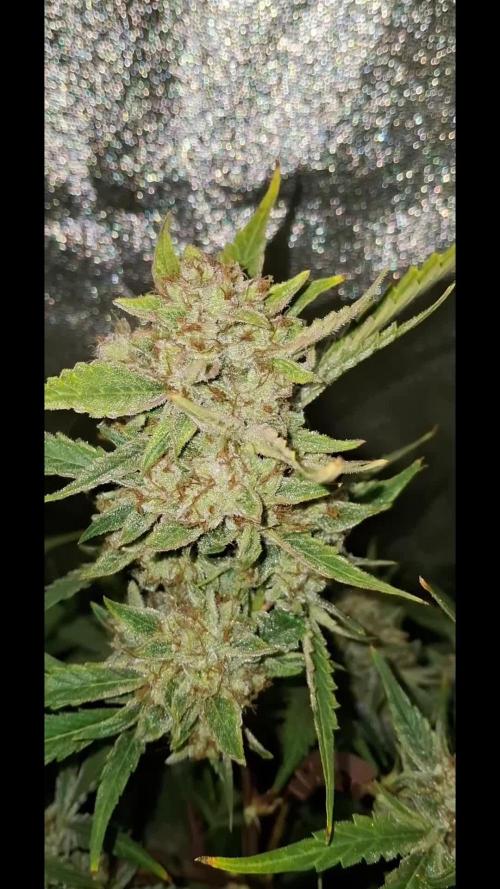
Ganadora del primer lugar en la categoría autofloreciente de la copa Litoral de Los Poetas en Chile.🏆🥇
Definitivamente en mi top 5 de preferencias ⭐️⭐️⭐️⭐️⭐️
Una genética muy estable, ya que es segunda vez que germino de estas semillas y se expresa exactamente el mismo fenotipo; tonalidades hermosas y caractericas, frutos muy apretados y macizos cubiertos de una capa de tricomas lo que le da una visual espectacular.
El aroma en frasco es una mezcla de frutilla ácida y tierra con un fondo dulce 🤤 es realmente exquisito. En la fumada se repiten gran parte de los aromas pero menos dulce y más cremoso y especioso, detodas formas es un humo genial que querrás fumar todo el día..
Likes
19
Share

@eldruida_lamota
Follow
Vamos familia quinta de vida de estás apollo black cherry de SeedStockers.
Que ganas tengo de ver el progreso de esta variedad, las plantas están sanas, se ven con buen color.
La cantidad de agua cada 48h entre riegos.
Esta semana añadimos nutrientes de la gama Agrobeta.
Tuve problemas de trips en un indoor y tengo todas plagadas pero ya las e tratado con aceite de neem y un insecticida genéricoy jabón potásico también añadí tiras azules, trataré esta semana.
Estas próximas semanas veremos cómo avanzan.
Mars hydro:
Code discount: EL420
https://www.mars-hydro.com/
Agrobeta:
https://www.agrobeta.com/agrobetatiendaonline/36-abonos-canamo
Hasta aquí todo, Buenos humos 💨💨.

Likes
72
Share


@BodyByVio
Follow
After 14 days drying, 7 days hanging and another 7 days on cardboard boxes 📦 at a temp between 61 and 65 degrees F and a humidity between 52-55 % I trimmed all the buds and jar them with Boveda 62. After 2 days in jars ( 16 days from cutting the plant down) I weighed in everything. I got 434g of grade A buds and 685g of Grade B ( perfectly smokable ) buds plus a lot of trim that I didn’t weight.
I’m very pleased with everything and I enjoyed every single step along the way. Probably next time I will lollipop/defoliate more aggressively so I can get more top bud and less grade b bud.

Likes
6
Share


@DrFabrizio_85
Follow
Still pushing branches under the net. I give sugar royal once a week


