
Likes
Comments
Share


@German_GrowLab
Follow
Einen wunderschönen guten Tag, liebe Grow-Community, und herzlich willkommen zur neunten Woche meines kleinen Outdoorprojekts!
Heute dann doch mal wieder an einem Montag :). Ich habe es nach dem Mary-Jane-Wachenden leider noch nicht nach Hause geschafft. Allerdings habe ich paar Bilder vorproduziert, um hier nicht mit leeren Händen aufzutauchen.
Ich bin die letzte Woche ein wenig durch die heimischen Wälder flaniert und habe den ein oder anderen Schatz bergen können. Aber alles der Reihe nach …
Da ich messbedingt nicht bei den Pflanzen sein konnte und das mit dem Gießdienst an Dritte abgeben mal so, mal so funktioniert. Dachte ich mir, man muss der Verdunstung und der damit einhergehenden Trockenheit etwas entgegensetzen.
Ich habe mich als kurz und knapp für eine Mulchschicht entschieden. Diese schützt nicht nur vor Austrocknung, sondern macht ebenso die obere Erdschicht für die Durchwurzelung brauchbar. Sie ist obendrein ein weiterer Schritt zu einem gesunden Bodennahrungsnetzwerk. Dieses wird durch die in dem auf dem Grünschnitt/Waldlaub enthaltenen Mikroorganismen (Protozonen, Wimperntierchen), welche durch das Belüften im Tank nochmals gefördert werden, noch einmal gestärkt. Last but not least führt der Mulch dazu, dass Schadorganismen das Einfallen in die obere Erdschicht erschwert wird.
Aber was ist drin?
Ähnlich wie schon beim Komposttee wird bakterienreiches organisches Material in einen Tank mit vorzugsweise Regenwasser gegeben und anschließend über einen gewissen Zeitraum belüftet (siehe Woche 5). Der wohl größte Unterschied zum Komposttee ist, dass wir eher auf das Material und nicht auf die Flüssigkeit aus sind. Dieses besteht zu ca. 90 % aus Grünschnitt (in meinem Fall eine Biokleintiermischung) und zu ca. 10 % aus Laub, welches ich in einem wenig bis gar nicht bewanderten Waldstück gesammelt habe.
Die richtige Platzwahl:
Bei der Platzwahl war mir wichtig, einen möglichst naturbelassenen Teil des Waldes auszusuchen, um eine Kontaminierung von bspw. Müll oder Hundeurin zu vermeiden. Ebenso habe ich nach Material Ausschau gehalten, welches schon Kontakt mit einem Pilzmyzel und dem ein oder anderen Regenwurm aufwies. Beides sind Indikatoren für ein gesundes Bodenleben.
Zum Schluss …
Nun einfach alles in einen großen Tank, Wasser drauf und Pumpe an. Belüftet wurde das Ganze für drei Tage. Danach das Material entfernen und luftig um die Pflanzen aus Ringen (leicht in den Boden einarbeiten). Um mit so wenig Waste wie möglich zu arbeiten, habe ich dann noch das Wasser gegossen. Dieses ist sehr reich an Mikroorganismen.
Aber nun (besser spät als nie) noch ein paar Credits:
Und zwar an Flo von Florganics, von dem ich das meiste Wissen um den Komposttee, die Erdmischung sowie auch das Mulchen bezogen habe. All die genannten Themen sind nochmal deutlich detaillierter auf seinem Yt-Kanal (Florganics) zu finden.
Noch ein kurzes Wort zu den Damen:
Soweit sehen alle sehr saftig und grün aus. Mit dem Toppen warte ich noch, bis ich wieder da bin. Alles in allem sollte am Ende doch ein wenig herauskommen (im Optimalfall 50 g/Person).
Das war’s für diese Woche. Euch nun einen schönen Restmontag und einen guten Wochenstart.
Peace


Likes
88
Share


@PEAKYPLANTERS
Follow
Holy god ... brothers .... I was growing of the magnificent raw diamonds of Sierra Leone and I didn't realize it !!!!
Magnificent look gems covered with a huge frosted layer of resin so pearlescent to make them look from white appearance.
Of course it was not at all easy to grow them given their multiple ramifications and not having a containment network installed.
In a short time they filled all the cultivation sweats, even the little ones and this to ensure that the lower gems did not have the same compactness as the upper ones, but they still came very resinous!
My advice and to contain this very powerful plant and try to concentrate all its exposure with a scrog technique and remove all the lower bulbs


Processing
Likes
11
Share


@kcartel
Follow
growing rapidly, next week I plan to add fertilizers, at the current stage the plant has gone through LST and topping and pruning large fan leaves, in my opinion this stress did not affect the growth this is my first experience in the style of Maine Lining, waiting for 4 week!


Likes
12
Share


@cookingwithninja
Follow
day 49 just pure water phed down.
it is day 51, morning before lights on, I might chop today. I use a zero water filter pitcher got off walmart. My humidifier is only a sonic wave. If you use regular tap water it will get gunky in a sonic humidifier. If you have a heat humidifier that boils the water the mist should be clean. These are the 2 types of water humidifiers. Researching best water filters this "zero water" also comes with a free ppm meter! yay! Other water pitcher brands; the water still has ppm. So water misted will still have ppm contamination. You can easily used distilled water only, and reverse osmosis. I just fill a 4gal office water jug with the pitcher and fill my humidifier when needed. I do not use a humidifier in my entire grow up to this point when I chop, I need the perfect rh or this whole effort can fail. growing up to this point only requires 20% effort, chopping now for the 2 weeks dry is this 80% of crucial determination, succeed. A lot of tasks are required today for a clean chop. I feel confident, observed my cross seeds with pink paradise and one with a slightly open caylex looks dark enough for successful germination. I figured 8-16 seeds may be created, 3-4 buds were potentially pollinated. Many growers don't understand when creating genetics with female/female there is a slight chance of herm. You lose 50% of your genetic function. Just water last 2 days, no humic no folvic, 1st time entire grow ha!
There is a lot of cleaning to do, remove the trees, clean the entire tent and environment with bleach water, hacksaw.
I am very proud of my grow. I have sampled 3 of the strains, dr. thunder legit made my lips numb but it could have just been the terps removing my skin cells from the sticky filter, no lie. This is my best grow to date. I did this for you, and to document hype or not under the best conditions I could give my plants, full max potential, although I wish I had more lights, I am not looking for industrial lol, this is how I grow. Learn a lot on youtube and podcasts there is many good content and I may dab into it. You can have a room full of growers and you have 1 seed in your hand, they will all tell you that their way is correct ;) and the best way. Oreo is stinky AF, Bridal is just amazing glad its massive, just not into sativa but the test seemed slight sativa with majority indica, pink untested, dr, thunder just a lip numming plant aha, its very nice, all 4 amazing appeal like advertised, and excited for next run. Either crosses from this or other copycat genetics.
I will give you beautiful glamout shots today, the sizes of the plants, My guesstimate bridal 1lb, thunder 1lb, pink, 0.4lb, bridal 0.5, I am ambitious off 640w lm301h, and 4x 20w blurples daisy chained.
day 51 4 chopped see you in a few weeks :D

Likes
24
Share


@DeepRootsGrowTrees
Follow
GORILLA COOKIES 🍪 FF / FASTBUDS
WEEK #17 OVERALL
WEEK #9 FLOWER
This week she's doing good buds are looking good they are mostly dense decent trichome coverage and she's got a nice aroma to her and her buds are looking good she's got a few big buds going on. Stay Growing!!
Thank you for stopping by and taking a look it's much appreciated!!
Thank you FASTBUDS!!
FASTBUDS / GORILLA COOKIES 🍪 FF
Likes
13
Share

@cdxxbuds
Follow
Second Plant down. They rock hard and iced out.
Hella impressed with this strain

Likes
2
Share


@KeemBboomin
Follow
Now that you are all caught up, we are in week three a flower. I just gave them a top dress feet of Gaia green just blown because I still have just a little bit up all purpose in there but other than that I look at them every morning, give a big smile and turn on their favorite Mosark album
Likes
34
Share


@ClubRiot
Follow
BCN Power Plant
Week 14
11L Pot
LED: SP250 (245W) for Flow. Stage
Canna COCO
Mineral Nutrients:
👇
Sensi Cal-Mag Xtra: 1 ml/L
Power House Part A: 1.5 ml/L
Calcium Plus Part B: 1.5 ml/L
Stimulus: 1.5 ml/L
Bud Explosion: 1.5 ml/L


Likes
32
Share

@Hempface86
Follow
Here we are this girl is flowering fast. So I do not think this is purple haze unless it is the fast flowering version.But even then, I don't think it is based off of other characteristics... So I legit have a mystery plant on my hands.. I will say she's getting frosty. It's super super early yet, and she's already frosting up, so I am happy about that.. I hope everyone is doing well.. Shout out to Herbies Seeds idk what this is but it looks like.It's gonna be good either way.. God bless him happy growing ✌️
Likes
13
Share


@Prozak
Follow
to mutch cold here 2 week with low temps at night cicle betwen 12 &16 graus in europe.
maybe this is the reason of that purple orange colors (:
Likes
36
Share


@brownbae420
Follow
Day 42
- Nutes mixed and fed
- Have a bug to remove - awaiting Petratools Fogger
- Preflower is happening now
- Vibe: 😅
Day 44
- Ladies looking a bit droopy and sad
- Nutes given
- Most likely week 1 of flower for Gorilla Cookies and Wiz Stash Remix
- Vibe: 🍃😩🤞🏽🙏🏽
Day 46
- After advice provided from @GrowingGrannie & Others, I watered with purpose
- The really sad Gorilla Cookies took the most water, and was in fact dried out
- Did not see praying for at least 24hrs, but did eventually see praying in the top portion
- As well as lifting of the lower leaves from a curled position to a straighter position
- Vibe: 😰
- Readings
-- Lights 24/0 - Level 9
-- Temp: 70 (ideal) | 66.9 (avg)
-- Humidity: 55% | 53.4%
-- VPD: 0.8 | 1.03 kPa
- Vibe: 😳
"Persistence and resilience only come from having been given the chance to work though difficult problems." — Gever Tulley

Likes
38
Share


@Chucky324
Follow
Hello. This is the end of week 9 and the beginning of week 10 of flowering.
Got 1 week of flushing done. I'll give the 3rd flushing tomorrow and and I should get another in before the harvest, starting on Aug 5, a Monday.
In years past, it's taken about a week to cut it down, hang the branches for a few days and then put the buds into curing bags.
Getting yellow leaves because of the flushing and there is another week to go so there will be more yellow leaves.
That's Ok. I think if you mistreat them a bit, you gets more THC at harvest.
The 3 plants I have inside were wilted when I checked on them. With the heat they went through their water faster since the last watering.
Now they have got lots of yellow leaves, especially Plant #8b. That twin has been a little strange since the start. Oh well?!?
The inside plants are a week behind the ones in the greenhouse and they will be harvested after I've finished in the greenhouse.
Showed some of my flowering peyote. They are self pollenating and the oldest is about 20 years old.
Finished book 5 of Weirdo. I've got more Freak Bros. comic books for the next diaries which will be Pink Kush and Death Bubba from weedasecgenetics.simdif.com/ or weedasec.org/
OK. Keep Growing Straight.
Chuck.

Likes
89
Share


@nonick123
Follow
Dia 1 (17/01): La semilla ha germinado! (+3 días) 💥 Enciendo la lámpara del armario a PPFD 225
Dia 2 (18/01): Fuerte y vibrante plántula
Día 5 (21/01): Las plántulas se han estirado ligeramente, por lo que subo a PPFD 300
Día 8 (24/01): Las chicas están asomando las raíces por la parte inferior de la maceta. Parecen fuertes!
Nutrients by Gen1:11 - www.genoneeleven.com
Substrate PRO-MIX HP BACILLUS + MYCORRHIZAE - www.pthorticulture.com/en/products/pro-mix-hp-biostimulant-plus-mycorrhizae
Likes
12
Share

@GermanGrow182
Follow
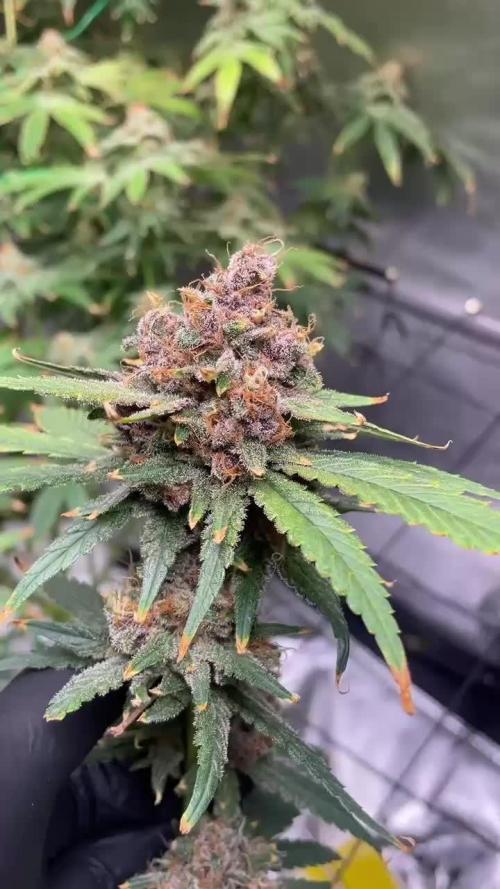
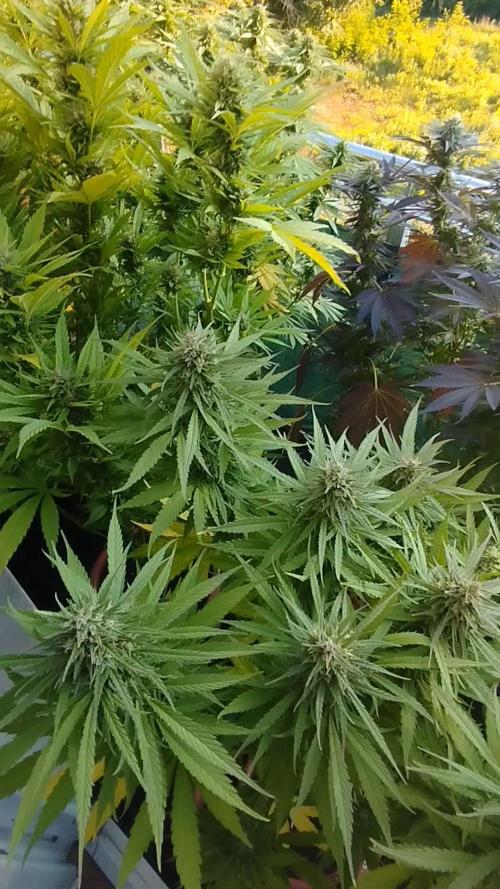
Das Wetter war kühl und nass. 3 tage Regenwetter, 2 Tagen kalt und Sonne, 2 tage mild und Sonne.
Die dicken Blüten von Larry og haben die erste Schimmelstelle bekommen. Wurde entfernt und sie steht weiterhin. Bei der nächsten Stelle ernte ich sie.
Die AK sind gut in der vollblüte angekommen und nutzen jeden Sonnenstrahl, um Masse in den Blüten anzusetzen. Die AK zeigt purple. Sattviolett aufgrund der letzten 3 Nächte unter 5 Grad.
Ich lasse Larry noch ein paar Tage. Die trichome sind fast alle milchig, aber noch keine Bernstein Farbe zu sehen.
Es läuft gut 👍 bis nächste Woche ✌️


Likes
Comments
Share

@Bread_n_Buds
Follow
Merry Christmas and happy holidays to everyone, and above all, a fantastic new year of growth with monsters, plants, unicorns, and all the magical beings we love.
** This week, mostly just growbox photos so you don't miss out on updates during the holidays.
Our Georgia Pie #2 from Zamnesia has emerged with the first seedlings, and after a strong vegetative phase, a fimming seemed right to send her into flowering, especially since I'm afraid she'll get too tall. The first week went well; there are four of us in a small growbox, but I'll soon expand with the release of all the autoflowering strains.
Selected techniques - This plant is going like a rocket, just repeated fimming and no topping, so she's practically straight, just like nature intended.
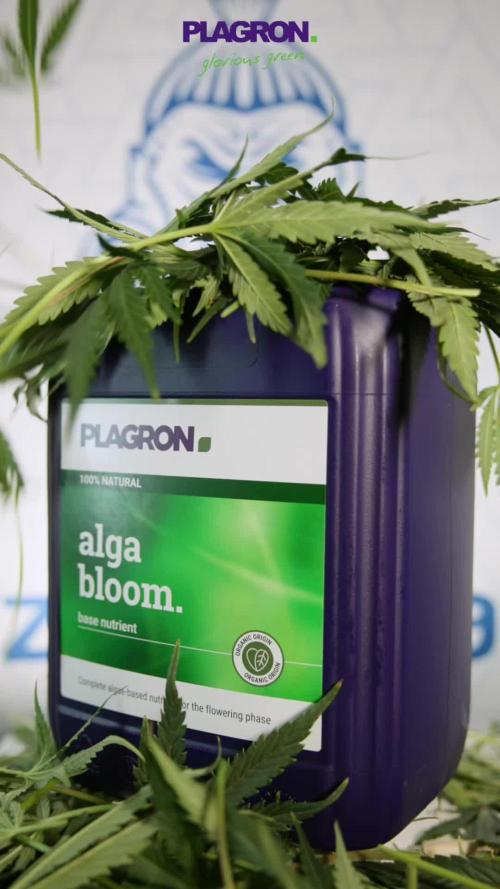
We're 100% organic and 1000% Plagron, as usual.
The soil we've chosen is Plagron Promix, unfertilized and 100% organic. The green bag and green label mean this with Plagron.
We're in the early stages of the bloom phase, but we're well-equipped with fertilizers and additives. We've added Power Buds and switched too ALga Bloom, using power buds from first week is important to launch the bloom activity fast:
- Power Roots 1 ml/l
- Pure Zym 1 ml/l
- Silic Rock 1 ml/l
- CalMag Pro 1 ml/l
- Sugar Royal 1 ml/l
- Alga Grow 5 ml/l
Once a week as a foliar spray
- Vita Race 5 ml/l
Choose your favorite style and calculate your results on the website:
www.plagron.com
Our new 720W Spider King lamp from Vanguard Hydroponics is still dimmed to its lowest setting. Visit the new Growshop area on the Zamnesia website:
Z - https://www.zamnesia.io/it/531-growshop
I can almost hear Ray Charles singing...Georgiaaa, try it.
Z - https://www.zamnesia.io/en/11085-zamnesia-seeds-georgia-pie.html
Z - Spice up your grow with this delicious US hybrid. Originally created in San Francisco, Zamnesia breeders worked hard to trace and stabilize the Gelatti x Kush Mints lineage that gave rise to the original Georgia Pie. The result? A 50/50 indica/sativa hybrid that grows beautifully both indoors and outdoors, quickly producing dense buds with deliciously sweet terpenes and a potent effect.
Combining the genetics of two fantastic parent strains (Gelatti and Kush Mints), Georgia Pie is both productive and easy to grow. During the vegetative stage, plants grow vigorously, developing moderately spaced internodes and fairly broad fan leaves. Expect noticeable stretch when it transitions to flowering: mature plants can reach 130cm indoors and up to 200cm outdoors, with numerous side branches that will develop large buds. Thanks to its exuberant leaf growth, Georgia Pie responds very well to regular pruning, defoliation, and training. These interventions will open up the plant's canopy, exposing even the lower buds to light. Indoors, Georgia Pie typically requires 8–10 weeks of flowering to produce up to 500g/m², while outdoor plants are generally ready to harvest around mid-October, producing up to 500g/plant.
You know it but I recommend it, here you will find many beautiful things basically "all the best that nature has to offer"
Z - www.zamnesia.com
Music //
www.radionula.com
+ Feng Shui Music
+ Frequencies 432 Hz

Likes
58
Share


@Gisbert
Follow
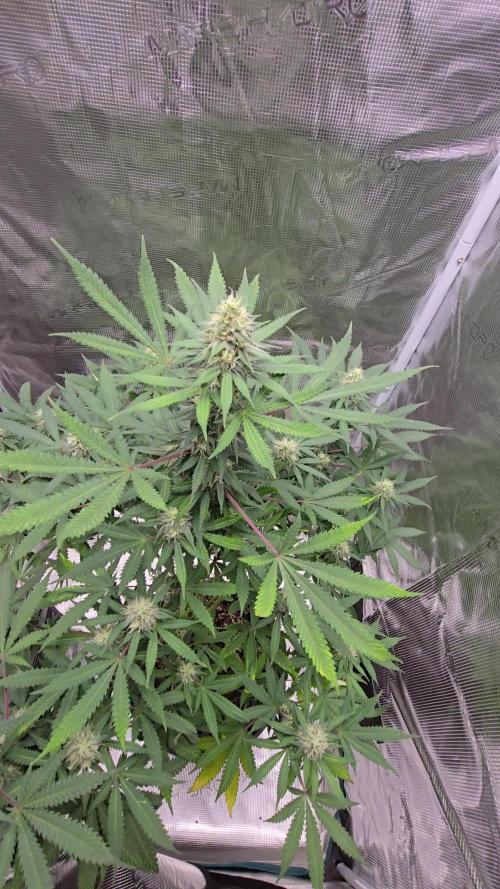
An Größenwachstum ist kaum etwas dazu gekommen. Dafür entwickeln sich die Blüten prächtig und der Geruch ist ein Traum, superintensiv nach Limette.


