The Grow Awards 2026 🏆 


Likes
Comments
Share
@Hazeberg
Follow
Day 63 Jungle Jimmy 69 cm / Day 64 Pink Cookies 99 cm: Nothing to do today.
Day 64 Jungle Jimmy 69 cm / Day 65 Pink Cookies 99 cm: Nothing to do today, except cleaning the reservoir.
Day 65 Jungle Jimmy 69 cm / Day 66 Pink Cookies 100 cm: Nothing to do today.
Day 66 Jungle Jimmy 69 cm / Day 67 Pink Cookies 100 cm: Nothing to do today. I noticed something, I thought I would never see in my grow, some leaf buds on Jungle Jimmy 😍
Day 67 Jungle Jimmy 69 cm / Day 68 Pink Cookies 100 cm: Nothing to do today.
Day 68 Jungle Jimmy 69 cm / Day 69 Pink Cookies 100 cm: Nothing to do today. Day 29 after switching to 12/12.
Day 69 Jungle Jimmy 70 cm / Day 70 Pink Cookies 102 cm: Last day of the week. Everything looks pretty good and I'm very happy with the development. Nothing to do today.
--------------------------------------------------------------
🙏 Thanks for visiting and follow for daily updates 🌱
Likes
7
Share
@StickyFingah420
Follow
Día 73 desde su nacimiento y ya se ha dejado de abonar hace un par de días para obtener resultados más limpios de residuos.
El progreso está a la vista, flores muy densas que estaban doblando todas las ramas de esta planta por lo que tuve que agarrarla para ayudarlas a soportar el peso.
El nivel de tricomas es impresionante y desprende una fragancia dulce bastante agradables por toda la casa.
BUENOS HUMOS! 👽

Likes
29
Share

Likes
15
Share
@OrganikTek
Follow
Weather Continuos Cool And Wet
Beautiful Bubs Forming In Black Cream
Wedding Cake Gone Full Bloom. Discoverd Source Of The Yellowing.... Red Led From My esp32....
BomBerry Shes a Later Late VegBoom Late Full Bloom If Shes Continuos To Grow I Dont Have More Space For Her
Couskush She Isnt So Big as The Other. The Other Are More Evolued I Think. Shes Now Starting To Go Full On Bloom.
Chears BrotherHood


Processing
Likes
15
Share
@MG2009
Follow
08/16/2020
She seems to be recovering well I think she was hungry. So fert.
(4-9-3) spikes and LAB worked well together. Affected leaves are fading, new growth looks good.
And not a spot of PW any where! We are getting some light rain throughout the day but still could use more rain
Likes
13
Share
@Leanback
Follow
Day 21 of flowering did defoil the lady’s. No hermaphrodite showing up. Did a compost tea today. Corn is sprouting for tea. Did covercrop to get some fresh greens for the hcompost after the run.
The buds are stick as fuck. Looking forward for the next and last defoil in week 5.


Likes
5
Share
@HAN_GROWER17
Follow
Ha sido una excelente semana, en la cual podemos distinguir que las flores han crecido bastante, además se han fortalecido sus propiedades organilepticas perfeccionando un aroma a "Horneado" además de una nota bien marcada a menta con suaves pinceladas a Chocolate, el cual me hace recordar las galletas que se hacen para celebrar la navidad! Esperemos que las flores crezcan aun mas!

Likes
5
Share
@Mrbudgrower88
Follow
The ladies are going into flower now in the main room and the second room is half up and running with four sick French macarons and 29 cuttings of all the strains


Likes
4
Share
@DankyGenetics6661
Follow
I'm midway through the ninth week she is almost done probably a week left ATM I am just flushing her with H20 and a tbsp of molasses... I know on my next grow of Strawberry Gorilla from FastBuds I will be ordering another light of the same brand just one more 1000w and that would be the perfect amount. The buds are extremely sticky and smell like heaven they are turning purple the leaves are I'm thinking I need to water one more time and let that be it but the bud production is insane. I've learned a lot and I do plan on starting a Craft Cannabis grow... Proverbs 11:1
Likes
3
Share
@AutoZone420
Follow
I know she’s small but I learned a lot... please feel free to leave comments on how she looks regardless
Likes
9
Share
@Scilef
Follow
Daily reports:
Day 1.
Flushing: 3x 14l plain water with 5.7-6.0 pH. Last 7 l: 5.8 pH 30 ppm => 6.3 pH 45 ppm
Watering - Day: 6.0 pH 774 ppm 2.0 l => 6.6 pH 71 ppm 1.5 l
Watering - Night: 6.0 pH 786 ppm 1.5 l => 6.4 pH 115 ppm 0.55 l
Day 2.
Watering - Morning: 6.0 pH 861 ppm 1.5 l => 6.45 pH 149 ppm 0.8 l
Watering - Night: 6.0 pH (848 ppm 1.5 l + 797 ppm 0.7 l) => 6.1 pH 329 ppm 0.25 l
Day 3.
Watering - Morning: 6.0 pH 699 ppm 2.0 l => 5.7 pH 740 ppm 0.8 l
Watering - Night: 5.7 pH 569 ppm 3.0 l => 5.8 pH 1000 ppm 0.8 l
Notes: Yesterday I broke dropping irrigation system, so today I showered Heracles as usual. It seems that dropping irrigation made less runoff. And here we are again, 2 times ppm in runoff. I think I just can't fix that, so I will finish this grow as is and try to change fertilisers for the next grow.
Day 4.
Watering - Morning: 5.8 pH 334 ppm 2.0 l => 5.8 pH 1050 ppm 0.8 l
Watering - Night: 5.8 pH 435 ppm 3.0 l => 5.8 pH 1570 ppm 0.6 l
Day 5.
Watering - Morning: 5.8 pH 323 ppm 2.0 l => 5.8 pH 1220 ppm 1.0 l
Watering - Night: 5.8 pH 333 ppm 2.0 l => 5.8 pH 1220 ppm 0.7 l
Day 6.
Watering - Morning: 5.8 pH 344 ppm 1.5 l => 5.8 pH 1190 ppm 0.25 l
Watering - Night: 5.8 pH 344 ppm 2.0 l => 6.0 pH 1120 ppm 0.25 l
Day 7.
Watering - Morning: 5.8 pH 356 ppm 2.0 l => 5.8 pH 1020 ppm 1.0 l
Watering - Night: 5.8 pH 337 ppm 2.0 l => 5.9 pH 807 ppm 0.5 l
Likes
18
Share
@ArizonaGrower
Follow
June 11th: Wasn't able to snap a pic in time :(
June 16th: Video instead of picture

Likes
98
Share
@Tropicannibis_Todd
Follow
💩Holy Crap We Are Back💩
Well i took the summer off to do some outdoor but thats all done so , we are back indoors and at it again 😁
So super happy to be trying this one out , can't wait😝 ..... it's been awhile since I've grown some BubbleGum so looking forward to it ..👍
Seed soaked for 24 then placed in a tub with paper towels , once it cracked and rooted , placed into its main pot 👌
Lights being readjusted and chart updated .........👍rain water to be used entire growth👈
👉I used NutriNPK for nutrients for my grows and welcome anyone to give them a try .👈
👉 www.nutrinpk.com 👈
NutriNPK Cal MAG 14-0-14
NutriNPK Grow 28-14-14
NutriNPK Bloom 8-20-30
NutriNPK Bloom Booster 0-52-34
I GOT MULTIPLE DIARIES ON THE GO 😱 please check them out 😎
👉THANKS FOR TAKING THE TIME TO GO OVER MY DIARIES 👈
Likes
9
Share
@Belivitez
Follow
Very happy with buds i have some problems in flowering and this is new school for me... Thanks to watch ✌️

Likes
3
Share
@MangoFett
Follow
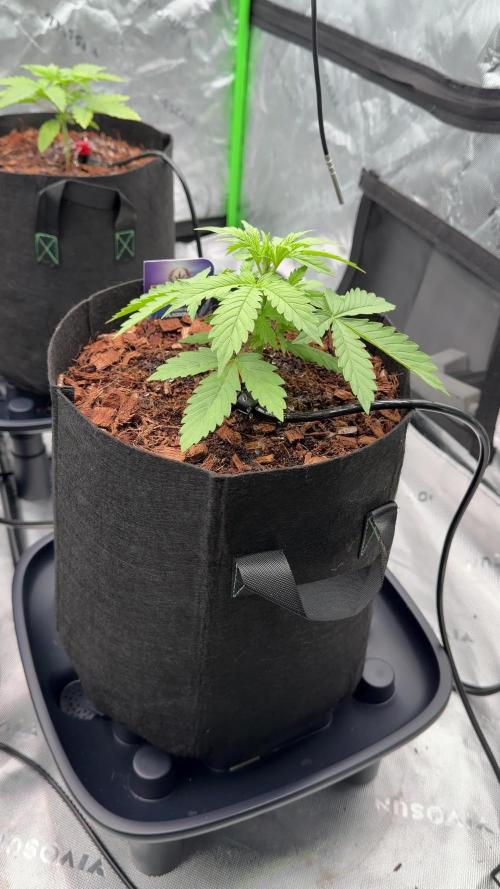
Tried to FIM the plants not quite sure it worked. Decided to top them instead and see where it leads. Also added a net to support the stem from falling over.

Likes
5
Share
@Stoney_Stark
Follow
Stoney_Stark Week 2 Update — Sticky Broccoli Auto
Grower: Stoney Stark / Little Lilly Farms
Stage: Early Veg (Week 2)
⸻
Growth Overview
Plants are establishing well and responding positively to automation. No visible stress from the siphoning incident. What initially appeared to be a nitrogen deficiency was later identified as a magnesium deficiency common in coco systems, with a light green fade also indicating the early onset of nitrogen demand.
⸻
Irrigation & Automation
• Transitioned to auto-irrigation emitters this week
• Distribution appears even across all plants
• Initial siphoning issue identified and corrected by removing pump after feed cycle
• Monitoring pot weight closely to avoid overwatering
⸻
Watering & Feeding Log
1/29 — First Auto-Irrigation Run
• Amount: ~¼ gallon per plant
• PPM: 420
• pH: 5.9
Nutrients (per gallon):
• 0.5 ml Silicium
• 4 ml Cocos A
• 4 ml Cocos B
• 2 ml Power Roots
• 3 ml Pure Zym
• 5 ml Ruby Fulvic
• 2 ml Photo+
• 1 ml Fish Sh!t
Notes: First run with emitters. Feed appeared evenly distributed.
⸻
1/31 — Siphoning Incident
• Issue: 5-gallon bucket siphoned into all 4 plants
• Result: No negative plant response observed
Nutrients (per gallon):
• 0.5 ml Silicium
• 4 ml Cocos A
• 4 ml Cocos B
• 2 ml Power Roots
• 3 ml Pure Zym
• 5 ml Ruby Fulvic
• 2 ml Photo+
• 1 ml Fish Sh!t
⸻
2/1 — Auto-Irrigation Dialed In
• Feed Time: 1 minute
• Runoff: Small amount
• Adjustment: Pump removed immediately after feed to prevent siphoning
Observations:
• Noticed early light green coloration initially interpreted as nitrogen deficiency
• Adjustments made to increase available nitrogen
Nutrients (per gallon):
• 0.5 ml Silicium
• 4 ml Cocos A
• 4 ml Cocos B
• 2 ml Power Roots
• 3 ml Pure Zym
• 5 ml Ruby Fulvic
• 2 ml Photo+
• 1 ml Fish Sh!t
• +2 ml additional Cocos A
• +1 ml Royal Rush
⸻
2/2 — Moisture Hold
• Pots felt heavy
• Decision made to skip watering for 1–2 days to avoid overwatering
⸻
2/3 — Light Auto Feed + Deficiency Diagnosis
• Feed Time: 1 minute
• Pots: Still holding moisture; irrigation paused for the next couple days
Updated Diagnosis:
• What initially appeared to be nitrogen deficiency was confirmed to be magnesium deficiency, common in coco when running low-mineral water
• The light green coloration also indicates the beginning stages of increased nitrogen demand
Correction Plan:
• Adding Scientetics MagCal at 2 ml per gallon starting next feed to supply readily available magnesium and calcium
• Nitrogen levels maintained via Cocos A and Royal Rush without over-increasing EC
Nutrients (per gallon):
• 0.5 ml Silicium
• 6 ml Cocos A
• 6 ml Cocos B
• 3 ml Power Roots
• 4 ml Pure Zym
• 4 ml Photo+
• 2 ml Fish Sh!t
• 1 ml Royal Rush
• (MagCal to be added next feed)
⸻
Issues & Adjustments
• Magnesium deficiency: Identified and corrected with planned MagCal supplementation
• Early nitrogen demand: Being met through controlled increases to Cocos A and Royal Rush
• Overwatering risk: Managed via pot-weight monitoring and irrigation pauses
• Auto-irrigation: Functioning correctly after siphon fix
———
Deficiency Learning Note
This week provided a useful reminder about how nutrient deficiencies present in coco-based systems. What initially appeared to be early nitrogen deficiency was identified as magnesium deficiency, which commonly manifests as a light green fade and interveinal chlorosis on lower leaves. In coco, magnesium can become limiting even when using coco-specific base nutrients, particularly when running low-mineral or RO water.
The light green coloration also coincided with increasing nitrogen demand as the plants transitioned deeper into vegetative growth. Rather than aggressively raising EC, the correction strategy focused on restoring magnesium availability while maintaining balanced nitrogen levels.
⸻
Plan for Week 3
• Introduce Scientetics MagCal at 2 ml/gal
• Allow pots to dry slightly before next irrigation
• Monitor color correction in new growth
• Fine-tune auto-irrigation timing and volume
• Gradually increase feed strength as plants size up
Processing
Likes
10
Share
@CanadianFillmore
Follow
Welcome to the beginning of week 13. Green Crack looks happy and healthy, if one can say that about crack lol. Not much else to report about this girl at the moment.
Thanks for taking a look at my grow 👽🌳

Likes
25
Share
@Esoteric_growing
Follow
Had problems with ph swing on this run and a faulty ph meter caused extra issues but overall it bounced back well. Moral of the story is always have a spare ph tool lol

Likes
7
Share
@DogDoctorOfficial
Follow
🌸 Week 2 Flower – BlueBerry Diaries Continue
Grower’s Journal – BlueBerry by Zamnesia Seeds | Entry 007
⸻
🌱 From Seed to Here – A Quick Recap
Our BlueBerry journey began with three germinated seeds, from which we carefully selected two strong phenotypes to carry into flower. From delicate sprouts to fast-branching vegetative bushes, they’ve thrived under a mix of Aptus nutrition and precisely managed environments.
By Week 4 of veg, their symmetry and vigor showed just how stable and legendary these genetics really are true to the BlueBerry heritage: Afghan strength, Thai influence, and purple notes hidden in their DNA.
Now, here in flower, they’re 57 cm tall, nearly twins in their morphology, and fully embracing their transition into bloom.
⸻
🌸 Week 2 in Bloom – Shifting Morphology
This week the girls are changing shape, stacking nodes tighter, pushing pistils, and clearly leaving veg behind. Their body language is all flower now:
• Branches are stretching with intention.
• Nodes are clustering toward bud formation.
• Pistils are reaching, glowing under the LEDs.
Despite fewer photos this week (a busy one outside the garden), a room tour video captures it all the environment, the gear, the girls in context. What the photos can’t show, the video will.
⸻
Nutrient Recipe – An Improvised Symphony
We shifted last week from Start Booster → Top Booster, and this week we’ve gone further by weaving in Plagron additives.
🌼 Current Recipe (per liter)
• Aptus Regulator – 0.15 ml
• CalMag Boost – 0.25 ml
• Plagron Power Buds – 1 ml
• Plagron Sugar Royal – 1 ml
• Plagron Green Sensation – 1 ml
• Aptus Top Booster – 0.25 ml
📌 Note: All-in-One Liquid is on pause, the soil pellets are providing base nutrition, while Plagron complements are here to push flower expression.
Why this recipe?
Because flower is about stacking, energy, and quality.
• Power Buds → boosts initial flower development
• Sugar Royal → supports metabolism + secondary metabolites (terpenes, aromas)
• Green Sensation → bloom stimulator for resin and density
• Top Booster → P+K push at the perfect timing
It’s experimental, yes, but that’s how progress and learning happen. Past runs with Plagron have shown promise, so this run is the testbed for full synergy.
⸻
Room Conditions – Riding the Summer Wave
• Temperature peaks: up to 34°C (a bit high)
• Humidity range: 50–70% depending on the day
• VPD: averaging 1.89 kPa
Not perfect, but the girls are adapting beautifully. Their leaves remain vibrant, posture upright, and growth unimpeded.
✅ Upcoming fix: AC unit arriving soon to stabilize temp & RH into optimal ranges.
⸻
🌊 Watering & Substrate Monitoring
Irrigation is triggered when soil moisture drops to 19–20%, measured precisely by the TrolMaster WCS Substrate Sensor, connected to the Tent-X brain.
This system doesn’t just track moisture, but also EC and medium data, giving real-time insights into what’s happening below the surface. It’s like having an X-ray into the soil, ensuring that every watering is timely and efficient.
⸻
💡 Lighting & Ecosystem
• Future of Grow LEDs + ThinkGrow Model 1 LEDs running together, controlled by TrolMaster ecosystem.
• New addition: Lumatek Zeus Compact Pro 465W in the tent, expanding coverage and spectrum flexibility.
As the canopy thickens, we’ll be increasing light intensity to match plant demand and keep PPFD within optimal flowering ranges.
⸻
🐝 A Moment for the Bees – Nature’s Allies
This week, alongside garden updates, I want to honor the bees 🐝💛.
In the wild, bees are the silent partners of flowering plants, carrying life between blossoms, ensuring the cycle of fruit, seed, and renewal continues. Without them, much of what we enjoy in gardens and on our tables would not exist.
Just as I guide my BlueBerries with nutrients, lights, and sensors, bees guide the world with wings, pollen, and persistence.
They are tiny alchemists, weaving ecosystems together.
So here’s a fairy-tale note for the bees:
“Every pistil in my tent glows in light. Every flower in the fields waits for you. May the hum of your wings remind us always, life depends on the smallest of guardians.”
⸻
🔮 Looking Ahead – Week 3 Flower
We expect:
• Bud stacking to intensify
• Resin glands to begin sparkling
• Aroma to whisper into the air (first terpenes awakening)
• Nutrient balance to remain key as morphology shifts fully into flower
No heavy defoliation yet, focus stays on stability, airflow, and adaptation as the stretch slows and flowers bulk begins.
⸻
💬 Final Thoughts – Busy Week, Blooming Garden
Even without many photos, the garden speaks for itself.
The video tour shows it: thriving plants, a robust ecosystem, and the beauty of legendary genetics expressing in modern conditions.
From seed, through veg, and now two weeks into flower, the BlueBerry story continues to write itself. And it’s a story of balance: between nature and technology, experiment and tradition, the grower’s hand and the plant’s will.
With bees in the fields and LEDs in the tent, life is thriving.
And that’s what this journey is all about. 🌸🌍🐝
Growers Love to you all,
DD (DogDoctor)🌱💚
📲 Don’t forget to Subscribe and follow me on Instagram and YouTube @DogDoctorOfficial for exclusive content, real-time updates, and behind-the-scenes magic. We’ve got so much more coming, including transplanting and all the amazing techniques that go along with it. You won’t want to miss it.
• GrowDiaries Journal: https://growdiaries.com/grower/dogdoctorofficial
• Instagram: https://www.instagram.com/dogdoctorofficial/
• YouTube: https://www.youtube.com/@dogdoctorofficial
⸻
Explore the Gear that Powers My Grow
If you’re curious about the tech I’m using, check out these links:
• Genetics, gear, nutrients, and more – Zamnesia: https://www.zamnesia.com/
• Environmental control & automation – TrolMaster: https://www.trolmaster.eu/
• Advanced LED lighting – Future of Grow: https://www.futureofgrow.com/
• Root and growth nutrition – Aptus Holland: https://aptus-holland.com/
• Nutrient systems & boosters – Plagron: https://plagron.com/en/
• Soil & substrate excellence – PRO-MIX BX: https://www.pthorticulture.com/en-us/products/pro-mix-bx-mycorrhizae
• Curing and storage – Grove Bags: https://grovebags.com/
⸻
We’ve got much more coming as we move through the grow cycles. Trust me, you won’t want to miss the next steps, let’s push the boundaries of indoor horticulture together!
As always, this is shared for educational purposes, aiming to spread understanding and appreciation for this plant. Let’s celebrate it responsibly and continue to learn and grow together.
With true love comes happiness. Always believe in yourself, and always do things expecting nothing and with an open heart. Be a giver, and the universe will give back in ways you could never imagine.
💚 Growers love to all 💚
Likes
4
Share
@Ninjabuds
Follow
My new grow pros solutions under canopy lights are really making the colors pop
Black Cherry Gushers is a strain that's sure to turn heads. The buds are round and dense, like little nuggets of pure fire. And the trichome coverage? Absolutely insane! This plant is a frosty wonderland, begging to be admired. It's a testament to the grower's skill and the plant's incredible genetics.
