
Likes
Comments
Share

@German_GrowLab
Follow
Einen wunderschönen guten Tag, liebe Grow-Community, und herzlich willkommen zur 14. Woche meines kleinen Outdoorprojekts!
Diese letzte Woche ging es den Damen an den Kragen …
Da die Kleinen in letzter Zeit doch ordentlich an Pflanzenmasse zugelegt hatten und das Wetter in Kombination mit zu dichtem Blattwerk ein erhöhtes Pilzrisiko birgt, habe ich mir die Schere geschnappt und die Pflänzchen ordentlich ausgedünnt. Ich bin hierbei relativ radikal vorgegangen (nach dem Prinzip „Viel hilft viel“). Das hat mehrere Gründe: Einerseits bin ich kein Fan von diesen ganzen Popcornnug-Geschichten (sowohl qualitativ als auch vom Trimaufwand her). Ich stelle die Qualität immer über die Quantität und so gewährleiste ich, dass die Haupttriebe die gesamte Energie erhalten und optimal performen können. Des Weiteren gewährte ich so eine deutlich bessere Luftzirkulation und vermeide ein unnötiges Überlappen der Blätter, welche wiederum Kondenswasser einfangen und somit ein optimales Klima für Pathogene bilden. Und last but not least darf ich ja eh nur meine 50 g/Person ernten.😇
Beim sogenannten „Lollipopping“ verwende ich eine frisch sterilisierte Schere, welche ich nach jeder Pflanze neu reinige, um eine mögliche Kreuzkontaminierung zu vermeiden.
Vor diesem Eingriff habe ich den Pflanzen noch eine Stärkung verabreicht, um sie auf den kommenden abiotischen Stress (nicht durch Lebewesen erzeugter Stress) vorzubereiten. Hier kam wieder mein noch nicht so altbewährter Biostimulator ins Spiel. Dieses Mal allerdings in Kombination mit einem Komposttee. Dieser hat den Vorteil, dass er den Gasaustausch der Pflanze fördert (,,ein lebenswichtiger Prozess, bei dem Sauerstoff (O₂), Kohlenstoffdioxid (CO₂) und Wasserdampf mit der Umgebung ausgetauscht werden“), indem sich die Mikroorganismen um die Spaltöffnung (Stomata) ansiedeln und diese sich schneller öffnet und schließt.
Wichtig ist hierbei noch zu erwähnen, dass sich die meisten Stomata auf der Blattunterseite befinden, diese also ebenfalls besprüht werden sollte. Und da wir Bakterien ausbringen, ist es von Bedeutung, mit großen Tropfen und wenig Druck zu arbeiten und die Pflanze möglichst nass zu machen.
Jetzt hoffe ich nur noch, dass das Wetter wieder mitspielt und wir gesund und vital in die Blüte übergehen können.
Und zum Schluss noch das altgewohnte Gequengel: Grow Diaries hat mir aus irgendwelchen Gründen meine Views gedrittelt (vielleicht wegen der Kritik im letzten Bericht)😁. Bisschen ärgerlich, aber ich mache es ja nicht für den Fame.😂
Das war’s für diese Woche. Euch noch einen schönen Restsonntag.
Peace


Processing
Likes
2
Share


@MidwestBudz
Follow
From the looks of my top of the coco it seems like I was over watering. I seem a bit of algae growth, my coco stay moist for 4-5 days it seem like. So should my nute feeding be huge or give them small daily feeding in between the large watering?


Likes
22
Share


@CanarianGrow92
Follow
Wonderful tangerine smell, all strains are looking and smelling more or less the same, some buds are a bit bigger and some other showed some more stretching when we switched to flower but in general wonderful strain, lets see if the buds taste as good as they smell 😜
Week 4 already! We start to see a small nutrients deficiency, time to add some more organic stuff, i didn't applied too much so it seems it was food for 4 weeks, great as i dont want to give too much nutrients, I heard that organic nutrients gives a better taste and avoid salt accumulation in the roots, i always have been a typical grower using bottles but lets see, at the moment very happy, buds are looking good, i do need to add some sugars I think 🤔

Likes
30
Share


@TragicTerps
Follow
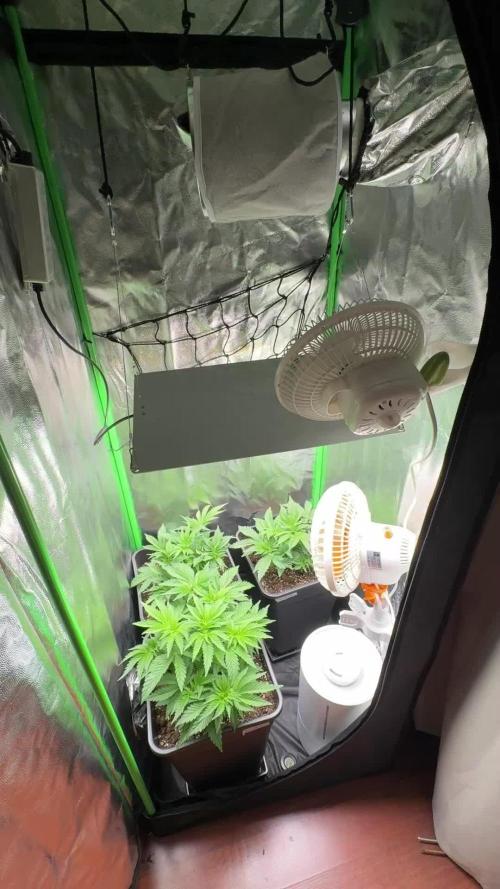
I have been using LST in the form of a fan on medium speed to try and strengthen the main stalk of the plant as well as planter rotation to strengthen the main stalk for tie down LST.
So far I've been impressed with the rate of growth and the overall experiment. For what it's worth, the growth wth is very very similar to a hydroponics growth. I'm sure as the experiment continues I'll notice some big differences.
It does appear to have either a minor potassium deficiency or a little too much nitrogen. Will monitor and update as needed.
The above signs may have been trying to indicate the main stalk was weakening from too much weight from vertical grow rate. This would ultimately lead to a fractured stalk. Is this what happened or is it a fungus or disease problem?
Plant C sprouted within 48hrs and will be 6 days behind Plant A. End goal of harvest is still 360g from the two plants combined.
Both plants are looking very happy regardless of the toxicity or deficiency. Strong strain nonetheless.

Likes
30
Share


@Green_Dream
Follow
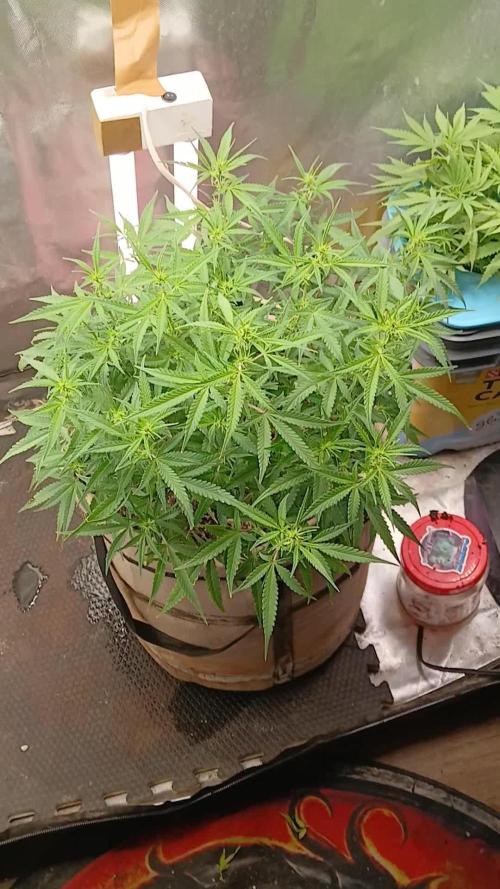
The first week of flowering went great! The girls stretched nicely and they are growing vigorously. The pistils started showing up quite quickly, only a few days after I flipped them. I increased the PK as they showed slight signs of deficiency.
They are packed with shoots, almost too much I would say, I hope they will have enough space for the buds to develop properly and healthily.

Likes
11
Share


@BudBeezy
Follow
A lot has happened this week. After I watered the nettle manure, some of the leaves turned a little yellow. There seems to have been enough nitrogen left in the soil, so this week there was only pure water. Unfortunately, my supply of rainwater is pretty empty, so I topped up the tank with tap water. After I noticed that the roots were already coming out of the drainage holes, I thought it was time for another repotting. As you can see, the roots have spread well. This time the plant will be planted in the 55-litre end pot. I'm using a fabric pot from the brand Gronest. The soil is the same as for the first repotting. Here is the nutrient profile again.
Floragard TKS 2
N 210 mg/L - P 240 mg/L - K 270 mg/L - Mg 70 mg/L - S 150mg/L
After repotting, I defoliated the plant a little and attached plant hooks. I have looked for inspiration on the Internet and am trying to build up a good basic structure. As the pot size has changed, the watering quantity also had to be increased. I tried 8 litres this time every 2 to 3 days and nothing leaked out at the bottom.
The weather was better again this week. The daytime temperatures fluctuate between 17 and 22 degrees. I'm happy with the weather so far, but it could still get a bit warmer. Especially at night.

Likes
34
Share


@Herbz_Unkraut
Follow
Only ph'ed water this week
I have to add a few days till harvest...many plants still produce alot of bud...


Likes
6
Share


@Alienrdwc1
Follow
This week has been a recovery week. Cleaned the roots in alien root rot x..turned lights down to 4x250w chiller still struggling..waiting for new big one..roots still look a little brown but nute solution is brown. New roots coming out of baskets nice and white and thick. Plenty of new growth. Keep topping and have added lst to try and combat stretch and allow light in. When running advanced ph perfect at half strength ph is too high at full strength ph drops back into the 5s. Ec at 2.8 but no sign of nute burn yet anyway..

Likes
13
Share


@GrandmasBoy2021
Follow
Week 14,
Week 14 was the last week before Harvest/Havrest! I flushed the plant and trimmed her a bit before harvest. I hope you all enjoy the videos and the pics!
Likes
2
Share

@Hidden
Follow
:
- Day 1 week 5: just checking how lst is doing, they will be ok
- Day 2 week 5: not completely dry to water so I’ll wait for day 3 of week. Did lst to make sure all branches receive as much ligth as possible
- Day 3 week 5: watered them with 4ml/L calmag and 2ml/L bio grow ph 6,5 tap water trough activated carbon filter. RHC#2 broke one of the branches, I had to tape it. Not to be worried, she’ll recover from that. RHC#3 is very slow compared to the others.
- Day 4 week 5: defoliation so sun enters better and wait.
- Day 5 week 5: added 1L of water with 2ml/L Bio grow, 6 ml/L calmag and 2ml/L bio heaven. 1600 us/cm and ph 6,2 - 6,5. RHC#3 suffered of broken branch due lst 😞 still learning about the flexibility of branches. I think she’ll recover hoping not too much stress for her.
- Day 6 week 5: RHC#3 looks good despite broken branch. Not much for today just watch temp and humidity, hoping they grow tall so I can cover a good part of the tent.


Likes
16
Share


@DeepRootsGrowTrees
Follow
GORILLA MELON / 420FASTBUDS
WEEK #13 OVERALL
Week #3 FLOWER
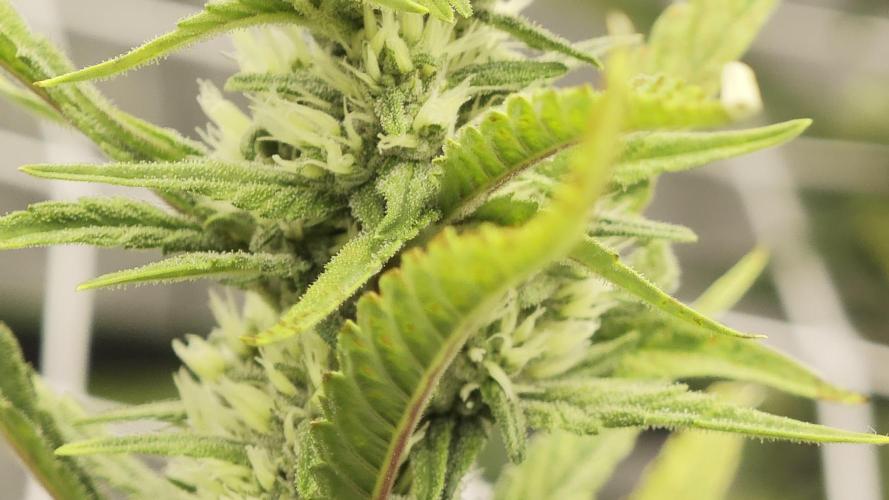
This week she doing good 👍 she's continued to grow her buds and she's getting good trichome coverage she's looking frosty. Stay Growing!!
Thank you for stopping by and taking a look it's much appreciated!!
BUDTRAINER.COM
BUD CLIPS/BUD CUPS
GORILLA MELON / 420FASTBUDS
Likes
1
Share


@AppleFritterGarden
Follow
esta semana fue una buena semana de buenos avances, no tanto en altura sino en ramificación, los que rematé ya parecen haberse recuperado y uno de ellos ya está atado a las 4 ramas. Por lo demás todo va bien, los automáticos solo consumen agua mientras los demás vuelven a la alimentación. Mañana volveré a aplicar el nutri spray.

Likes
13
Share


@KinoBudz74
Follow
Buds fattening up🤟I think in about 3-4 for more weeks will be harvest time 🔥
Likes
13
Share


@NicoKh
Follow
Was a little bit challenging for me, due to the outdated nutrients table, mostly on the Flowering period, also little thing like i have to fill more the pots, also with this kind a strain and also with cuts instead of seeds, may be is better to don't do the topping and don't loose time and energy on the vegetative period. At the same time, more or less about the 8th week of flowering it starts to appear something like Alternalia or Overfeed of Phosphor still don't sure. All this issues have impact the grow in terms of the size of the branches and the whole plant, the size of the buds and the hardness.
In strictly terms about the strain, the quality is out of mind, amount of resin is crazy, just have to improve my skills and get bigger crops

Likes
2
Share

@BasedBuds_89
Follow
Started to defoliate and lollipop her slowly, cut back on nitrogen completely and will only be using a tiny amount of Micro and Big Buds nutrients for the remainder of the grow.

Processing
Likes
5
Share


@Greenfox89
Follow
Good evening and welcome to the second entry in this diary.
So that we already have to work with high temperatures, I carefully ordered the leave coat from Biobizz but it is still not there!Just like the rest of the order.
I gave the plant 350ml Enchancer from Greenhouse. This is a new product for me. Which I will definitely include in my range.
The room climate is 40% -50% humidity humidity from 25 to 28c during the day and 21-23c at night.I once read that frozen 2L bottles can help get a few degree down, and I think about trying it.
We are still waiting for the 3 noiden of the plant and then we start training. The low stress training will be my choice
Thanks for your time the fox✊🦊❤️
Likes
3
Share


Likes
16
Share


@DevilishCherryBlossoms
Follow
I Make 2L Nutrients at a time
To always give fresh Nutrients
I only water with nutrients
Shake before watering.
Mix 30/08/21:
Kelpack 55ml
30/08 - New Nutrient mix
- watered @ 5PM today to further stress Relieve
- Excellent Health and Growth
- Smelling Amazing!
31/08
- New Mix for flowering Boost week 3 flower
Mix
Umya Nutrients :
Flora 2g; Carbon K 2g
Moblend1g (stand 1H for micro Organisms)
Calmag 1ml; Multi Amino 2ml
Molasses 5ml; Kelpack 25ml
- Watered @ 5pm
31/09 - Watered @ 5pm
01/09 - Watered @ 6:32pm
02/09 - got up this morning to some loud smelling MJ Lovin it
02/09 - Watered @ 5:45pm
- Pistils Changing color RED
03/09 - Early morning mini Feed 250ml
- Pistils Adding purple to color Changes
- So turns out on closer inspection that these pistils are orange and dark red not purple as i thought before pic is at the top ^ (* Closer look)
- Watered @ 8:45pm
04/09 - Watered @ 8am
- Watered again @ 6pm
05/09 - Watered @ 11:46am 1L
- added another 1L before she went to sleep today just to see how shed react
- Walked into grow area and she's about to disturb the neighbors cause she's loud tonight !
- End of week 11