
Likes
Comments
Share


@KurbinTurbin
Follow
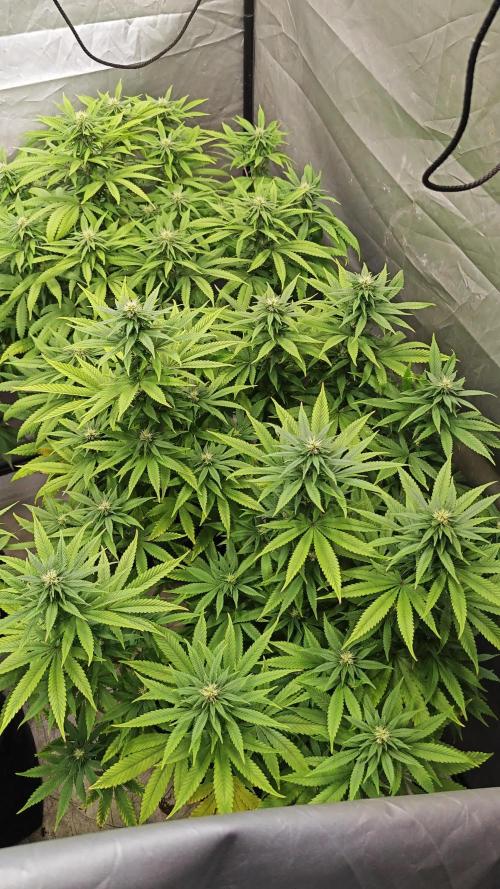
This strain was easy to grow, short and very bushy. The smell when drying has an incredibly strong earthy/chocolate aroma which is very pleasant🤤.

Likes
5
Share


@MafuMome
Follow
Regando uma vez a cada 3 dias com 50% de runoff. 43 dias de flora. Hora de engordar. Temos dois fenos da Granny's home, um com características indicas e outro com características mais híbridas tendendo ao sativo.


Likes
34
Share


@AshBrand
Follow
Welcome!
In this grow we have:
2x Platinum Wedding Crasher
2x Gelato 41
1x Sour OG
2x Lemon Kush
Germination/Rooting - 14 Days
9/17/21 - The clones look good in solo cups of soil. We will transplant into 5 gallon pots in the grow tent after they fully root in the cups.
9/18/21 - Looks like the clones are doing well in soil! We are so excited to grow these out. The clones came from a very highly respected grower.
9/19/21 - No ugly growth. All clones look amazing! We upgraded the light to a Mars TSW 2000.
9/20/21 - They are looking good and most likely rooting throughout the cups. I’ll give them a little bit of water today. I want the roots to go looking for the water so I’ve kept them slightly dry.
9/21/21 - They look happy. I will let them just do their thing… We are waiting on our Mars TSW 2000 light to show up anyways. No roots visible from the drainage holes in the cups.
9/22/21 - Looking really healthy and growing nicely. I’m excited for them to fully root in the cups so we can transplant them into the tent. The Mars TSW 2000 should be here in the next few days.
9/23/21 - Looking so good! We can’t wait to get these under the Mars TSW 2000 in the tent. They smell and look great.
9/24/21 - The clones look really good except for one Sour OG. It wilted and died, roots did not take unfortunately. I have a Lemon Kush started from seed we will grow in place of the dead Sour OG. Today we got our Mars Hydro TSW 2000 light. We will be hanging it and updating with pics/videos.
9/25/21 - They look amazing. Lots of growth while rooting.
9/26/21 - So far so good. Watering when the cups get light in weight. In just a few days we will be transplanting. See the video for today, we hung the Mars Hydro TSW 2000!
9/27/21 - Watered them yesterday, they look healthy. The Lemon Kush isn’t a clone, it is from seed. It’s the smallest girl but it’ll perk up quickly.
9/28/21 - Transplant day!! The clones are looking really good and it’s time to transplant into the 4x4 under that Mars Hydro TSW 2000 at 50% intensity. Check out the pictures and videos from today!

Likes
147
Share


@Coco4CocoPuffs
Follow
😴💤😴💤😴💤😴💤😴💤😴💤😴💤😴💤😴
We are now at day 70 from seed and we are 42 days in flower 👈 I am running 2 Sleepys and both are doing great 👍
so new nutrients plan has once again started 🙂 let's go Brandon 👈😄😅😆
we are just steaming ahead everythings is fire 👍
Thank you my friend for the support 🙏
😴💤😴💤😴💤😴💤😴💤😴💤😴💤😴💤😴

Likes
8
Share


Likes
4
Share


@adam_pawloski87
Follow
@twenty20mendocino Ateam R&D Update ~ Let’s Go day 18 of 🌸almost 3 weeks in an we are looking great! Gave em another aggressive trim up some lollipops this week hopefully wasn’t too early but hey it’s we learn as growers, but they are bouncing back super nice, praying a looking happy y’all! Can’t wait to see what these girls do over the next few weeks, y’all have to keep them eyes peeled for next weeks update. Y’all have an amazing productive rest of your day as well as great rest of your week! Hope y’all enjoy, peace love an positive vibes to all y’all Cheers an blaze on 😶🌫️💨💨💨💨

Likes
5
Share


@Aleks555
Follow
42 Fast Buds – Test FBA 2506 | Day 72
The result exceeded all expectations!
The main cola of this beauty reached 27 cm in height and nearly 25 cm in circumference!
Dense, resinous buds completely covered in trichomes. The plant structure is compact but productive — the side colas are not far behind the top.
Grow details:
• Nutrients: Xpert Nutrients
• Light: Mars Hydro FC-3000 EVO
• Pot size: 11 L
• CO₂: used during veg and for 4 weeks of flowering
• Stage: 72 days, with ~15% amber trichomes
• Aroma: very strong and pungent, reminiscent of chemicals — sharp and powerful
Strain: Test FBA 2506 (Fast Buds)
Type: Autoflowering (exact genetics still unknown)
Harvest and trichome check coming soon!
Likes
1
Share

@Pot_Portraits
Follow
Royal moby is doing amazing, heat wave is hitting but she is not impressed, it's kind of hard to keep the soil moisture right with 33c in the tent but we are going on !

Likes
16
Share


@Ladyblazed
Follow
Bud forming so fast!!!!!! Comparing to previous plants I growth in witch I used biobizz light soil I changed kind of soil in this one I’m using canna professional and the different is quite noticeable I’m really satisfied. I was worried that the small box I’m growing in would eventually make the plant suffer but it’s totally not, the plant is responding well!!
Started with the maximum dose of bud ignitor by advanced nutrient. I’m really exited for this lady can’t wait to se the beautiful complete resinous buds.. keeping growing with LOVE 💚


Likes
3
Share


@Spazmagi
Follow
Wow! She has been upgraded to a 4x4 tent with 600w of flowering lights (2x Mars Hydro TSL2000; 300w each) and she is LOVING IT! Continuing on the Early Bloom nute schedule and holding a super-solid pH/EC through the end of this week. Her uptake has started to slow, so I'm thinking that she is close to being done with stretch. She is definitely going crazy with buds as it looks to me like they swell more each day. I've been very happy with her growth so far; impressed even. I'm just hoping that the increased lighting doesn't cause her to herm due to the close distance. Updates will continue weekly, and, until then, Grower Love and thanks for stopping by the garden.
~Spaz

Processing
Likes
6
Share


@BestbudsPT
Follow
As you can see differenfe between mediums is huge..have to improve my solo grow bcs i think i might be doing something wrong..any tips??

Likes
142
Share


@PapaNugs
Follow
This grow went well overall. No herming. No nutrient deficiencys. Can't complain there. However the bud structure wasn't there. And the smell isn't of strawberry sugar or at least during the grow. It's mostly gas with a little sweetness. No real strawberry so far.

Likes
97
Share


@Anonymous_2022
Follow
Thanks for stopping by.. Please hit the like button if you like what you see and ill be sure to check you out too Growmies 🌱
First of all would like to give a BIG shout out to my sponsors for providing me with the necessary items for this grow 👍
🌟🌟🌟🌟Mars Hydro FC4800🌟🌟🌟🌟
Powered By Samsung LM301B Diodes: The Mars Hydro FC 4800 480-watt LED grow light is installed with high-performance Samsung LM301B chips, the top-bin horticultural diodes, to provide a high Photosynthetic photon efficacy efficiency of 2.85 μmol/j and a long-lasting color rendering capability, supporting indoor plants to grow and thrive.
High PPF Output and Uniform Light Distribution: FC4800 provides a high PPF of 1,366 μmol/S. The multi-light bar design and the dense diode layout facilitate an even distribution of grow lighting making PPFD optimized for Photosynthesis to achieve consistent growth in every part of the coverage range.
Exclusive Recipe Of Full Spectrum Lighting: The full spectrum is enhanced with blue and red light, in which the blue light stimulates plant growth and promotes the accumulation of plant-based phytochemicals; the abundant red light improves the maturing process and flower quality of the plants.
🌟🌟🌟 Kannabia - Monkey Grease ⭐️ ⭐️⭐️
At Kannabia Seeds we have put all our effort into bringing out our own feminized Monkey Grease, a cross between Monkey Grease x White Widow, focusing above all on giving it its own personality in flavor and aroma (frankly unmistakable) and, of course, in Highly demanded characteristics, such as high resistance to diseases and pests, and adaptability to all types of growing conditions, making it close and easy to grow to the widest possible range of growers. The result is a really powerful and versatile indica-sativa marijuana seed, with a powerful relaxing effect, ideal for those moments when you want to disconnect from the madding crowd.
——————————————————————————————
👊👊👊👊Down to Business 👊👊👊👊
Week 7 from seed .. Week 3 flower..
Again like her sister shes a beauty and starting to form that stuff we all love 👌
Shes full of colour and smells so sweet 😎
Super happy with her 🔥🔥🔥
Thanks for the support guys 💚


Likes
5
Share


@Staffedition
Follow
Привет друзья!
Вот и прошла ещё одна неделя.
На мой взгляд растение развивается не много медленней, чем положено.
Вчера начал кормить, посмотрю на динамику.
Всем мира и добра!

Likes
10
Share


@SmokieMcPot
Follow
Haven't really been updating much as traction is low and I keep hella notes upstairs and on paper.
Flowers forming, slight stretch began days ago. Looking and smelling good. May need to hook up the external RES with how massive the root system has gotten. Main stem is over an inch thick. She's drinking ALLOT and eating well.
F Day19 - RES clean/change. Mixed 3gal
M-4.6ml/g
G-4.6ml/g
B-6.6ml/g
PH'd to 6.2 since it's been dropping last few days on its own and needing adjustment.
F Day23- stripping day... added a goodmorning vid of the Booshberry prior to stripping it. Will update post pics/vid this afternoon.


Likes
7
Share

@AestheticGenetix
Follow
Coming along nicely. The smells are developing. The frost has come in strong before the buds have even started to swell. Now they shall start to swell and we will see them at their full potential in another 4-5 weeks.
Stay tuned. Come check out my YouTube. I'm going to be giving out some of the seeds I produce. They're untested but should be absolute fire.
Likes
10
Share


@russrahl
Follow
End of week 4 and all is great! This girl is beefin up to be a monster! Already got a ton of bud on her an their is still 4-6 weeks to go. loving this Hortilux Eye 1000w bulb. Really bringing the A game. Not so bumbed about spending $ 125 on a bulb now...lol haven’t had to really take any foliage off yet with the exception of the growth under the netting I removed at 1 weeks into flowering. I say “hell no” too popcorn fluff! Lol gotta save that energy for the top buds. Going great so far anyway, I made a DIY light bar for my light rail mover out of an old metal bed frame so that was cool. Saved $50 per tent... I ain’t no sucker gonna pay $50 for an aluminum bar with some bolts. Lol gonna hook up my “water coolers soon too since the summer is approaching and my water temps are begging to creep up again. Lol you may have noticed a computer case sitting in the corner of my grow tents in past videos, they are DIY water chillers made from some thermoelectric coolers and a copper cooling coil. Stay tuned to see them operational soon! I will be posting a DIY video on how to build one yourself out of an old desktop computer and a few other parts off Amazon. Cheers 💨
Likes
12
Share


@GanjaFarmerGrow
Follow
Week is has just passed..
Haven't done anything different than last week...
She is in FULL FLOWERING...
producing hairs like crazy...
hope it keeps on like this...
fingers crossed👍
