
Likes
Comments
Share

@ibbzy
Follow
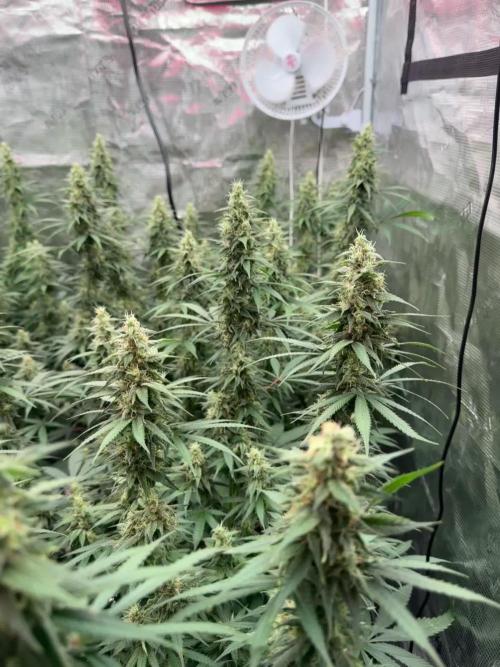
Jesus! Smells like pineapples and some sort of exotic juice. Amazing. Definitely coming from the purple afghani lineage side
They’re chugging along nicely, will switch to the 10/14 next week and see if that helps with the ripening phase.
Sticky as hell, just brushing against them will feel like glue on your skin. Sticky, frosty and stinky!

Likes
17
Share


@ChitownCannaChica
Follow
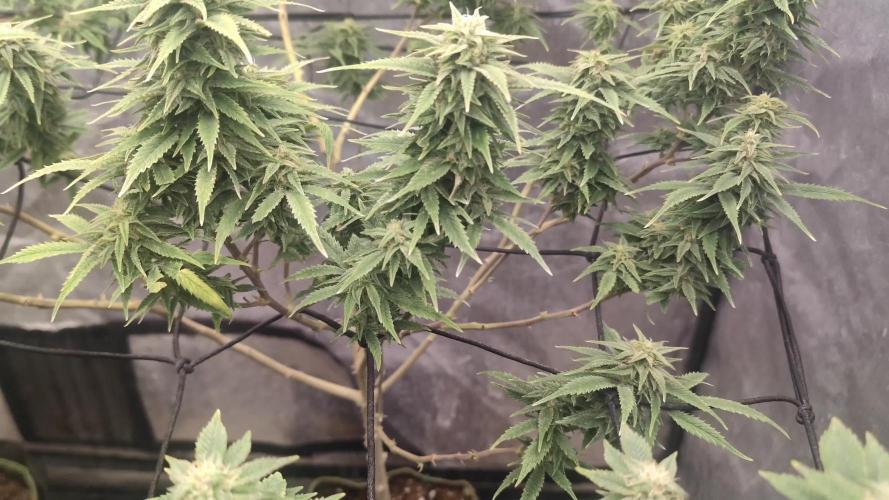
Love this plant! So it’s a generic Slurricane cross abs she is getting frosty and tall! The two topped branches were stunted and the 2 outside are huge! Just giving her my normal feed schedule now with a weekly tea. Love this! ✌️🏻💚🌿💨

Likes
86
Share


@CANNASIM
Follow
------GENERAL COMMENT------
As planed I lowered the base nutrient to 2ml, and took a break from Cal Mag, to release the N a bit, green is on point now.
Tomorrow will catch up with the Cal Mag schedule as usual.
Time for some overdrive, for the rest all good, girls are developing well and buds are getting bigger, no issues.
Smelling delicious! Hope I had some Terpinator to give a go...
------GG. AK47 COMMENT------
AK47 is developing slower, but with more branches.

Likes
13
Share


@Flowers_By_Irene
Follow
Started to dial down the nutrients, can already see a slight colour change in the leaves as they start to turn autumn colours with the reduced nitrogen
Did a flush/refresh of the roots using florakleen 0.5ml/Litre and left it in the reservoir for 2 days before dumping and adding fresh nutrients. The roots look bright white afterwards where they were nutrient stained a reddish brown before.
I swapped the side light from the left side to the right side to promote some more bud development on that side lower down
Happy with how the plants are looking but I had hoped that the buds would be a little fatter by this stage.
Clear winner so far is the bruce banner which has by far the biggest and most dense buds, then the gorilla glue next, then the blue dream although her buds are tall and skinny, then the gsc comes next with the critical last, most of the buds on the critical are still very small (it's the shortest plant and furthest away from the light)


Likes
37
Share


@Smokwiri
Follow
Welcome to week 10 of my Watermelon candy by Zamnesia seeds.
Zamnesia seeds 10% discount with code GROWITGD
Just a couple of weeks to go, plant has developed into a beauty, buds are bathing in trichomes, smell is superatractive and the word dank comes through the mind after looking and smelling some time.
Nutrients are dosed quite precise, so nutes in the substrate are almost finished, which already is a bit visible.
😱
Also had a minor WPM problem, but solved😁it with a rotten milk🐈 with water 50ml to 400ml milkwater solution, spray during daylight, sprayed the #@*✓out of it and put in some extra ventilation.
Fresh milks works too but you need to double or quadriple your dose.
I love growing weed.... Works against pests too btw
Zamnesia seeds 10% discount with code GROWITGD
Viparspectra discount:
Amazon: http://url-9.cn/0y9i
Amazon US: https://amzn.to/3e0P2bk
Amazon CA: https://amzn.to/3bTnEJC
Amazon discount Code:
it10smokwiri XS1000 10%
XSsmokwiri XS1500 8%
it20smokwiri XS2000 5%
it40smokwiri XS4000 5%
Music is with authors permission. All rights reserved.
Likes
12
Share


@Pot_Portraits
Follow
Punch Pie in Flower, stretching nice and doing great, the topping helped to slow down the main stem and spread the plant a bit.
Now its just time to wait for some nice top colas to form.
I cleaned the bottom of the plant up a bit just like the others to make sure we got good airflow in the areas with less light to avoid problems.
Still no fertilizer just living Soil by Sonnenerde.
Likes
4
Share

@Chrisandweed
Follow
Engorde weenooo engoorde real jajajajaja
Bueno, pues buenas noticias dado que la población tan bestia de araña roja ha descendido a minimos! Por lo general ni veo ya, pero se que aún queda alguna, por ello, les meteré una limpieza mas con aceite de neem y jabón potásico, pero una sola mas, quizá esta noche o ya mañana. A partir de esta aplicación ya se acabo el uso de estos productos, y el siguiente lavado foliar que le haré será un té de canela, haré un concentrado hirviendo agua y con canela en polvo, filtrándolo para wue no quede residuo. Esto lo haré con intenciones antifungicas y de controlar un poco mas la humedad para mantener los bichos controlados.
Likes
5
Share


@Lazuli
Follow
I flowered during a heatwave so lights were dimmed a half week.. other then that everything was good. Humidity was between 45-60% all way trough flower. I really love this pheno smells very blueberry

Likes
25
Share


Likes
2
Share

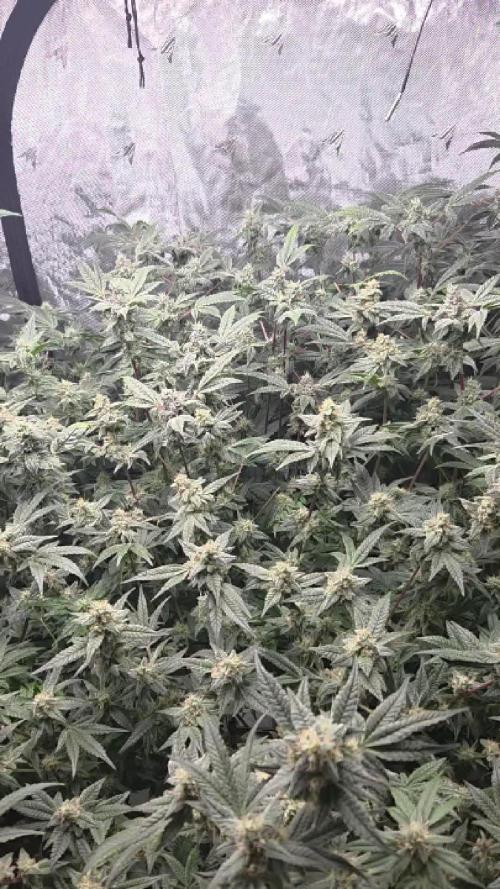
@WaffleTerps
Follow
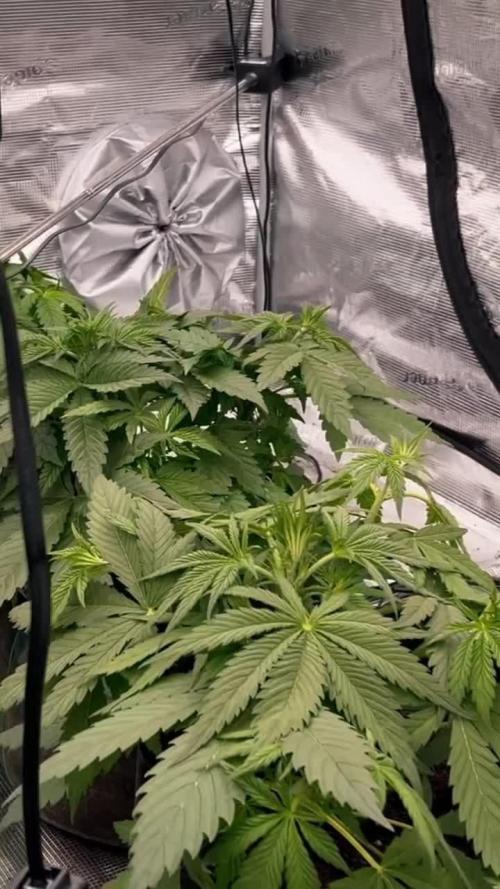
Great structural progress this week. I adjusted the first LST on all Tropicanna Poison plants and they responded perfectly — fast recovery, strong lateral growth and a very even canopy. Installed the SCROG net at ~26–30 cm to prepare for the next stage.
I also switched to the automatic drip system (2 L/h emitters). The nutrient mix needed a few corrections, but the final feed landed at EC ~850 µS / pH ~5.8, giving each plant 700 ml. Soil dried quickly and the roots are clearly active.
Environment stayed stable at 22–23°C, 65–70% RH and PPFD ~420 µmol/m²/s.
All plants look healthy, compact and already releasing a nice sweet cannabis aroma.


Likes
4
Share

@Selkot
Follow
.
FIRST DAYS
-------------
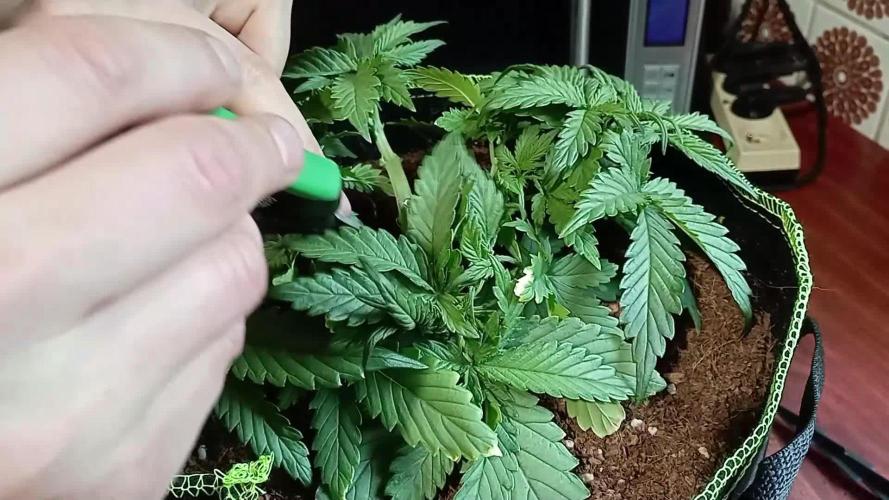
The girls tolerated the topping well; in three days, I found small bushy bushes in my tent.
So, a little mainlining to give them the desired shape, and a little splash of water with just Voodoo.
Tomorrow they will receive their 4ml Grow A+B, with 2ml B-52 this time.
PS: as you can see in the photo, a little mistake due to over-enthusiasm...
I damaged one, but the branch didn't break completely; a little bandage, we'll see if it recovers, if not it will do without that branch.
I've seen worse in a previous session, and it was my 3-branch plant that gave me the best harvest!
👉 https://www.youtube.com/watch?v=_QTXbEUN8pA
MIDWEEK
-----------
Two days after mainlining, it's time for the first defoliation.
I cut the “horizontal” sites, as I don't want branches growing in the center of the structure.
I'll leave them to rest now; I'll do some lollipopping when they've climbed.
+ I'll switch Voodoo to B-52.
PS:
- The damaged branch is not dead, but does not seem to be recovering; I will give it a few more days before deciding to cut it
- On the other hand, I had an unpleasant surprise: one of my other girls showed signs of wilting and browning on three of the four branches. I've never had that before... As with gangrene, I cut the three, hoping that the fourth will hold up. For her, I kept the middle sites + mainlining; if it works, I'll still have three branches.
see 2 last pics 👆


Likes
185
Share

@LGreen
Follow
Einen schönen Sonntag mal wieder & frohes Neues 😊
🌿 Wochenupdate
Es läuft alles in allem weiterhin stabil =)
Ich tracke und erhalte nach wie vor die Nährstofflösung.
Mir ist lediglich ein kleiner Interpretationsfehler unterlaufen…
Notorious hat erste Anzeichen von Salzstress durch einen konstant zu hohen EC gezeigt.
Kein starkes Schadbild und ziemlich sicher nichts, was den Run oder ihre Entwicklung gefährden würde zum Glück =D
Trotzdem hat es mich zu dem Zeitpunkt ehrlich gesagt ziemlich abgefuckt 😅
Ich hätte hier deutlich intensiver hinschauen sollen.
Da sie von ihrer Blattstruktur her generell eher hart bzw. rau ist, ist mir der Fehler erst relativ spät aufgefallen, jetzt zeigt sie bereits leichte lokale Verbrennungen.
Sonst sind keine klassischen Mängelbilder vorhanden, keine Root-Probleme und keine pH-Ausreißer.
Die anderen Ladies performen im selben Reservoir völlig unauffällig 😊
Ich gehe davon aus, hier einen EC-empfindlichen Phäno erwischt zu haben.
Natürlich habe ich mich direkt nach dem ausgiebigen Ärgern daran gemacht, die Nährstofflösung etwas zu entspannen =D..
Ich bin jetzt runter auf 1.800 EC und beobachte zunächst ein paar Zyklen des Uptake-Patterns.
Danach entscheide ich, wie es weitergeht 😊
🌸 Pflanzenstatus & Training
Blueberry Cupcake Frostet fleißig weiter ❄️
Ich finde, sie sieht einfach traumhaft aus 😄
Ihr Geruch hat sich nochmal deutlich intensiviert und geht jetzt klar in Richtung beerig, der Joghurt Teil ist verschwunden =D
Bin wirklich gespannt, was da noch kommt und wie sie sich weiterentwickelt 🔥
Purpz ist Aktuell für mich ganz klar der Eyecatcher im Zelt =)
Top Frost, sehr schöne homogene Sites und ich meine bereits leichte Anthocyan-Einlagerungen erkennen zu können 😍
Der Geruch geht inzwischen eher in Richtung Diesel, mit einem leicht fruchtigen Abgang 🍋
Schwer zu greifen, aber extrem spannend 😄
Notorious THC Entwickelt sich ebenfalls gut 😊
Abgesehen von den lokalen Burns macht sie insgesamt einen guten Eindruck.
Der kushige, eher dumpfe Geruch hat sich manifestiert, allerdings muss man bei ihr schon etwas näher rangehen =)
Vom Frost zieht sie gut nach ❄️
Vom Aufbau her habe ich generell den Eindruck, dass sie etwas später dran ist.
Dafür sehe ich aber klar das Potenzial auf richtig schöne Buds, die Ansätze sehen sehr vielversprechend aus =D
Guzzlerz Hat auch echt gut aufgeholt, bin ehrlich gesagt überrascht 😄
Optisch immer noch etwas zart, das hat sie noch nicht ganz abgelegt,
aber von der Entwicklung her würde ich sagen mittlerweile auf Augenhöhe mit NTHC 👍
Bei ihr meine ich einen leichten bläulichen Schimmer in der jungen Blüte erkennen zu können, für mich bleibt es auch hier absolut spannend =D
Geruchs review gibt's hier beim nächsten update.
⚙️ System
Top-Ups erhalten weiterhin die Lösung 🔧😊
VPD: 1,35 kPa
CO₂: 700–800 ppm im Durchschnitt
EC: 1.800–1.850 µS/cm
PPFD: 1.000
Vielen Dank fürs Lesen und Mitfiebern 😊
Ich wünsche euch allen eine schöne Woche 🌱

Likes
9
Share


@eldruida_lamota
Follow
Vamos, familia, séptima semana, que ganas ya de que terminen de madurar. No veáis cómo están qué grandes y gordas que contento que estoy es que no fallan las Kritical de GrowBarato.
Tengo 6 ejemplares 2 están algo más maduros pero aun así cre que los aguantare igual que los otros 4.
Ya les hice el lavado de raíces y desde ya están solo Agua.
Ya vamos viendo cómo acaban.
Agrobeta:
https://www.agrobeta.com/agrobetatiendaonline/36-abonos-canamo
Mars hydro:
Code discount: EL420
https://www.mars-hydro.com/
Las maximas de temperatura no superan los 26 grados y las mínimas no bajan 20, así que no me puedo quejar.
Los niveles de humedad también son los correctos van entre 45%/55% de humedad relativa.
Por supuesto el Ph lo estamos dejando alrededor de 6.
Hasta aquí es todo, buenos humos 💨💨💨.


Likes
7
Share


@DisTentAint4Campin
Follow
Trying to tuck these huge fan leaves to expose the branches to get som growth the leaves were too big and blocking all the sites but man these plants are exploding on these self watering bases from ac infinity ️
Likes
35
Share


@GODSGIFT_2005_JM
Follow
🍼Greenhouse Feeding BioGrow & Bio Bloom
⛺️MARSHYDRO
The ⛺️ has a small door 🚪 on the sides which is useful for mid section groom room work. 🤩
☀️ by VIPARSPECTRA (models: P2000 & XS 2000)

Likes
13
Share


@GrowGuy97
Follow
Flower day 38 - Ladies are growing beautifully, the smell inside my tent is unbelievable with all the different strains in there😍 really excited to see how this harvest turns out! Makes sure to check back for daily updates! Thanks for all the support & happy growing friends!
Also I started a new job & have been extremely busy so I’m sorry if I’m a little late on my update sometimes but greatly appreciate the support🙏🏼🙏🏼


Likes
2
Share


@vooodi
Follow
В конце этой недели я снял урожай, но сделал это вынуждено.
Верхние бутоны начали вянуть (1 фото), в отличии от остального растения, здесь я заподозрил неладное... Я насильно раздвинул верхний цветок и получил психологическую травму 😢
Так как самые верха уже были размером с кулак и очень плотные,- внутри они не проветривались, там скопилась влага и завелась плесень 😭😭😭
Это выглядело ужасно!!! Настолько, что я даже не стал делать фото.
Почти все прекрасные верха пошли на выброс. Слава джа, что я заметил это не слишком поздно и плесень была только в самых плотных шишках на самом верху растения.
Я самым тщательным образом осмотрел каждую срезанную шишку, порезал на части чтобы рассмотреть все изнутри.
И в результате пришлось выкинуть 83 гр самых смолянистых цветов, самых кайфовых 😓
Еще я не подумал о том, что мелко порубленные шишки, без стеблей, высохнут быстрей чем обычно.
Итого я получил 115 гр сухих (пересушенных) цветов.
После харва разрезал корневую из любопытства, оцените и вы на фото.
Друзья, учитесь на моем опыте - следите за обдувом растения!
И если у вас крупные и плотные соцветия - не бойтесь их тревожить и тщательно осматривайте шишки внутри, вплоть до стебля.
Ну и в финале из этого растения родился ганджа-жук, защитник кустов от всевозможных вредителей 👽 (видео)


