The Grow Awards 2026 🏆 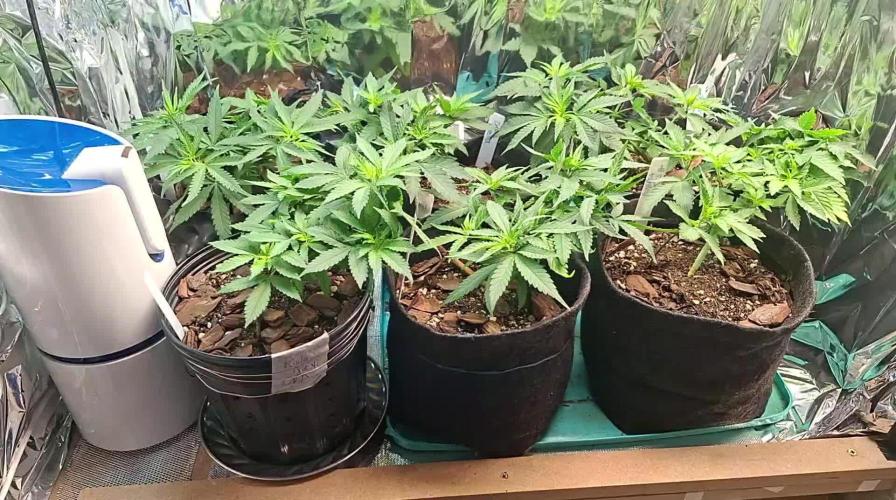


Likes
Comments
Share
@Elemental
Follow
0.1) Observação Geral
Todo o cultivo foi conduzido com monitoramento constante e ajustes precisos de intensidade luminosa (DLI e PPFD), temperatura e umidade, garantindo condições ideais em cada estágio do desenvolvimento.
1) Substrato e Nutrientes
O cultivo foi realizado utilizando água mineral com pH balanceado durante todo o ciclo.
Fase vegetativa: fertilização com BioGrow.
Floração: alimentação com Flowermind.
A mistura do solo foi composta por 50% de substrato reutilizado, rico em nutrientes do cultivo anterior, e 50% de novo solo (proporção 70/15/15), resultando em uma base equilibrada e fértil.
2) Germinação – 19 de agosto
As sementes foram germinadas utilizando água mineral + peróxido de hidrogênio em copinhos de gelatina individuais. Permaneceram por 24 horas na solução líquida, seguidas de 24 horas no escuro total sobre papel toalha umedecido com a mesma água, dentro do mesmo recipiente. Os copos foram abertos apenas a cada 12 horas, em ambiente de baixa luminosidade.
Todas as sementes germinaram com sucesso.
As sementes com raízes de aproximadamente 2 cm foram transferidas para vasos de 1 litro, com adição gradual de substrato conforme o crescimento das plântulas, prevenindo o tombamento dos caules.
3) Fase de Plântula
a) Conduzida sob lâmpadas de 35W e 50W dentro de uma caixa de papelão personalizada, equipada com coolers e exaustor para controle de temperatura.
b) Aplicação de FORT (enraizador) em uma rega, após o aparecimento do primeiro conjunto de folhas com cinco pontas.
4) Topping – 10 de setembro
Foi realizado o primeiro corte apical para incentivar maior ramificação e uma distribuição mais equilibrada de energia.
5) LST (Low Stress Training) – iniciado em 13 de setembro
O treinamento começou três dias após o topping, com amarrações graduais dos ramos para promover a abertura do dossel e melhor penetração de luz.
6) Transplante – 27 de setembro
Transplante realizado para vasos de 4 litros, com rega leve e adaptação gradual à nova base de substrato.
7) Início da Floração (Troca para 12/12) – 6 de outubro
O fotoperíodo foi ajustado para 12 horas de luz e 12 horas de escuridão, marcando o início oficial da fase de floração.
8) Defoliação – 10 de outubro
Remoção estratégica das folhas grandes de ventilador (fan leaves) para melhorar a circulação de ar, otimizar a distribuição de luz e estimular o desenvolvimento dos buds.
pment.

Likes
11
Share
@Mr_Motalovah
Follow
Operation Flower of the Jungle is a Go!
Second week of flower and these ladies are stretching and blooming!
A part from the stretch and flowers coming out, there hasn't been much change.
Which said like that seems like it's nothing but there has been a huge flower production in the past week.
Were gonna have some nice jungle nuggets.
Upped the nutrients 1ml/L

Processing
Likes
12
Share


Processing
Likes
18
Share
@wheedtobeus420
Follow
Day 84. She’s huge and growing bulkier each day it seems. I try to rotate her because she has grown over the light. She’s a slow finisher. But I’m hopeful of what she will become and how she will smoke.
Likes
8
Share
@skaterblasted
Follow
Days 99 - 105 (from sprout)
8/30/24 - 9/5/24
Raised light above canopy of The Good Shit - PAR on main tops is 800-700+ while remaining lowers are seeing closer to 450-500
Loompa's Headband x TK fading to a close this week - trichome check starting to show amber on the bracts
Sweet 16 S1 now starting senescence and a little fading on some fan leaves
The Good Shit showed signs of some overwatering, so a newly made FPE was added to feed schedule to assist the microbiology
Light schedule lowered to 10 hrs this week
IPM: Applied enzymes (tweetmint) at a rate of 0.5 fl oz to 1/2 gallon and sprayed on cover crops + mulch throughout the week. Significant decrease in pest population, now needs a high quality compost top dressing for long term correction

Likes
8
Share
@Chubbs
Follow
420 Fastbuds week 1
Cherry Cola Auto
This week was definitely a good one. I ended up testing the drip system by going on a camping trip for a few days. Coming back I had no idea what to expect but low and behold these girls doubled in size in only the few days I was away. All in all Happy Growing

Likes
17
Share
@Notsogreenthumb
Follow
We’ll week ten is here and I’m amazed to say the least. The girls are doing wonderful. Getting sticky and thick. Probably going to start flushing the zkittles and purple lemonade here in the next day or so. Most of the tricomes are milky noticed one or two ambering. The blackberry has another week I believe. They all smell amazing. Can’t wait to smoke them!
Likes
12
Share

Likes
15
Share
@MrJones
Follow
Mr. Jones Fast Buds Moby Dick
╰⊰´🌿 ╰⊰´🌿 ╰⊰´🌿 ╰⊰´🌿 ╰⊰´🌿 ╰⊰´🌿 ╰⊰´🌿
🏡Indoor - 3"x4"x8" Custom Built Grow Closet
🌾This strain likes to stretch, so a heavy training regiment will be needed.
🗓️Germenation - Soaking in Water Strait into Amended Soil.
⚱️3-Gallon Pots 📊6.4 / 6.8 PH
💧 Feeding - Gaia Green Grow / Bloom
🕷️ IPM - We will be using Green Cleaner" 1 OZ per Gallon, and CannControl from Mammoth alternating between products each month for Integrated Pest Management.
🌿╰⊰´🌿╰⊰´🌿 PLANT UPDATES 🌿╰⊰´🌿╰⊰´🌿
🗓️SUNDAY 10.29.23 - Going to leave the light cycle alone for another week, these ladies are blowing up pretty well, don't want to mess with the MoJo :)
╰⊰´🌿 ╰⊰´🌿 ╰⊰´🌿 ╰⊰´🌿 ╰⊰´🌿 ╰⊰´🌿 ╰⊰´🌿
📝 Notes - Original Moby Dick Auto is a world-renowned Sativa-dominant giant created from two of the most popular strains ever, the White Widow and Haze cannabis strains which are known for the huge delicious aroma, huge size and yields; It’s an extremely easy-to-grow variety highly recommended for growers of all levels seeking for maximum yields with minimum effort as this strain grows up to 150cm and yields up to 650 g/m2 in 10 weeks without extra maintenance. Thanks to its 23% THC, this marvelous hybrid is all about happiness as it will melt your worries away while boosting your mood, leaving you with a big fat smile on your face and ready to get things done as soon as you take the first hit, making it an excellent choice for social scenarios and busy workdays. The Sativa effect comes hand-in-hand with a mix of lemony, piney, and woody terpenes that translate into that classic aroma every stoner loves.
╰⊰´🌿 ╰⊰´🌿 ╰⊰´🌿 ╰⊰´🌿 ╰⊰´🌿 ╰⊰´🌿 ╰⊰´🌿
Likes
1
Share
@psychonaut420
Follow
Buds have Been fattening up and making shape with the pistols sill stretching with slight change in colour for some of the pistols and are able to see the trichomes start to spread out and starting to get more frosty and the side branches are stretching out and stem thickness is also coming along nice nugs are quite sticky and the terpy smell has become more noticeable and I’m doing some light trimming to leaves covering lower bud sites for better light ab
Processing
Likes
29
Share
@Grey_Wolf
Follow
Ginger Nut Cookies & Aussie Music Videos
4 weeks of flowering completed
26th March 2020
Hi Everyone I hope you are well , This Plant is starting to get some frosting happening and the smell has elvolved a little once again 😏
It's still got the tropical fruit like aroma but has got an underlying smell almost like honey.
I had to get up Early this morning as an impending thunderstorm threatened to drench my plants which I wasn't going to let happen 😡 bloody rain 😆
It's all good now they are under cover and protected from any more showers we may have .
She had a good feed yesterday of some Liquid potasium, Seaweed solution , Epsom salts and Mollasses so she should be content until the sun returns .
Ph is still keeping stable at 6.4 so that's about it for the plant update Now It's time for the Weekly Aussie Music Videos 🙌
Last Week was jimmy Barnes and his song Working class Man
This week I am playing The Angels as requested from @Lovemabud .
The Angels are an Australian rock band that formed in Taperoo, a small beachside suburb in Adelaide South australia in 1974
There biggest hit "Am I ever gonna see you face again?" became iconic because of the pub chant that followed which was "No Way , Get Fucked! Fuck Off!" 😆
If you watch the 2nd vid preview you will understand what I'm on about .
Sadly the lead singer Bernard "DOC" Neeson Passed away in 2014 from a Brain tumor.
First link is to the original version of "Am I ever gonna see your face again"
and the 2nd link is to one of the final performences before Docs death with the full Pub chant
Link 1
https://www.youtube.com/watch?v=xj_QkLrW3qc
Link 2
https://www.youtube.com/watch?v=3-VZP1pCIL8
I hope you enjoy this weeks Aussie Music Video and I'll be back next week with another one .
Take care 👍👊 Stay positive 👍
Likes
1
Share
@RoJoWW5308
Follow
Still looking fair. I'm waiting for the fourth node before I top it the first time.
Day 13 the fourth node was out yesterday so I topped it for the first time to begin mainlining. Transplanting into the final container (7 gallon fabric pot) to continue indoor growth until it's warm enough to send it outdoors

Likes
6
Share
@Ryno1990
Follow
The Purple Lemonade from fast buds is starting off week 3 awesome she has been blowing up with growth this last week an has been looking healthy an praying to the medic grow fold 6 every day
Ending week 3 the Purple Lemonade has started bushing out with growth she filled her pot up in a couple days an has been growing great with these cronk nutrients
Likes
27
Share
@w33dhawk
Follow
Hallo meine Freunde des gepflegten Grow sports! 💐
Die Damen sind abgehackt und aufgehangen davor habe ich alle Fächer Blätter entfernt noch als die Pflanzen im Zelt standen heut morgen Ach ja wir haben den 26.04.23 nur so zur Info 😂😂 danach habe ich alle Damen also 4stk an der Zahl genau unter dem ersten Knoten entfernt das gesamte ScroG netzt abgegangen umgedreht und wieder an gehangen (bin irgendwie faul diesmal) war die schnellste und einfachste Lösung und somit wurde aus dem ScroG netzt ein trocken netz 😂🍾😂 Jetzt heisst es warten bis sie trocken sind wie man sehen kann auf dem letzten Video überwache ich weiter die Temperatur und Feuchtigkeits Werte! liegen bei 50% rlf und guten 16 Grad, denke mal in 10 bis 14 Tagen werde ich dann diesen Bericht als ernte ein tragen da die Damen dann in die Gläser gehen werden zum curing, feucht Gewicht kann ich grad nicht sagen, da ich sie ja nicht aus dem netzt entfernt habe aber so bald sie in die Gläser wandern werden sie gewogen
Ach ja bevor ich es vergesse habe die Basis der Pflanze dran gelassen da sonnst einiges aus dem netzt fallen würde ohne Befestigung. Wir lesen uns dann in ca 14 Tagen wieder wenn alles soweit fertig ist euch allen einen erfolgreichen Grow und bis die Tage 🖖🤘✌️👋
Likes
61
Share
@Captensmokey
Follow
It was a hell of a job to get everything in my place but it's there. Follow this awesome guerilla grow

Likes
21
Share
@Insaniac_0
Follow
3/11 to 3/17 Veg Days 22 to 28
Week 3
Transferred to Auto pot base and continue to top feed for another week before setting up and turning it on. Began node strength training by simply pressing down on the branches to encourage water way repairs into the branches since these are the main arms of my mainlines. They more than doubled in size in just 4 days.
Feed this week was 3 cups of 6.3ph RO water once using 100ppm of Veg Mix (recipe Week 2) However, I also added 1ml/gal of CaliMagic (General Hydroponics 1-0-0). Then about 4 days later when I transferred to the auto pot, I added .5gal of plain RO water to top feed over the new soil.
Feed plan next week will be to start using the reservoir and autopot base feed by the end of the week. I expect to use another .5 top feed prior to that tho.
Processing
Likes
63
Share
@AsNoriu
Follow
Day 78. Just runs fine.
Day 42 for Control garden. Biggest Incredible Bulk is amazing plant, very strong, should be really nice to harvest, 3 weeks veg is my shortest ever....
Thinking to leave them untouched, hope they will mature quicker, even without direct light, they grow amazing..
For now just heavy feed, reached 1100, normally 1200 is my max.
Day 79. Girls are fine, plain water today. Thinking to leave Control Garden with all leaves, but despite them growing not under direct light they are 70+ cm height. Now they cause shadow and block air move...
In doubts a bit...
Day 83. Control garden is a lot behind and still stretching , took 12 leaves in total from 3 plants. Now second canopy will have more light, should really chop bottom branches and leaves, but maybe will do it on second defoliation round...
All girls getting heavy feed 1250 ppm. Gorillas still too hungry, Cookies overfed as always... Hard grow for lazy hard stoner :)))


Processing
Likes
3
Share
@Bloom_Room_By_Jared
Follow
3/21: Just letting her do her thing for now contemplating on taking a few leaves off
3/22: I talked to the company yesterday that I purchased my light from in early February they said my Optic 4 XL LED will ship out this upcoming week......I’m definitely happy about that news I really need more light what I have right now since I had to take down my cheap Chinese blurple isn’t cutting it
3/24: Fed plain water and took off a few bottom leaves, in a few days I’m going to pry her open more then I’m gonna try not to fuck with her as much unless it’s necessary. Received email that my Optic 4XLs shipped finally

Likes
37
Share
@Chunkmasta1
Follow
Well she’s is strong and today is day one of flower. I have turned the lights off for the next 24 hours. Cleaned the Reservoir. Increased the nutrients for the flip. I am running 1 mL of each flora grow flora bloom flora micro silica and Cal mag. My 12 hour light schedule be from 8 AM to 8 PM lights on 8 PM to 8 AM lights off. I will need to dehumidify a little bit to get it down to about 50 and then 45 I believe would be good once the pistols start coming in and colas start to grow. Ive been thru a lot with this plant due to user error but the genetics are strong and this plant can take serious abuse. I would absolutely recommend the strain for a beginner as you can see my many mess ups and still this plant survived and is ready to be budded now. She scroged well with topping multiple times. She’s not a fan of heavy nutrients she also does not like a high pH. You can clearly see the bomb genetics in it as these plants tend to explode in growth very easily. I am extremely happy with this growth so far even with the hiccups. I cannot wait to see these callers grow hopefully fat and happy and heavy.


Likes
62
Share
@MeaCulpa
Follow
OK, it is bloomingtime.
Everything is fine.... I hope.... but it seems so.
