The Grow Awards 2026 🏆 


Likes
Comments
Share
@CeeJayy420
Follow
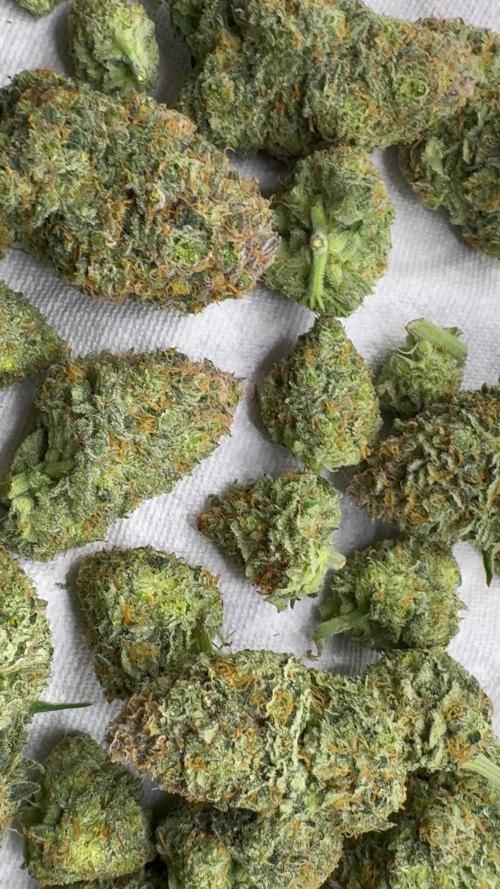
She’s been chopped and trimmed—final weight came in at 105g. The buds are dense, pleasantly heavy, and absolutely beautiful. They shimmer like green velvet under the light, a texture and glow that feels almost surreal after weeks of care and anticipation. It’s a satisfying end to the cycle, and seeing the results laid out makes all the effort worthwhile. Now onto drying and curing, with hopes of preserving every bit of that richness.

Likes
2
Share
@leitogrowARG
Follow
8 DE AGOSTO - DIA 15 💦👨🌾🏻
- Hoy es día de riego. Mi niña está sedienta, puedo notar que me demanda agua más seguido.
Estoy analizando empezar a aumentar el agua de riego en los próximos días.
1 litro de agua (700 cc desclorada y 300 cc destilada)
-PH 5.9📊 (ajustado con jugo de limón)
- Tronco mide 10 cm aproximadamente
9 DE AGOSTO - DIA 16
- Coloqué algunas monedas para ejercer algo de presión sobre el tallo. Con el fin de enderezar el tronco y que no se doble demasiado.
10 DE AGOSTO - DIA 17
11 DE AGOSTO - DIA 18 💦👨🌾🏻
- Hoy es día de riego con fertilizante.
1 litro de agua (700 cc desclorada y 300 cc destilada) con una dosis de 2 ml de TOP VEG 🌿
- PH 6.0 📊 (ajustado con jugo de limón)
12 DE AGOSTO - DIA 19 📏🌱
- Hoy tome algunas fotos para determinar la altura aproximada que tiene mi niña.
- 10 centímetros aproximadamente.
- 4 nudos
13 DE AGOSTO - DIA 20
14 DE AGOSTO - DIA 21 💦👨🌾🏻
- Hoy es día de riego
1 litro de agua (700 cc desclorada y 300 cc)
- PH 6 📊 (ajustado con jugo de limón)
Estoy analizando comenzar con una leve defoliación en los próximos días. Ayudará a la planta en la circulación del aire y evitará la aparición de moho.

Likes
9
Share
@TheBulldozerSicily
Follow
Potevo ottenere molto di più sicuramente, ma questa volta ho deciso di impegnarmi poco, e si vede dai scarsi risultati rispetto alle altre volte, l'unico parametro rispettato grazie al timer sono le 12/12 ore buio luce, questa volta ho basato tutto sul basso consumo energetico, sicuramente la prossima volta avrò un miglior equilibrio. Continua a l'esperienza

Likes
4
Share
@ATX_growguy
Follow
Has a great taste not too strong of a buzz but just right night time. Cdb numbing effect… this was the smelliest plant ive grown so far. I wanted to make fem seeds but seems like it was unsuccessful using. Colloidal silver. I see one weird looking seed but don’t know if it’s viable. Callin this a half win because the bud is good . Will grow again when i have more space because i have a seed left. Thanks seedsman.
Solid auto genetics send me more autos please lol

Likes
4
Share
@Bear_Grows_Green
Follow
12/18 start of a new week. Smelling super strong now Trichs still a lot of clear no amber yet.
12/19 watered in gallon with coconut and q
Likes
19
Share
@nonick123
Follow
Día 6 (29/04) Spray solo agua el top del sustrato. DLI 13
Día 7 (30/04) Spray solo agua el top del sustrato. DLI 13
Día 8 (01/05) Spray solo agua el top del sustrato. Subo a DLI 17
Día 9 (02/05) Elimino la cúpula casera de humedad y empiezo a regar con 300 ml solo agua
Día 10 (03/05) Empiezo a luchar con una ola de calor inesperada para esta época, que me trae temperaturas exteriores de 30 ºC y humedad relativa del 30%...
Mantengo la cúpula casera de humedad
Día 11 (04/05) Hace muchísimo calor.. 30 °C. A ver como lo llevan
Hago un invento casero para aumentar la humedad
Día 12 (05/05) Primera alimentación con Aptus! 300 ml H2O + Regulator 0,15 ml/l + CaMg-Boost 0,25 ml/l + Startbooster 0,25 ml/l - pH 6.2
Creo que las plantas se ven un poco pequeñas para tener 12 días... esperando por explosión de crecimiento en los próximos días....
💦Nutrients by Aptus Holland - www.aptus-holland.com
🌱Substrate PRO-MIX HP BACILLUS + MYCORRHIZAE - www.pthorticulture.com/en/products/pro-mix-hp-biostimulant-plus-mycorrhizae
Likes
12
Share
@brosef_b_baggin
Follow
Week 3: Roots started getting bigger so I moved the plant to a bigger pot. Watered too frequently so algae began forming on the topsoil surface, note the black cover. Started LST early.
Likes
1
Share
@Blucha
Follow
I had to wait to see if they're healthy before flipping so postponed them for two weeks, all in all they are all good.
Before I lowered ppm to 800 and they thrived. I overtrained them I think and overfeeded as well, burnt tips. Haven't touched them for 2 weeks and these are monsters now.


Likes
38
Share
@Zurban_Poison
Follow
I won't say anything! look at the photos and videos and you yourself will understand everything! namely that this is just a cool bush!

Processing
Likes
6
Share
@Moss420
Follow
First week of flowering went well. See pic descriptions for details or hit us up if you want to know more!

Likes
33
Share
@Master_weeda
Follow
Bonjour à tous les padawans et maîtres jedis
Arrosage tout les 2 ou 3 jours avec 2 litres d'eau ph6.3 à laquelle j'ajoute 5 millilitres de Hesi bloom 2.5 millilitres de Hesi phosphorus 2 millilitres de Hesi boost et supervit
Cet engrais m'offre entière satisfaction

Likes
149
Share
@CBD_Sweden
Follow
Hi all the happy people here in GrowDiaries.
This is my second cultivation ever and it will be fun to try a bigger space than my closet grow.
First, I'm just going to say I'm done with the construction of my new growroom.
I put some pictures on the construction here in week one.
The room is 2.14 meters by 1.7 meters and has a ceiling height of 2 meters.
It provides a floor area of 3.6 square meters.
I use a 54 Watt Lightwawe T5 for germination and 2 Pcs 400 Watt HPS lamps.
I have a channel fan that replaces the room air about 40 times an hour to get a comfortable theme in the room, the air enters a fresh air intake from the outside.
The air is purified through a carbon filter to then leave the room to the rest of the basement.
Then I use that heat to heat the rest of the basement.
I will use 8 pcs 15 liter Autopots to grow with and a 100 liter water tank that supplies the pots of water and nutrition.
I will grow completely organically in soil and will watercure my buds to get the best possible medicine for me.
But there are no cultivation rooms to be displayed here, so I continue with what is most important.
Today I have put my seeds in my moisture dome and hope the seeds have germinated within a few days.
I am very excited to see how the new growroom will work and how this Blue cheese Auto from Royal queen seeds will turn out.
Blue Cheese automatic cannabis seeds are a cross of Blueberry Automatic and Cheese Automatic that has been perfected over five years of breeding and careful selection. The result is a feminized, autoflowering strain with superior yield, flavor, and effects to either of its distinguished parent strains.
THC: 16%
CBD: Low
Yield Indoor : 325 - 375 gr/m2
Yield Outdoor: 60 - 110 gr/plant
Height Indoor: 40 - 70 cm
Height Outdoor: 60 - 110 cm
Flowering: 7 - 8 weeks
Harvest month: 9-10 weeks after planting
Genetic Background: Blueberry x Cheese x Ruderalis
Type: Sa 35% In 40% Ru 25%
Effect: Cerebral and uplifting
Climate: Mild
..............................................................................................................................................................................................................................................................................................................................................
Update 2017-08-15. All 4 seeds have germinated and planted in small pots inside the humidity dome.
I'm so glad it worked so well and now it's just hoping they'll start growing and become 4 big healthy girls :)
...............................................................................................................................................................................................................................................................................................................................................
Update 2017-08-16. I have mixed my own soil today. Its 40% sieved peat harrow H2-H4 0-30 mm, 45% sieved peat harrow H4-H6 0-30 mm. 5% sand and 10% of compost soil. And i use 15% of perilite and mix it all together.
................................................................................................................................................................................................................................................................................................................................................
Update 2017-08.20. Nr1 and 2 grow and thrive.
Number 3 just got rid of the seedpod and is folding out the sheets.
Number 4 is a bit shy and can only be seen if you look carefully into the soil.
.........................................................................................................................................................................................................................................................................................................................................
Update 2017-08-21. Nr 1 and 2 is doing well. Nr3 is trying to catch up and Nr4 is still shy.
--------------------------------------------------------------------------------------------------------------------------------------------------------------------------------------------------------
2017-08-23. Transplanted 2 girls from humidity dome and the small germinating pots to 15 liter autopots. The other 2 girls have to wait a little more before transplant to the autopots.
................................................................................................................................................................................................................................................................................................................................................................................
2017-08-27. The girls have settled in to there new home of the 15 liters autopot after a little transplant chock. Now the real week 1 starts for me and the girls.
--------------------------------------------------------------------------------------------------------------------------------------------------------------------------------------------------------
2017-08-28. New pic and movies.
---------------------------------------------------------------------------------------------------------------------------------------------------------------------------------------
2017-08-28. Nr3 is transplanted in 15 liter autopot.
-------------------------------------------------------------------------------------------------------------------------------------------------------------------------------
2017-08-29. New movie of the girls. Its no water for 3 days now for Nr1 and 2 so the roots develop more and match the plant above the soil. The temp controlled fan is awesome, its easy to set what temp you like to have in the room. Right now its 28 celcius. And humidity is 56%.
------------------------------------------------------------------------------------------------------------------------------------------------------------------------------------------
2017-08-29.
Hello to you who read my diary, I just want to say that I am pleased that you have chosen to check in with me and in my diary.
I just want to say that I do this for myself and for a steady flow of my medicine.
Everything you read and see in my diary is 100% honest and I will never distort or beautify anything here.
I document my crops so that I can learn from my mistakes and also to look back at those different crops.
I try to update with pictures every day and with text if something special has happened in the garden.
This is my strainhunt for the best medicine and the beginning of my journey with cannabis and the cultivation of it.
-----------------------------------------------------------------------------------------------------------------------------------------------------------------------
2017-08-30. Cleaned the room this morning, just vacuuming and cleaning with chlorine solution. Im testing the fan to control temp and humidity, it works great.
Added some pics with measurements and movie. Everything is looking great right now.
---------------------------------------------------------------------------------------------------------------------------------------------------------------------------
2017-08-31. New pics and videos.
---------------------------------------------------------------------------------------------------------------------------------------------------------------------------------
2017-09-01. New pics and videos. Gave each of the girls with 2 ml Alg-A-Mic, 4ml Bio-Grow, 4ml Bio-Heaven and 10 ml Formulex mixed in 2 liters of water.
I hope they like it :)
-------------------------------------------------------------------------------------------------------------------------------------------------------------------------------------------------------------------------------------------
2017-09-02. New pics and the girls liked the water and nutrients yesterday.
-------------------------------------------------------------------------------------------------------------
2017-09-03. New videos of the girls this morning. Nr1 and 3 looks great and nr 2 is looking a little funny, maby a little stressed.
Kl. 16.00. Did some defoliation on the girls. Added video.
Kl.. 23.00. New videos, defoliation and leaftucking.
-----------------------------------------------------------------------------------------------------------------

Likes
17
Share
@Lazuli
Follow
The growth went as planned, not too bushy and not mich stretch and fast flower

Likes
16
Share
@Big_Rade_SCLA
Follow
Week 13 (Aug/1/2024-Aug/7/2024)
DAY85 - Nothing new. Water, check, repeat. Added Kelp Meal for nutrients this week. I am thinking how I will separate the plants this week--they're starting to bunch up together--staggered may be the best option to minimize space in the garden.
DAY 89 - Gave one of the girls to my buddy. Helped with the bunching of the plants in a limited space. They're a lot to handle when you harvest alone. Kept the tall one, the short two(LST), the different one in the 45 gallon pot, and the bushy one(LST-ish).
By the way: I include germination as part of the day count. So basically day 1 is when I put the seed in water. These seeds all rooted within 48 hours.

Likes
78
Share
@Roberts
Follow
Pure Ice cream is doing great under the Spider Farmer G5000/UVR40 lights. She is bulking well. Smelling very sweet, and creamy. Everything is looking really good. Thank you Spider Farmer, Athena, and Pure Instinto Seeds. 🤜🏻🤛🏻🌱🌱🌱
Thank you grow diaries community for the 👇likes👇, follows, comments, and subscriptions on my YouTube channel👇. ❄️🌱🍻
Happy Growing 🌱🌱🌱
https://youtube.com/channel/UCAhN7yRzWLpcaRHhMIQ7X4g
Spider Farmer Official Website Links:
US&Worldwide: https://www.spider-farmer.com
CA: https://spiderfarmer.ca
UK: https://spiderfarmer.co.uk
EU: https://spiderfarmer.eu
AU: https://spiderfarmer.com.au
G5000 Light Amazon Link:
amzn.to/4643esa
UVR 40:
https://www.amazon.com/dp/B0BR7SGTHS
Discount code: saveurcash (Stackable)

Likes
4
Share
@NSABND
Follow
Day 43 a new week starts 💪😃👍
Day 44 every single Day a little bit more 😋🙏👍
Day 45 the queens doing well 😃👍
Day 46 cutting the leaves today 😵🙏
Day 47 the queens are in good shape... no leak from cutting leaves 😎🙏💪👍
Day 48 everything is ok 😃🙏👍
Day 49 put some early bird pics first

Likes
14
Share
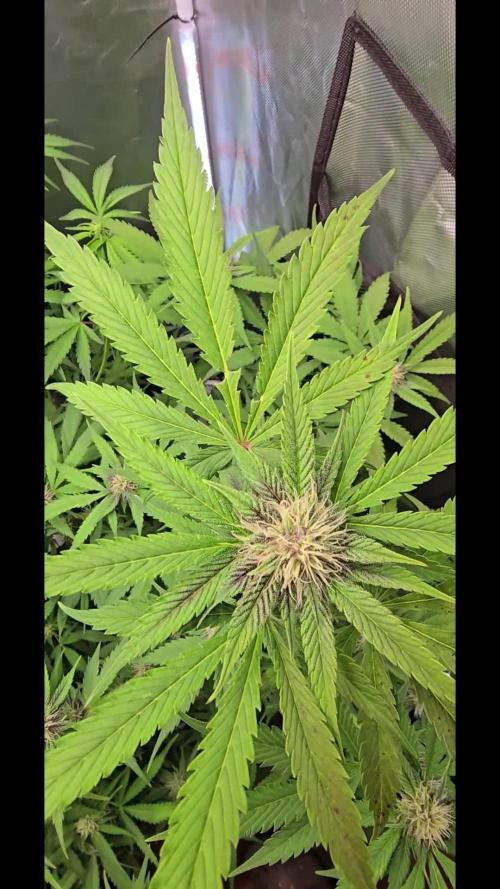
@Farmerted
Follow
So far so good she is going to produce a little as I hoped. Other than a couple deficiencies overall this hasn’t been as bad as I thought. I forgot to get pictures when I inspected the roots. She is definitely root bound yet the root color is good and healthy overall. May be close to finishing next week. We shall see!!
Likes
10
Share
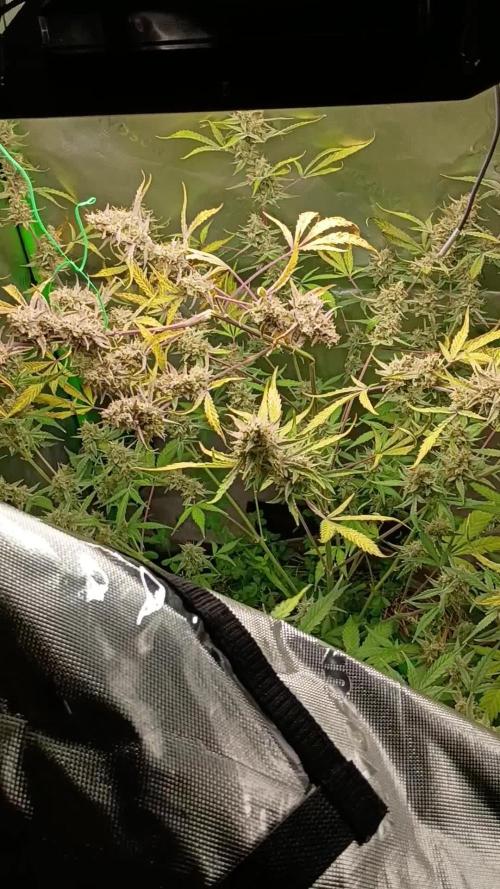
@BklynBushRx1
Follow
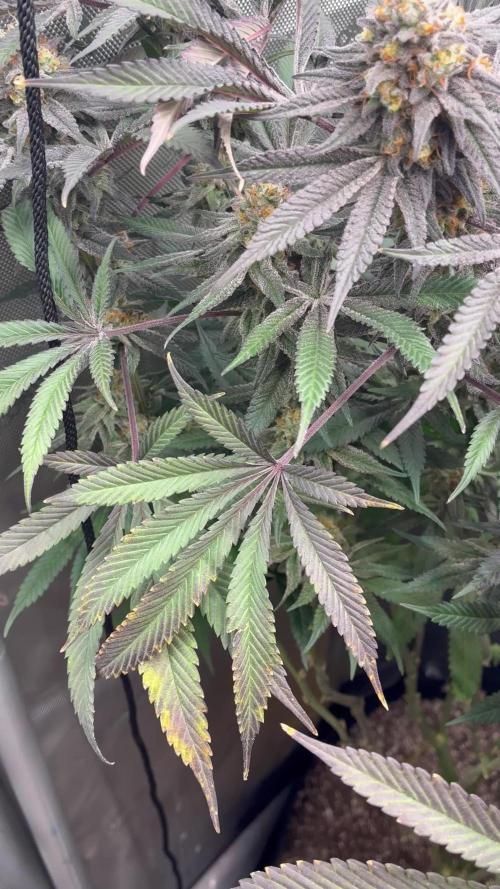
Day 43 of flower - I start counting when I see pistils so for some people it would be day 50 of flower, maturing really fast they are just about done! This will be my last update until they are dried, trimmed, and out in the scale! Thank you all for following along! Last week I did still give them their fish shit and silica watering because I wasn’t expecting the trucks to turn so suddenly ! We also had some beautiful colorful fade and got some nice dark purple from the 2 permafrost ! Well that’s about it and I’ll be back in a couple weeks for the final post and conclusion of the grow!
Likes
6
Share
@didioganja
Follow
24/08/2023 - made a 2.2sh solution with 2ml bio grow, 8ml bio bloom, 8ml top max, and 6ml bio heaven and fed like 40% of it today and will give the rest tomorrow. 5.5ph and 735 ppm was the measure readings. Did not gave nutes to the monster cropped one, only plenty of plain water.
26/08/2023 - gave the rest of the solution to them. noticed today some deficiency, plants must be requiring more nutes for the flowers


