The Grow Awards 2026 🏆 


Likes
14
Share
@Lushbloomz
Follow
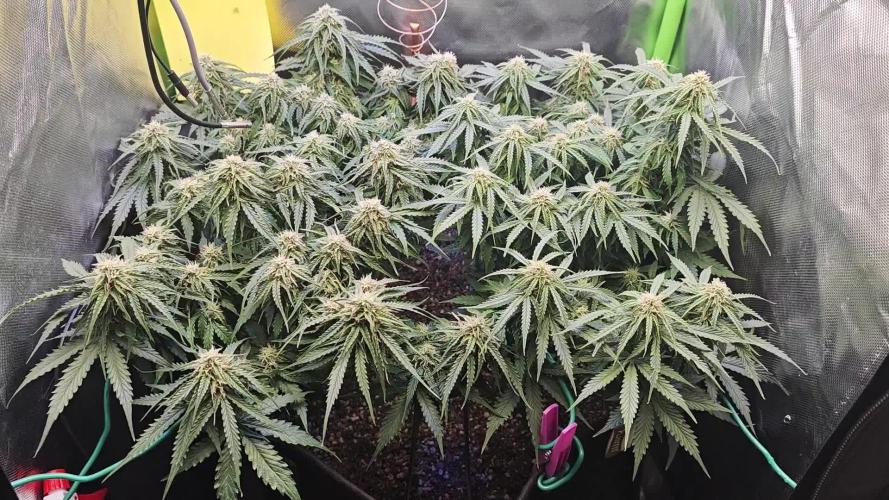
She's done! Whew! I can say that this wasn't my easiest grow. She had some issues in the beginning, due to over fertilizing (see diary) but she managed to produce some beautiful crystallized nuggets. I flushed her for a week but she looked so ready, and she's so loud, I had to chop her down.
Stay tuned for the smoke report.

Likes
11
Share
@WeedM8
Follow
The way flowers are pumping is beautiful 🤩 starting to make some sirius progre

Likes
48
Share
@Rangaku
Follow
So that’s that , the GSC is done , clipped and drying . I’ve already chopped up about a half oz and it’s soo tasty I’ll leave it alone now to dry and cure . I tried the 48 hours of dark before harvest and fed her only water the last week or so . A successful run from fast buds genetics I’ll end up with about 30 oz in a 4x4 thanks largely to this GSC that will end up around 12oz when she’s bagged .
Likes
2
Share
@RatmanJR
Follow
July 12th. 49 days post flip.
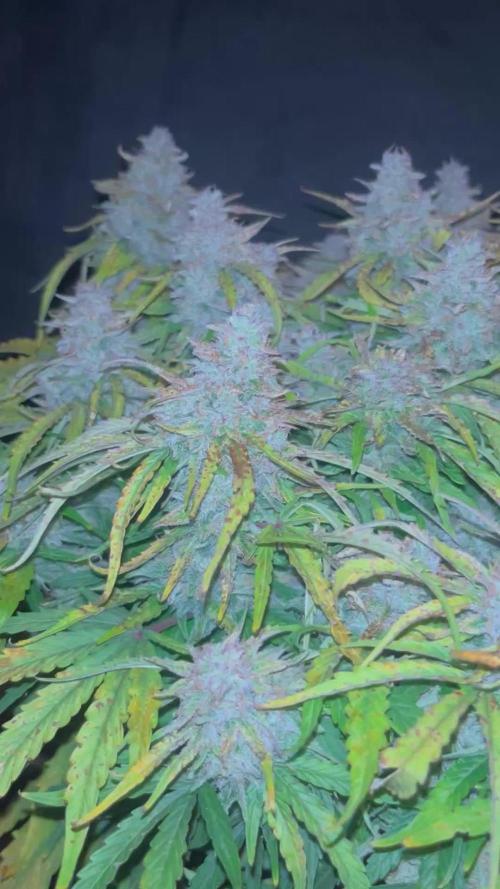
Whatever my plant has been experiencing seems to be getting worse. I can’t see it having a deficiency with everything I’ve been giving it so I’ve just been giving it water. I suspect it’s lockout, or it could even potentially be light burn.
At this point I have about two weeks left so going to continue giving it water. I also dialed the lights back from 80% down to 60% to see if it helps at all because the leaves on this thing have been susceptible to light burn from the very start.
I will say I think it was a little underwatered this week as when I went to give it tea the leaves were a little turbid. So I might be dealing with a multifaceted issue
Regardless the buds themselves continue to fatten, not as large as I would have hoped but we have so many tops I’m not concerned. Still have two more weeks to go for this thing to pack on some weight
I will be getting my soil tested at a local university and posting the results here soon. I just ordered the kit.
Aside from all this the plants smells amazing and trichome density looks good. I’m super excited for this crop.
God bless!
Likes
6
Share
@pzwags420
Follow
On week 2 she is putting out much more preflowers. She is stretching for sure but still maintaining excellent node spacing. the average ppfd is 850.

Likes
8
Share
@CannabisCultivate
Follow
These girls have become part of our favourites list and we are already discussing the next round for this strain! As you can see one of them has powdery mildew and will most definitely need a wash. This is also the one that had the issue with the rust a while back and her colours have not changed like the other two. Her buds are still beautifully formed and smell delicious, so the issues for the week are obvious, but they could be much worse.

Likes
22
Share
@bypado_farm
Follow
Day 37:
Watered each plant with 0.8L with nuts
1516 ppm, 3221 us/cm, 3.2 EC
Still giving sensi grow to the gorilla cookies
Day 40:
Watered each plant with 0.8L with nuts
1594 ppm, 3391 us/cm, 3.3 EC
Still giving sensi grow to the gorilla cookies
Did some defoliation
Likes
6
Share
@MisterFlavonoid
Follow
This one was In-Z-Air by PerfectTreeSeeds, grown with GreenPlanetNutrients only! Check the other weeks to see the ones with AptusPlantTech!
Great zkittles terpz, awesome structure, beautiful colours!

Likes
72
Share
@BodyByVio
Follow
Day 65 : officially 1st day of flush . Changed the reservoir with fresh water and 1.2g/5 gallons of Yucca extract and 5ml/gallon of Cleanex from Botanicare .
Day 68- I did some defoliate. Few more days until harvest.

Likes
43
Share
@Sabac
Follow
Plantitas en su semana 12.
Crecen y crecen espero dejarlas entre 13 y 14 semanas.


Likes
89
Share
@nonick123
Follow
Día 54 (10/03) Riego 1,25 Litro H20 + Wholly Base 2,5 ml/l + Solid Green 2 ml/l + Early Flower 1,25 ml/l de Gen1:11
TDS 1033 PPMs - pH 6,51
Día 55 (11/03) Defoliation time!
Con la increíble ayuda de @miyaguiokpolilla, @dogdoctorofficial y @growwithflow420 hice la defoliación recomendada exactamente después de 21 días cambiada a 12/12
Consejos de defoliación
- Elimine menos del 20% de las hojas de abanico y solo las hojas de abanico
- Retirar el tercio inferior de la planta, incluidas las ramitas.
- Retirar las hojas en forma de abanico dirigidas hacia el interior de la planta.
- Retire las hojas de abanico que dan sombra a los futuros cogollos.
Día 56 (12/03) Esperando algo de estrés tras la defoliación... Han crecido 2 centímetros en 24 horas 😍🚀
Día 57 (13/03) Riego 1,25 Litro H20 + Wholly Base 2,5 ml/l + Solid Green 2 ml/l + Early Flower 1,25 ml/l de Gen1:11
TDS 1043 PPMs - pH 7,0
Las plantas muestras una ligera deficiencia de CalMag. Voy a subir el pH a 7.0 en este riego para mejorar la biodisponibilidad
Día 58 (14/03) Siguen con su crecimientos, los cogollos formándose y las hojas de azúcar empezando a llenarse de resina
Parece que la corrección de la deficiencia de CalMag ha sido muy efectiva! No hay más manchas y las plantas no paran!
Día 59 (15/03) Como mañana me voy a Spannabis 😍 voy a adelantar 1 día el riego reduciéndolo a 1 litro
Riego 1 Litro H20 + Wholly Base 2,5 ml/l + Solid Green 2 ml/l + Early Flower 1,25 ml/l de Gen1:11
TDS 1080 PPMs - pH 6,57
Día 60 (16/03) Spannabis time! 🚀
Día 61 (17/03) Spannabis time! 🚀
💦Nutrients by Gen1:11 - www.genoneeleven.com
🌱Substrate PRO-MIX HP BACILLUS + MYCORRHIZAE - www.pthorticulture.com/en/products/pro-mix-hp-biostimulant-plus-mycorrhizae
🎚️Controlled by TrolMaster TCS-1 Tent-X System Main Controller - https://www.trolmaster.com/Products/Details/TCS-1
Processing
Likes
23
Share
@Cookie_thefarmer
Follow
Day 122- first signs of the some pistols ambering! Super excited I know to be patient! About 3-4 weeks out I think!
Putting my favorite photos and more on my Instagram! Follow me 📷 @cookie.thefarmer

Likes
3
Share
@DrewZenRox
Follow
Into 2nd day of week 3.
Jealousy/Green Poison inside the Epic Attic Tent 1.2x1.2x1.6. Growing Under 'Karma EVO 3'
SkyWalker OG Inside unbranded 60x60x120 Tent. Growing under 'Karma Stealth 1000'


Likes
14
Share
@Snickelfritters
Follow
10/2 They made it to their forever pots. Next Saturday we'll be hitting 2 months from sprout and as a whole its been a pleasure to grow these plants. They all are a very healthy green and seem to be happy. Temperatures in the region may have unexpectedly slowed them down (I grow in a basement) because temps have plummeted from around 78 with the lights on to as low as 71! I don't think they like it either. Growth has slowed with it. Never fear, space heater is here. Everything thing needs to be dialed in for the next few weeks because I want explosive growth over the next 21 days.
Going to try a SST somewhere in there. Parsing through all this bro science isn't easy but it sure is fun to experiment. It allegedly gives you good root growth and provides crucial enzymes. Almost sounds too good to be true but I'm going to see how it goes regardless. I heard you can use I wide variety of seeds but alpha alpha is the only one I have on hand. Wish me luck.
As for the plants:
Moby= beast. I'd be a fool not to attempt to clone her. Vigorous grower and responds well to training. Not a demanding eater either, at least so far. Loving this freebie from NASC. Highly recommend them if you're in the northeast US looking for a local seed bank.
GZ 1 = steady. Probably the biggest back slide if you want to call it that. Spotted some yellowing on lower leaves but they are shaded by this ones thick canopy. May not even be an issue but we keep an eye on it. Probably the biggest critic of the lowering temperatures because she's slowed down in the past 2 days.
Gz2= trooper. She had a rougher upbringing and she's got a far different shape than the other two because of it. But with a little work I'm sure soon both GZ will be indistinguishable from one another.
Banana daddy= forgot to take pics of her. Man have I been growing autoflowers all wrong. I may have fed this plant once. Though it should be noted that the soil I put her in was amended with alpha alpha, fish bone meal, and guano. She seems to really enjoy it so far. Not a single yellow leaf. Droopy at times though which is odd. Also some tacoing on new growth that ends up correcting itself as the leaf gets bigger. Double odd.
Next time I do an auto run I'm definitely doing much less in terms of feeding and maintenance. Loving your plants too much can be deadly. Starting to figure them out though so I'm happy I did at least one.
I'll post in a few days when I water my photos again.


Likes
5
Share
@Deli_Weed
Follow
En general me encanto cultivar esta genética, siempre fue la primer genética que quise cultivar desde que empecé en esto y no me decepciono en lo absoluto, de una sola semilla obtuve 106 gramos de flores de gran calidad 😃 increíble para ser mi primer cosecha con semillas de bancos, ya quiero ver que resulta en la próxima cosecha ya con más experiencia y mejor equipo 🤩
Likes
25
Share
@EBxAH
Follow
Well week 6 has started and 12-12 has 1 official day in the books! Short run with a couple of experiments, lol. We got some new seeds, autos. We got early miss and fucking incredible from crop kings and Zkittles, gelato, and wedding cake from ILGM plus a couple of Herer seeds from a friend. The wife is going to do the next run and I'm really excited about that...also nervous, lol. Well that's about it for now.
Happy Growing Everyone
✌️❤️😁🍀🎶👽
EB

Likes
14
Share
@KinoBudz74
Follow
Buds fattening up🤟I think in about 3-4 for more weeks will be harvest time 🔥
Likes
29
Share
@DankeyeBeaverjuice
Follow
This grow gets a ten out of ten from me on behavioral attributes on how she grew through out all the stages of life. Vegging was an absolute pleasure, she thrived off the 125g of amendments, cal-mag, and kelp all the way to day 30. Once I noticed flower development I proceeded to give her, her first feeding of grow and bloom nutrients both at the same time @ a diluted mixture of 25% then proceeded to increase increments as needed into flower, cutting out the grow after two feedings. She has been to date one of the cheapest grows I've ever had, all that's left is to harvest, cure and smoke for the final conclusion on 3 bears auto from Mephisto. Hats off to the boys over there! All this did was get me excited to grow the remaining Mephistos I have stored away!
